CONTROL Configuration basics
Overview
Enabling devices to be managed by the CONTROL platform can be accomplished through a few simple steps. This guide covers the basic configuration requirements to onboard devices into CONTROL.
Configuration Steps
Step 1: Create a Device Profile
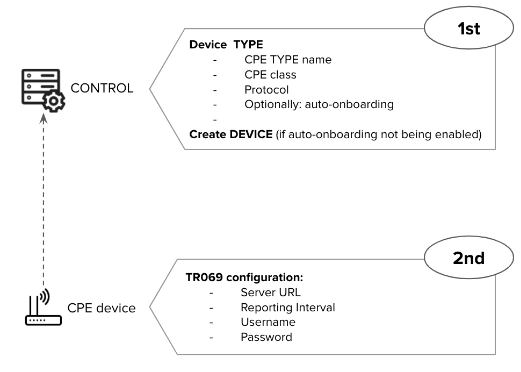
Before adding devices, you must first create a Device Profile (also called Device Type) that defines the characteristics of the devices you want to manage.
Required fields:
- CPE Profile/Type name
- CPE class
- Protocol
Optional fields:
- Auto-onboarding
Step 2: Create the Device
If auto-onboarding is not enabled, you need to manually create each device that will be managed by CONTROL.
Required fields:
- CPE name
- CPE Profile/Type
- Username
- Password
Note: This step can be skipped if auto-onboarding is enabled in the Device Profile.
Next Steps
Once you have completed these configuration tasks, proceed to configure the CPE to become managed by the CONTROL platform.
Understanding Device Profiles
First-Time Device Onboarding
When onboarding a device type for the first time, you must create and customize a Device Profile (Profile/Type) that will serve as a template for all devices of the same type.
Profile Reusability
Once a Device Profile is created, it can be reused for all new devices of the same type. Devices can be added to CONTROL through:
- Manual creation in the platform
- Batch creation
- Auto-onboarding (if enabled)
All devices will automatically use the appropriate Device Profile based on their type.
Profile Updates
Any changes made to a Device Profile—such as improvements or fixes—will be automatically applied to all devices that use that Profile/Type. This ensures consistent configuration across all devices of the same type without requiring individual device updates.
No comments to display
No comments to display