Zequenze Web Portal Setup
Introduction
This guide walks you through the complete process of setting up a dynamic web portal for your MikroTik hotspot using Zequenze GATE. The MikroTik device will redirect users to this external web portal, where they can register or log in to access your network services.
Table of Contents
- Prerequisites
- Creating a Dynamic Form
- Creating AAA User Profiles
- Adding RADIUS Clients
- Creating Portal Pages
Prerequisites
Before beginning this setup, ensure you have:
- Access to Zequenze GATE admin portal
- Admin credentials with appropriate permissions
- A MikroTik device configured for external portal redirection
Creating a Dynamic Form
Dynamic forms collect user information during the registration process. This form will capture essential user data before granting network access.
Step 1: Access the Forms Section
![![Image: 1.1_form_1.png]](https://docs.zequenze.com/uploads/images/gallery/2025-05/9vstZOAQYpXIC2ec-1-1-form-1.png) Navigation path: Click (1) Portals in the sidebar, (2) Templates, (3) Forms tab, and (4) the Add button.
Navigation path: Click (1) Portals in the sidebar, (2) Templates, (3) Forms tab, and (4) the Add button.
Step 2: Configure Basic Form Information
- Enter a descriptive name for your dynamic form (e.g., "hotspot-mikrotik-form-v1")
- Review the JSON data section where form components will be added
- Select your organization from the dropdown menu
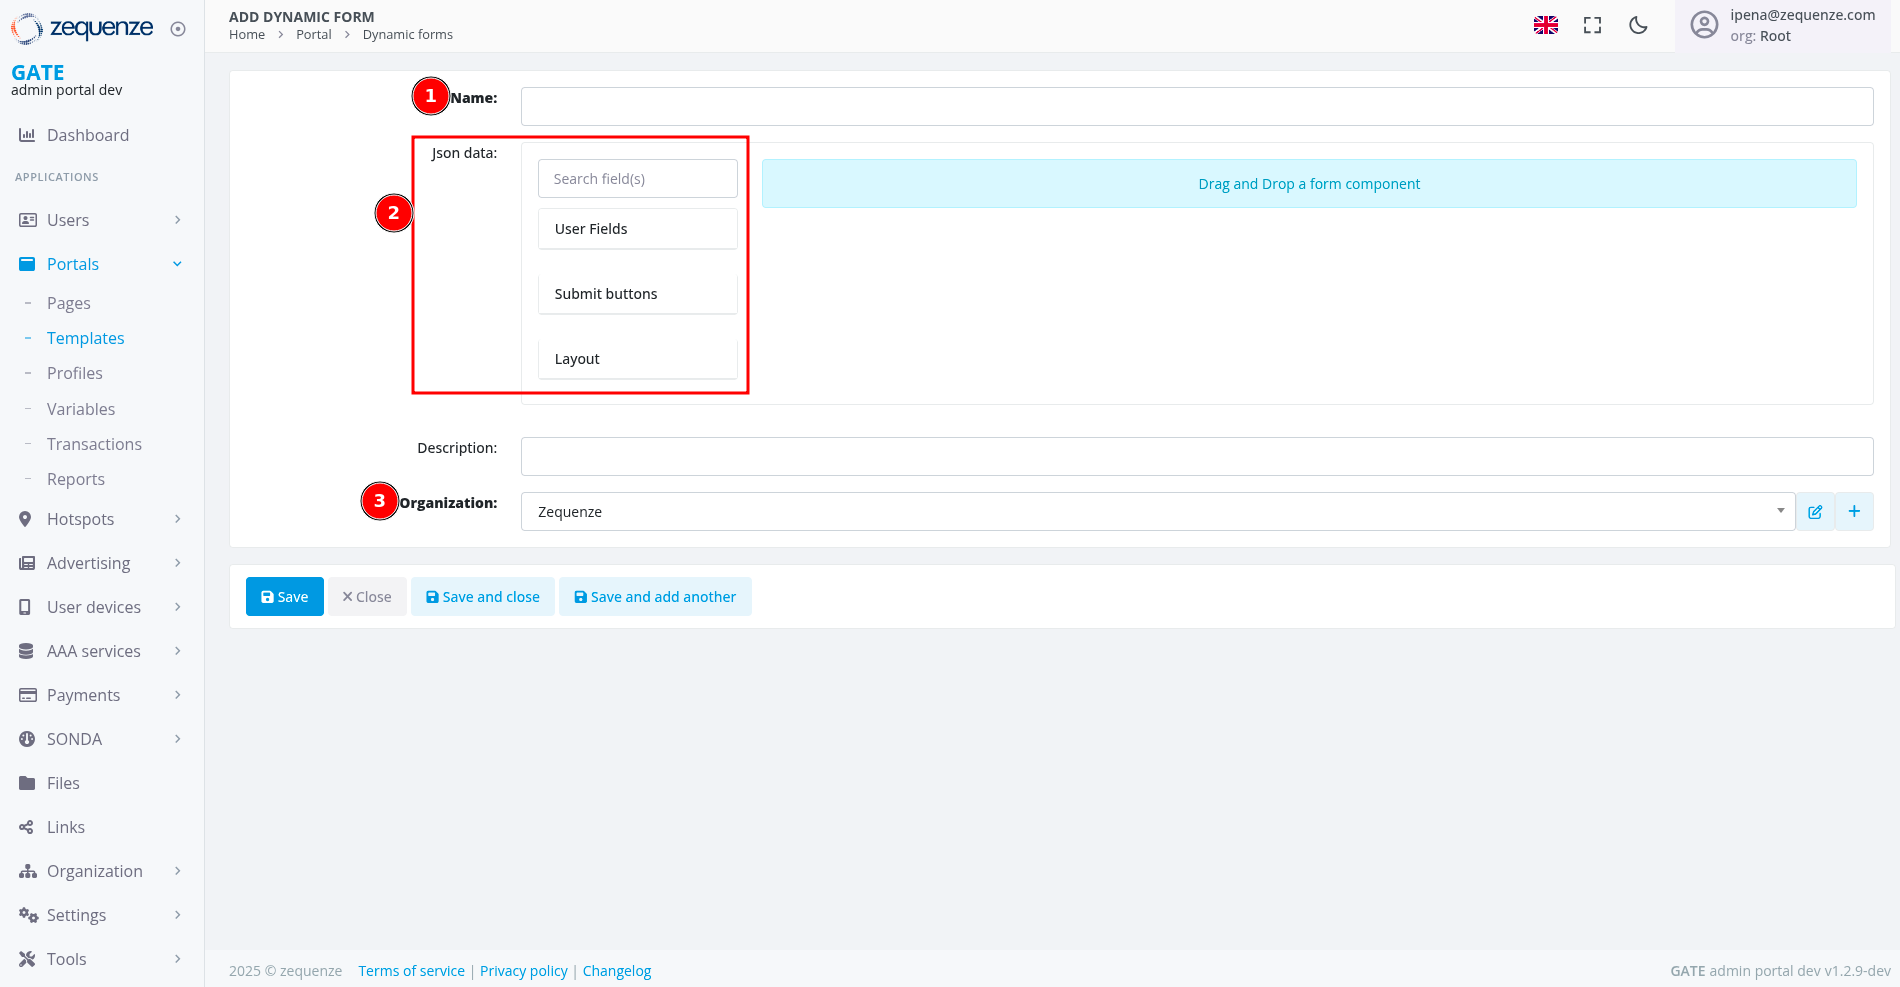 Form creation screen showing (1) Name field, (2) JSON data section, and (3) Organization selection.
Step 3: Add User Input Fields
Access User Fields Menu
- Click on User Fields in the left panel
![![Image: 1.1_form_3.png]](https://docs.zequenze.com/uploads/images/gallery/2025-05/bDyGAAPeym1hhk8X-1-1-form-3.png) User Fields menu option highlighted.
User Fields menu option highlighted.
Add Required Fields
- From the available user fields list, locate fields such as Email, First name, and Last name
- Drag and drop each desired field to the "Drag and Drop a form component" area
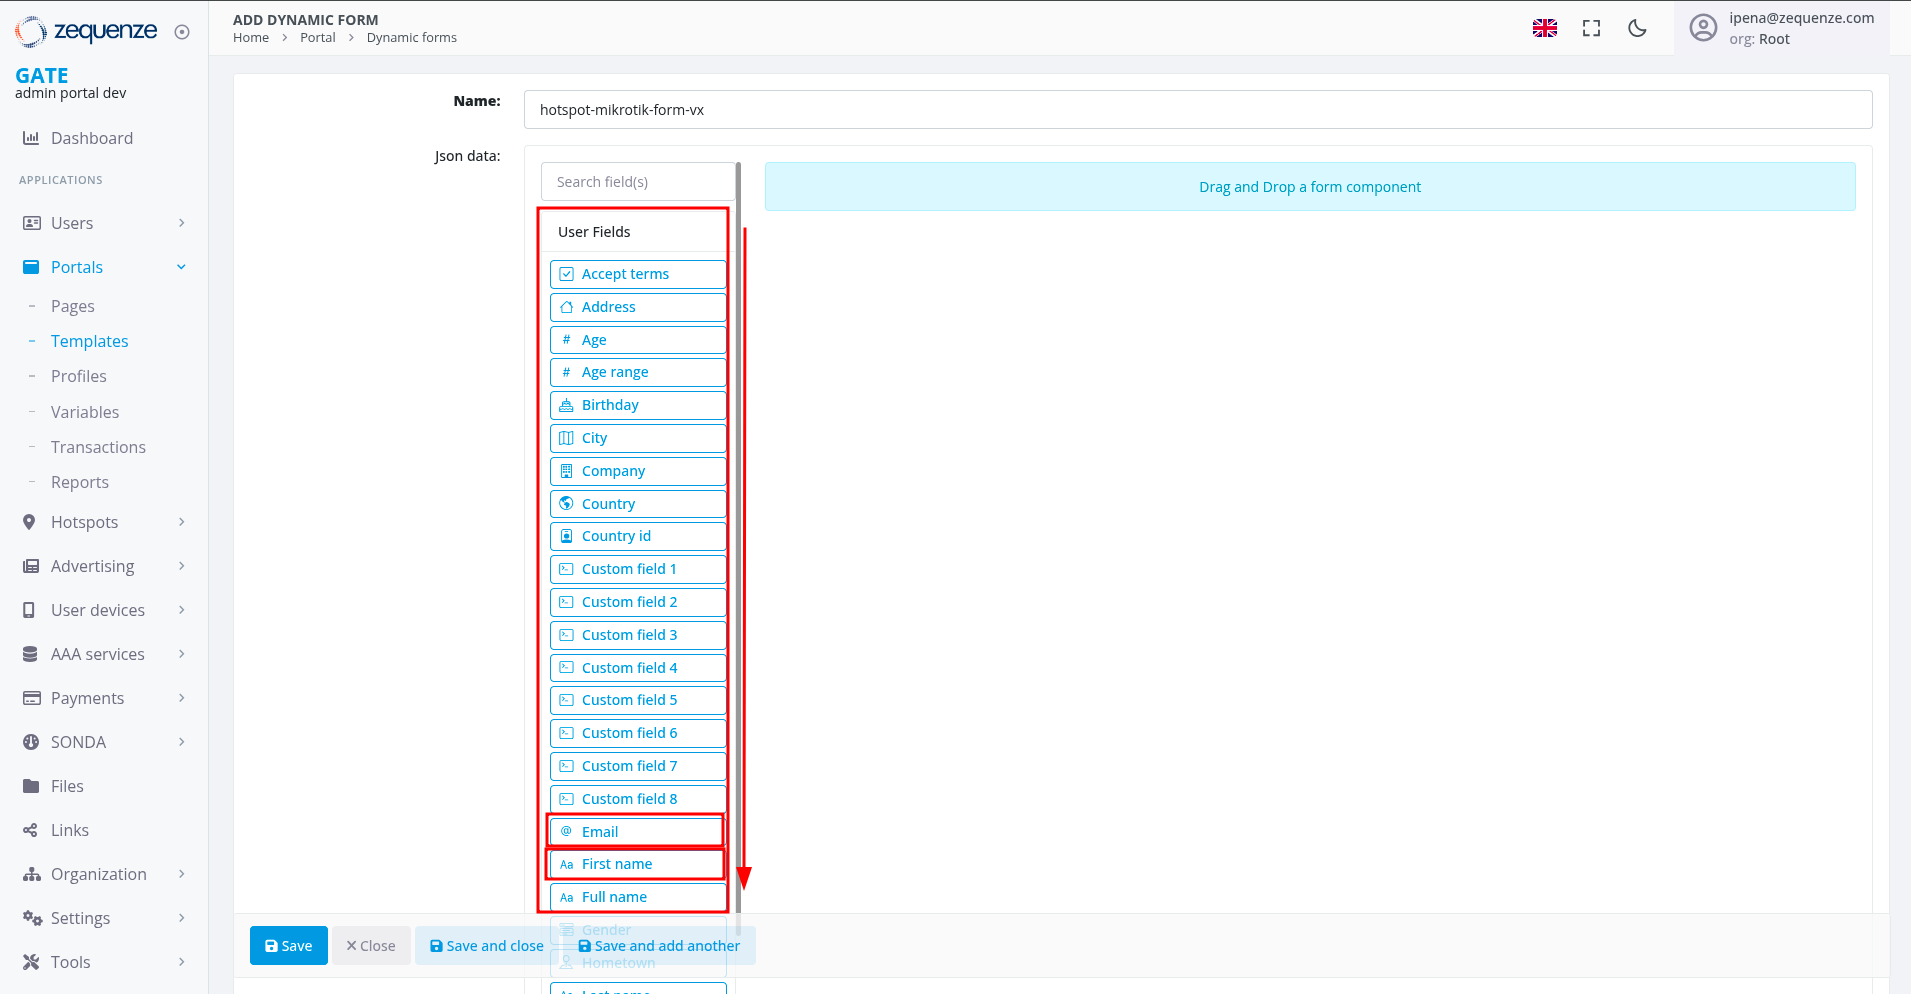 Available User Fields options list.
Configure Email Field
- Drag the Email field from the list to the form area
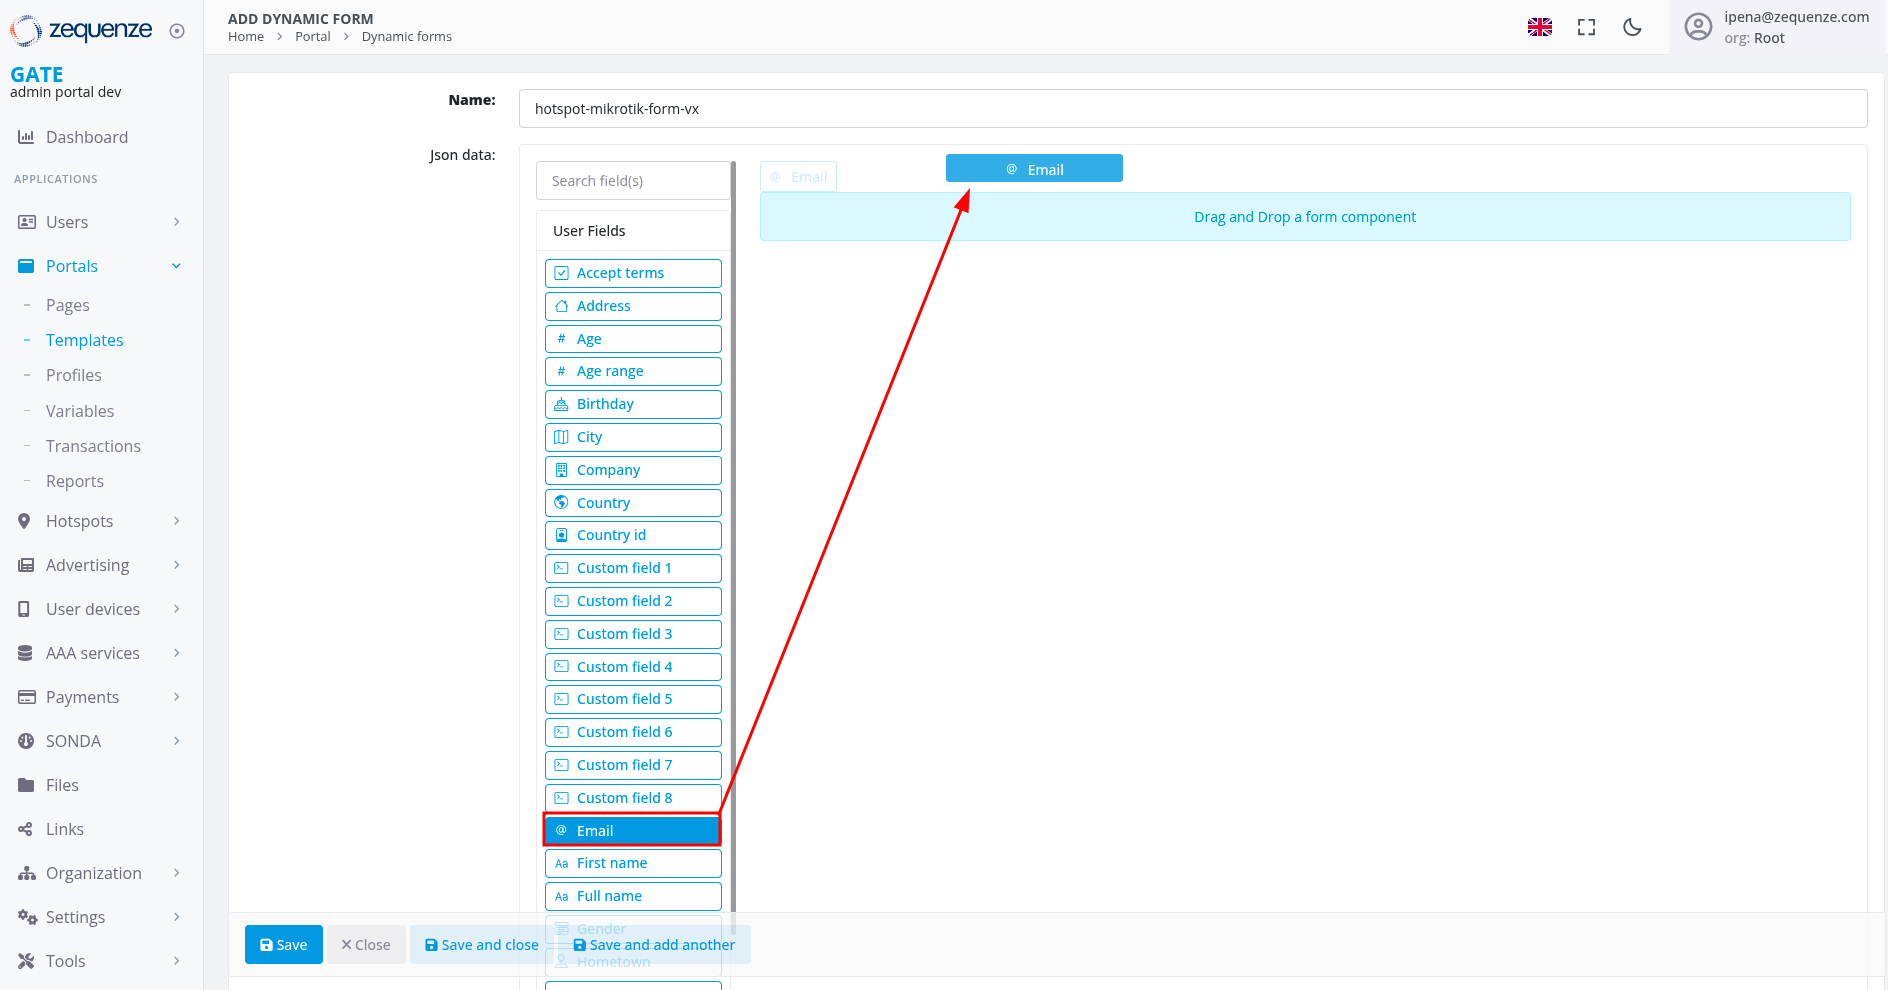 Dragging the Email field to the drop area.
- In the field properties popup:
- Click the API tab
- Verify or customize the Property Name (e.g., "email")
- Click Save
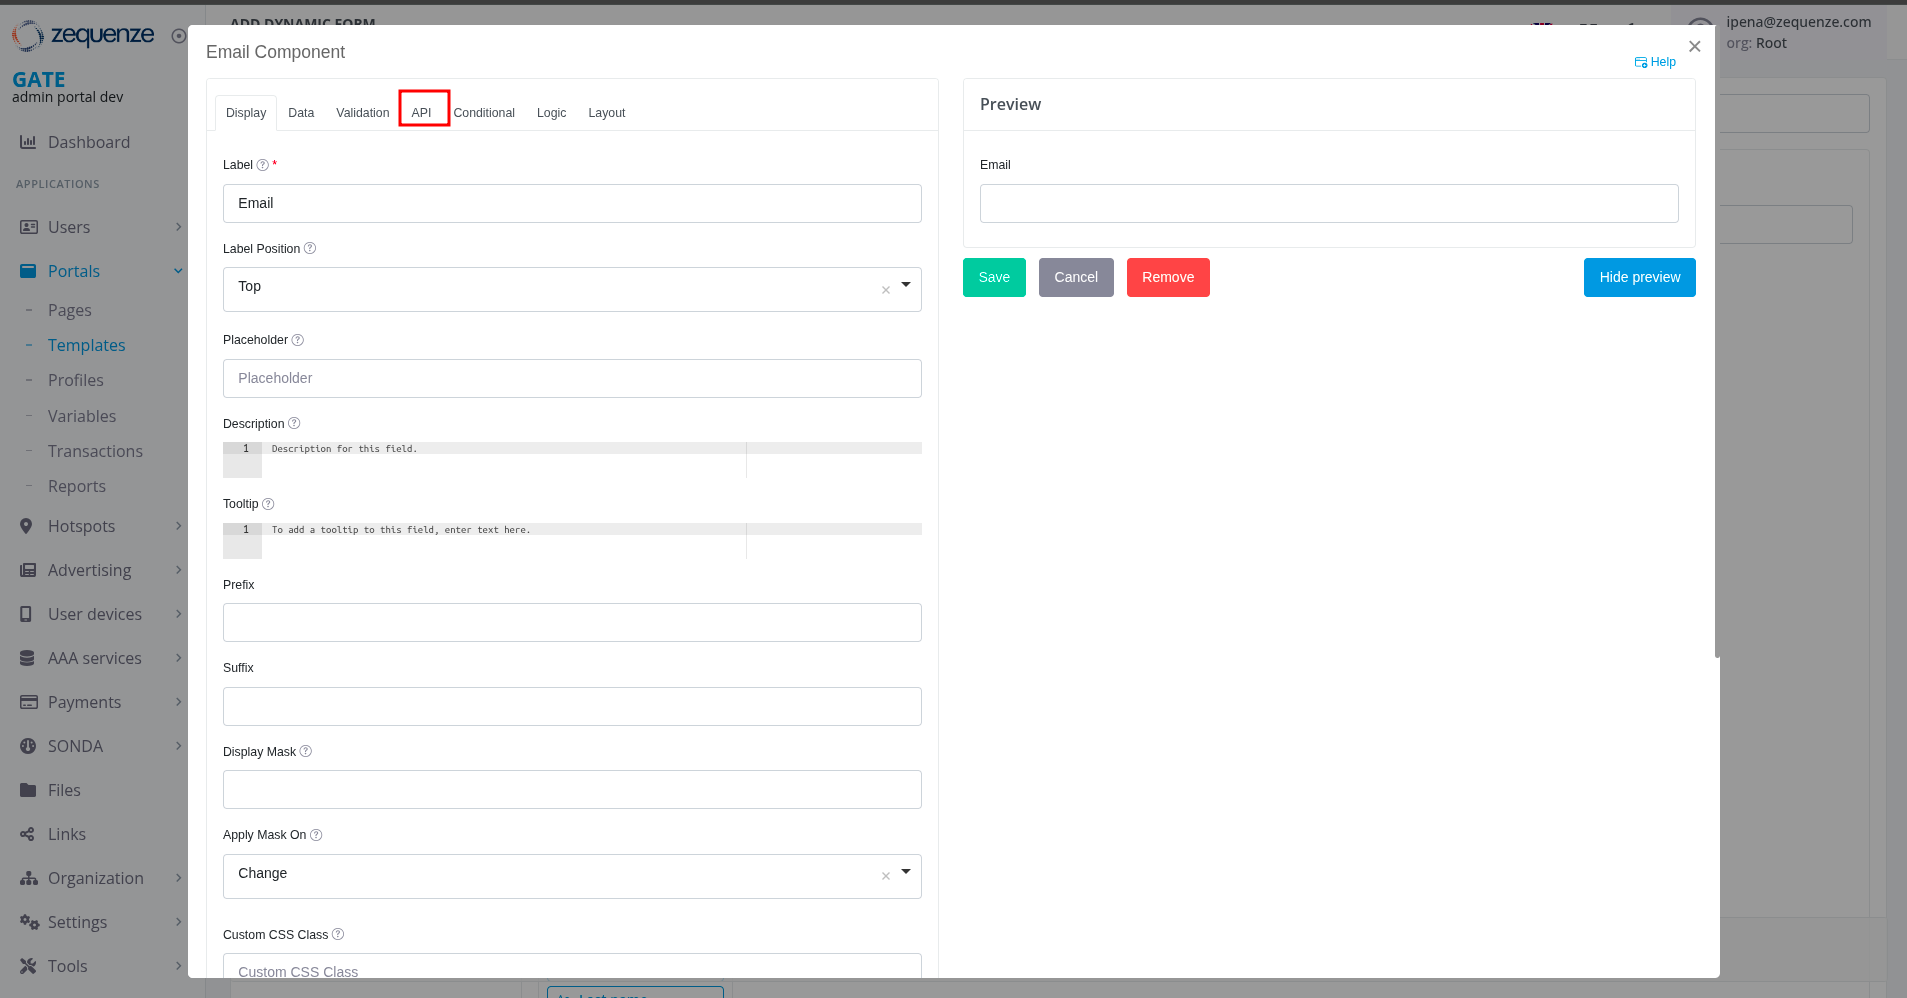 Selecting the API tab in field configuration.
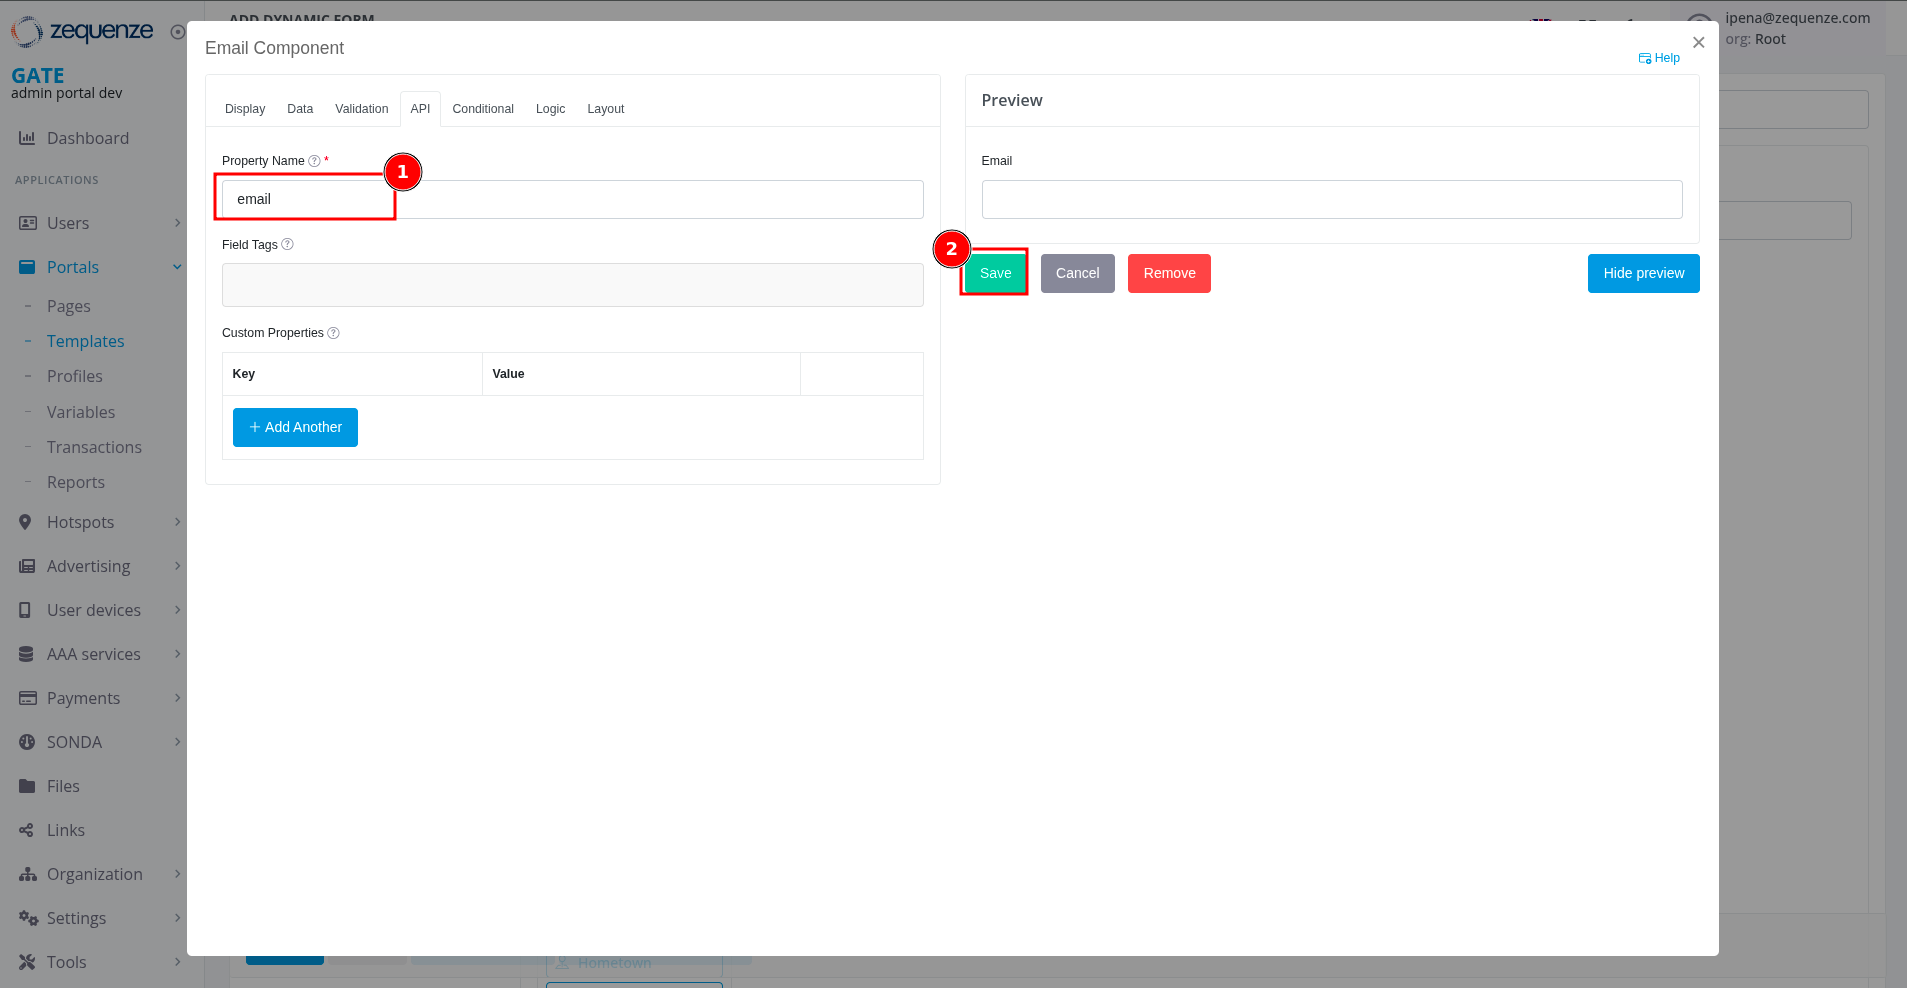 API configuration showing (1) Property Name field and (2) Save button.
- Repeat this process for First name and Last name fields
Step 4: Add Submit Button
- Click on Submit buttons in the left panel
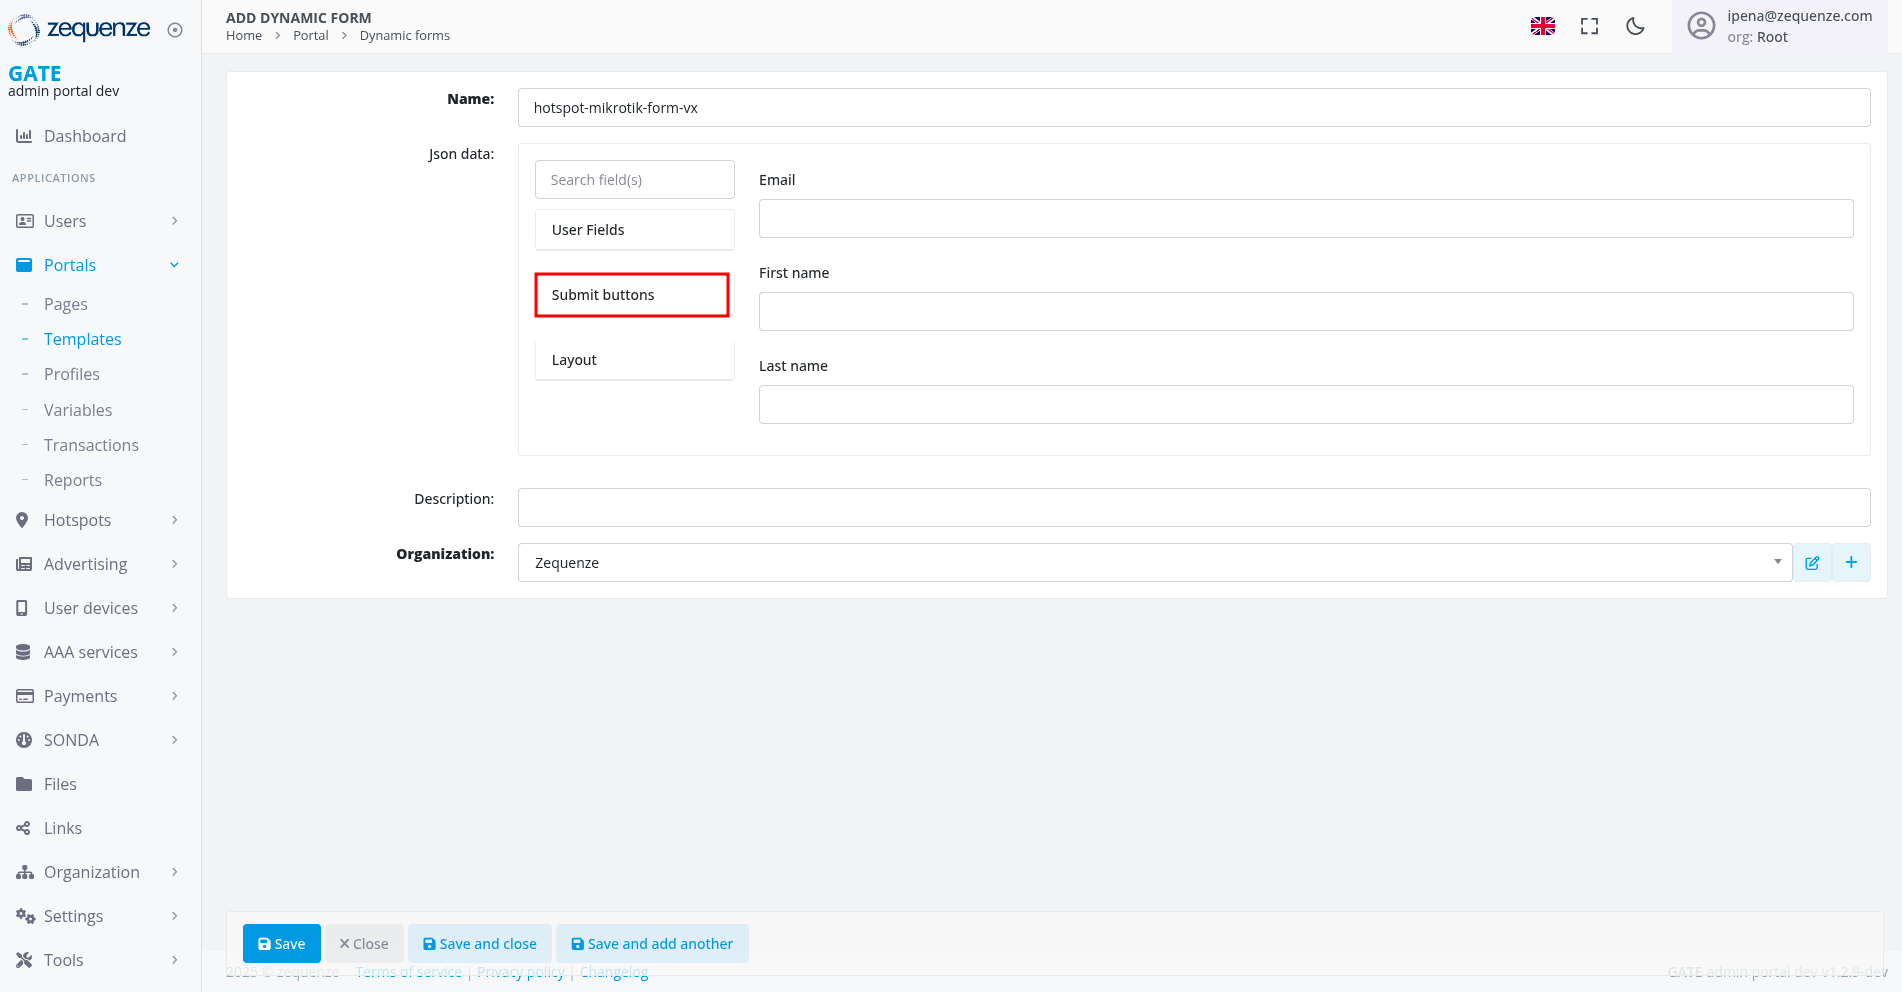 Submit buttons menu option.
- Drag and drop the Register button to the form area
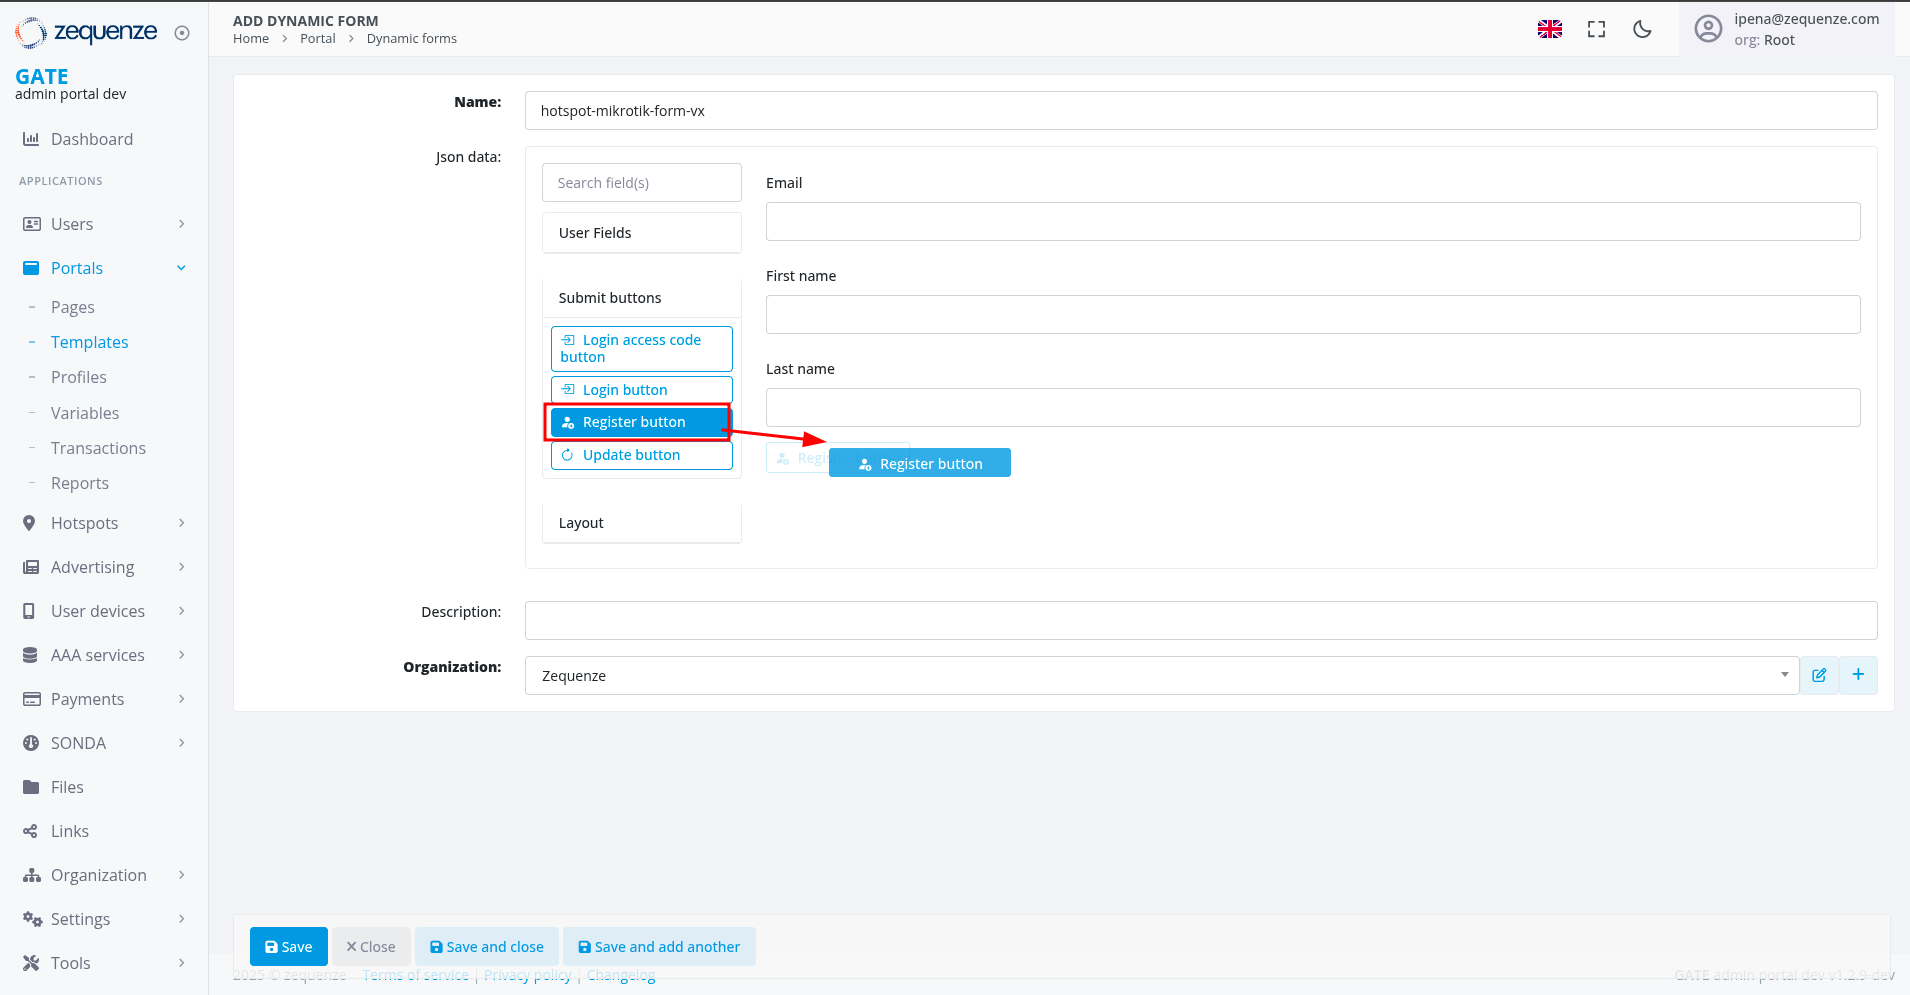 Selecting and dragging the Register button.
- Configure the register button:
- Click the API tab in the popup window
- Set the Property Name (e.g., "register_trigger")
- Click Save
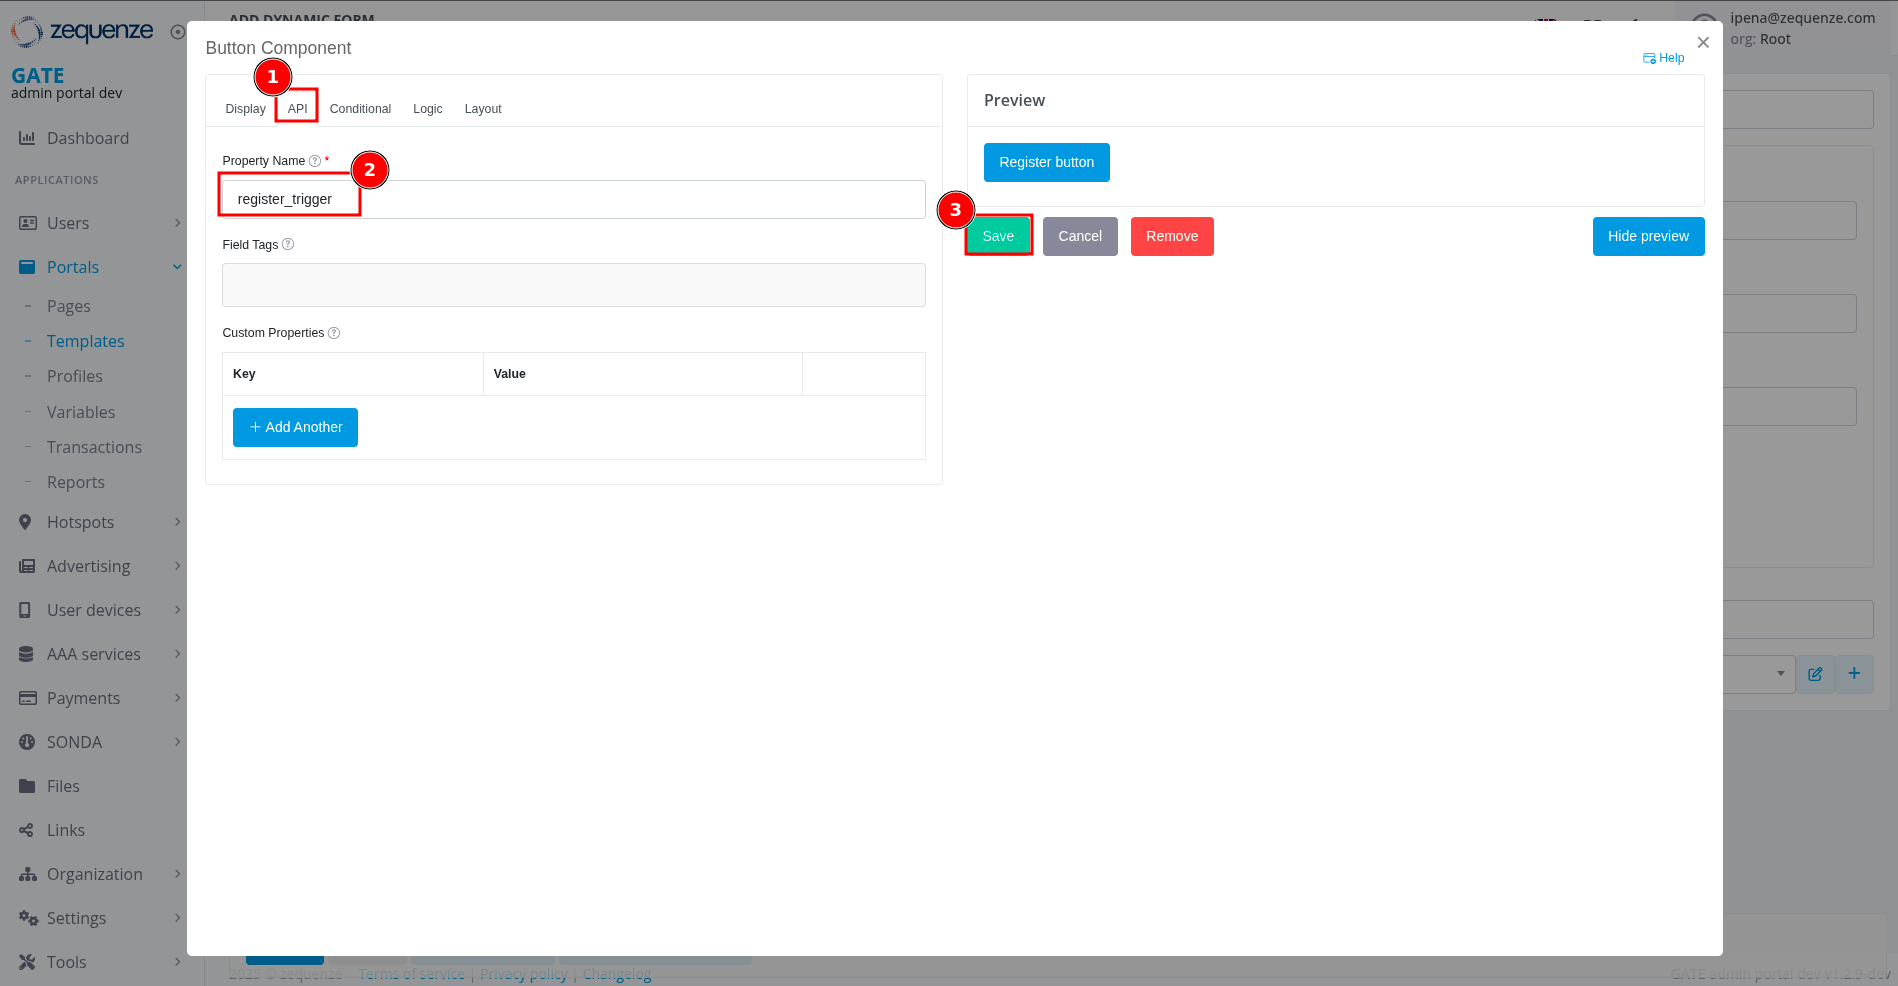 Button API configuration showing (1) API tab, (2) Property Name field, and (3) Save button.
Step 5: Save Your Dynamic Form
- Click the blue Save button at the bottom left of the screen
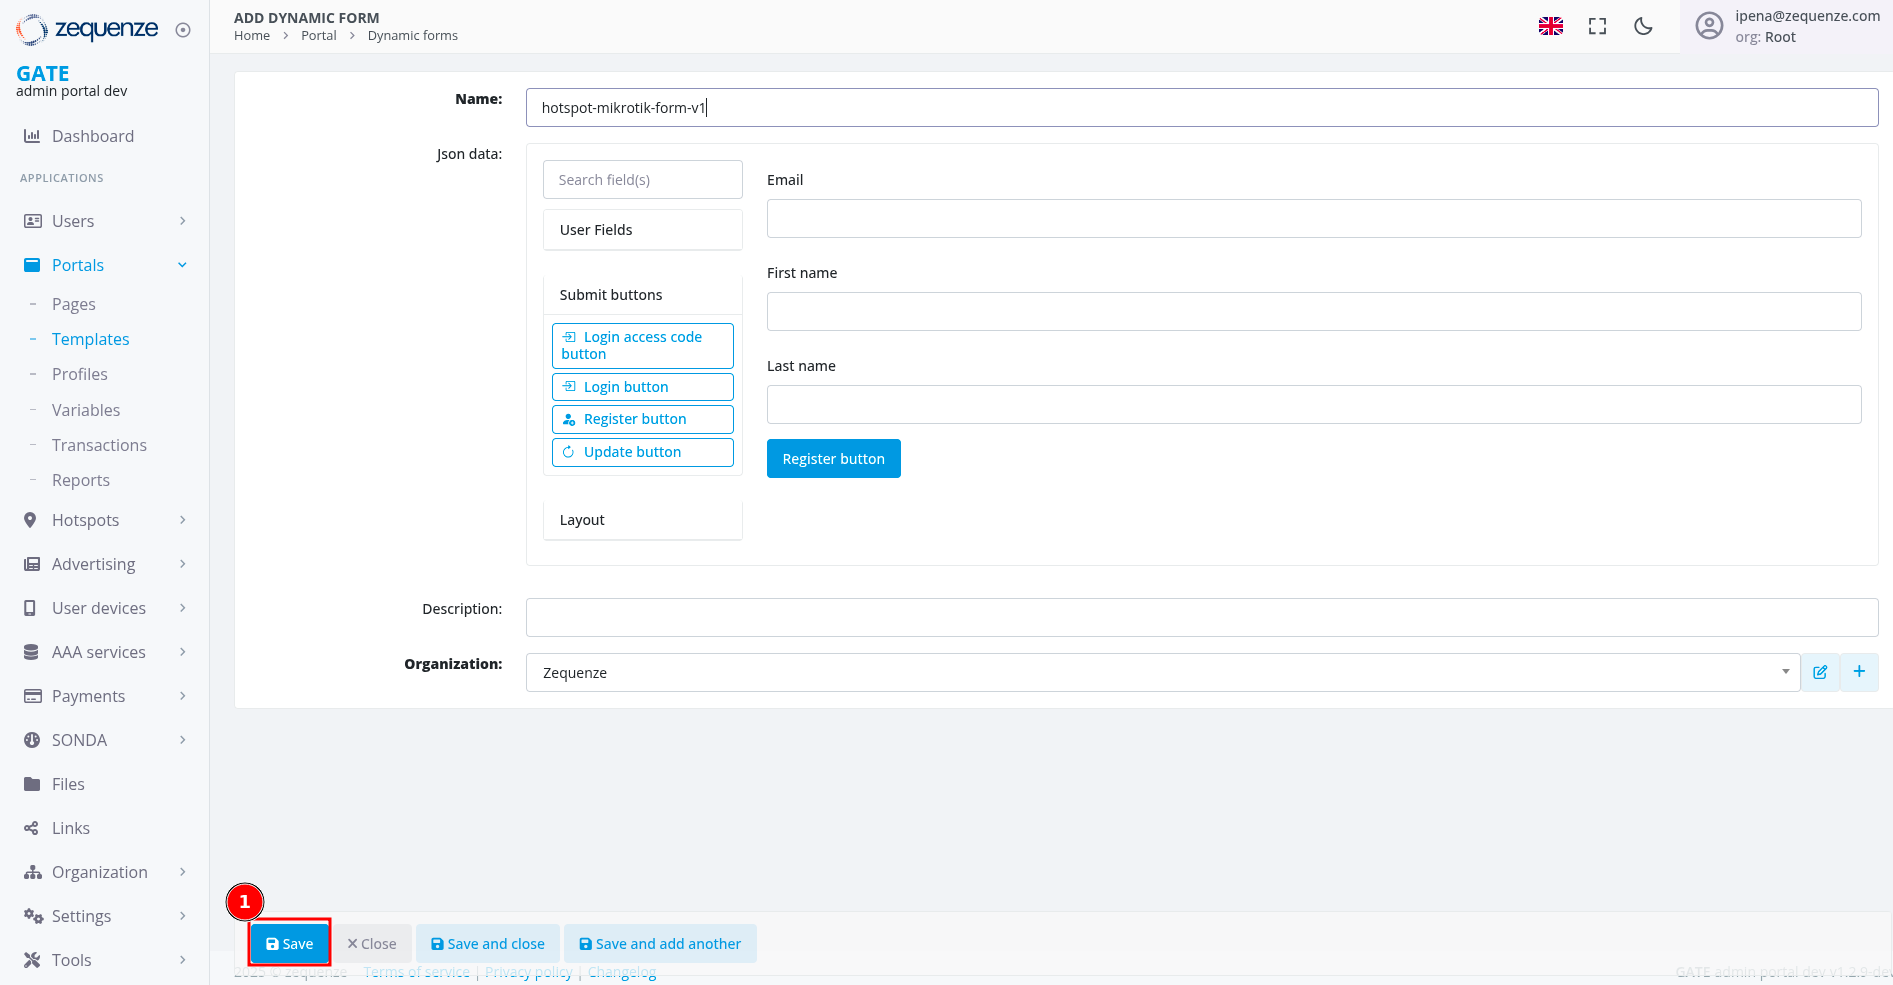 Save button highlighted at the bottom of the form creation screen.
- Verify successful creation - the form name and ID should appear at the top of the screen
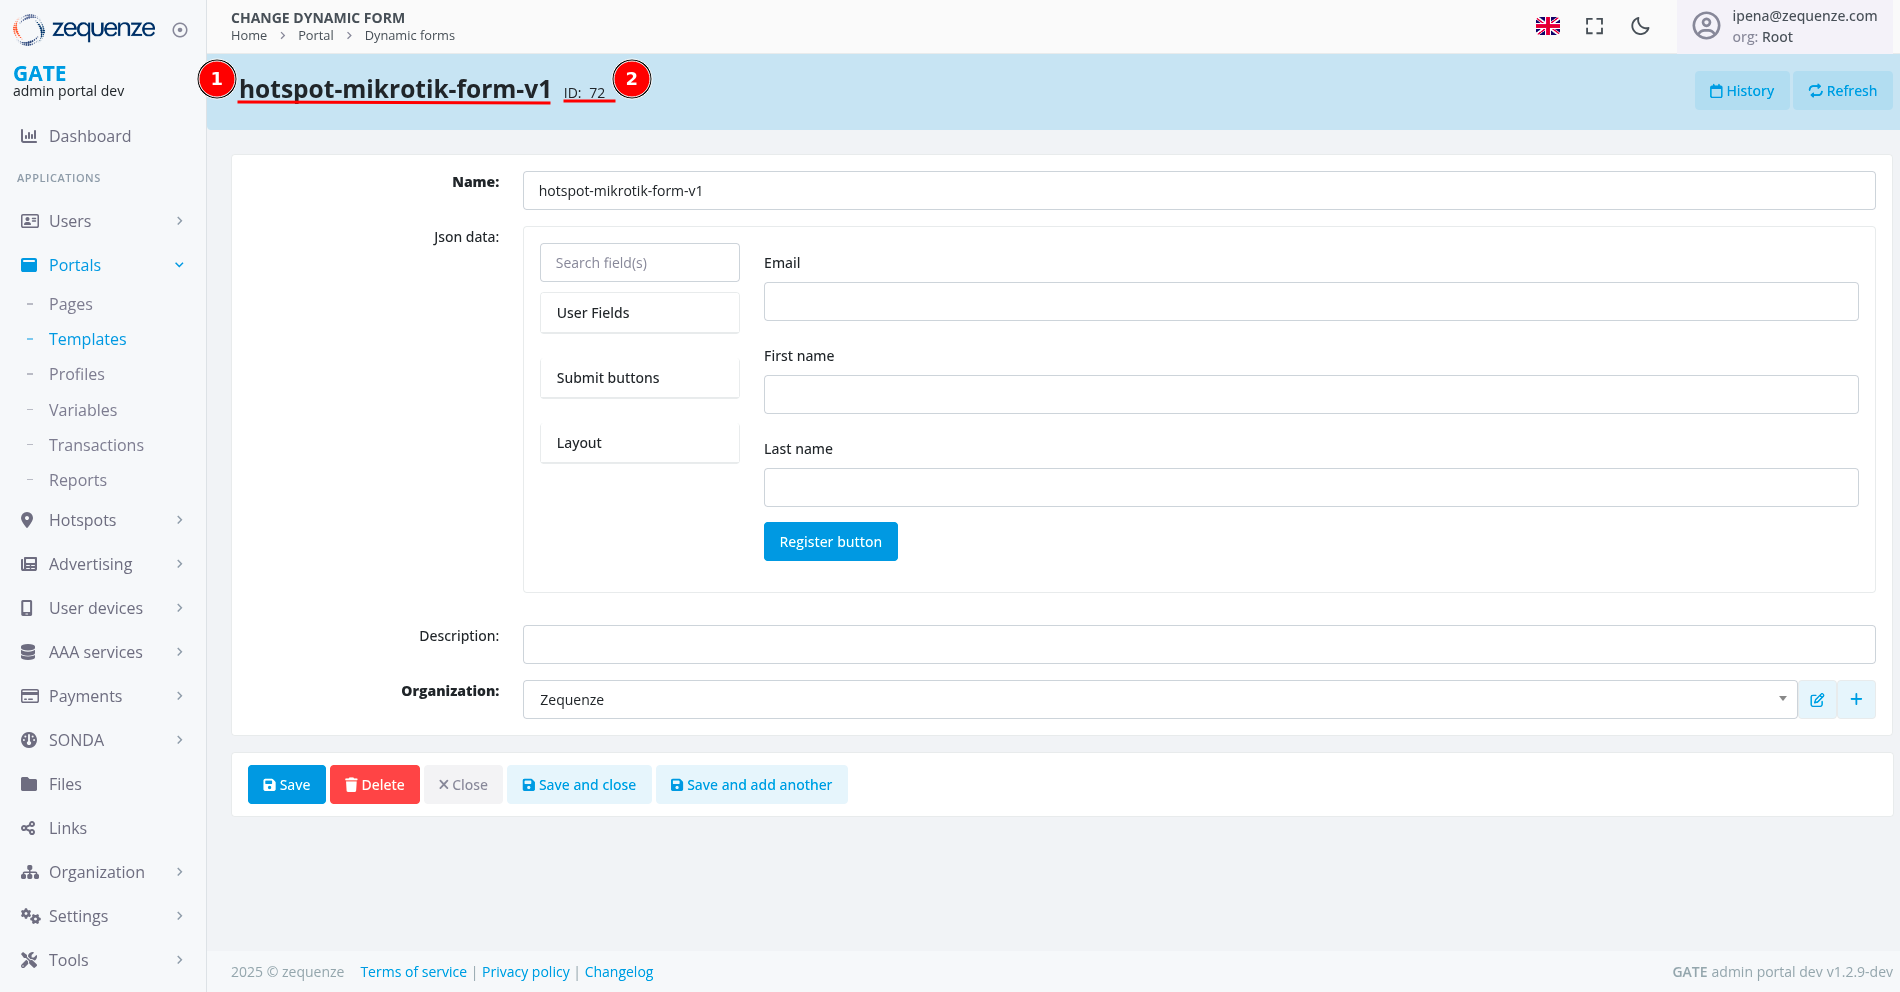 Saved form displaying (1) Form name and (2) Form ID at the top.
Form Verification Checklist
After saving, your dynamic form should include:
- ✅ Email field for user identification
- ✅ First name and Last name fields for personalization
- ✅ Register button for form submission
- ✅ Auto-generated form ID for system reference
Advanced Customization Options
You can enhance your form with additional features:
- Custom fields for collecting specific business information
- Multiple submit button types (Login, Update, etc.)
- Layout adjustments for improved user experience
- Validation rules for data quality control
Creating AAA User Profiles
AAA (Authentication, Authorization, and Accounting) user profiles define the network access parameters and bandwidth limitations that will be applied to users through RADIUS communication with your MikroTik device. These profiles use AVP (Attribute-Value Pair) attributes that will be sent to the MikroTik device.
Step 1: Access AAA User Profiles
- Click on AAA Services in the left sidebar menu
- Select Profiles from the submenu
- Click on the User profiles tab at the top
- Click the blue + Add button to create a new profile
 Navigation path: (1) AAA Services in sidebar, (2) Profiles, (3) User profiles tab, and (4) Add button.
Step 2: Configure Basic Profile Information
- Enter a descriptive name for your profile (e.g., "MikroTik 1Mbps Profile" - typically referencing the speed or specific AVP attributes)
- Set a Short-name / code for system reference (e.g., "mktk-1m")
- Select your organization from the dropdown menu
- Click the Save button
 Profile creation screen showing (1) Name field, (2) Short-name/code field, and (3) Organization selection.
Step 3: Add MikroTik RADIUS Attributes
After saving the basic profile information, configure the specific MikroTik attributes:
Required Attributes Configuration
-
Mikrotik: Rate-Limit (8)
- Set value to bandwidth limitation (e.g., "1M/1M" for 1 Mbps download/upload)
-
Mikrotik: Mikrotik-Group (3)
- Set value to "profile-mikrotik" (must match your MikroTik user profile name)
-
Auth-Type (1000)
- Set value to "Accept" for authentication verification
-
Click Save to apply all changes
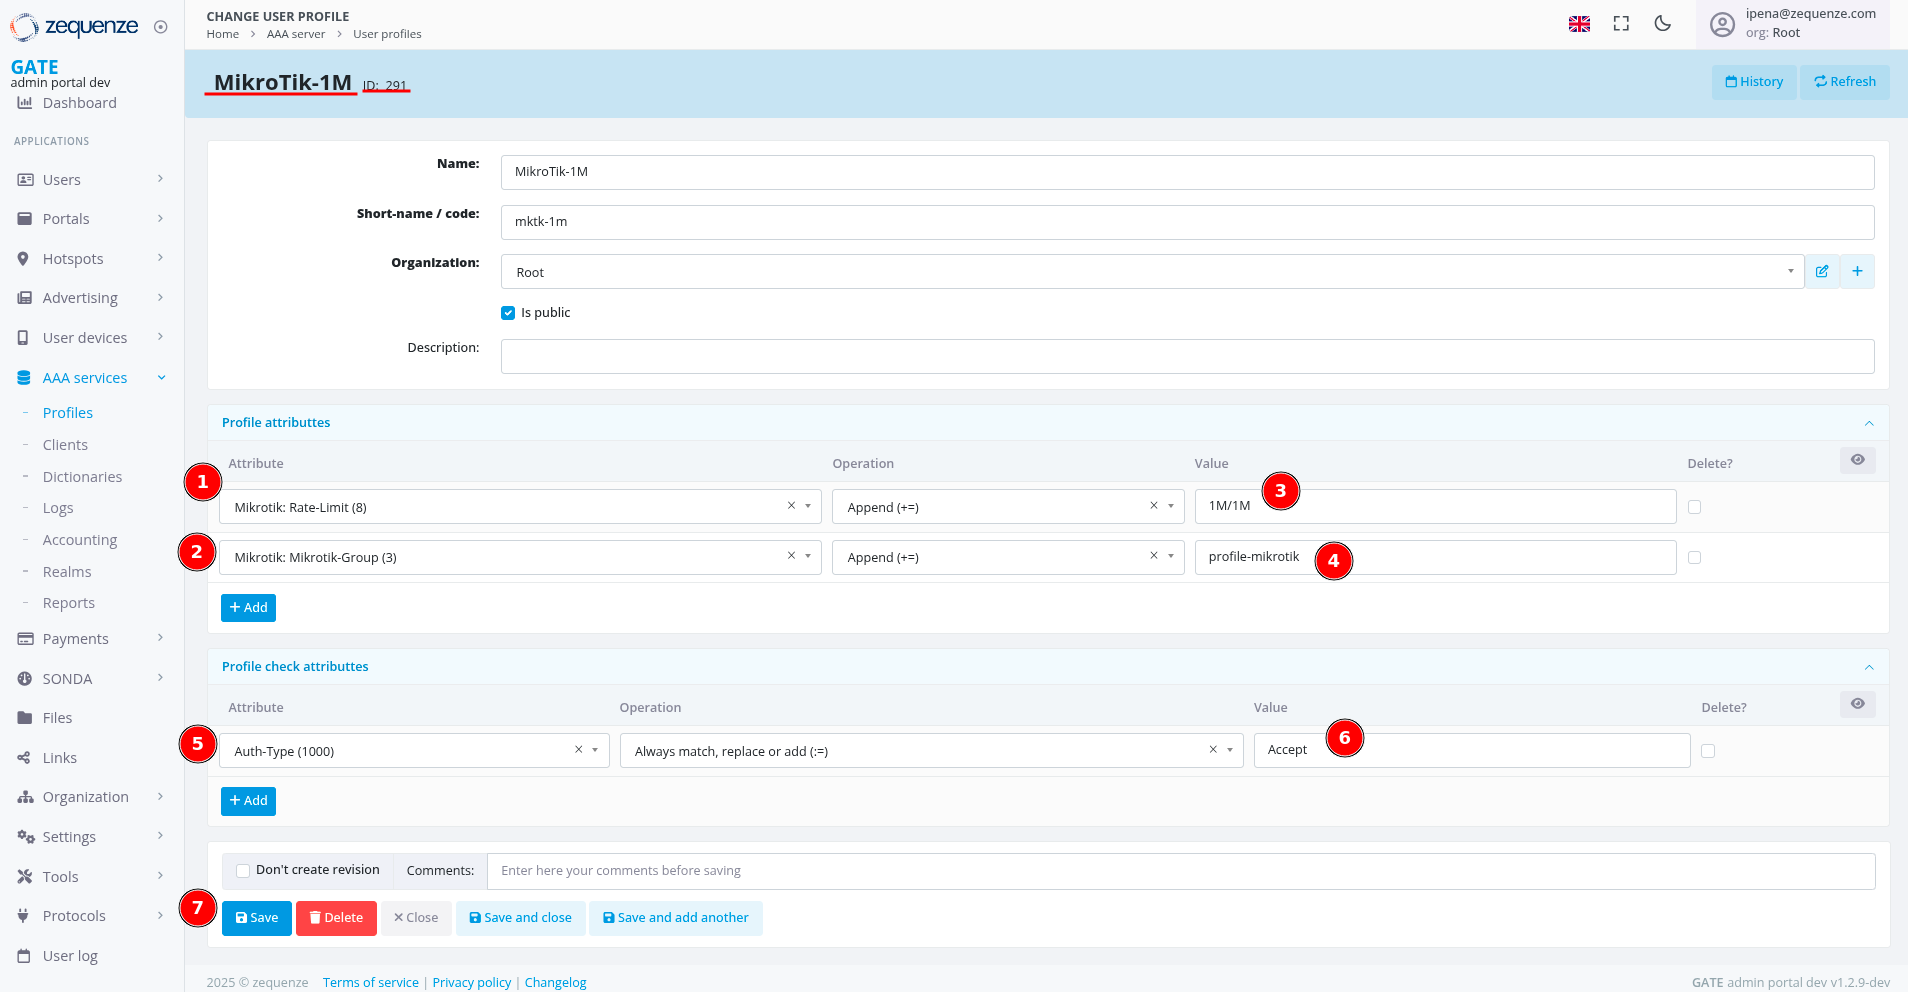 Attributes configuration showing (1) Rate-Limit attribute, (2) Mikrotik-Group attribute, (3) Rate-Limit value, (4) Mikrotik-Group value, (5) Auth-Type attribute, (6) Auth-Type value, and (7) Save button.
Important Configuration Notes
Critical: The "profile-mikrotik" value must match exactly with the user profile name created in your MikroTik device configuration.
Reference: For detailed MikroTik device configuration, see the official Zequenze documentation.
Bandwidth Configuration Examples
| Profile Type | Rate-Limit Value | Description |
|---|---|---|
| Basic | 1M/1M | 1 Mbps download/upload |
| Standard | 5M/5M | 5 Mbps download/upload |
| Premium | 10M/10M | 10 Mbps download/upload |
| Unlimited | 100M/100M | High-speed access |
Verification Checklist
After saving, verify your AAA user profile contains:
- ✅ Descriptive name and short-name code
- ✅ Rate-Limit attribute with bandwidth values
- ✅ Mikrotik-Group attribute linking to MikroTik profile
- ✅ Auth-Type attribute set to Accept
- ✅ Profile ID displayed at the top
Adding RADIUS Clients
RADIUS clients represent your MikroTik devices in the GATE platform, enabling secure authentication and authorization communication between GATE and your network infrastructure.
Step 1: Access AAA Clients Section
- Click on AAA Services in the left sidebar menu
- Select Clients from the submenu
- Click the blue + Add button to create a new RADIUS client
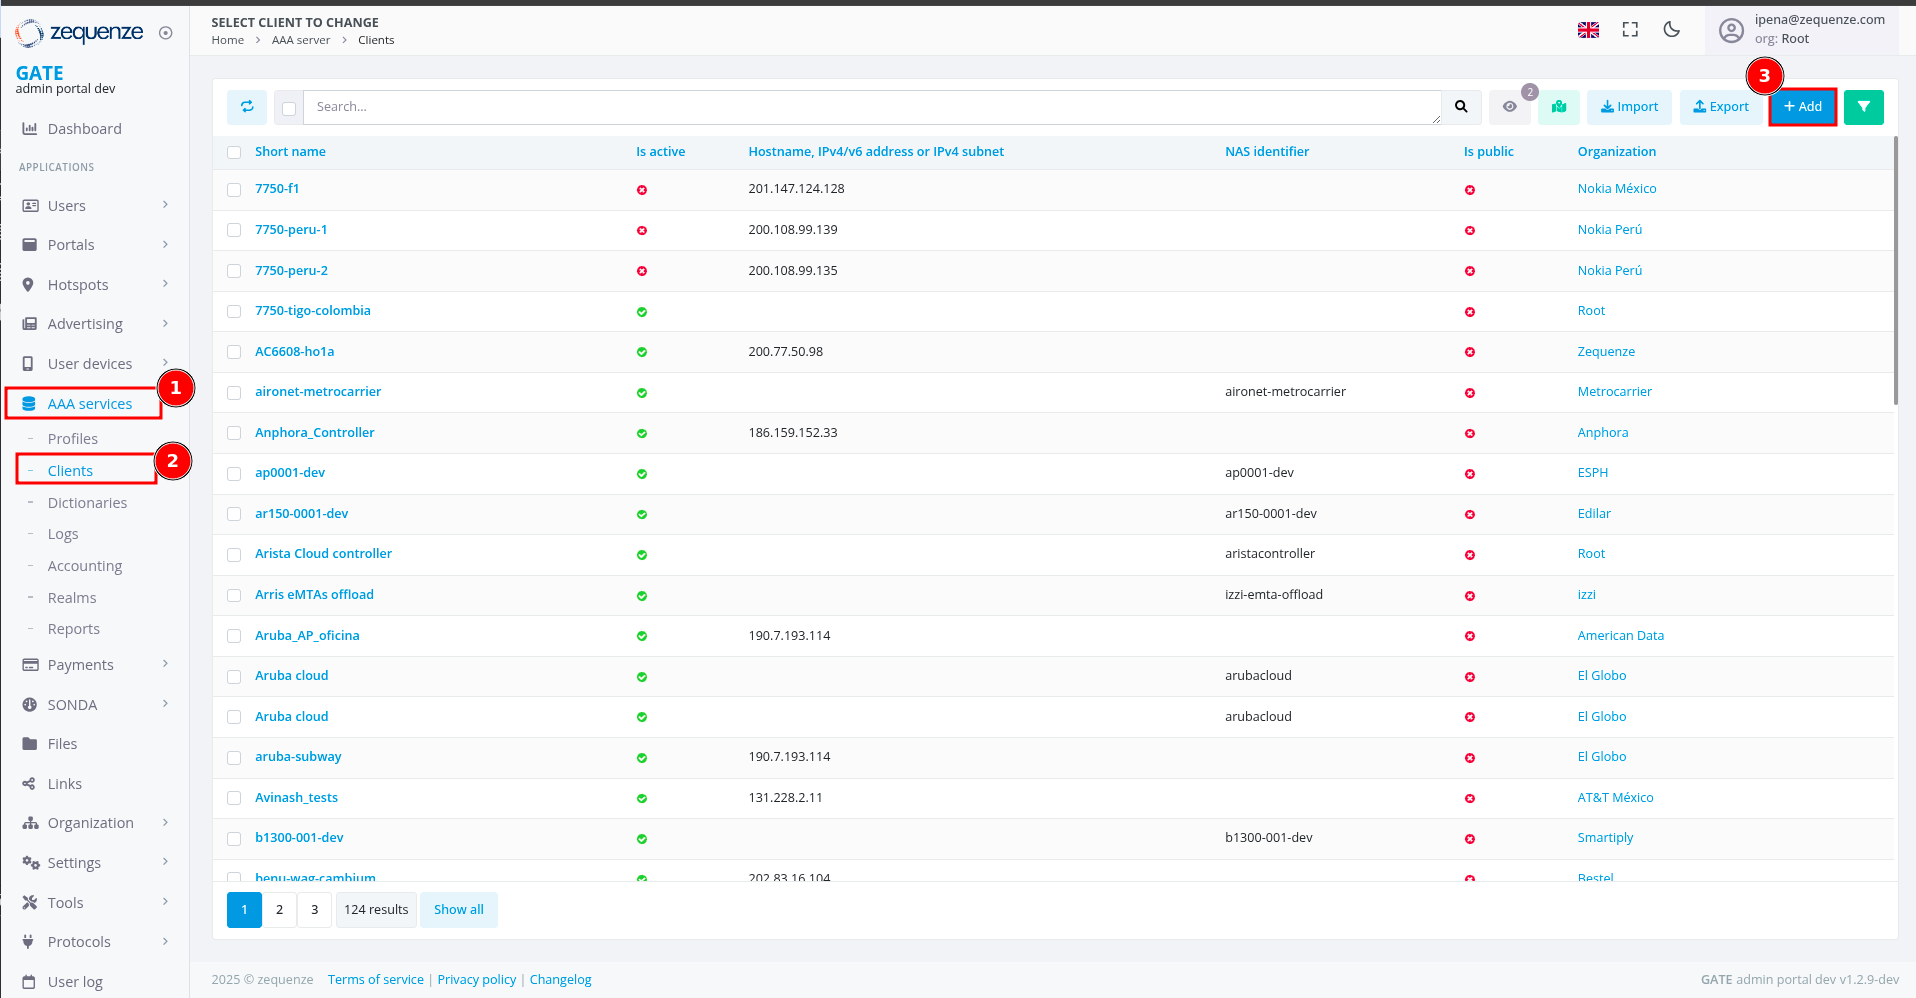 Navigation path: (1) AAA Services in sidebar, (2) Clients submenu, and (3) Add button.
Step 2: Configure RADIUS Client Parameters
- Short name: Enter an identifier for your MikroTik device (e.g., "mikrotik-hotspot-01")
- Organization: Select the appropriate organization from dropdown
- Hostname/IP Address: Enter your MikroTik device's IP address or hostname
- Secret: Create a strong shared secret for secure communication
- Enable debug: Check this option for development environments (disable in production)
- Click Save to create the RADIUS client
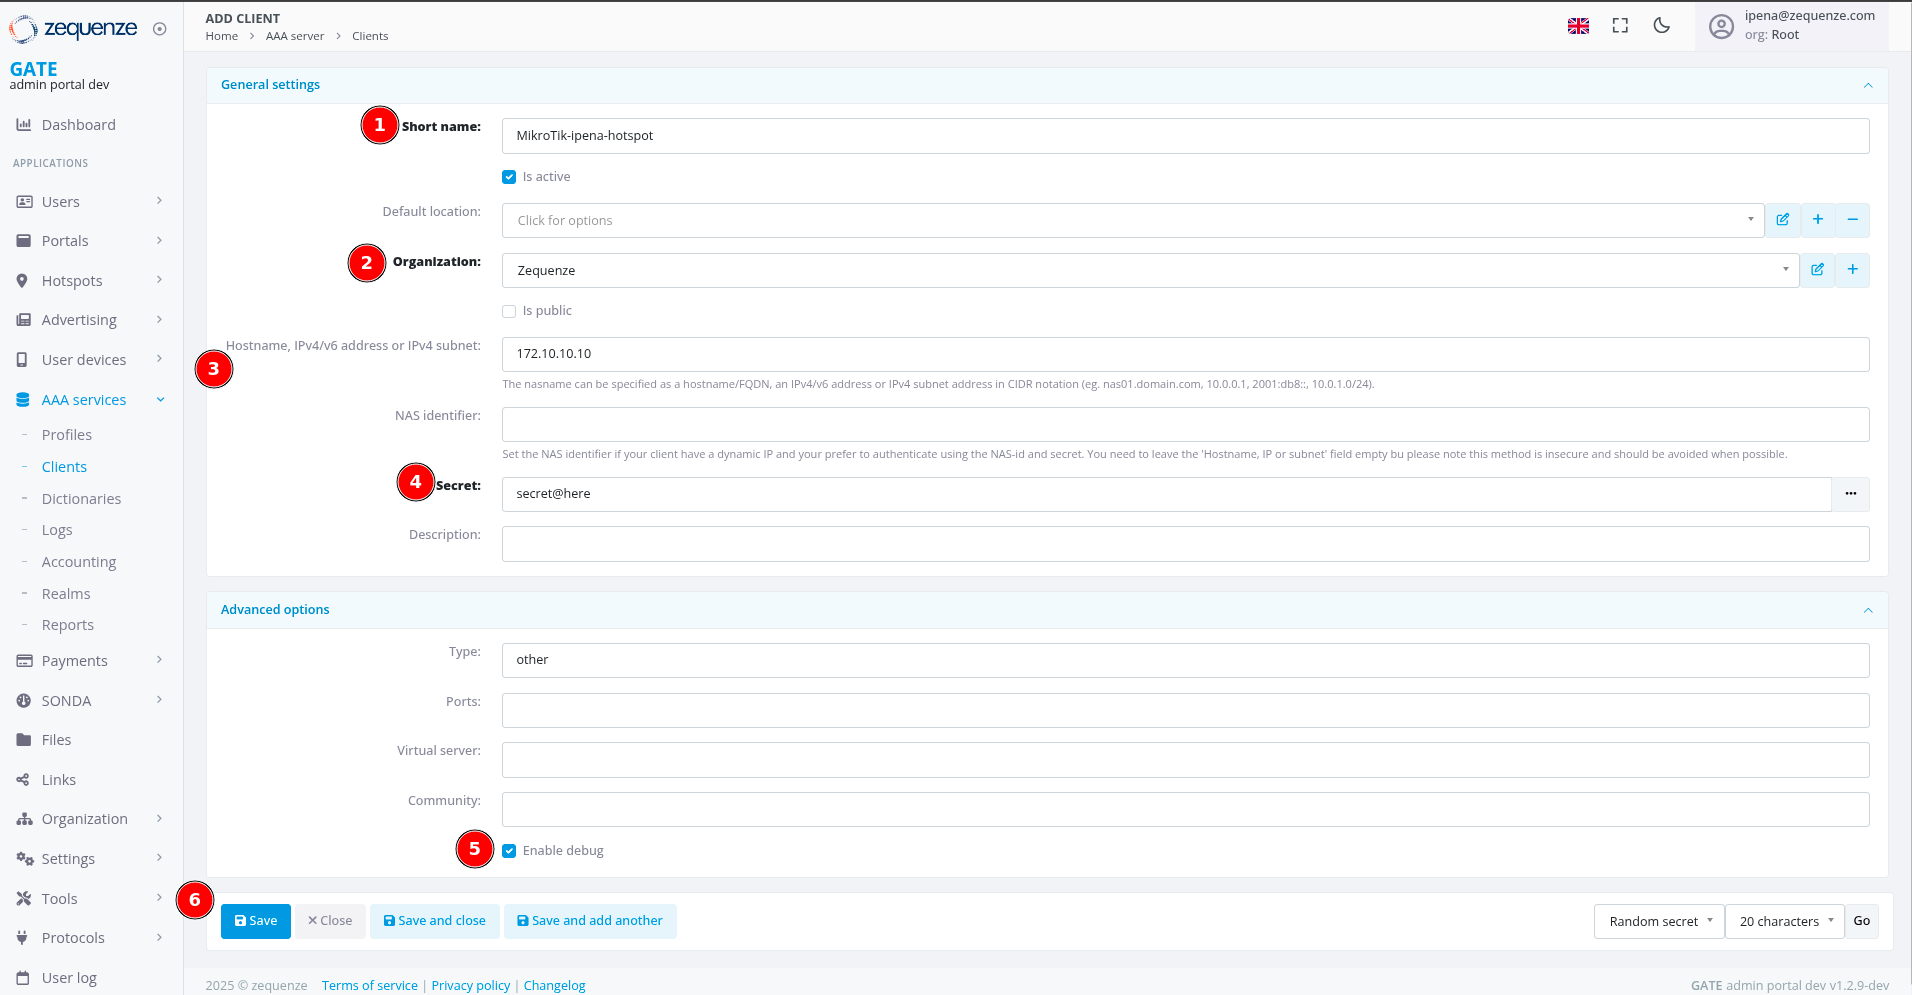 RADIUS client configuration showing (1) Short name, (2) Organization selection, (3) IP address field, (4) Secret field, (5) Enable debug checkbox, and (6) Save button.
Network Connectivity Requirements
Critical Network Note: The IP address must have direct connectivity with GATE for bidirectional communication. NAT configurations can block return traffic from GATE to MikroTik, causing authentication failures.
Security Best Practices
| Security Aspect | Recommendation |
|---|---|
| Secret Strength | Use minimum 16 characters with mixed case, numbers, and symbols |
| Secret Uniqueness | Use a unique secret for each RADIUS client to maintain security |
| Secret Matching | The secret used here must match exactly with the secret configured in your MikroTik RADIUS settings |
| Production Settings | Disable debug mode in production to reduce unnecessary logging |
| **Firewall |
No comments to display
No comments to display