General User Guide
General overview and documentation of zequenze platforms and solutions
Platforms Overview
Introduction
Service Providers and Enterprise are constantly looking to optimize their operationaly efficiency and to enrich their customers experience.
zequenze solutions are being built in order to help Service Providers and Enterprises accomplish these goals by automating and simplifying their operation and management of large amount of devices (CPE, modems, routers, WiFi AP) as well as to provide insighful analytics on their utilization and performance.

Major tasks accomplished by zequenze platform can be summarized as:
- Configuration and Service Management: which encompass device's onboarding, configuration management, services management, firmware management, etc. accomplished in a secure and automated fashion minimizing errors or human-driven mistakes.
- Analytics: referring to a wide set of statistics and analytics gathered from the devices and afterwards exposed either graphically and/or toward external systems through a flexible API.
- Scripting: based on information gathered from devices (analytics, configuration, others) zequenze platform can process (analyze, correlate, etc.) and new configurations pushed to the devices in order to automatically achieve Service Providers requirements.
TBC
Architecture
zequenze Platforms share the following framework architecure:
- Machine Interfaces: RADIUS, TR069, MQTT, Web Server, etc.
- Application: AAA, Captive Portal, Device Management, Service Management, Firmware Manager, among others.
- Databases: database for devices users/records, metrics, among others.

Each layer can be easily scaled horizontally depending on either traffic, activity or size requirements.
Further reading:
Specifications
zequenze Platforms Key Characteristics
- Carrier-Grade platforms
- Multiprotocol and Multivendor
- 100% based on standard protocols and interfaces allowing interoperation with any standard-compliant platform.
- Cloud-based architecture with horizontal scalability.
- Relaying on industry-leaders cloud computing platforms (AWS, GCE), zequenze platforms scales automatically when required.
- Integrates toward Service Provider OSS/BSS systems through an API.
- A rich and flexible API allow smooth integration with a awide variety of platforms such as CRM, OSS, BSS, among many others.
- A rich and flexible API allow smooth integration with a awide variety of platforms such as CRM, OSS, BSS, among many others.
- Multiprotocol and Multivendor
- Common Solution Framework
- All zequenze platforms run on the same solution framework, leveraging a consistent set of characteristics and features among all of them such:
- Rich set of nortbound (GUI/API) and southbound (RADIUS, API, webservices, TR069, SNMP, CLI, etc.) interfaces.
- Scalable Application Engines.
- Integrated DB for devices/users and metrics.
- All zequenze platforms run on the same solution framework, leveraging a consistent set of characteristics and features among all of them such:

- Easy/Flexible configuration & management through GUI/API
- All configuration management can be performed through an intuitive Web-based GUI and/or API for automated processes.
- Customizable priviledges for GUI/API access based in user/organization profiles (Call Center users, NOC operators, Enegineering staff).
- Extensive Reports & Analytics capabilities
- Devices, Location/Group based reports.
- Heatmaps.
- Historical data on any Devices' metric.
- Data-export facilities (CSV, API, others).
Further reading:
Platforms GUI navigation and options
Administrative GUI interface navigation and documentation of basic options and operations
Advanced search syntax help
The Advanced search option can be activated whenever you see the 'Advanced search' checkbox bellow the search bar:

When active will allow advanced search conditions and selection options according to the following documentation.
Search conditions
A search condition is a basic search query building block. It always consists of 3 elements: field, comparison operator and value, placed exactly in this order from left to right.
Here's an example - looking for users with first name "John". In the example below first_name is a field, = is a comparison operator and "John" is a value:
first_name = "John"
Another example, looking for users who registered in 2017 or later:
date_joined >= "2017-01-01"
One more example, looking for super-users:
is_superuser = True
And one more - finding all users whose names are in a given list:
first_name in ("John", "Jack", "Jason")
Multiple search conditions
You can combine multiple search conditions together using the logical
operators and (both conditions must be true) and
or (at least one of the conditions must be true, no matter
which one). Important - logical operators must be written in lowercase:
and and or is correct, and AND or
OR is incorrect and will cause an error.
Example: looking for users with first name "John" and
registered in 2017 or later. Please note that we have 2 search
conditions here, joined with and:
first_name = "John" and date_joined >= "2017-01-01"
One more example, looking for users who are either super-users
or marked with "Staff" flag:
is_superuser = True or is_staff = True
Logical operators can be quite powerful, as they let you to build
complex search queries. If you're building a complex query there's an
important tip to keep in mind: if your query contains both
and and or operators, we strongly encourage
you to use parenthesis to specify the precedence of operators. Here's
an example to illustrate why this is important. Let's assume that you
want to pull users who are either super-users or marked
with Staff flag, and registered in 2017 or later. It
might be tempting to write a query like this:
is_superuser = True or is_staff = True and date_joined > "2017-01-01"
The problem with the query above is that it won't do what you expect,
because the and operator is evaluated first. In fact it pulls
users who are either super-users (no matter when they registered)
or users who are both Staff and registered
after 2017. This problem can be fixed with parentheses, just put them
around the search conditions that must be evaluated first, like this:
(is_superuser = True or is_staff = True) and date_joined > "2017-01-01"
Using parenthesis is recommended only when your query mixes both
and and or operators. If your query contains
multiple logical operators of only one kind (either and
or or) you can safely omit parenthesis and it will work
as expected.
Fields
In a search query, you should reference the current model's fields exactly as they're defined in Python code for that particular Django model. Search query input has an auto-completion feature that pops up automatically and suggests all available options. If you're not sure what the field name is, then pick one of the options displayed (example):

In most cases, internal model fields look similar to what you see
in Django admin interface, just in lowercase and with _
instead of spaces. For example, in the standard Users admin interface,
the internal first_name field is displayed as
First name, email field is displayed as
Email address and so on. However there could be exceptions
to this, if developers have defined custom display names that look
very different from their internal representation. In such cases it
might be a good idea to ask developers to override this help template
and provide an "internal name -> display name" fields mapping right
here.
Note that some fields that you see in the admin interface may not be searchable. This includes computed fields, i.e. fields which are not stored in the database as a plain value, but rather calculated from other values in the code.
Related models
Advanced search allows you to search by related models as well (it
automatically converts relations to database joins under the hood). Use the
. dot separator to designate related models and their
fields. For example:
groups.name in ("Marketing", "Support")
See the . in the example above? It means that
groups is a related model and name is a field
of that model. As usual, DjangoQL auto-completion provides suggestions
for all available related models and their fields. For complex data
structures you can use multiple levels of relation, i.e. specifying a
related model, then its related model, and so on.
In most cases the search condition with a related model must specify the
exact field of that model, but not a related model itself. For example,
groups in ("Marketing", "Support") won't work, because
groups is a model and not a field. Models can have many
fields, and the server doesn't know against which field you would like
to perform a comparison. However there's one notable exception to
this - when you'd like to find records that are linked (or not linked)
to any related models of that kind. In such a case, you should compare
the related model to a special None value, like this:
groups = None
The example above would search for users that don't belong to any
groups. If you'd like to find all users that belong to at least any
group instead, use != None:
groups != None
Comparison operators
| Operator | Meaning | Example |
|---|---|---|
| = | equals | first_name = "John" |
| != | does not equal | id != 42 |
| ~ | contains a substring | email ~ "@gmail.com" |
| !~ | does not contain a substring | username !~ "test" |
| > | greater | date_joined > "2017-02-28" |
| >= | greater or equal | id >= 9000 |
| < | less | id < 9000 |
| <= | less or equal | last_login <= "2017-02-28 14:53" |
| in | value is in the list | first_name in ("John", "Jack", "Jason") |
| not in | value is not in the list | id not in (42, 9000) |
| startswith | value starts with the provided argument | name startswith "te" |
| endswith | value ends with the provided argument | name endswith "st" |
Notes:
-
~,!~,startswithandendswithoperators can be applied only to string fields; -
True,FalseandNonevalues can be combined only with=and!=; -
inandnot inoperators must be written in lowercase.INorNOT INis incorrect and will cause an error.
Logical operators
Standars and and or logical operator can be used on search query, ie:
name = "test" and description = "test objects"
name = "test" or name = "example"
Values
| Type | Examples | Comments |
|---|---|---|
| string | "this is a string" |
Strings must be enclosed in double quotes, like
"this". If your string contains double quote
symbols in it, you should escape them with a backslash,
like this: "this is a string with \"quoted\" text".
|
| int |
42, 0, -9000
|
Integer numbers are just digits with optional unary minus. If you're typing big numbers please don't use thousand separators, DjangoQL doesn't understand them. |
| float |
3.14, -0.5, 5.972e24
|
Floating point numbers look like integer numbers with optional
fractional part separated with dot. You can also use
e notation to specify power of ten. For example,
5.972e24 means 5.972 * 1024.
|
| bool |
True, False
|
Boolean is a special type that accepts only two values:
True or False. These values are
case-sensitive, you should write True or
False exactly like this, with the first letter in
uppercase and others in lowercase, without quotes.
|
| date |
"2017-02-28"
|
Dates are represented as strings in "YYYY-MM-DD"
format.
|
| datetime |
"2017-02-28 14:53""2017-02-28 14:53:07"
|
Date and time can be represented as a string in
"YYYY-MM-DD HH:MM" format, or optionally with seconds
in "YYYY-MM-DD HH:MM:SS" format (24-hour clock).
Please note that comparisons with date and time are performed in
the server's timezone, which is usually UTC.
|
| null |
None
|
This is a special value that represents an absence of any value:
None. It should be written exactly like this, with
the first letter in uppercase and others in lowercase, without
quotes. Use it when some field in the database is
nullable (i.e. can contain NULL in SQL terms) and you'd like to
search for records which either have no value
(some_field = None) or have some value
(some_field != None).
|
Exporting and Importing data
There are two ways for exporting data from and to zequenze platforms:
- Export/ Import with dependencies
- Export/ Import with no dependencies
The main difference between both is that the former will export data with all its dependencies, for example, if you want to export a Page object, it will be exported with its connection_profile, main_template, registration_service, campaign, etc.
The latter one will only import only the object you're trying to export, so to import the exported object on another platform it is a requirement to have all the dependencies already created
Below you can find some examples:
Export with no dependencies:
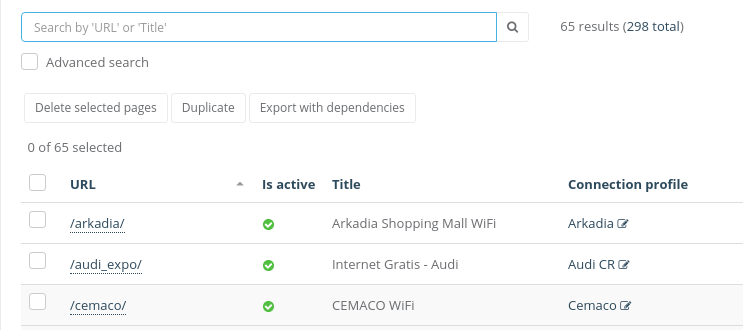
First, you must select the elements you want to export
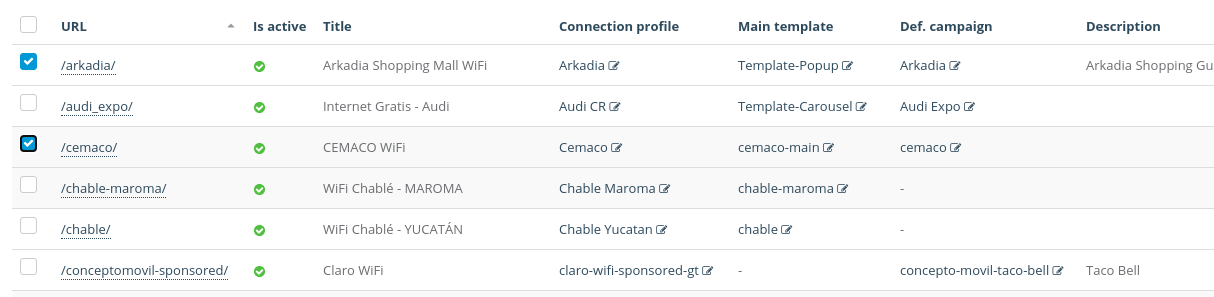
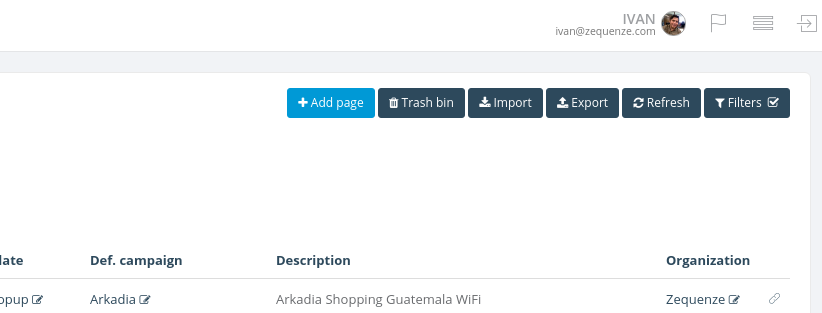
Once selected, click on the Export button located on the top right corner of the model principal view
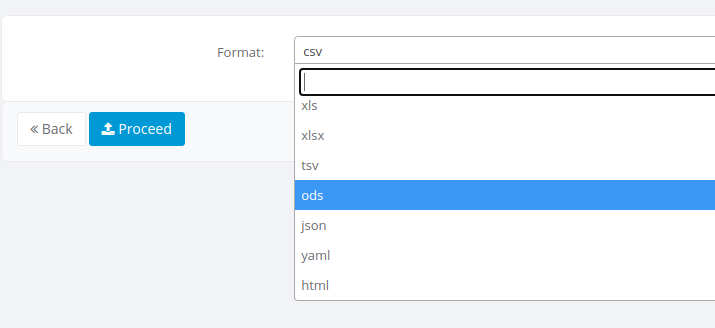
An export screen will be shown where you can select the type of file to be exported, select the desired format and hit the Proceed button
Finally, you'll get your file downloaded

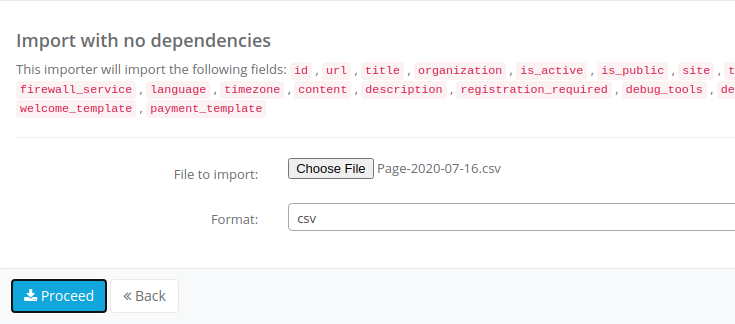
Import with no dependencies:
To import with no dependencies it will be required to have a file generated by the export with no dependencies process, with the file in hand click on the Import button located on the top right corner of the model principal view:
A form screen will appear where you have to select the file to be uploaded as well as its format, then hot the Proceed button:
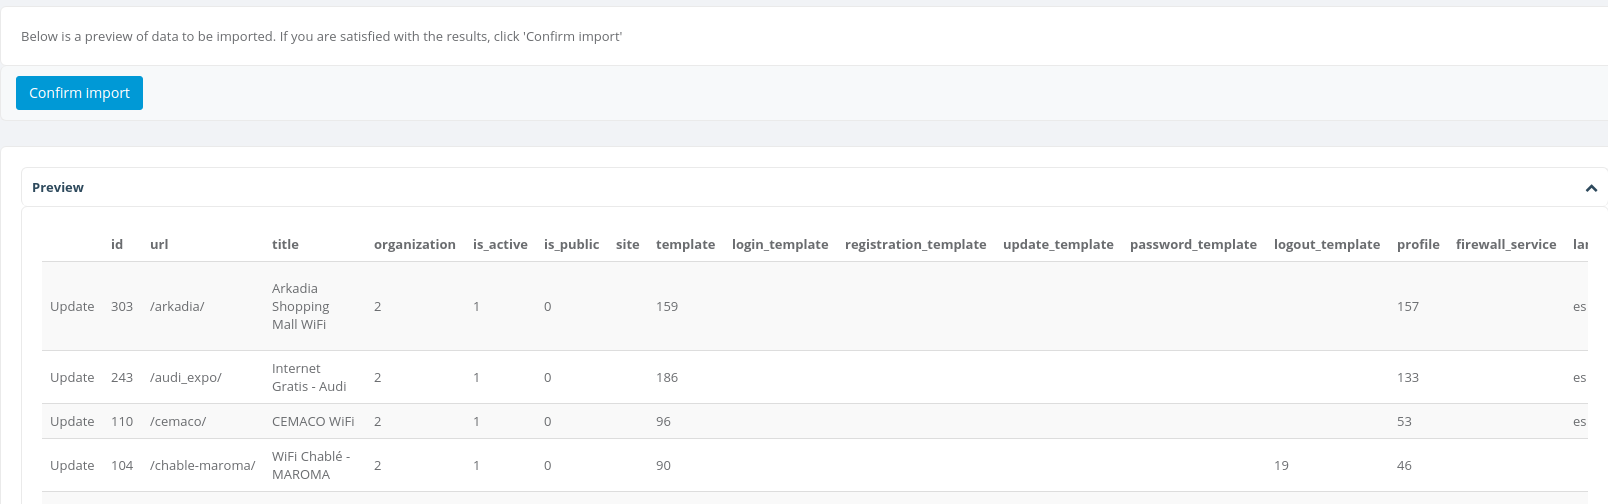
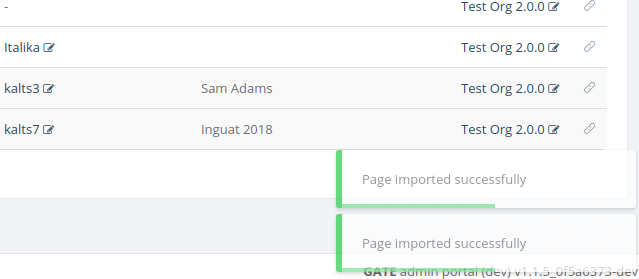
A confirmation screen will be shown, you may double-check the data to be uploaded, once checked hit the Confirm import button
if everything goes well, you'll see a success message on the bottom right corner of the model principal view.
Export with dependencies:
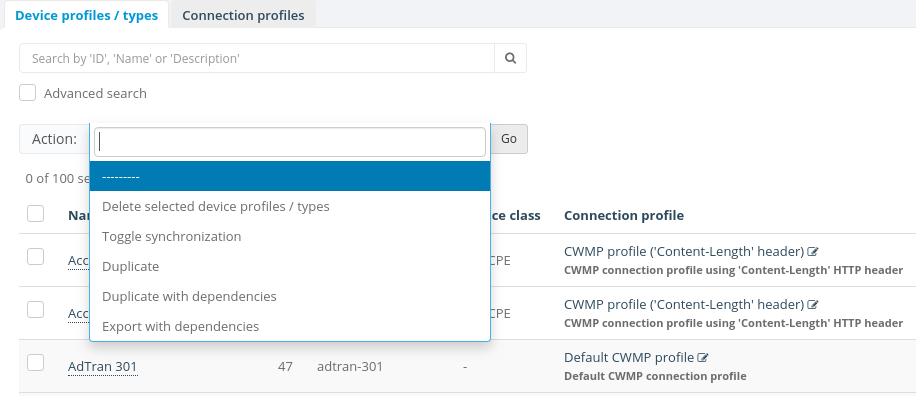
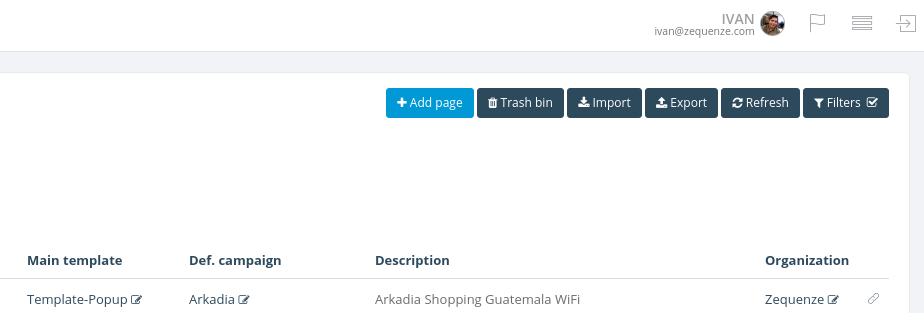
When a model can be exported with dependencies, Export with dependencies button will be available under the search bar
Sometimes the Export with dependencies button will inside the action menu under the search bar
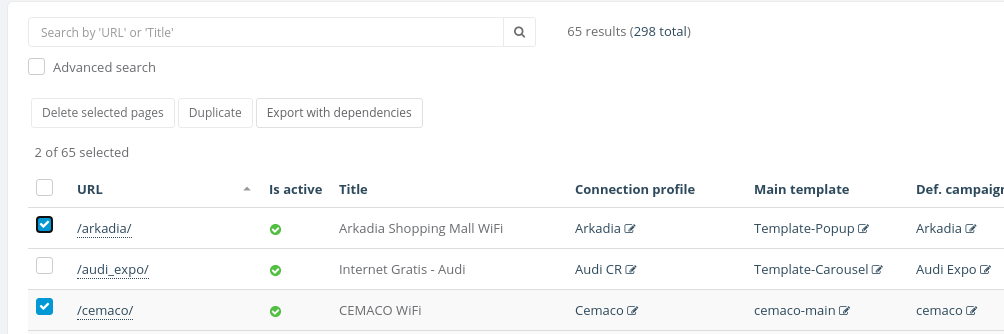
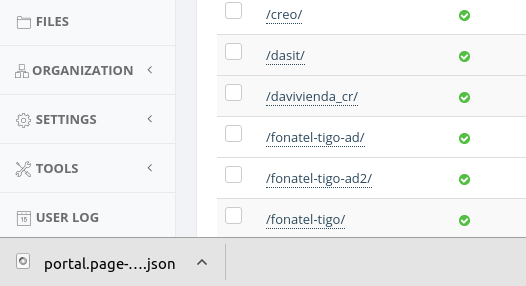
To start the process you can easily select the objects you want to export and click Export with dependencies button, for this example will be used a Page object
Finally, you will see a .json file downloaded into your computer
It's important to notice that this JSON file will be used when we want to import with dependencies
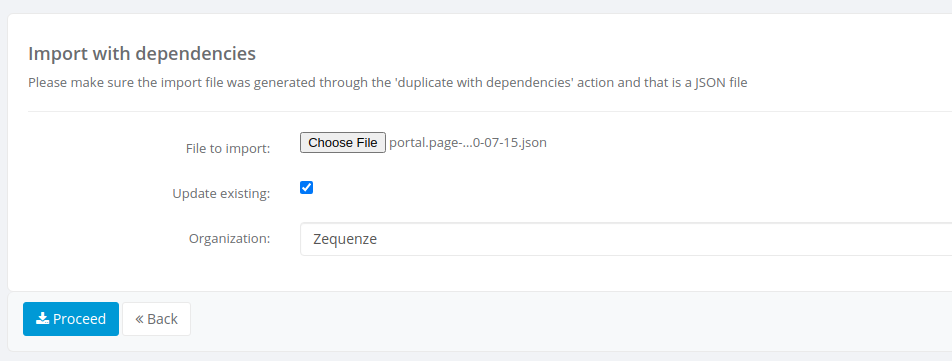
Import with dependencies
To begin the process of import with dependencies you should click on Import button located in the top right corner of the model principal view
You will see the Import with dependencies form
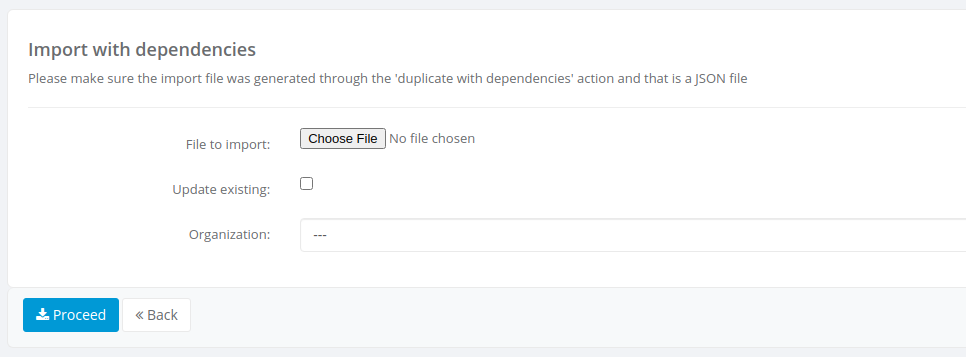
Here you must select the JSON file and the organization on which you want the object(s) to be created, the Update existing checkbox is used when the objects exist already on the organization you're trying to import. When checked the platform will try to update the existing objects and if those don't exist they will be created.
Note: make sure the .json file is one generated by an export with dependencies process
Once selected the .json file, the organization and either checked or not updating existing, you must click on Proceed button
After the process completed successfully you will see a success message on the bottom right corner on the model principal view
Hidden Columns and Linked Filters
Customizing Your Data Table View with Hidden Columns
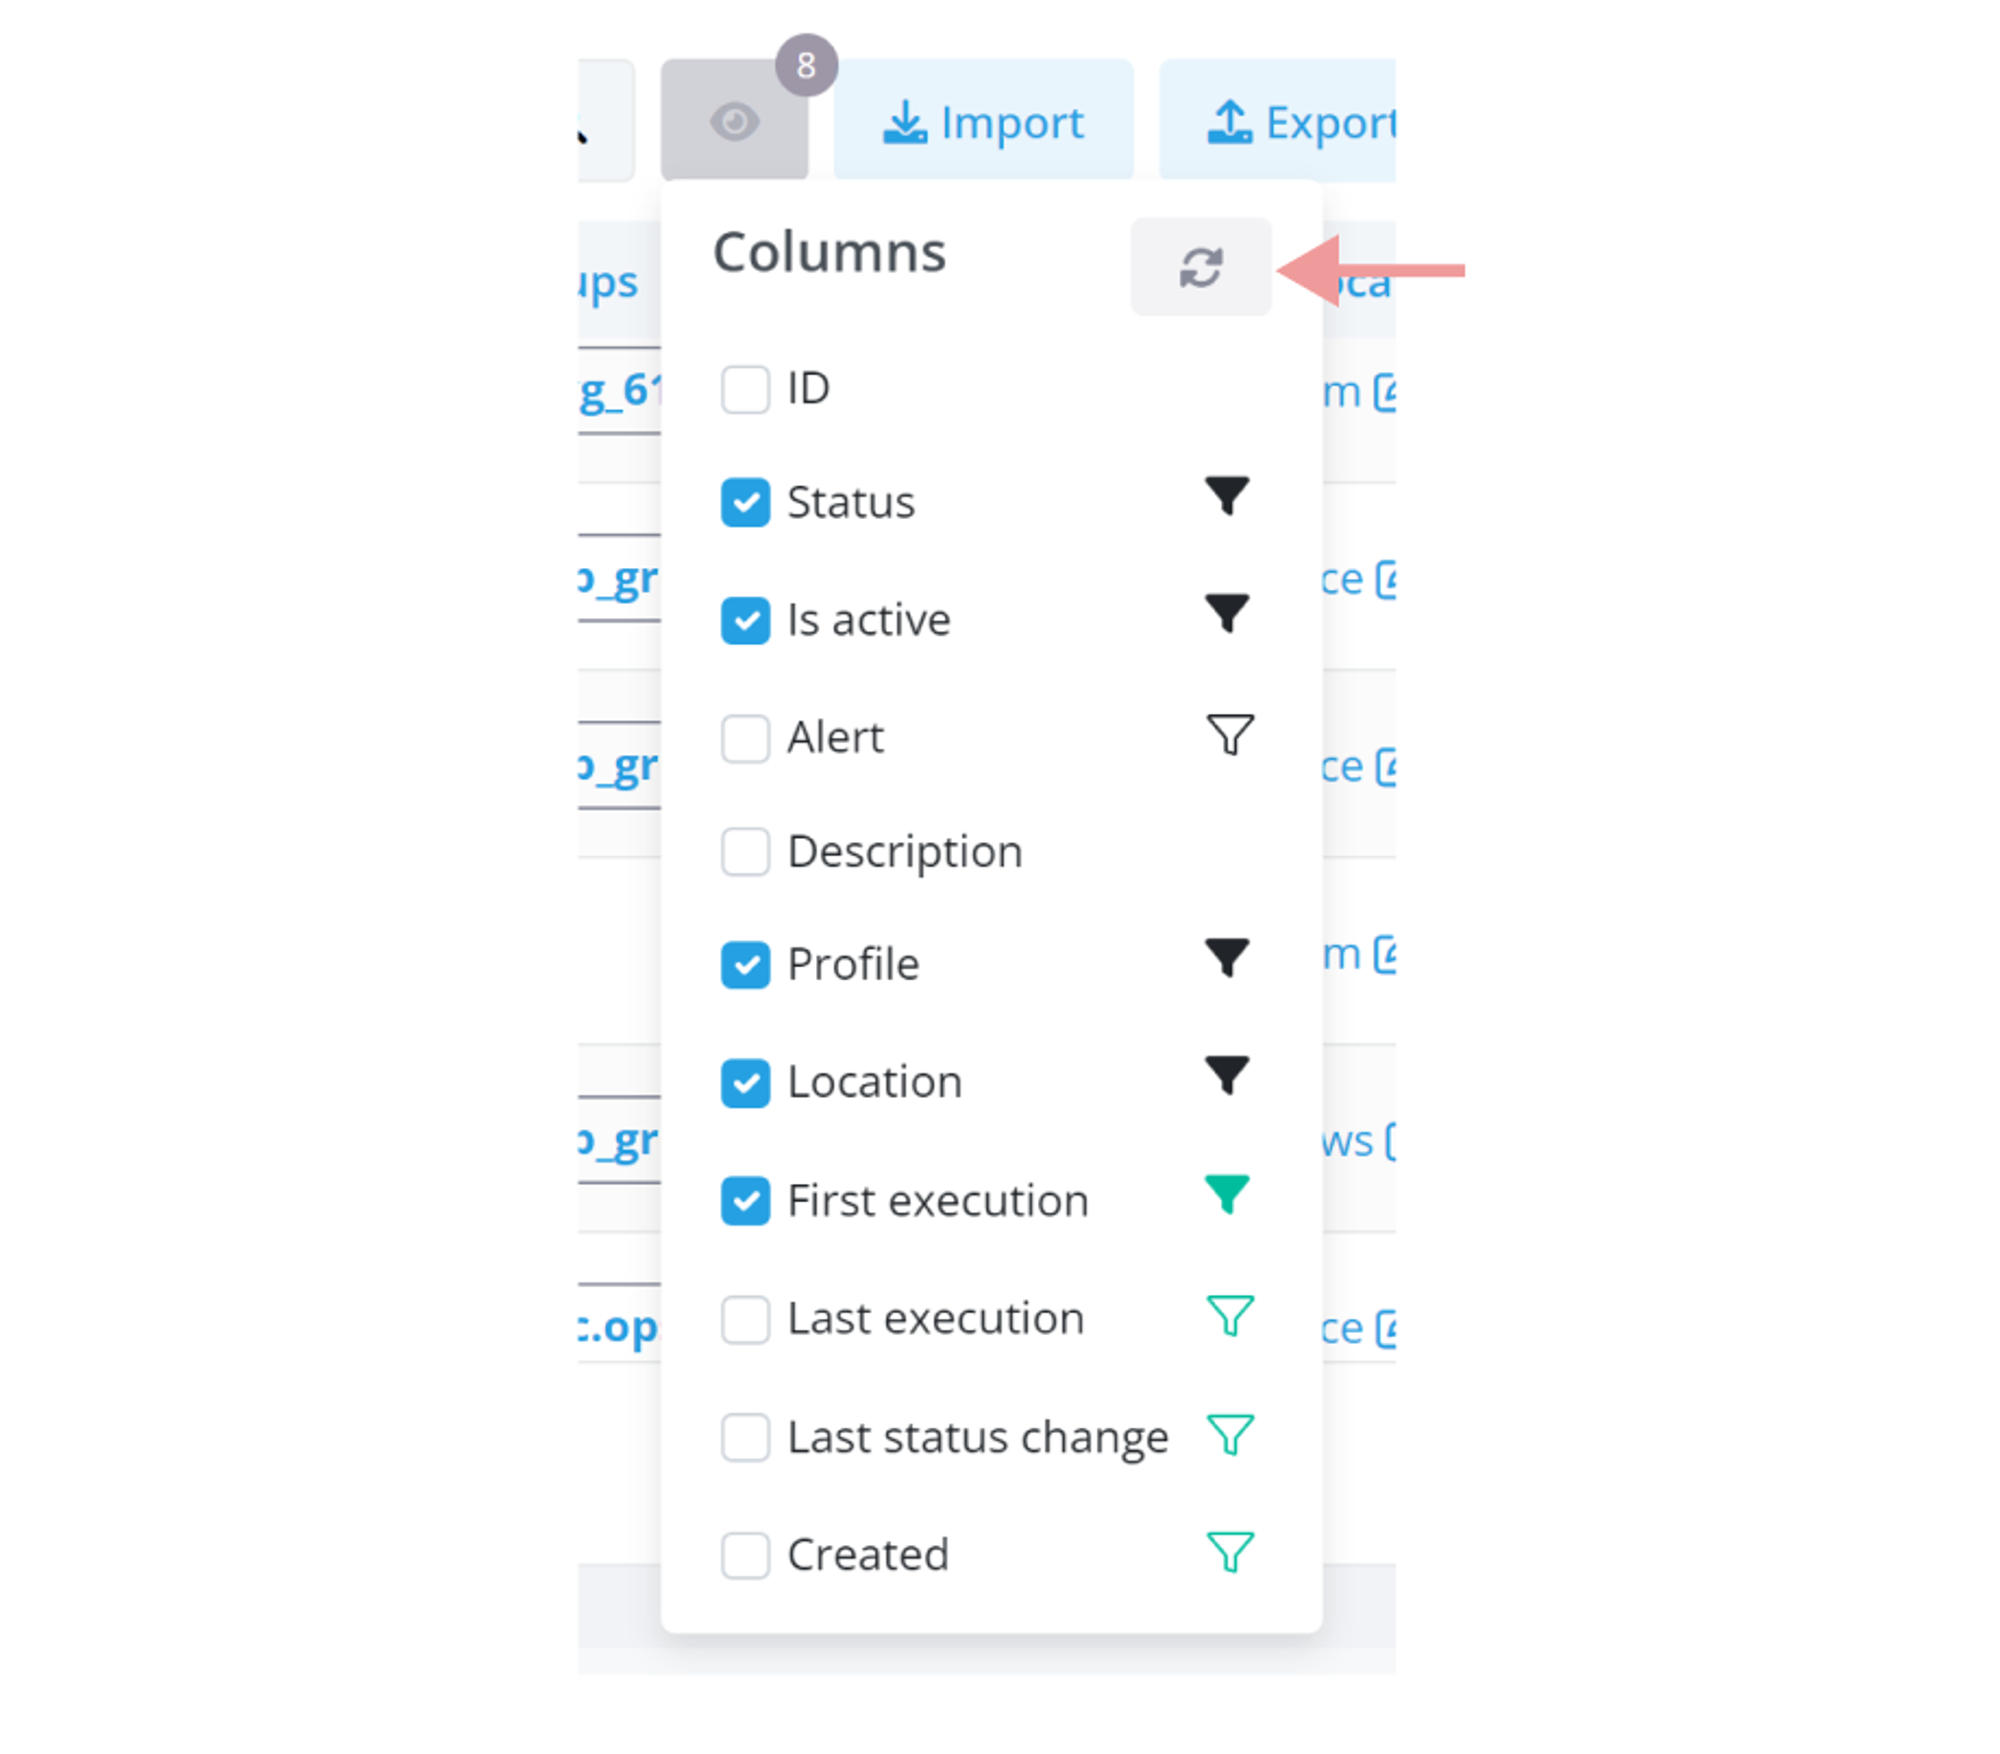
Accessing the Column Visibility Menu
 Near your data table, look for a this grey button with the eye icon. This button is your access point to customize the visible columns in your table. Clicking on this button reveals a dropdown menu with a list of options.
How to Show or Hide Columns
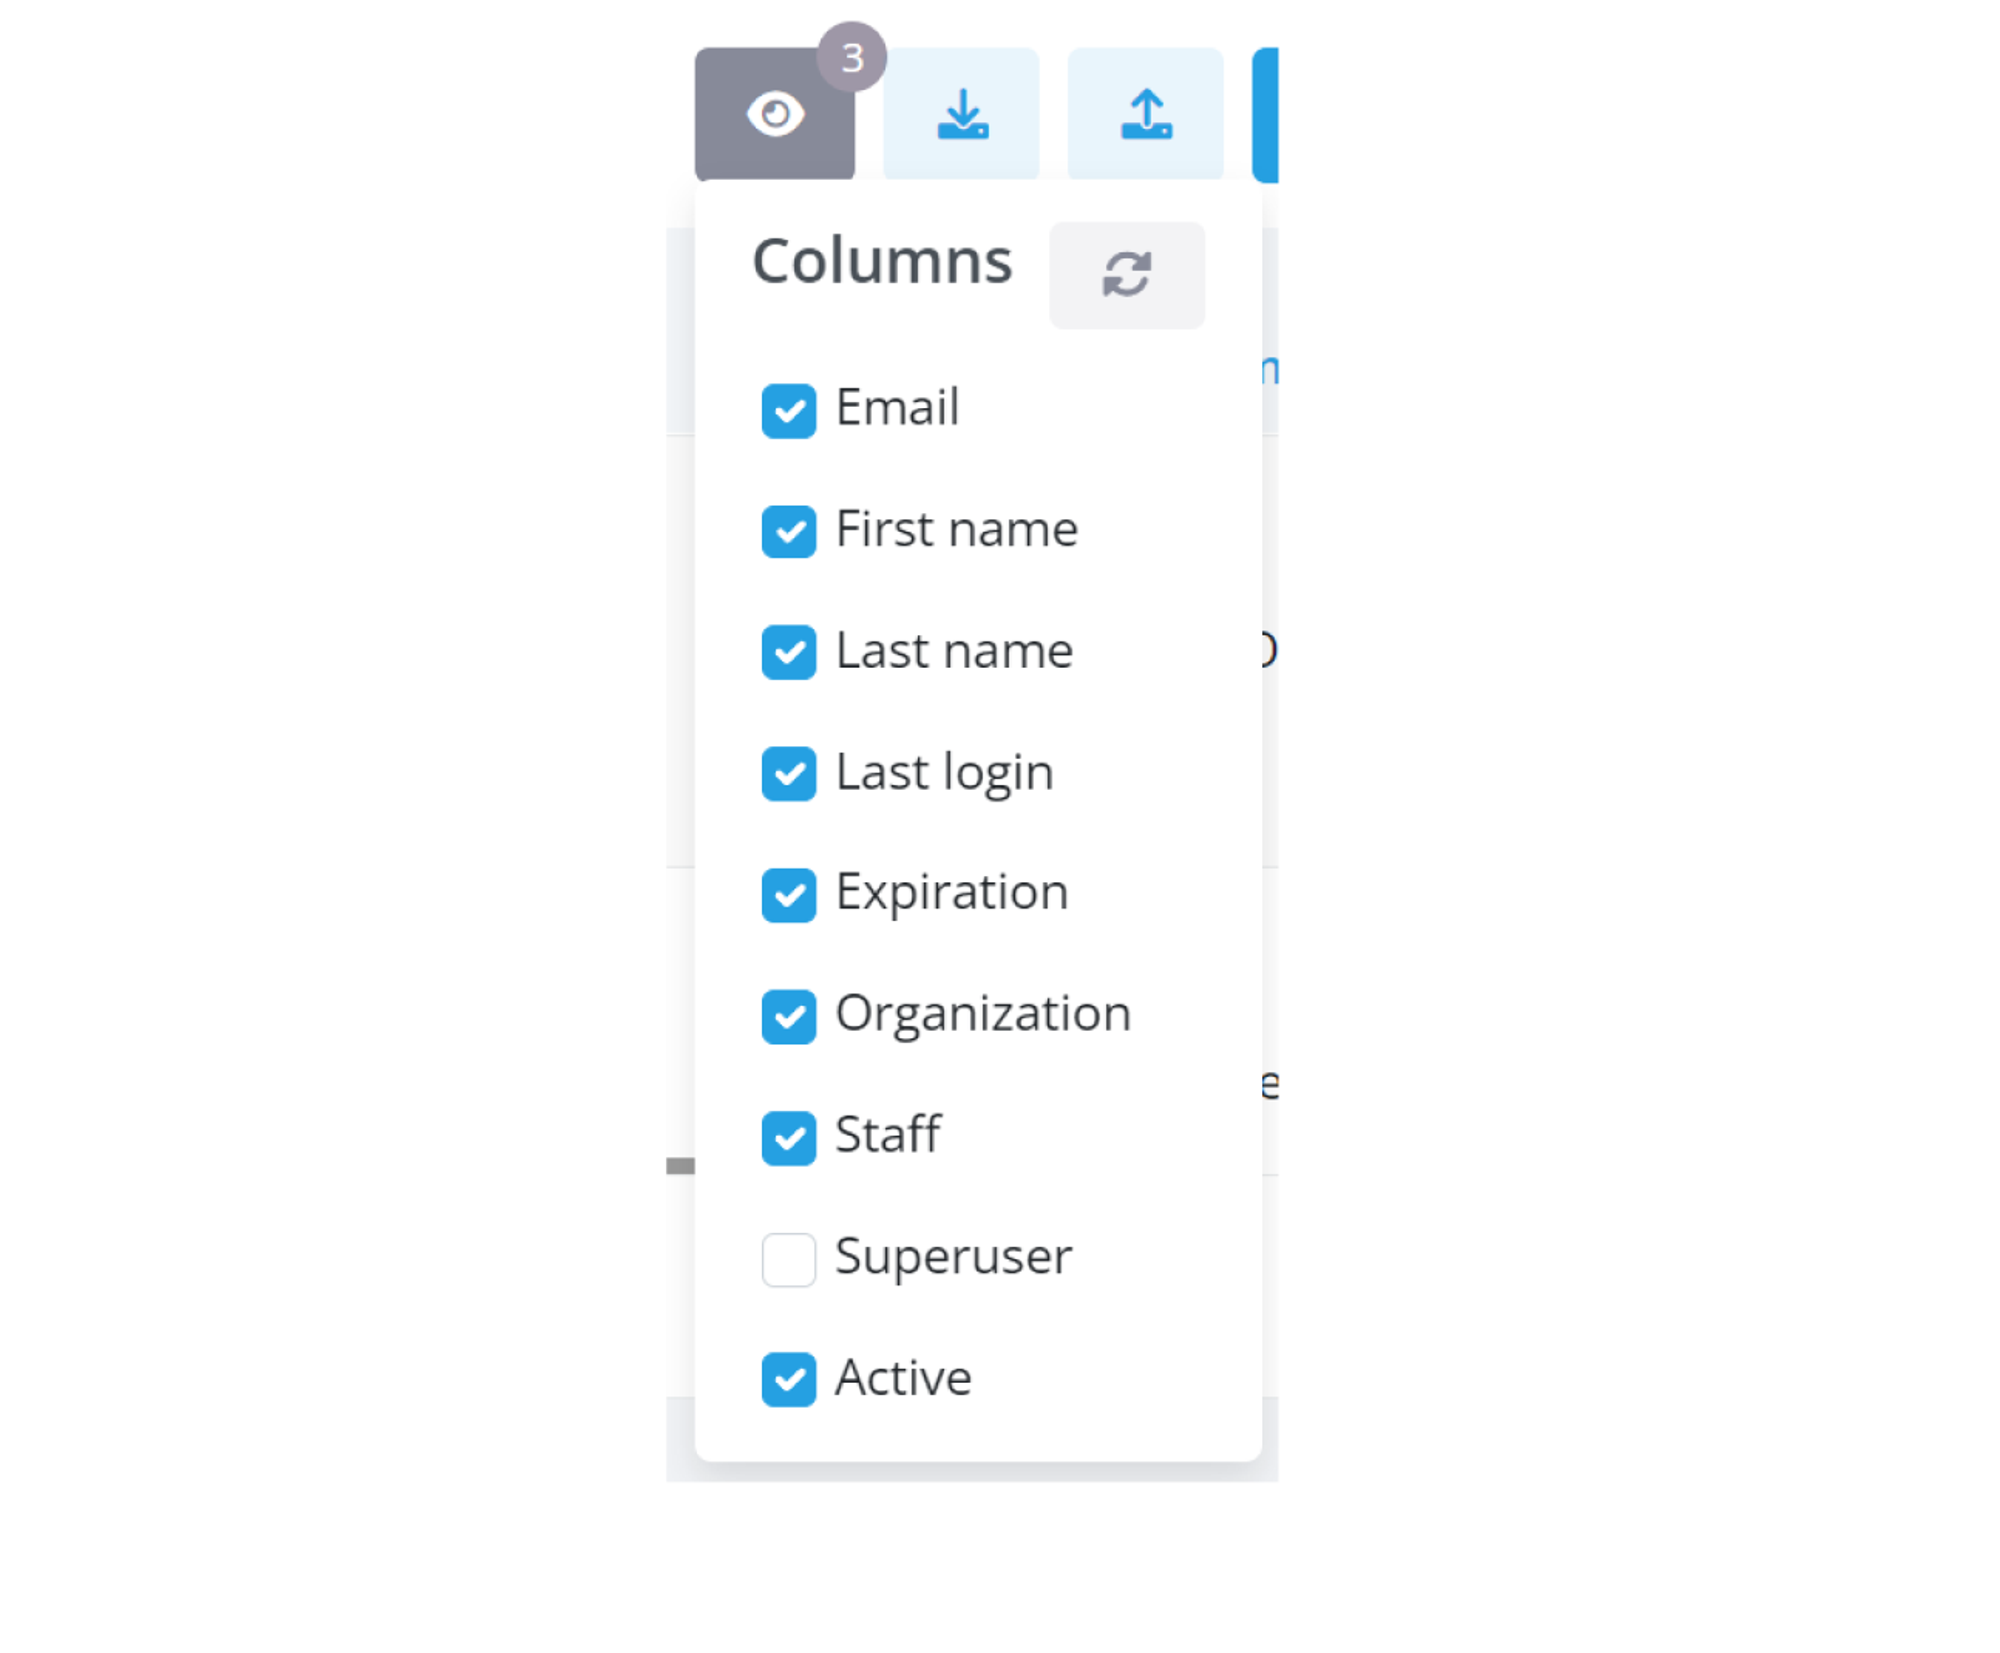
In the dropdown, you’ll find a list of column names, each with a corresponding checkbox. These checkboxes allow you to tailor your table view:
- To hide a column: Uncheck the box next to the column name, and watch it disappear from your table.
- To show a column: Check the box beside the column name you want to display, and it will reappear in the table.
Your adjustments are applied instantly, reshaping your table as per your choices.
Keeping Track with the Bubble Indicator
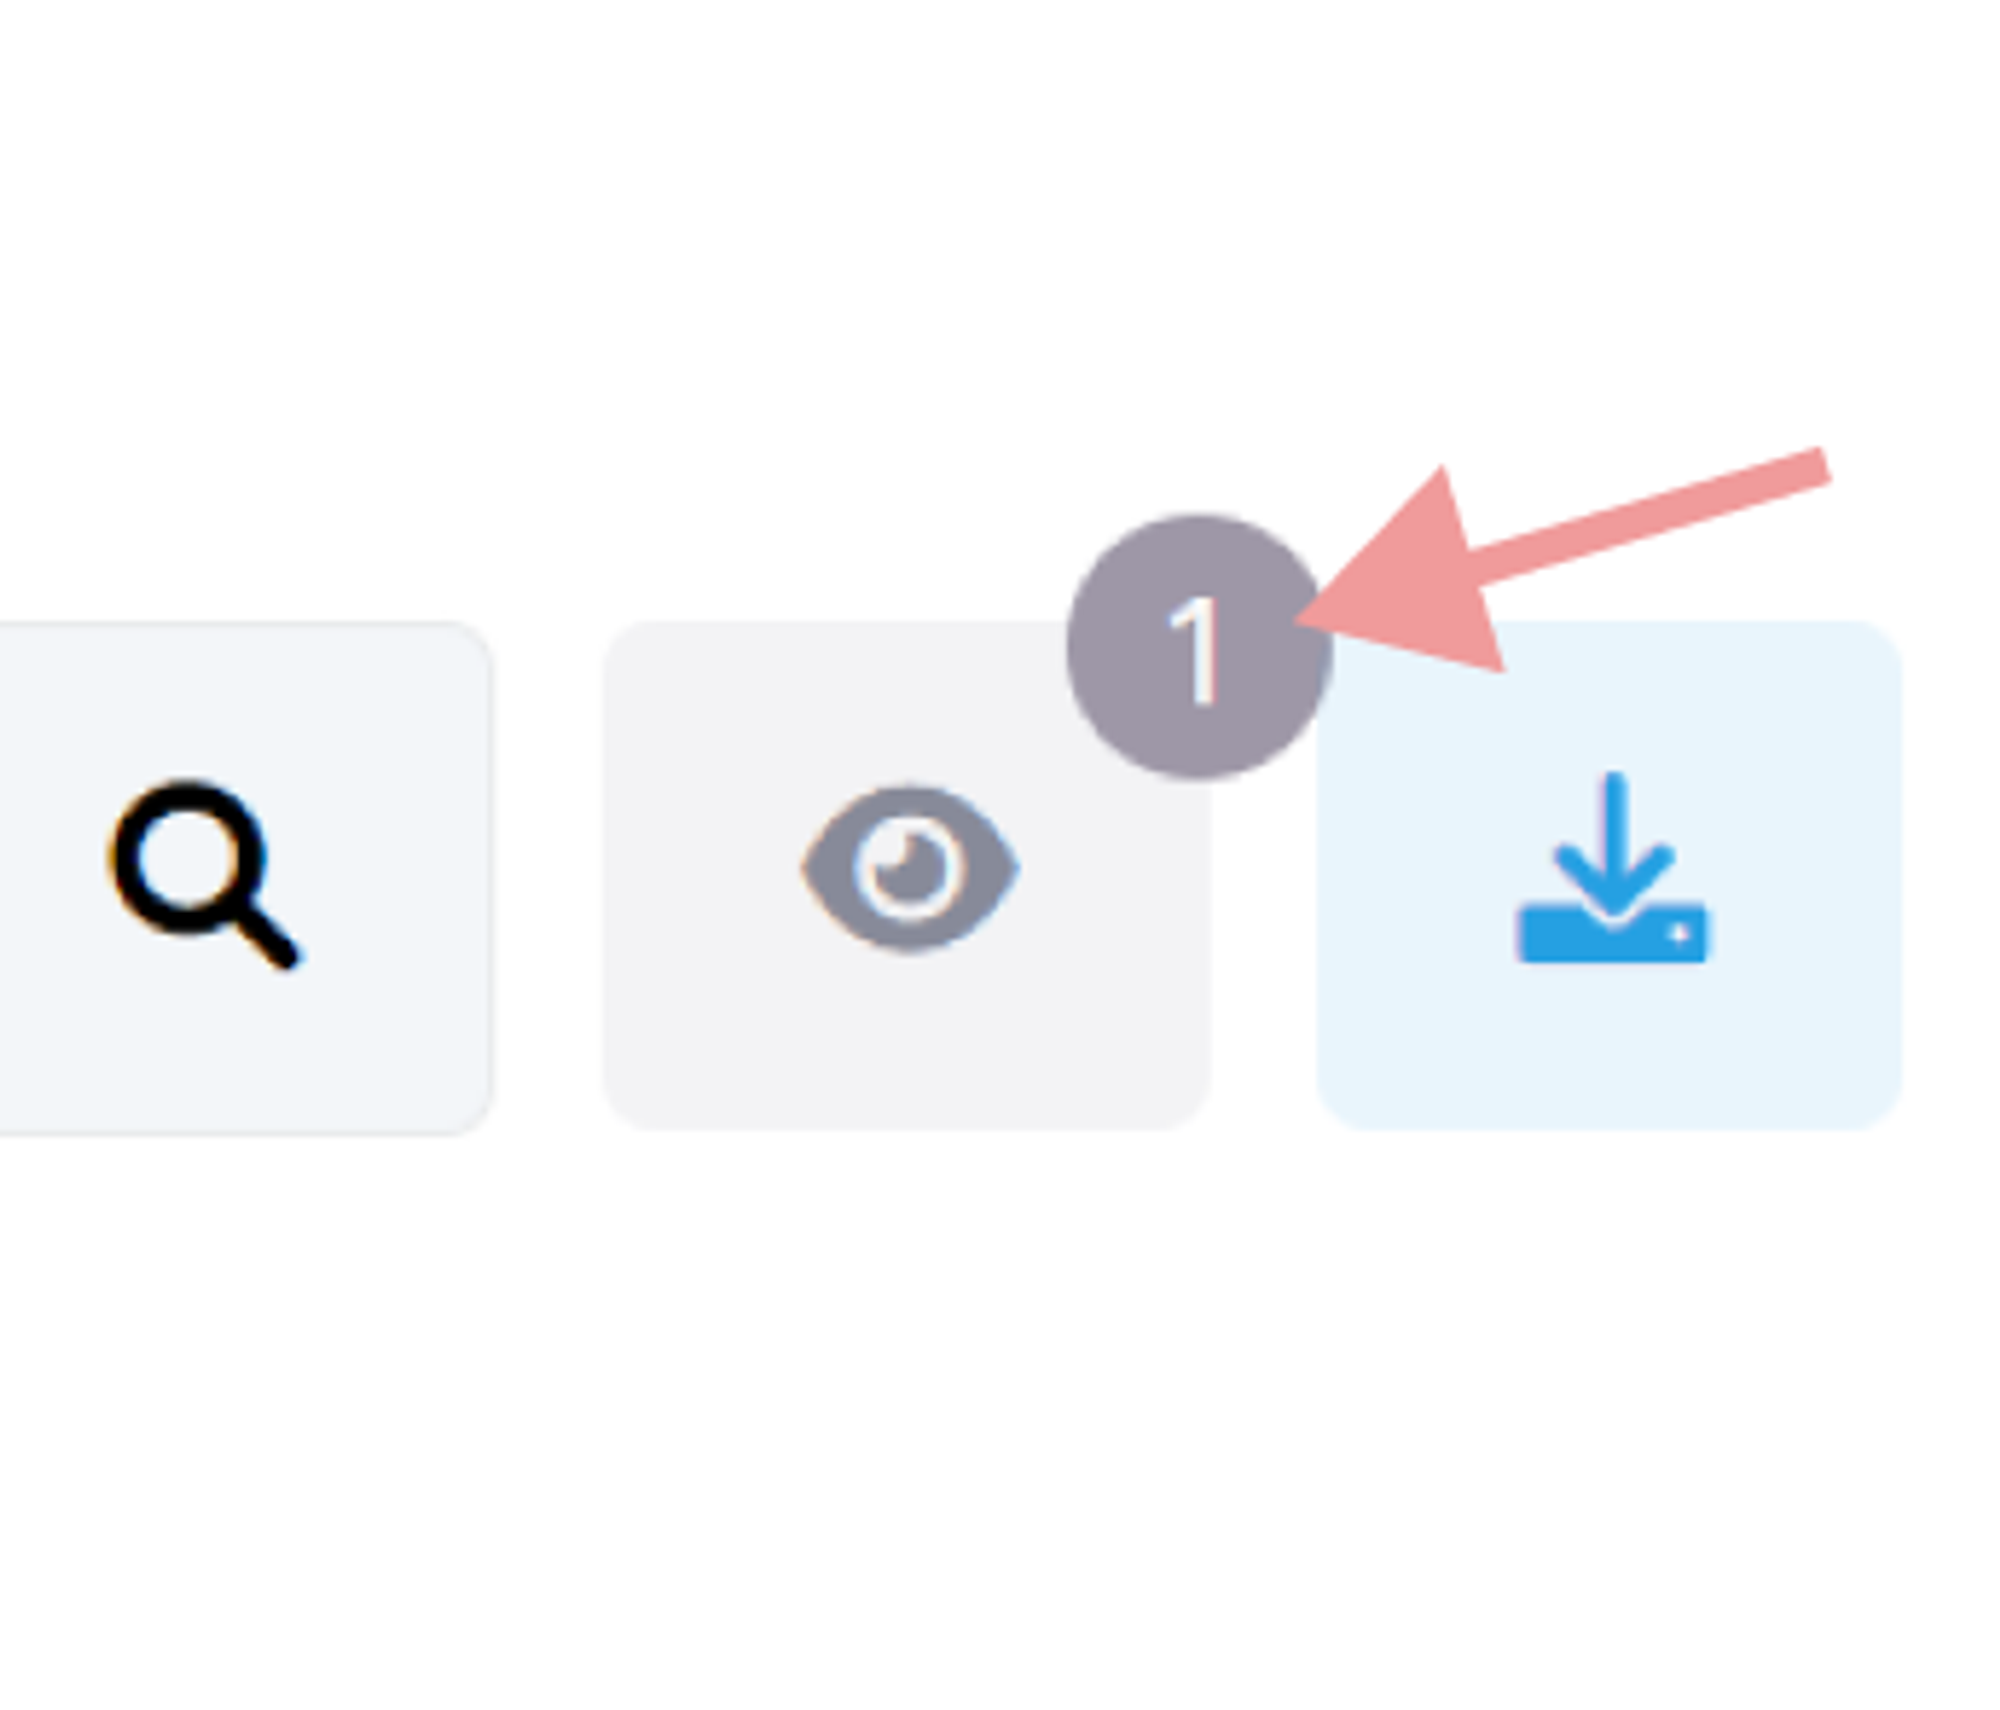
A small bubble indicator next to the visibility button helps you keep track of your customizations. It shows the number of columns you have chosen to hide, providing a quick reference at a glance.
Managing Data Effectively with Linked Filters
Understanding the Impact of Linked Filters
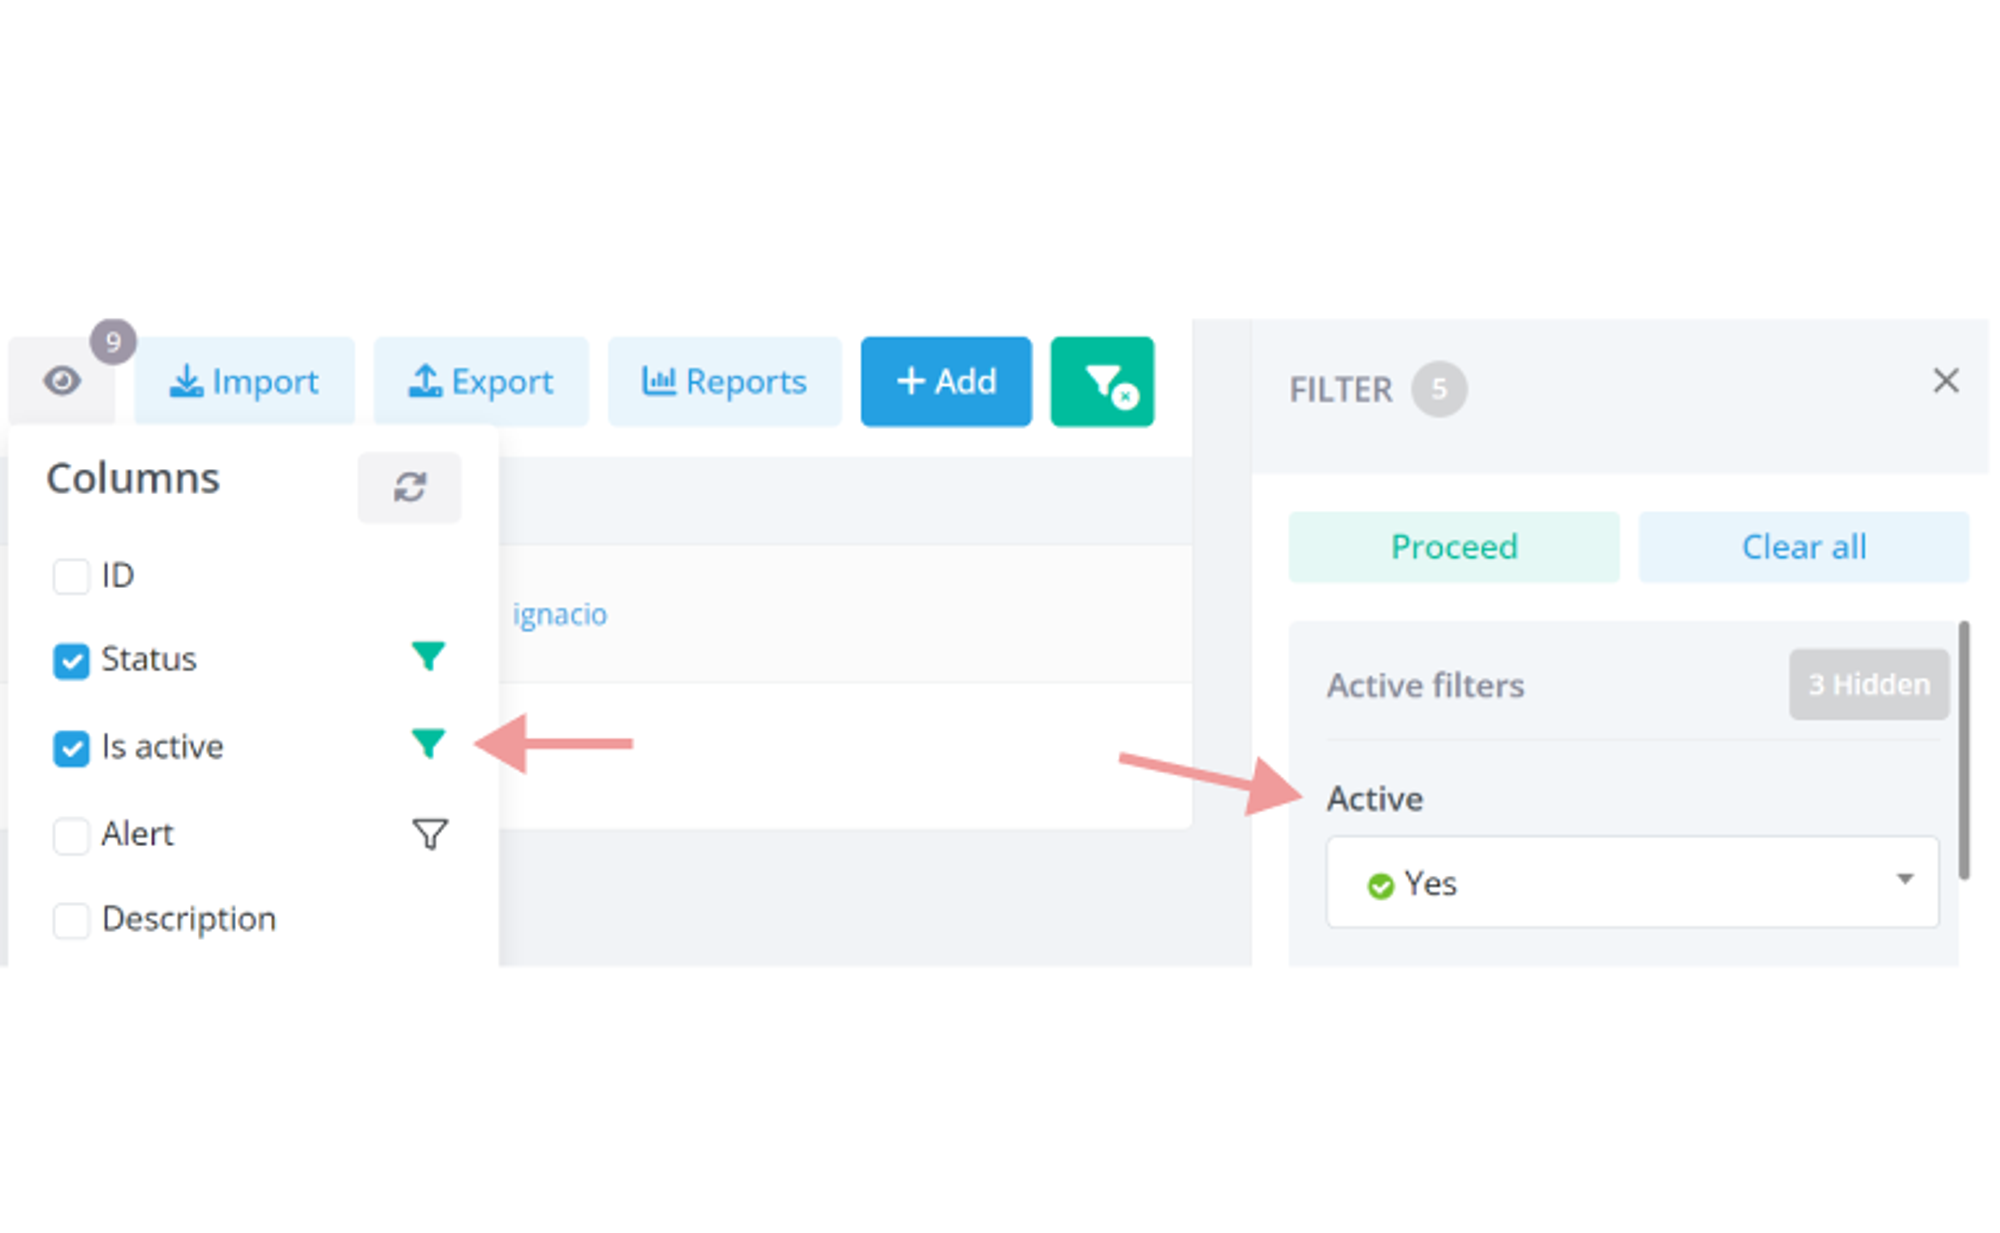
Some columns in your table are linked to specific filters. When you hide these columns, the corresponding filters are also hidden to maintain relevancy in your data view.
Spotting Active Linked Filters
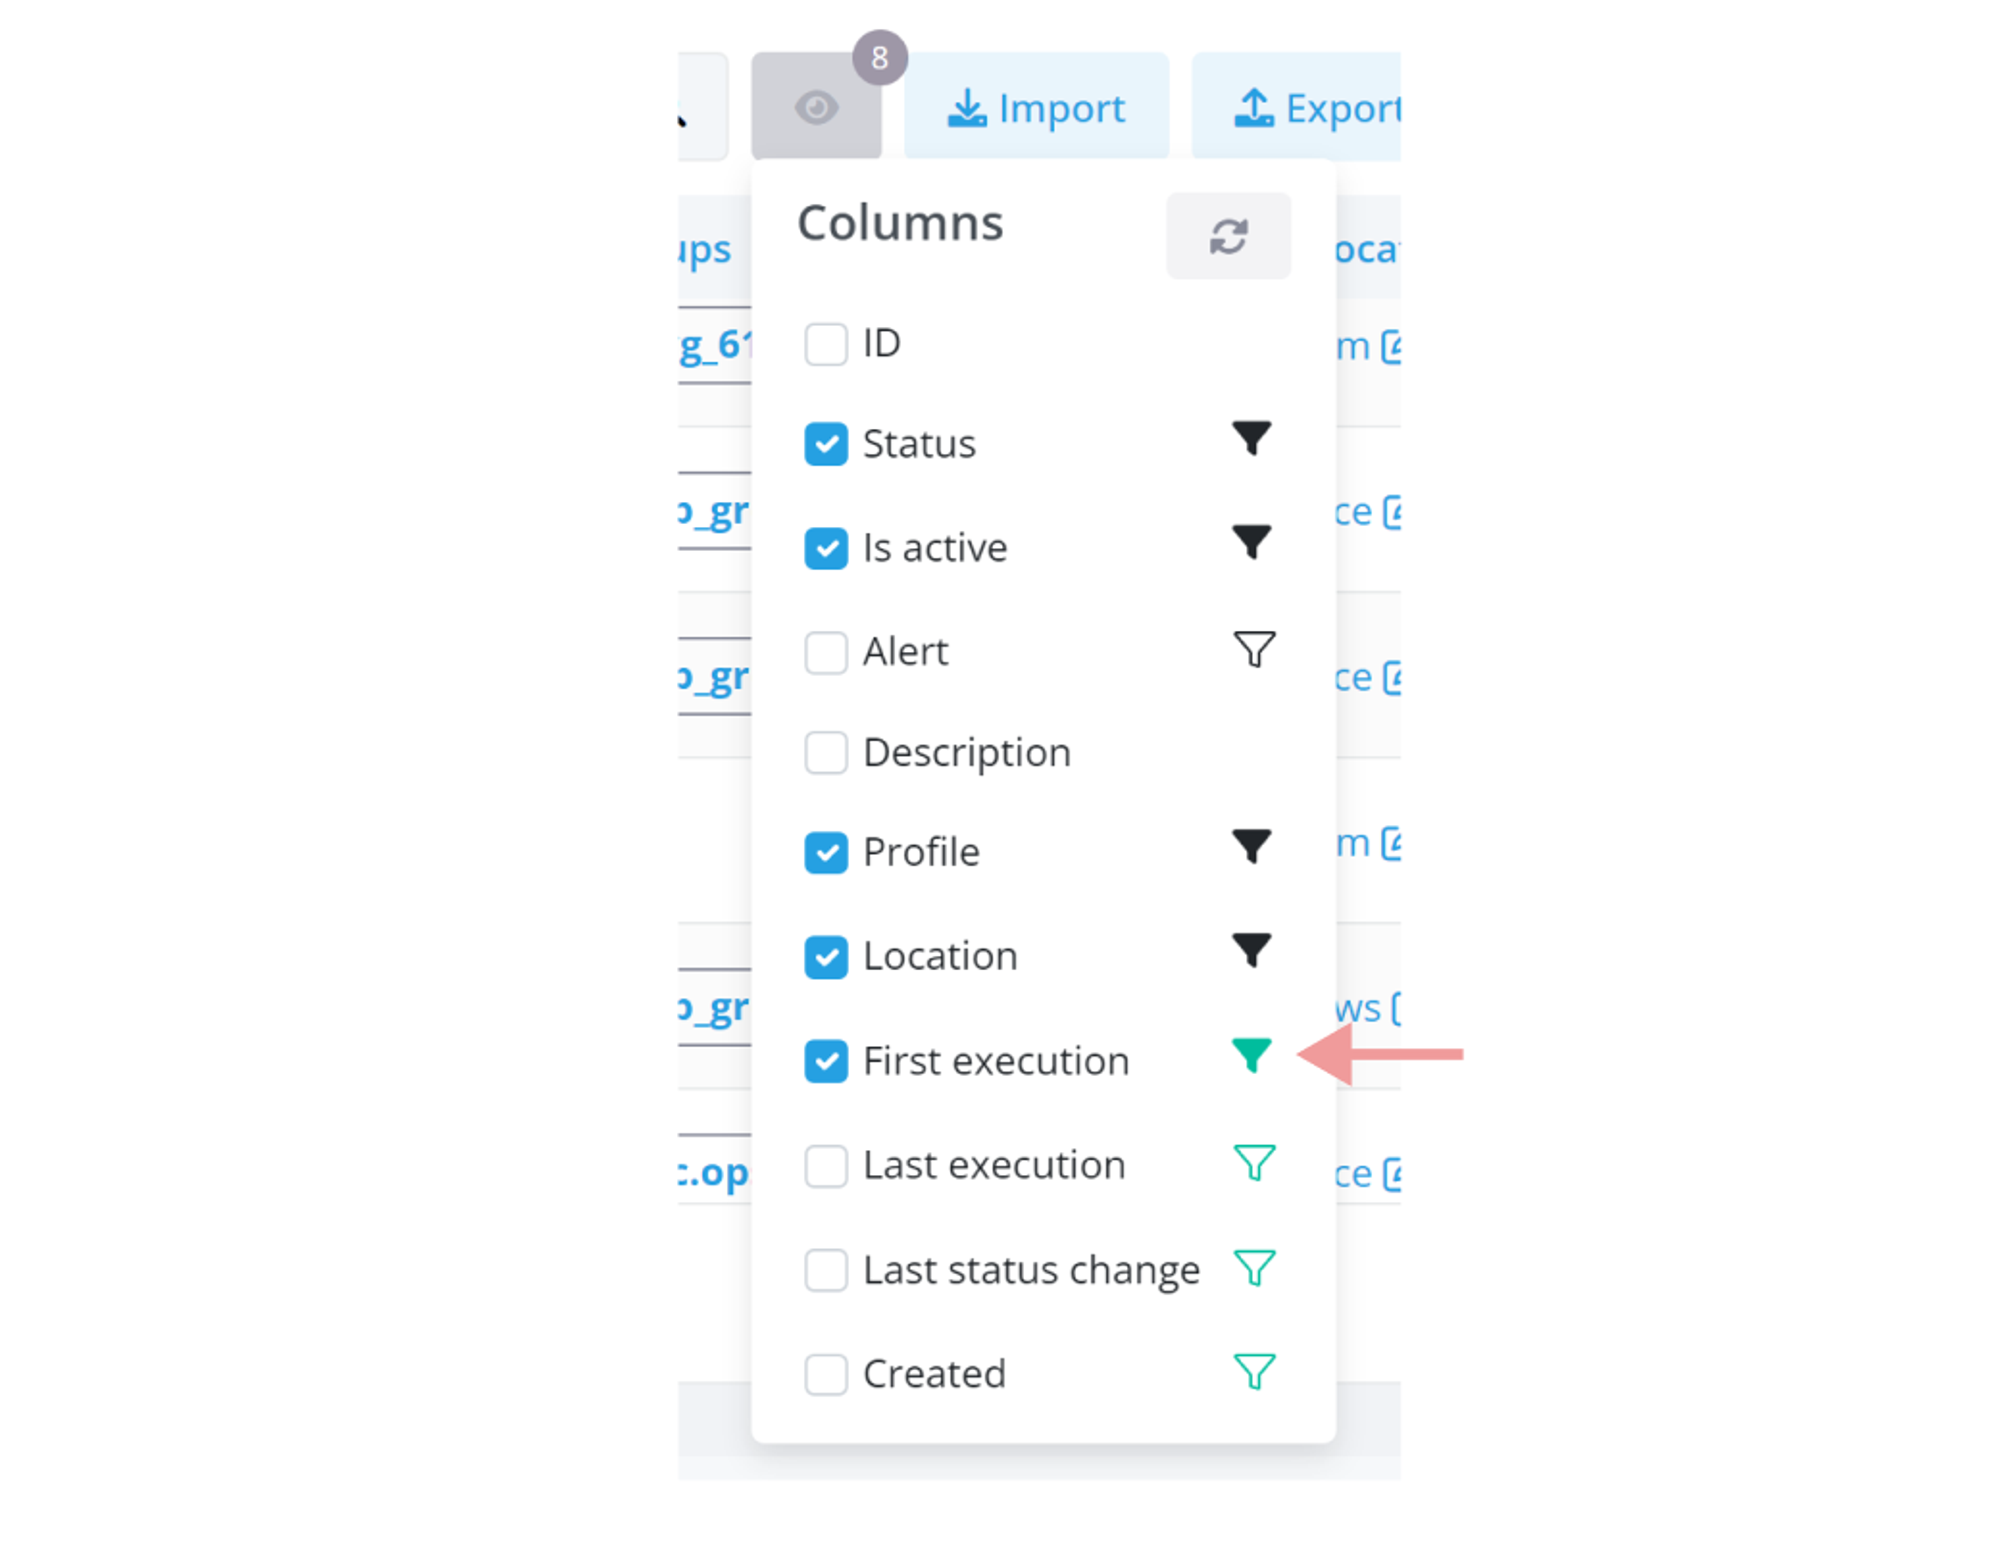
If you choose to hide a column linked to active filters, a special icon (often a filter icon) appears next to its name in the dropdown. This icon alerts you that hiding this column will also impact the active filters.
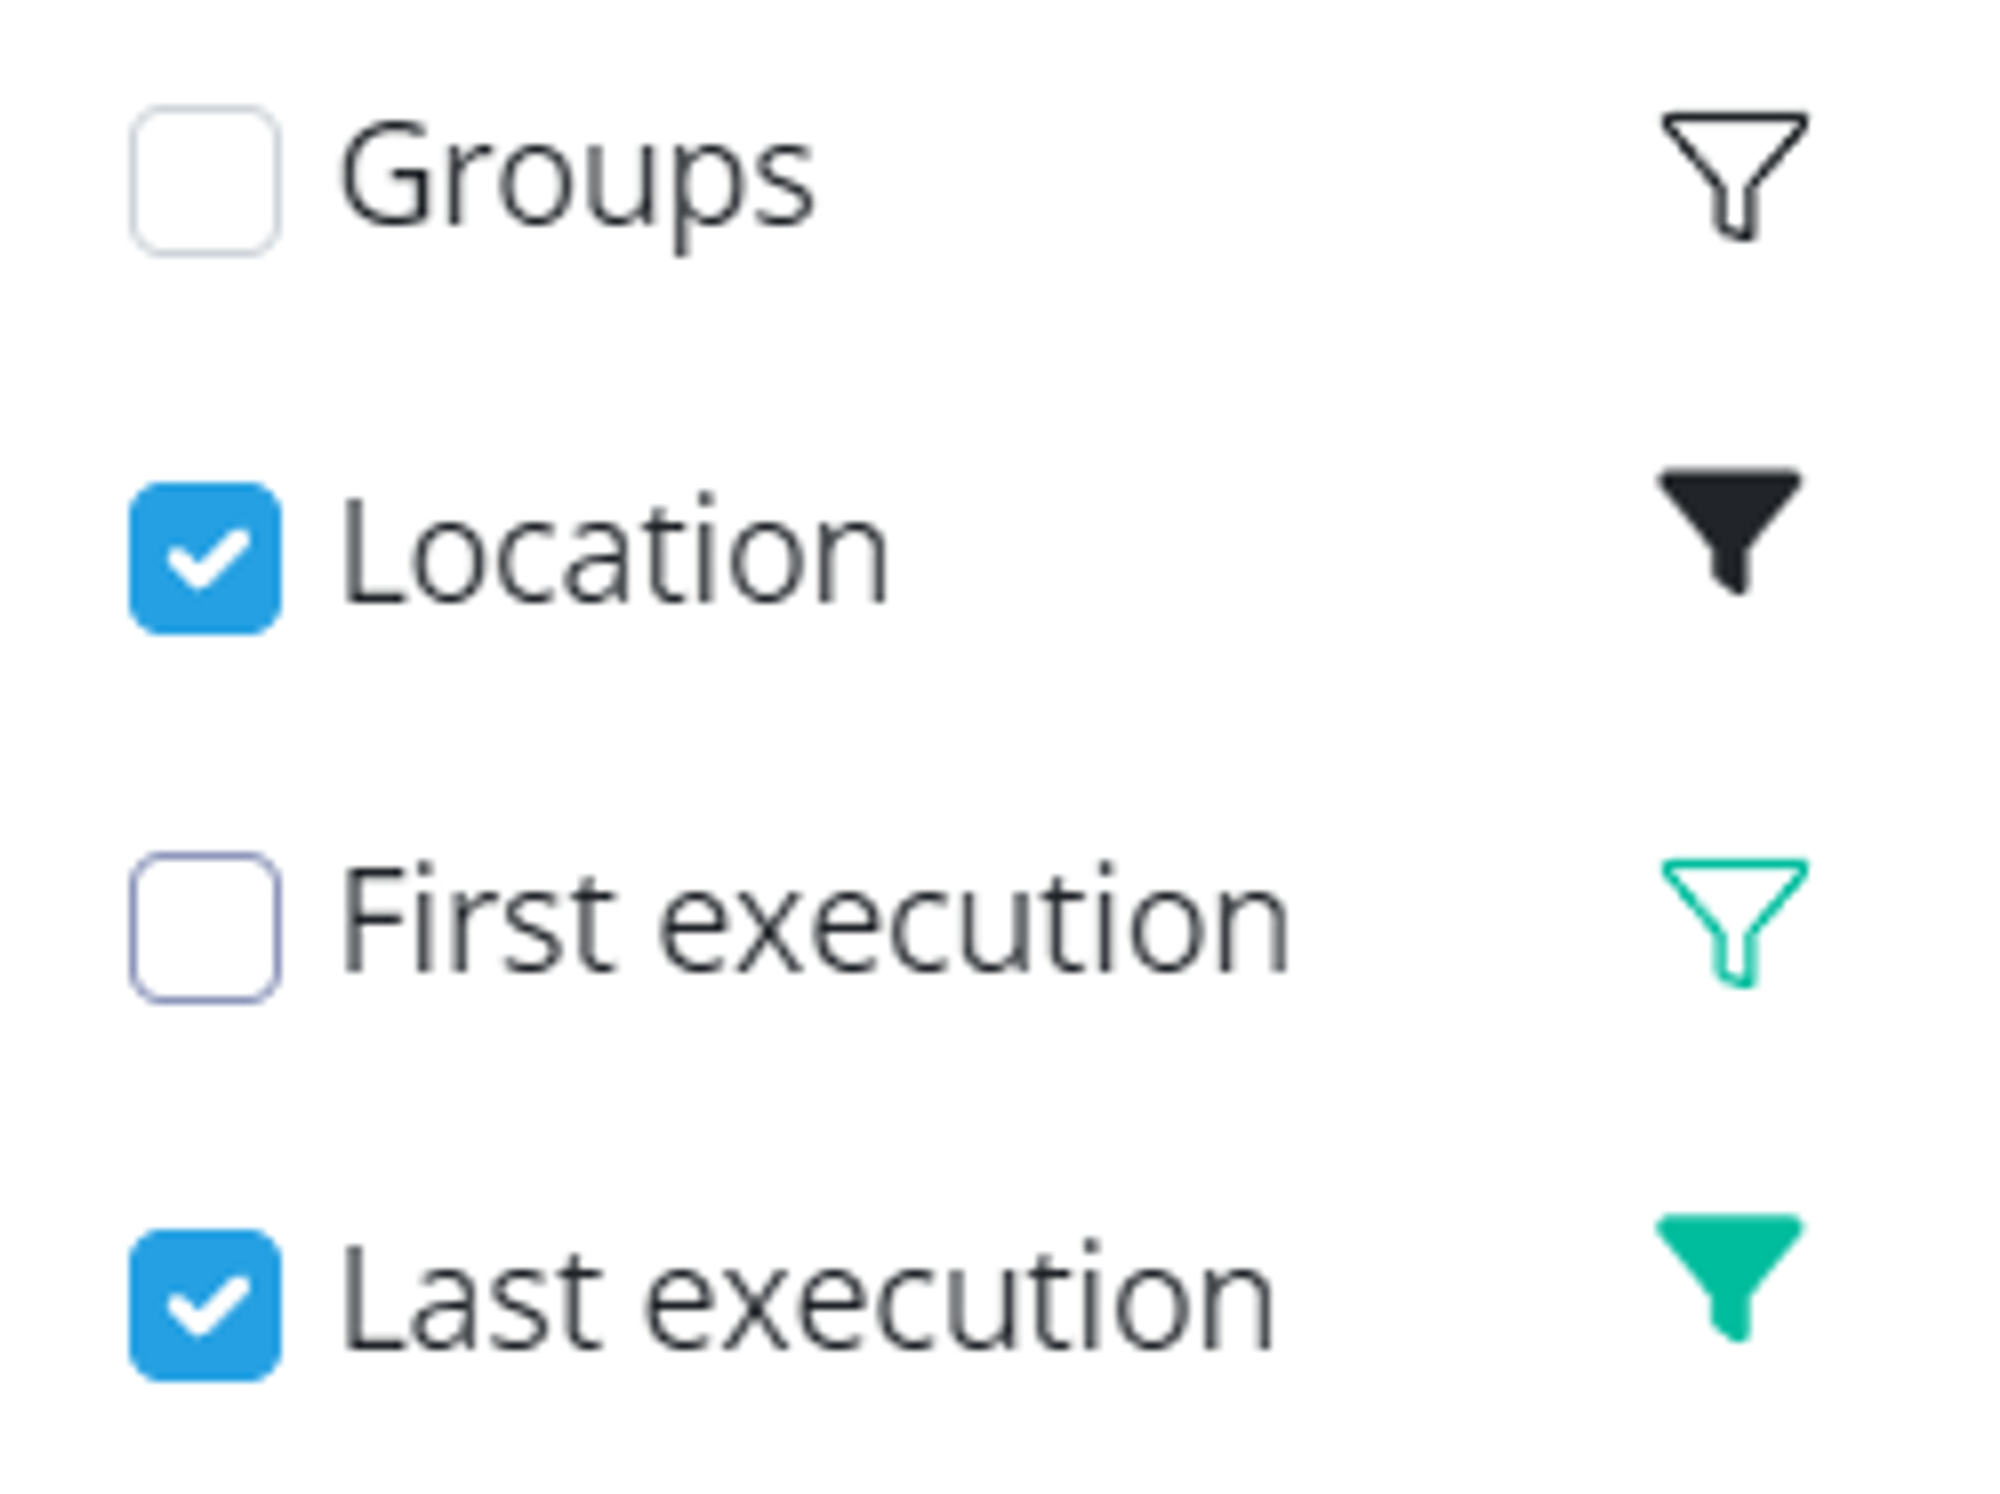
The solid icon denotes that the filter is currently displayed.
The empty icon signifies that the filter is concealed.
The green variations indicate that these filters, whether active or hidden, are currently affecting the data visible in your resulting table.
Your Preferences, Remembered
Your customized settings are saved in your browser, ensuring that you find the table just as you customized it during your last visit.
Resetting to the Default View
For returning to the standard table view, a 'Reset' button in the dropdown menu allows you to revert to the default column visibility settings.