# GATE Users Guide
Documentation for GATE Users Guide
# Overview
# What is GATE?
## Overview
GATE is a carrier-grade Access Control platform designed specifically for telecommunications service providers. It delivers enterprise-level authentication, authorization, and user management capabilities through an integrated suite of components.
The platform has been created to address key specifications and requirements from Telecom Service Providers in terms of features, scalability and flexibility, consequently, it allows Service Providers to implement carrier-grade services at scale.
## Core Components
### Authentication, Authorization & Accounting (AAA)
A fully functional AAA server providing comprehensive user authentication, access authorization, and transaction accounting services.
### Captive Portal
Complete captive portal solution for service providers implementing portal-based access control, featuring:
- **Ad-Server**: Configure and manage advertisement campaigns within the user journey through the captive portal login process
### User Database
Highly scalable user database system that seamlessly integrates with AAA functionality to store:
- User profiles and account information
- AAA transaction records and logs
### Analytics & Reporting
Comprehensive analytics platform delivering extensive reports and insights through:
- Intuitive graphical user interface (GUI)
- RESTful API for programmatic access
## Use Cases
The GATE platform addresses critical telecommunications requirements for features, scalability, and flexibility, enabling service providers to deploy carrier-grade services:
### Broadband Internet Access
- AAA services for BNG-based broadband access networks
- Captive portal integration when required
- Support for FTTH, DSL, and wireless technologies
### Public WiFi
- Captive portal and AAA services for large-scale public WiFi deployments
- Integration with WiFi controllers and/or WAG platforms
- Carrier WiFi-based architecture support
### Mobile Offload
- AAA services for mobile-to-WiFi offload scenarios
- Direct integration with Mobile Network Operator core systems
- HSS/SIM-based EAP-AKA authentication support
### Community WiFi
- Captive portal and AAA services for massive community WiFi networks
- Seamless WAG platform integration
## Deployment Options
GATE offers flexible deployment models to meet diverse infrastructure requirements:
- **Platform as a Service (PaaS)**: Cloud-hosted service model
- **On-Premises**: Self-hosted deployment option
## Industry Integration
GATE has been extensively tested and integrated with industry-leading solutions:
- BNG (Broadband Network Gateway) platforms
- WAG (Wireless Access Gateway) systems
- Carrier-grade WiFi solutions
## Further Reading
- [Architecture](https://docs.zequenze.com/books/gate/page/architecture)
- [Specifications](https://docs.zequenze.com/books/gate/page/specifications)
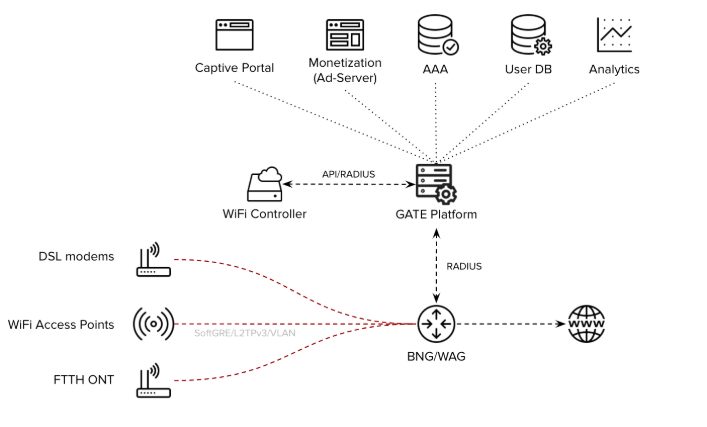
# Architecture
The GATE platform shares Zequenze's robust framework architecture, providing a scalable and reliable foundation for portal management and authentication services.
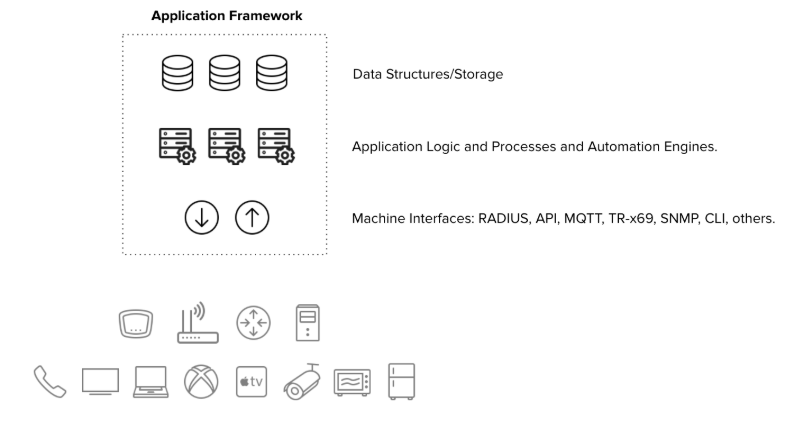
## Core Components
The GATE architecture consists of three primary layers:
### Machine Interfaces
- **RADIUS**: Remote Authentication Dial-In User Service protocol support
- **DIAMETER**: Next-generation AAA protocol implementation
- **Web Server**: HTTP/HTTPS interface for web-based interactions
### Application Layer
- **AAA Server**: Authentication, Authorization, and Accounting services
- **Captive Portal**: User authentication and access control interface
- **Ad Server**: Advertising content management and delivery
- Additional service applications
### Database Layer
- **User Records Database**: Storage for user accounts and profiles
- **Transaction Records Database**: Logging of authentication and access events
- **Metrics Database**: Performance and usage analytics storage
- Additional specialized databases for various operational data
## Architecture Diagram
## Scalability
Each architectural layer supports horizontal scaling to accommodate varying operational requirements and can be easily scaled depending on specific needs:
- **Traffic-based scaling**: Scale components based on network traffic volume
- **Activity-based scaling**: Adjust resources according to user activity levels
- **Size-based scaling**: Expand capacity based on database size and storage requirements
This flexible architecture ensures optimal performance across different deployment scenarios and growth patterns.
## Further Reading
- [Overview](https://docs.zequenze.com/books/gate/chapter/overview)
- [Specifications](https://docs.zequenze.com/books/gate/page/specifications)
# Specifications
## GATE Captive Portal
### Key Characteristics
**Carrier-Grade Platform**
- High-availability 1+1 architecture with carrier-grade scalability
- Seamless integration with WAG/BNG for large-scale architectures
**User Experience**
- Fully customizable end-user experience and customer journey
- Responsive design optimized for mobile, tablet, and desktop devices
- Integrated advertising server capabilities
### Access Control Features
**Authentication Methods**
The captive portal supports multiple authentication options through a customizable landing/splash window:
- **Credential-based login** — Username/password validation against Service Provider database
- **Email/Mobile verification** — Real-time validation with email or mobile number
- **Social network integration** — Login through social media platforms
- **Soft-token authentication** — Token-based access control
**Quality of Service (QoS) Profiling**
End-user QoS profiling with signaling to WiFi Controller or WAG/BNG systems:
- **Free access** — Time-limited with reduced speed/QoS parameters
- **Premium access** — Unlimited usage with higher speed/QoS allocation
- **Sponsored access** — Advertisement-supported connectivity
**Additional Capabilities**
- Payment gateway integration (Braintree and other providers)
- Self-managed and customizable HTML code for complete control over end-user experience
### Integrated Ad Server
**Campaign Management**
- Complete ad server functionality with banner, video, and campaign inventory management
- Advanced campaign programming and enforcement tools
**Targeting and Segmentation**
Rich segmentation capabilities based on login-generated metadata:
- Location, time, and date information
- Device specifications (type, brand, operating system)
- User demographics (gender, age, and other attributes)
**Reporting and Analytics**
Comprehensive and customizable reporting for advertising campaigns:
- Activity tracking per campaign, banner, and video content
- Detailed breakdowns by location, time, date, device specifications, and user demographics
### Reports and Analytics
**Data Visualization**
- Location and group-based reporting capabilities
- Interactive heatmaps for spatial analysis
- Historical data tracking for all captive portal and ad server metrics
**Data Export Options**
- One-click data export functionality
- Multiple formats: live reports, CSV files, API integration, and other standard formats
---
## GATE AAA Server
### Key Characteristics
**Enterprise-Grade Infrastructure**
- Carrier-grade platform with high-availability 1+1 architecture
- Horizontal scalability through cloud-based architecture
- Integration capabilities with WAG/BNG for large-scale deployments
**Protocol Compliance**
- Full RADIUS RFC compliance ensuring industry standard compatibility
- Flexible VSA (Vendor-Specific Attributes) integration
- Service Provider database integration via RADIUS/LDAP or API
### Database Integration
**Scalable Database Architecture**
- Database-driven configuration and subscriber record management
- Fully integrated database solution with optional external database support
- Multiple user provisioning methods: GUI interface, bulk provisioning, or external API
### Advanced AAA Features
**Proxy Capabilities**
- Comprehensive proxy AAA support
- RADSec support (RFC 6614) enabling direct peering with third-party AAA systems
**Configuration Management**
Easy and flexible configuration through graphical user interface:
- Scriptable Option 82 support
- Extensive manipulation capabilities for any RADIUS/VSA attributes
### Reports and Analytics
**Comprehensive Reporting**
- Location and group-based analytical reports
- Interactive heatmaps for network usage visualization
- Historical data retention and analysis for all AAA metrics
**Export Capabilities**
- One-click data export functionality
- Multiple output formats: live reports, CSV files, API integration, and additional standard formats
---
## Further Reading
- [Overview](https://docs.zequenze.com/books/gate/chapter/overview)
- [Architecture](https://docs.zequenze.com/books/gate/page/architecture)
# User Groups & Permissions Guide
## Overview
GATE implements a **role-based access control (RBAC)** model that ensures secure and organized user management. Permissions are never assigned directly to individual users. Instead, users inherit their permissions from one or more **groups**, allowing you to tailor user experiences while maintaining platform security.
Every group provides access to a specific **functional area** (such as AAA, payments, or advertising) at a defined **privilege level** (full admin, read-only admin, or reports-only). You can assign multiple groups to a single user to grant cross-functional responsibilities.
```mermaid
flowchart LR
U[User] -->|member of| G1[Group A e.g. AAA admins]
U -->|member of| G2[Group B e.g. Payment reports]
G1 -->|grants| P1[Permissions on AAA]
G2 -->|grants| P2[Permissions on Payment reports]
P1 --> UI[GATE admin UI]
P2 --> UI
```
> ✅ **Key Concept:** Groups are additive. A user belonging to multiple groups receives the **union** of all their permissions. This allows you to compose roles rather than creating new groups for every possible combination.
## Permission Levels
Most functional areas provide three standard permission levels. Always select the lowest level that enables users to complete their tasks effectively — this follows the **principle of least privilege**.
### Standard Permission Levels
| Level | Indicator | Access Granted | Typical Use Cases |
|-------|-----------|----------------|-------------------|
| **Admin** | 🟢 | Full CRUD operations (create, view, update, delete) on area resources | Day-to-day feature configuration and management |
| **Read-only Admin** | 🟡 | Browse all objects in the area without modification or deletion capabilities | Auditors, trainees, support staff conducting investigations |
| **Reports** | 🔵 | Access to dashboards, charts, and transaction listings without configuration access | Business analysts, finance teams, marketing personnel |
### Special Cross-Cutting Roles
Beyond the standard levels, GATE includes two important cross-cutting roles:
| Role | Indicator | Access Granted |
|------|-----------|----------------|
| **End User** | ⚫ | Personal profile access, password changes, and preference settings (non-administrative) |
| **Expert Mode** | 🟣 | Unlocks hidden "Expert Mode" toggle revealing advanced menus and **destructive operations** (bulk deletes, internal settings) |
> ⚠️ **Expert Mode Warning:** Only grant Expert Mode access to senior operators who understand the consequences of destructive operations.
## Functional Areas
GATE organizes functionality into distinct areas, each with its own group hierarchy using the three standard permission levels where applicable.
| Area | Scope |
|------|-------|
| 🌐 **Global Administration** | Cross-cutting operations, organization-wide configuration, and platform health monitoring |
| 🛡 **AAA** | Authentication, Authorization, and Accounting — profiles, realms, clients, home servers, session logs |
| 📇 **Account** | Tenant/account configuration including plans, services, lists, parameters, and site settings |
| 📣 **Advertisement** | Campaign management, banner configuration, segmentation rules, and advertising transaction logs |
| 📝 **API Logs** | Platform API request history inspection for debugging and auditing purposes |
| 📱 **Devices & Applications** | Mobile/desktop app registrations, device metadata, connection logs, and app subscriptions |
| 📡 **Hotspot Monitoring** | Real-time access point health monitoring including reachability, uptime, coverage, and availability reports |
| 💳 **Payments** | Payment plan management, gateway configuration, transaction processing, and refund handling |
| 👥 **Users** | End-user account management, social login configuration, and user-level activity logs |
| 📊 **Reports & Dashboards** | Cross-area analytics, KPI tracking, and exportable report generation |
| 🔎 **SONDA / User Experience** | Real-world user experience monitoring including latency, throughput, and client-side reachability measurements |
## Group Catalog
The following tables detail every built-in group shipped with GATE, organized by functional area. Group names are stable identifiers that you can search for in the group administration interface.
### Global Administration
| Group | Level | Description |
|-------|-------|-------------|
| `GATE admins` | 🟢 Admin | Comprehensive platform administration access for day-to-day operations across most areas |
| `GATE read-only admins` | 🟡 Read-only | Platform-wide browsing access without modification capabilities |
| `GATE reports` | 🔵 Reports | Access to dashboards, KPIs, and transaction listings across the platform |
> 💡 **Usage Recommendation:** These general-purpose roles serve as excellent starting points for most operators. Combine them with area-specific groups when users require deeper access to particular modules.
### AAA (Authentication, Authorization, Accounting)
| Group | Level | Description |
|-------|-------|-------------|
| `GATE AAA admins` | 🟢 Admin | Complete AAA administration including profiles, realms, clients, home servers, and accounting |
| `GATE AAA admins w/o Portals` | 🟢 Admin | Full AAA administration **excluding** captive portal builder access |
| `GATE AAA admins w/o Portals RO` | 🟡 Read-only | Read-only AAA administration without captive portal builder access |
| `GATE AAA read-only admins` | 🟡 Read-only | Read-only access to the complete AAA functional area |
| `GATE AAA reports` | 🔵 Reports | AAA accounting reports, session analytics, and traffic dashboard access |
| `GATE AAA user admins` | 🟢 Admin | Specialized role for managing AAA **end-users only** (profiles, attributes, credentials) without infrastructure access |
> 🎯 **Selection Guidelines:**
> - Use `AAA admins` for complete AAA stack ownership
> - Use `AAA admins w/o Portals` when captive portal design is managed separately
> - Use `AAA user admins` for support desk personnel who only reset credentials or adjust user attributes
> - Use `AAA reports` for analytics roles that must not access configuration
### Account Management
| Group | Level | Description |
|-------|-------|-------------|
| `GATE account admins` | 🟢 Admin | Complete account administration including plans, services, lists, parameters, and site settings |
| `GATE account read-only admins` | 🟡 Read-only | Read-only account administration access for audit and review purposes |
> 🎯 **Selection Guidelines:** `account admins` represents the closest equivalent to a tenant "owner" role — grant sparingly. `account read-only admins` is ideal for auditors and onboarding verification.
### Advertisement Management
| Group | Level | Description |
|-------|-------|-------------|
| `GATE advertisement admins` | 🟢 Admin | Complete advertisement administration including campaigns, banners, and segmentation rules |
| `GATE advertisement read-only admins` | 🟡 Read-only | Read-only advertisement administration for audit purposes |
| `GATE advertisement reports` | 🔵 Reports | Advertisement reporting and transaction access including impressions, clicks, and conversions |
> 💡 **Team Separation:** Assign `advertisement admins` to marketing teams, `advertisement reports` to analytics teams, and `advertisement read-only admins` to finance auditors.
### API Logs
| Group | Level | Description |
|-------|-------|-------------|
| `GATE API Logs read-only` | 🟡 Read-only | API request log browser access for debugging and auditing |
> 💡 **Usage Recommendation:** Ideal for integration teams and third-party partners who need API call troubleshooting capabilities without broader platform access.
### Devices & Applications
| Group | Level | Description |
|-------|-------|-------------|
| `GATE device admins` | 🟢 Admin | Device and application administration including registrations, subscriptions, and configuration |
> 💡 **Usage Recommendation:** Designed for mobile/desktop application operations teams responsible for registered device lifecycle management.
### Hotspot Monitoring
| Group | Level | Description |
|-------|-------|-------------|
| `GATE hotspots monitoring` | 🟢 Admin | Hotspot monitoring administration including monitoring profiles, thresholds, and alert configuration |
| `GATE hotspots monitoring read-only` | 🟡 Read-only | Read-only access to hotspot monitoring dashboards and availability reports |
> 💡 **Usage Recommendation:** Essential for network operations center (NOC) teams monitoring access point health and coverage.
### Payment Management
| Group | Level | Description |
|-------|-------|-------------|
| `GATE payment admins` | 🟢 Admin | Complete payments and plans administration including pricing, gateways, and plan lifecycle |
| `GATE payment read-only admins` | 🟡 Read-only | Read-only payment area access for audit and compliance |
| `GATE payment reports` | 🔵 Reports | Payment reporting and transaction access including revenue dashboards and reconciliation exports |
> 🎯 **Selection Guidelines:** Finance teams typically need `payment reports` for reconciliation **plus** `payment read-only admins` for transaction investigation. Reserve `payment admins` for billing operations personnel only.
### User Management
| Group | Level | Description |
|-------|-------|-------------|
| `GATE users admins` | 🟢 Admin | User account and user log administration |
| `GATE users RO` | 🟡 Read-only | Read-only access to user lists and user activity logs |
| `Users` | ⚫ End user | Standard end-user role providing profile access and password change capabilities |
| `Users: Expert mode` | 🟣 Expert | Enables **Expert Mode** toggle in admin UI, unlocking advanced menus and destructive operations |
> ⚠️ **Expert Mode Security Notice:** Expert Mode reveals advanced and destructive operation menus (bulk accounting record deletion, low-level configuration, internal tooling). Grant `Users: Expert mode` exclusively to trained senior operators who understand operational consequences.
### Reports & Dashboards
| Group | Level | Description |
|-------|-------|-------------|
| `Report admins` | 🟢 Admin | Report and dashboard administration including creation, editing, and sharing of custom reports |
> 💡 **Usage Recommendation:** Designed for business intelligence teams responsible for building and maintaining organizational dashboards.
### SONDA / User Experience
| Group | Level | Description |
|-------|-------|-------------|
| `SONDA admins` | 🟢 Admin | SONDA probing and user experience measurement system administration |
| `SONDA reports` | 🔵 Reports | SONDA reporting and transaction access including latency, throughput, and reachability metrics |
> 💡 **Usage Recommendation:** Essential for quality-of-experience (QoE) teams monitoring real user service perception.
## Access Matrix
This visual summary shows available group combinations for each functional area and permission level. Empty cells indicate no pre-built group exists for that combination — use the closest available level or combine multiple groups.
| Area | 🟢 Admin | 🟡 Read-only | 🔵 Reports | Notes |
|------|:----------:|:------------:|:----------:|-------|
| **Global** | `GATE admins` | `GATE read-only admins` | `GATE reports` | Starting point for most operators |
| **AAA** | `GATE AAA admins` | `GATE AAA read-only admins` | `GATE AAA reports` | `w/o Portals` variants available |
| **AAA (user-level)** | `GATE AAA user admins` | — | — | Support/helpdesk focused |
| **Account** | `GATE account admins` | `GATE account read-only admins` | — | Tenant configuration |
| **Advertisement** | `GATE advertisement admins` | `GATE advertisement read-only admins` | `GATE advertisement reports` | Complete coverage |
| **API logs** | — | `GATE API Logs read-only` | — | Integration/debug role |
| **Devices & apps** | `GATE device admins` | — | — | Limited coverage |
| **Hotspot monitoring** | `GATE hotspots monitoring` | `GATE hotspots monitoring read-only` | — | NOC teams |
| **Payments** | `GATE payment admins` | `GATE payment read-only admins` | `GATE payment reports` | Complete coverage |
| **Users** | `GATE users admins` | `GATE users RO` | — | See also `Users` and `Users: Expert mode` |
| **Reports & dashboards** | `Report admins` | — | — | BI team role |
| **SONDA / UX** | `SONDA admins` | — | `SONDA reports` | QoE role |
## Common User Profiles
These ready-to-apply group combinations cover most real-world operational requirements.
### 🧑💼 Platform Operator (Day-to-Day Admin)
**Group Assignment:**
- `GATE admins`
- `GATE AAA admins`
- `GATE account admins`
- `GATE device admins`
**Role Description:** Handles platform configuration, service onboarding, and operational issue resolution across all areas. Expert Mode is **not** included by default.
### 🛠 Helpdesk / Tier-1 Support
**Group Assignment:**
- `GATE read-only admins`
- `GATE AAA user admins`
- `GATE users RO`
- `GATE API Logs read-only`
**Role Description:** Platform browsing, user credential resets, and API log inspection without configuration modification or data deletion capabilities.
### 📊 Business Analyst / BI
**Group Assignment:**
- `GATE reports`
- `GATE AAA reports`
- `GATE advertisement reports`
- `GATE payment reports`
- `SONDA reports`
- `Report admins` *(optional, for dashboard creation)*
**Role Description:** Dashboard-focused access without configuration capabilities, eliminating accidental change risks.
### 💰 Finance / Billing
**Group Assignment:**
- `GATE payment read-only admins`
- `GATE payment reports`
- `GATE read-only admins` *(optional, for context)*
**Role Description:** Transaction reconciliation and payment configuration auditing without modification capabilities.
### 📣 Marketing Operator
**Group Assignment:**
- `GATE advertisement admins`
- `GATE advertisement reports`
**Role Description:** Campaign creation and measurement with isolated functional scope.
### 🌐 Network Operations (NOC)
**Group Assignment:**
- `GATE hotspots monitoring`
- `GATE AAA reports`
- `SONDA reports`
**Role Description:** Real-time access point health monitoring with session analytics and user experience correlation capabilities.
### 🎛 Senior Operator (with Destructive Tooling)
**Group Assignment:**
- `GATE admins`
- `GATE AAA admins`
- `Users: Expert mode`
**Role Description:** Standard operator capabilities enhanced with Expert Mode access. Reserve for trusted operators exclusively.
### 👤 End User (Self-Service)
**Group Assignment:**
- `Users`
**Role Description:** Personal profile and password management without administrative area access.
## Best Practices
### 🛡 Principle of Least Privilege
Always assign the **minimum permission level** required for job function completion. Prefer `read-only admins` over `admins` for investigation or audit roles. Choose `reports` over `read-only admins` when users only need dashboard access.
### 🔀 Compose Rather Than Customize
Resist creating specialized groups for individual users. Combining two or three built-in groups typically addresses requirements while maintaining audit simplicity.
### 🧪 Test in Staging Environment
Before production deployment, apply new user profiles (group combinations) to test users in non-production environments. Verify exact menu, button, and action visibility before real user rollout.
### 📆 Periodic Review Schedule
Implement quarterly group membership reviews. Revoke `admins` and Expert Mode capabilities from users who no longer require them. Former employee accounts with lingering admin access represent the most common security incident cause.
### 🚨 Separation of Duties
When possible, distribute **configuration** and **audit** responsibilities among different personnel:
- Payment configuration (`payment admins`) and payment auditing (`payment read-only admins` + `payment reports`) should involve different individuals
- Campaign creation (`advertisement admins`) and advertising budget approval (via `payment reports`) should involve different individuals
### 🔒 Expert Mode Access Control
Treat `Users: Expert mode` as break-glass permission due to irreversible operation access:
- Grant exclusively to named senior operators
- Document justification for each recipient
- Implement quarterly Expert Mode group membership reviews
- Remove temporary Expert Mode access immediately upon task completion
## Frequently Asked Questions
### Can I modify built-in groups to add or remove permissions?
While technically possible, modification is **not recommended**. Built-in groups may receive updates in future GATE releases, overwriting manual changes. Instead, create **additional** groups with required deltas and assign both to users.
### Can a user belong to multiple groups simultaneously?
Yes. Group memberships are **additive** — users inherit the union of all permissions from assigned groups. This represents the recommended approach for role composition.
### Which groups should new support agents receive?
Start with `GATE read-only admins` + `GATE users RO` + `GATE API Logs read-only`. Add area-specific groups as responsibilities expand.
### A user sees unauthorized menus. How do I remove access?
Remove the group granting menu access. If the menu persists, verify the user is not a **superuser** — superusers bypass the group system entirely and see all menus. Downgrade to regular user status and assign appropriate groups instead.
### How do I identify which group grants specific menu access?
Each admin section corresponds to a functional area (AAA, payments, advertising, etc.). Match the menu to the area using **Section 3: Functional Areas**, then select the appropriate level from **Section 5: Access Matrix**.
### Can I grant access to organization subsets only?
Yes — group-granted permissions are automatically scoped to the user's organization and its sub-organizations. A user with `GATE admins` in organization "Acme" will only see and administer Acme and its children, never sibling organizations.
---
> 📬 **Documentation Feedback:** If you believe a group is missing, misnamed, or if use cases in this guide don't match your requirements, please submit a documentation request for review in the next release.
# Reports & Analytics
# AAA Services Reports
## Overview
This section provides detailed information about all available AAA Services reports in GATE. Reports are organized into two main categories: Authentication reports for login activity analysis, and Accounting reports for session and bandwidth tracking.
## Report Categories
### Authentication Reports
Authentication reports focus on subscriber login requests, tracking accept/reject patterns, and access point activity analysis.
### Accounting Reports
Accounting reports provide insights into active sessions, bandwidth usage, session duration, and traffic patterns across your network infrastructure.
## Available Reports
| Report Name | Description | Category |
|-------------|-------------|----------|
| **AAA Access Point MAC distribution by organization (Accounting table)** | Subscriber activity, by organization over time | Accounting |
| **AAA Access Point MAC distribution by organization and type** | Subscriber requests, by accept/reject over time | Authentication |
| **AAA accounting sessions** | Sessions trend | Accounting |
| **AAA accounting sessions by Access Point** | Sessions trend, by AP | Accounting |
| **AAA accounting sessions by Location** | Sessions trend, by location | Accounting |
| **AAA accounting sessions by NAS Client** | Sessions trend, by NAS client | Accounting |
| **AAA accounting sessions by Realm** | Sessions trend, by realm | Accounting |
| **AAA accounting sessions by organization** | Sessions trend, by organization | Accounting |
| **AAA accounting traffic per Location and Organization (GBytes)** | Bandwidth by location and organization over time, GBytes | Accounting |
| **AAA accounting traffic per location (GBytes)** | Bandwidth by location over time, GBytes | Accounting |
| **AAA accounting traffic per user (GBytes)** | Bandwidth detail by subscribers over time, GBytes | Accounting |
| **AAA active Access Point MAC addresses (Accounting table)** | Sessions trend, by AP address | Accounting |
| **AAA active Access Point MAC addresses per NAS client (Accounting table)** | Sessions trend, by AP address and NAS client | Accounting |
| **AAA active Access Point MAC addresses per Organization (Accounting table)** | Sessions trend, by AP address and organization | Accounting |
| **AAA active Access Point MAC addresses per organization** | Accepted Sessions trend, by AP address and organization | Authentication |
| **AAA active sessions** | Active sessions trend | Accounting |
| **AAA active sessions per NAS Client** | Active sessions trend, by NAS client | Accounting |
| **AAA active sessions per Organization** | Active sessions trend, by organization | Accounting |
| **AAA active sessions per Realm** | Active sessions trend, by realm | Accounting |
| **AAA active sessions per called station** | Active sessions detail, by called station | Accounting |
| **AAA active sessions per user and realm** | Active sessions detail, by user and realm | Accounting |
| **AAA maximum sessions** | Max sessions trend | Accounting |
| **AAA multi-session time average (in minutes)** | Average minutes, by session | Accounting |
| **AAA number of active Access Point MAC addresses** | Active AP address trend | Authentication |
| **AAA requests by Access Point MAC address and type** | Subscriber requests accept/reject trend, by AP address | Authentication |
| **AAA requests by access point and type** | Subscriber requests accept/reject trend, by AP address and location | Authentication |
| **AAA requests by calledstation and type** | Subscriber requests accept/reject trend, by calledstation and type | Authentication |
| **AAA requests by calledstation, access point, and type** | Subscriber requests accept/reject trend, by calledstation, AP and location | Authentication |
| **AAA requests by type** | Subscriber requests accept/reject trend | Authentication |
| **AAA requests distribution by organization and type** | Subscriber requests accept/reject trend by organization | Authentication |
| **AAA session time average (in minutes)** | Average minutes trend, by sessions | Accounting |
| **AAA session time average (in seconds)** | Average seconds trend, by sessions | Accounting |
| **AAA session time average by Location (in minutes)** | Average minutes trend, by location and sessions | Accounting |
| **AAA session time average by Location and Organization (in minutes)** | Average minutes trend, by location, organization and sessions | Accounting |
| **AAA session time average by organization (in minutes)** | Average minutes trend, by organization and sessions | Accounting |
| **AAA session time average by terminate cause** | Average minutes trend, by terminate cause | Accounting |
| **AAA sessions by terminate cause** | Sessions trend, by terminate cause | Accounting |
| **Bottom AAA Access Point MAC address by number of requests and type** | Bottom-ranked subscriber requests, by AP address and accept/reject over time | Authentication |
| **Bottom AAA Access Points by number of requests and type** | Bottom-ranked subscriber requests, by AP, location and accept/reject over time | Authentication |
| **Bottom AAA Access Points by number of sessions (Accounting table)** | Bottom-ranked sessions, by AP and location over time | Accounting |
| **Bottom AAA Locations by number of requests and type** | Bottom-ranked subscriber requests, by location and accept/reject over time | Authentication |
| **Bottom AAA Locations by number of sessions (Accounting table)** | Bottom-ranked sessions, by location over time | Accounting |
| **List of active AAA Access Point MAC address** | Total logins, by AP address over time | Authentication |
| **List of active AAA Access Point MAC address (no transaction count)** | Active AP address over time | Authentication |
| **List of active AAA Access Point MAC addresses (Accounting table)** | Total sessions, by AP address over time | Accounting |
| **List of active AAA Access Point MAC addresses (Accounting table, no count)** | Active AP address over time | Accounting |
| **Number of accounting requests from unidentified Access Points by MAC address** | Sessions trend for unidentified AP, by AP address | Accounting |
| **Number of accounting requests from unidentified Access Points by MAC address and NAS client** | Sessions trend for unidentified AP, by AP address and NAS client | Accounting |
| **Number of accounting requests from unidentified Access Points by MAC address and NAS-ID** | Sessions trend for unidentified AP, by AP address and NAS-ID | Accounting |
| **Number of accounting requests with and without matching Access Point** | Sessions trend for identified/unidentified AP | Accounting |
| **Number of distinct user devices (Called-Station-Id) by organization (Accounting table)** | Called Station Id trend, by organization | Accounting |
| **Top AAA Access Point MAC address by number of requests and type** | Top-ranked subscriber requests, by AP address and accept/reject over time | Authentication |
| **Top AAA Access Point MAC address without matching Access Point** | Top-ranked subscriber requests without AP, by AP address and accept/reject over time | Authentication |
| **Top AAA Access Point MAC address without matching Access Point (Accounting table)** | Top-ranked sessions without AP, by AP address and NAS client over time | Accounting |
| **Top AAA Access Point MAC address without matching Location** | Top-ranked subscriber requests without location, by AP address, accept/reject and NAS client over time | Authentication |
| **Top AAA Access Point MAC address without matching Location (Accounting table)** | Top-ranked sessions without location, by AP address and NAS client over time | Accounting |
| **Top AAA Access Points by number of requests and type** | Top-ranked subscriber requests, by AP, location and accept/reject over time | Authentication |
| **Top AAA Access Points by number of sessions (Accounting table)** | Top-ranked sessions, by AP and location over time | Accounting |
| **Top AAA Locations by number of requests and type** | Top-ranked subscriber requests, by location and accept/reject over time | Authentication |
| **Top AAA Locations by number of sessions (Accounting table)** | Top-ranked sessions, by location over time | Accounting |
## Report Usage Notes
- **Authentication Reports**: Use these reports to analyze login patterns, identify authentication issues, and monitor access point performance
- **Accounting Reports**: These reports are essential for bandwidth monitoring, session analysis, and capacity planning
- **Time-based Analysis**: Most reports support time range selection for historical trend analysis
- **Organization Filtering**: Reports can be filtered by organization for multi-tenant environments
# Advertising reports
## Overview
The advertising reports provide comprehensive analytics for banner campaigns, user interactions, and performance metrics within GATE. These reports are categorized under the AD Events group and offer detailed insights into views, clicks, and user engagement patterns.
## Report Categories
### Campaign Performance Reports
These reports focus on campaign-level analytics and overall performance metrics:
| Report Name | Description |
|-------------|-------------|
| **Transactions by campaign** | Views/Clicks trend analysis by campaign |
| **Transactions by campaign and banner** | Views/Clicks trend analysis by campaign and banner |
| **Transactions by campaign, type and action** | Views/Clicks trend analysis by campaign and action |
| **Transactions by campaign, type and page** | Views/Clicks trend analysis by campaign and page |
| **Transactions by campaign, type and user's device brand** | Views/Clicks trend analysis by campaign and device brand |
| **Transactions by campaign, banner, type and location** | Views/Clicks trend analysis by campaign, banner and location |
| **Transactions by campaign, type, action and location** | Views/Clicks trend analysis by campaign, action and location |
| **Transactions by campaign, type, action and location group** | Views/Clicks trend analysis by campaign, action and location group |
| **Transactions by campaign, type, location and user's device brand** | Views/Clicks trend analysis by campaign, location and device brand |
### Banner Performance Reports
These reports provide detailed analytics at the individual banner level:
| Report Name | Description |
|-------------|-------------|
| **Active banners** | Active banner tracking by campaign, page and organization over time |
| **Active banners with Views and Clicks** | Active banner Views/Clicks by campaign, page and organization over time |
| **Transactions by banner** | Views/Clicks trend analysis by banner |
| **Transactions by banner, type and action** | Views/Clicks trend analysis by banner and action |
| **Transactions by banner, type and hour of day** | Views/Clicks analysis by banner over time |
| **Transactions by banner, type and page** | Views/Clicks trend analysis by banner and page |
| **Transactions by banner, type, action and location** | Views/Clicks trend analysis by banner, action and location |
| **Transactions by banner, type, action and location group** | Views/Clicks trend analysis by banner, action and location group |
| **Transactions by banner, type, location and user's device brand** | Views/Clicks trend analysis by banner, location and device brand |
### User Demographics and Device Reports
These reports analyze user behavior based on demographics and device characteristics:
| Report Name | Description |
|-------------|-------------|
| **Transactions by banner, type and user's age (from birthday)** | Views/Clicks analysis by banner and age (from birthday) over time |
| **Transactions by banner, type and user's device brand** | Views/Clicks trend analysis by banner and device brand |
| **Transactions by banner, type and user's device type** | Views/Clicks trend analysis by banner and device type |
| **Transactions by banner, type and user's gender** | Views/Clicks trend analysis by banner and user gender |
| **Transactions by banner, type and user's telephone country code** | Views/Clicks trend analysis by banner and telephone country code |
### General Transaction Reports
These reports provide broad transaction analytics and detailed breakdowns:
| Report Name | Description |
|-------------|-------------|
| **Detailed transactions report** | Comprehensive Views/Clicks analysis over time |
| **Transactions by type** | General Views/Clicks trend analysis |
| **Transactions by type and action** | Views/Clicks trend analysis by action |
| **Transactions by type, action and location** | Views/Clicks trend analysis by action and location |
| **Transactions by type, action and location group** | Views/Clicks trend analysis by action and location group |
| **Transactions by page, type and action** | Views/Clicks trend analysis by page and action |
### Heatmap Reports
These reports provide visual representations of user interaction patterns:
| Report Name | Description |
|-------------|-------------|
| **Heatmap - Transactions by Banner and Access Point** | Total Views/Clicks visualization by banner and AP |
| **Heatmap - Transactions by Banner and Location** | Total Views/Clicks visualization by banner and location |
| **Heatmap - Transactions by Campaign and Access Point** | Total Views/Clicks visualization by campaign and AP |
| **Heatmap - Transactions by Campaign and Location** | Total Views/Clicks visualization by campaign and location |
| **Heatmap - Transactions by Location** | Total Views/Clicks visualization by location |
## Key Metrics
All advertising reports track the following primary metrics:
- **Views**: Number of times banners are displayed to users
- **Clicks**: Number of user interactions with banners
- **Trends**: Performance patterns over specified time periods
## Report Group Classification
All advertising reports are classified under the **AD Events** group for easy identification and organization within the GATE reporting system.
# Glosary
## Report Glossary
This glossary defines key concepts and terminology used throughout GATE reporting features.
### Network Infrastructure
| Term | Definition |
|------|------------|
| **AP** | Access Point |
| **AP address** | Access Point MAC address |
| **AP address ID** | Access Point address identifier |
| **AP locations** | Name of the location where an Access Point is deployed |
| **Hotspots** | Menu for Hotspot management and configuration |
| **Location** | Name of the hotspot's physical location |
| **Location group** | Name of the location group registered by an organization |
| **Unidentified AP** | Unidentified Access Point |
### User Management & Authentication
| Term | Definition |
|------|------------|
| **AAA services** | Menu for Authentication, Authorization and Accounting |
| **Session** | Period between login and logout. In reports, refers to repeated subscriber sessions with username |
| **Session classes** | Subscriber email in the Klass field |
| **Transaction** | Exchange of messages between AAA server and subscriber device |
| **User** | User with access to network service. In reports, refers to unique user with User ID |
| **User capture** | User with captured information |
| **User connections** | User connections with status u200 and type ui,ai |
| **User ID** | Unique user identifier |
| **User request** | User authentication request (Accept/Reject) |
| **Users** | Menu for user profiles and AAA transactions |
### Device & Network Analytics
| Term | Definition |
|------|------------|
| **Bandwidth** | Consumed bandwidth by download, upload and total |
| **Device** | Type of subscriber device connected to the network (PC, Mobile, Tablet) |
| **Group** | Division of reports by source: Accounting, Authentication, Hotspots, Portal Events, AD Events |
### Advertising & Marketing
| Term | Definition |
|------|------------|
| **Advertising** | Menu for advertising management |
| **Banner** | Graphic advertising image displayed, also known as an ad |
| **Campaign** | A set of ads from an organization |
| **Views/Clicks** | Views (count of ads served to a user) and Clicks (count of user interactions with an ad) |
### Data Analysis & Statistics
| Term | Definition |
|------|------------|
| **Average** | Calculated by dividing the sum of the values in a set by their number |
| **Trend** | General movement over time of a statistically detectable change |
### System & Localization
| Term | Definition |
|------|------------|
| **ES** | Spanish translation |
# Hotspots Reports
## Overview
The Hotspots Reports section provides comprehensive analytics for Access Points (AP) and their locations across different geographical hierarchies. These reports enable you to monitor and analyze hotspot distribution and performance metrics over time.
## Available Reports
### Access Points Reports
Track Access Point distribution and trends across various geographical levels:
| Report Name | Description | Group |
|-------------|-------------|-------|
| Access Points by country and state | AP by country and state over time | Hotspot |
| Access Points by country and city | AP by country and city over time | Hotspot |
| Access Points by country and municipality | AP by country and municipality over time | Hotspot |
| Access Points by country and region | AP by country and region over time | Hotspot |
### Location Reports
Analyze Access Point locations and their geographical distribution:
| Report Name | Description | Group |
|-------------|-------------|-------|
| Locations by country and state | AP locations by country and state over time | Hotspot |
| Locations by country and city | AP locations by country and city over time | Hotspot |
| Locations by country and municipality | AP locations by country and municipality over time | Hotspot |
| Locations by country and region | AP locations by country and region over time | Hotspot |
## Report Categories
All hotspot reports are organized within the **Hotspot** group for easy navigation and management within the GATE portal interface.
# Records, Transactions and Logs
## User Records
Each user registered on the platform is stored in a database table with the following fields:
| Field | Description |
|-------|-------------|
| ID | Incremental and unique ID (platform-wide) for the user |
| Username | Unique username registered, selected, or assigned by the user |
| First-name | First name of the user |
| Last-name | Last name of the user |
| Email | Email address of the user |
| Valid Email | Boolean field indicating if the email address was validated |
| Email Class | Regular, Catch-all, Disposable, or Unknown |
| Active | Boolean flag indicating if the user is active |
| Class | Class of service or class of user |
| Date-joined | Date and time when the user was registered or entered in the database |
| Organization | Used in multi-tier or multi-tenant applications to group requests for a specific organization or sub-organization |
| Source | Authorization service used to register and authenticate this user |
| Avatar | Binary field with an image used as an avatar |
| Avatar-URL | URL for an external avatar |
| Expiration | User's expiration date and time |
| Gender | Male, Female, or Other |
| Age range | Indication of the user's age range |
| Birthday | Birth date of the user |
| Locale | Detected locale for the user |
| Address | Address of the user |
| City | City of the user |
| State | State of the user |
| Country | Country of the user |
| Hometown | Hometown/birthplace of the user |
| Location | Current/last location of the user |
| Telephone | Telephone number of the user |
| Valid Telephone | Boolean field indicating if the telephone number was validated |
| Telephone Class | Landline, Mobile, or Unknown |
| Telephone Network Code | MCC-MNC telephone carrier code |
| Telephone Carrier Name | Name of the carrier that corresponds to the obtained telephone network code |
| Telephone Country | Country of origin for the telephone number |
| Company | Name of the user's company |
| Title | Job title of the user |
| Event | Name of the event during which the user information was captured |
| Optional fields | Optional fields that can be used to capture customized information |
## Location Records
Each location registered on the platform is stored in a database table with the following fields:
| Field | Description |
|-------|-------------|
| ID | Incremental and unique ID (platform-wide) for the location |
| Name | Name of the location as assigned by the administrator |
| Is Active | Boolean indication if the location is active |
| Short Name | Short name or code assigned to the location by the administrator |
| UUID | UUID identifier for the location (generated by the platform) |
| Timezone | Timezone for the location |
| Organization | Used in multi-tier or multi-tenant applications to group requests for a specific organization or sub-organization |
| Description | Description of the object or record |
| Address | Address of the location |
| Reference | Geographical reference for the location |
| City | City of the location |
| Postal Code | Postal code of the location |
| State | State of the location |
| Region | Region of the location |
| Country Code | ISO country code of the location |
| Latitude | Latitude coordinates of the location |
| Longitude | Longitude coordinates of the location |
| Last change | Date and time of the last change to the location's information |
| Created | Date and time when the location was created |
## Access Point Records
Each access point registered on the platform is stored in a database table with the following fields:
| Field | Description |
|-------|-------------|
| ID | Incremental and unique ID (platform-wide) for the access point |
| Name | Name of the access point as assigned by the administrator |
| Short Name | Short name or code assigned to the access point by the administrator |
| Is Active | Boolean indication if the access point is active |
| Organization | Used in multi-tier or multi-tenant applications to group requests for a specific organization or sub-organization |
| Description | Description of the object or record |
| Location ID | ID of the location that this access point belongs to |
| Zone | Zone reference of the access point within the location |
| IP Address | IP address of the access point |
| MAC address | MAC address of the access point |
| MAC address (secondary) | Secondary MAC address of the access point |
| Serial | Serial number of the access point |
| Version | Software version of the access point |
| Latitude | Latitude coordinates of the access point |
| Longitude | Longitude coordinates of the access point |
| Last change | Date and time of the last change to the access point's information |
| Created | Date and time when the access point was created |
## Log Types
### User Portal Event Logs
*To be completed*
### AAA Logs
*To be completed*
### Advertisement Logs
*To be completed*
# Report Name Reference
## Overview
The GATE portal has implemented a comprehensive report naming update to improve clarity and organization. All reports are now grouped by function and feature standardized naming conventions for better usability.
This reference list provides the equivalent name for each report and includes a glossary of terms to help you understand the new naming structure.
## Report Categories
Reports are organized into the following functional groups:
- **Portal Events** - User authentication, transactions, and portal activity
- **Hotspot** - Access Point location and geographic data
- **Authentication** - AAA authentication requests and responses
- **Accounting** - AAA session tracking and bandwidth usage
- **AD Events** - Advertising campaign performance and user interactions
---
## USERS Reports
All user-related reports are categorized under **Portal Events**.
| Previous Report Name | New Report Name | Group |
|---------------------|-----------------|-------|
| Active Access Point MAC addresses | **Active AP address trend** | Portal Events |
| Active Access Point MAC addresses from successful login transactions | **AP address trend with Log in** | Portal Events |
| Active Access Point MAC addresses per Organization | **Active AP address trend, by organization** | Portal Events |
| Active Access Point MAC addresses without matching Access Point | **Active AP address trend without AP** | Portal Events |
| Detailed user login transactions report ES: Reporte detallado de transacciones de login de usuario | **User Log in detail over time** | Portal Events |
| Detailed user transactions report ES: Reporte detallado de transacciones de usuario | **User transactions detail over time** | Portal Events |
| Error user transactions by status and error message ES: Transacciones de usuario con error por estado y mensaje de error | **Transaction error message trend, by status** | Portal Events |
| Error user transactions by status, error message and page ES: Transacciones de usuario con error por estado, mensaje de error y página | **Transaction error message trend, by status and page** | Portal Events |
| Error user transactions by type ES: Transacciones de usuario con error por tipo | **Transaction error type trend** | Portal Events |
| Error user transactions by type and location ES: Transacciones de usuario con error por tipo y localidad | **Transaction error type trend, by location** | Portal Events |
| Error user transactions by type and location group ES: Transacciones de usuario con error por tipo y grupo de localidades | **Transaction error type trend, by location group** | Portal Events |
| Error user transactions by type and page ES: Transacciones de usuario con error por tipo y página | **Transaction error type trend, by page** | Portal Events |
| Error user transactions by type and service ES: Transacciones de usuario con error por tipo y servicio | **Transaction error type trend, by service** | Portal Events |
| Error user transactions by type, service and page ES: Transacciones de usuario con error por tipo, servicio y página | **Transaction error type trend, by service and page** | Portal Events |
| List of active Access Point MAC addresses | **Transactions by AP address over time** | Portal Events |
| Number of distinct MAC addresses with connections ES: Usuario Top con conexiones | **AP address ID connections trend** | Portal Events |
| Number of distinct MAC addresses with connections average by organization | **AP address ID connections, by organization over time** | Portal Events |
| Number of distinct MAC addresses with connections by organization | **AP address ID connections trend, by organization** | Portal Events |
| Number of distinct user classes with connections | **User classes with connections trend** | Portal Events |
| Number of distinct user external IDs with connections | **External user ID with connections trend** | Portal Events |
| Number of distinct usernames with connections ES: Número de usuarios distintos con conexiones | **User connections trend** | Portal Events |
| Number of distinct usernames with connections by page ES: Número de usuarios distintos con conexiones por página | **User connections trend, by page** | Portal Events |
| Number of distinct usernames with connections per device type | **User device trend** | Portal Events |
| Number of new, existing and total users with connections ES: Número de usuarios nuevos, existentes y totales con conexiones | **User trend, by new/existing** | Portal Events |
| Number of new, existing and total users with connections by AAA profile ES: Número de usuarios nuevos, existentes y totales con con conexiones por perfil AAA | **User trend, by new/existing and AAA profile** | Portal Events |
| Number of new, existing and total users with connections by Access Point group | **User trend, by new/existing and AP group** | Portal Events |
| Number of new, existing and total users with connections by Location ES: Número de usuarios nuevos, existentes y totales con conexiones por localidad | **User trend, by new/existing and Location** | Portal Events |
| Number of new, existing and total users with connections by Location group ES: Número de usuarios nuevos, existentes y totales con conexiones por grupo de localidades | **User trend, by new/existing and Location group** | Portal Events |
| Number of users with connections ES: Número de usuarios con conexiones | **Session trend** | Portal Events |
| Number of users with connections by AAA profile ES: Número de usuarios con conexiones por perfil AAA | **Session trend, by AAA profile** | Portal Events |
| Number of users with connections by Location ES: Número de usuarios con conexiones por localidad | **Session trend, by Location** | Portal Events |
| Number of users with connections by Location group ES: Número de usuarios con conexiones por grupo de localidades | **Session trend, by Location group** | Portal Events |
| Number of users with connections per device type | **Session trend, by device type** | Portal Events |
| Successful user captures by service ES: Capturas de usuario exitosas por servicio | **User capture trend, by service** | Portal Events |
| Successful user login transaction rate per Access Point group and number of Access Points | **Average log in trend, by Access Point group** | Portal Events |
| Successful user login transactions ES: Inicio de sesión de usuario exitosa | **Log in trend** | Portal Events |
| Successful user login transactions average by organization | **Average log in by organization over time** | Portal Events |
| Successful user login transactions by Access Point ES: Inicio de sesión de usuario exitoso por access point | **Log in trend, by Access Point** | Portal Events |
| Successful user login transactions by Access Point installation type | **Log in trend, by Indoor/Outdoor AP** | Portal Events |
| Successful user login transactions by Access Point installation type and page | **Log in trend, by Indoor/Outdoor AP and page** | Portal Events |
| Successful user login transactions by Location ES: Inicio de sesión de usuario exitoso por localidad | **Log in trend, by location** | Portal Events |
| Successful user login transactions by Location group ES: Inicio de sesión de usuario exitoso por grupo de localidades | **Log in trend, by location group** | Portal Events |
| Successful user login transactions by Location group and state | **Log in trend, by location group and state** | Portal Events |
| Successful user login transactions by device type | **Log in trend, by device type** | Portal Events |
| Successful user login transactions by organization ES: Inicio de sesión de usuario exitoso por organization | **Log in trend, by organization** | Portal Events |
| Successful user login transactions by page ES: Inicio de sesión de usuario exitoso por página | **Log in trend, by page** | Portal Events |
| Successful user login transactions by service ES: Inicio sesión de usuario exitoso por servicio | **Log in trend, by service** | Portal Events |
| Successful user login transactions by service and page ES: Inicio de sesión de usuario exitoso por servicio y página | **Log in trend, by service and page** | Portal Events |
| Successful user login transactions by service, page and location ES: Inicio de sesión de usuario exitoso por servicio, página y localidad | **Log in trend, by service, page and location** | Portal Events |
| Successful user login transactions by service, page and location group ES: Inicio de sesión de usuario exitoso por servicio, página y grupo de localidades | **Log in trend, by service, page and location group** | Portal Events |
| Successful user logins by OS family ES: Cantidad de inicios de sesión de usuario por familia del SO | **Log in by OS family over time** | Portal Events |
| Successful user transactions by Access Point group | **Log in trend, by AP group** | Portal Events |
| Successful user transactions by Access Point with Location | **Log in trend, by AP and Location** | Portal Events |
| Successful user transactions by Access Point with No Location | **Log in with no location trend, by AP** | Portal Events |
| Successful user transactions by Location ES: Transacciones de usuario exitosas por localidad | **User transactions trend, by location** | Portal Events |
| Successful user transactions by Location group ES: Transacciones de usuario exitosas por grupo de localidades | **User transactions trend, by location group** | Portal Events |
| Successful user transactions by organization ES: Transacciones exitosas de usuario exitosas por organization | **User transactions trend, by organization** | Portal Events |
| Successful user transactions by organization and type ES: Transacciones exitosas de usuario por oranization y tipo | **User transactions trend, by organization and type** | Portal Events |
| Successful user transactions by type | **User transactions trend, by type** | Portal Events |
| Successful user transactions by type and location ES: Transacciones de usuario exitosas por tipo y localidad | **User transactions trend, by type and location** | Portal Events |
| Successful user transactions by type and location group ES: Transacciones de usuario exitosas por tipo y grupo de localidades | **User transactions trend, by type and location group** | Portal Events |
| Successful user transactions by type and page ES:Transacciones de usuario exitosas por tipo y página | **User transactions trend, by type and page** | Portal Events |
| Successful user transactions by type and service ES: Transacciones de usuario exitosas por tipo y servicio | **User transactions trend, by type and service** | Portal Events |
| Successful user transactions by type, service and page ES: Transacciones de usuario exitosas por tipo, servicio y página | **User transactions trend, by type, service and page** | Portal Events |
| Successful user transactions by type, service, page and location ES: Transacciones de usuario exitosas por tipo, servicio, página y localidad | **User transactions trend, by type, service, page and location** | Portal Events |
| Successful user transactions by type, service, page and location group ES: Transacciones de usuario exitosas por tipo, servicio, página y grupo de localidades | **User transactions trend, by type, service, page and location group** | Portal Events |
| Top users with connections ES: Usuario Top con conexiones | **Top-ranked users Log in over time** | Portal Events |
| User transactions by OS family ES: Transacciones de usuario por familia de SO | **User OS family over time** | Portal Events |
| User transactions by browser family ES: Transacciones de usuario por familia del navegador | **User browser family over time** | Portal Events |
| User transactions by device brand ES: Transacciones de usuario por marca del dispositivo | **User device brand over time** | Portal Events |
| User transactions by device brand and location | **User device brand by location over time** | Portal Events |
| User transactions by service ES: Transacciones de usuario por service | **User transactions trend, by service** | Portal Events |
| User transactions by status ES: Transacciones de usuario por estado | **User transactions trend, by status** | Portal Events |
| User transactions by type and user's age ES: Transacciones de usuario por tipo y edad del usuario | **User transactions by type and age over time** | Portal Events |
| User transactions by type and user's age (from birthday) ES: Transacciones por tipo y edad del usuario (fecha de cumpleaños) | **User transactions by type and age (from birthday) over time** | Portal Events |
| User transactions by type and user's age range ES: Transacciones de usuario por tipo y rango de edad del usuario | **User transactions by type and age range over time** | Portal Events |
| User transactions by type and user's country ES: Transacciones de usuario por tipo y pais del usuario | **User transactions by type and country over time** | Portal Events |
| User transactions by type and user's country and state ES: Transacciones de usuario por tipo, país y estado del usuario | **User transactions by type, country and state over time** | Portal Events |
| User transactions by type and user's gender ES: Transacciones de usuario por tipo y género del usuario | **User transactions by type and gender over time** | Portal Events |
| User transactions by type and user's telephone country ES: Transacciones de usuario por tipo y país del teléfono del usuario | **User transactions by type and phone country code over time** | Portal Events |
| User transactions by type, service, page and status ES: Transacciones de usuario por tipo, servicio, página y estado | **User trend, by type, service, page and status** | Portal Events |
| Heatmap - Successful user transactions by Access Point | **Total successful user transactions by Access Point** | Portal Events |
| Heatmap - Successful user transactions by Location | **Total successful user transactions by Location** | Portal Events |
---
## HOTSPOTS Reports
Geographic and location-based Access Point reports are categorized under **Hotspot**.
| Previous Report Name | New Report Name | Group |
|---------------------|-----------------|-------|
| Access Points by country and state | **AP by country and state over time** | Hotspot |
| Access Points by country and city | **AP by country and city over time** | Hotspot |
| Access Points by country and municipality | **AP by country and municipality over time** | Hotspot |
| Access Points by country and region | **AP by country and region over time** | Hotspot |
| Locations by country and state | **AP locations by country and state over time** | Hotspot |
| Locations by country and city | **AP locations by country and city over time** | Hotspot |
| Locations by country and municipality | **AP locations by country and municipality over time** | Hotspot |
| Locations by country and region | **AP locations by country and region over time** | Hotspot |
---
## AAA SERVICES Reports
Authentication, Authorization, and Accounting reports are split into **Authentication** and **Accounting** groups.
| Previous Report Name | New Report Name | Group |
|---------------------|-----------------|-------|
| AAA Access Point MAC distribution by organization (Accounting table) | **User activity, by organization over time** | Accounting |
| AAA Access Point MAC distribution by organization and type | **User requests, by accept/reject over time** | Authentication |
| AAA accounting sessions | **Sessions trend** | Accounting |
| AAA accounting sessions by Access Point | **Sessions trend, by AP** | Accounting |
| AAA accounting sessions by Location | **Sessions trend, by location** | Accounting |
| AAA accounting sessions by NAS Client | **Sessions trend, by NAS client** | Accounting |
| AAA accounting sessions by Realm | **Sessions trend, by realm** | Accounting |
| AAA accounting sessions by organization | **Sessions trend, by organization** | Accounting |
| AAA accounting traffic per Location and Organization (GBytes) | **Bandwidth by location and organization over time, GBytes** | Accounting |
| AAA accounting traffic per location (GBytes) | **Bandwidth by location over time, GBytes** | Accounting |
| AAA accounting traffic per user (GBytes) ES: Trafico (accounting AAA) de por usuario (Gbytes) | **Bandwidth detail by users over time, GBytes** | Accounting |
| AAA active Access Point MAC addresses (Accounting table) | **Sessions trend, by AP address** | Accounting |
| AAA active Access Point MAC addresses per NAS client (Accounting table) | **Sessions trend, by AP address and NAS client** | Accounting |
| AAA active Access Point MAC addresses per Organization (Accounting table) | **Sessions trend, by AP address and organization** | Accounting |
| AAA active Access Point MAC addresses per organization | **Accepted Sessions trend, by AP address and organization** | Authentication |
| AAA active sessions | **Active sessions trend** | Accounting |
| AAA active sessions per NAS Client ES: Número de sesiones AAA activas por NAS Client | **Active sessions trend, by NAS client** | Accounting |
| AAA active sessions per Organization | **Active sessions trend, by organization** | Accounting |
| AAA active sessions per Realm ES: Número de sesiones AAA activas por realm | **Active sessions trend, by realm** | Accounting |
# Reports Page Reference
[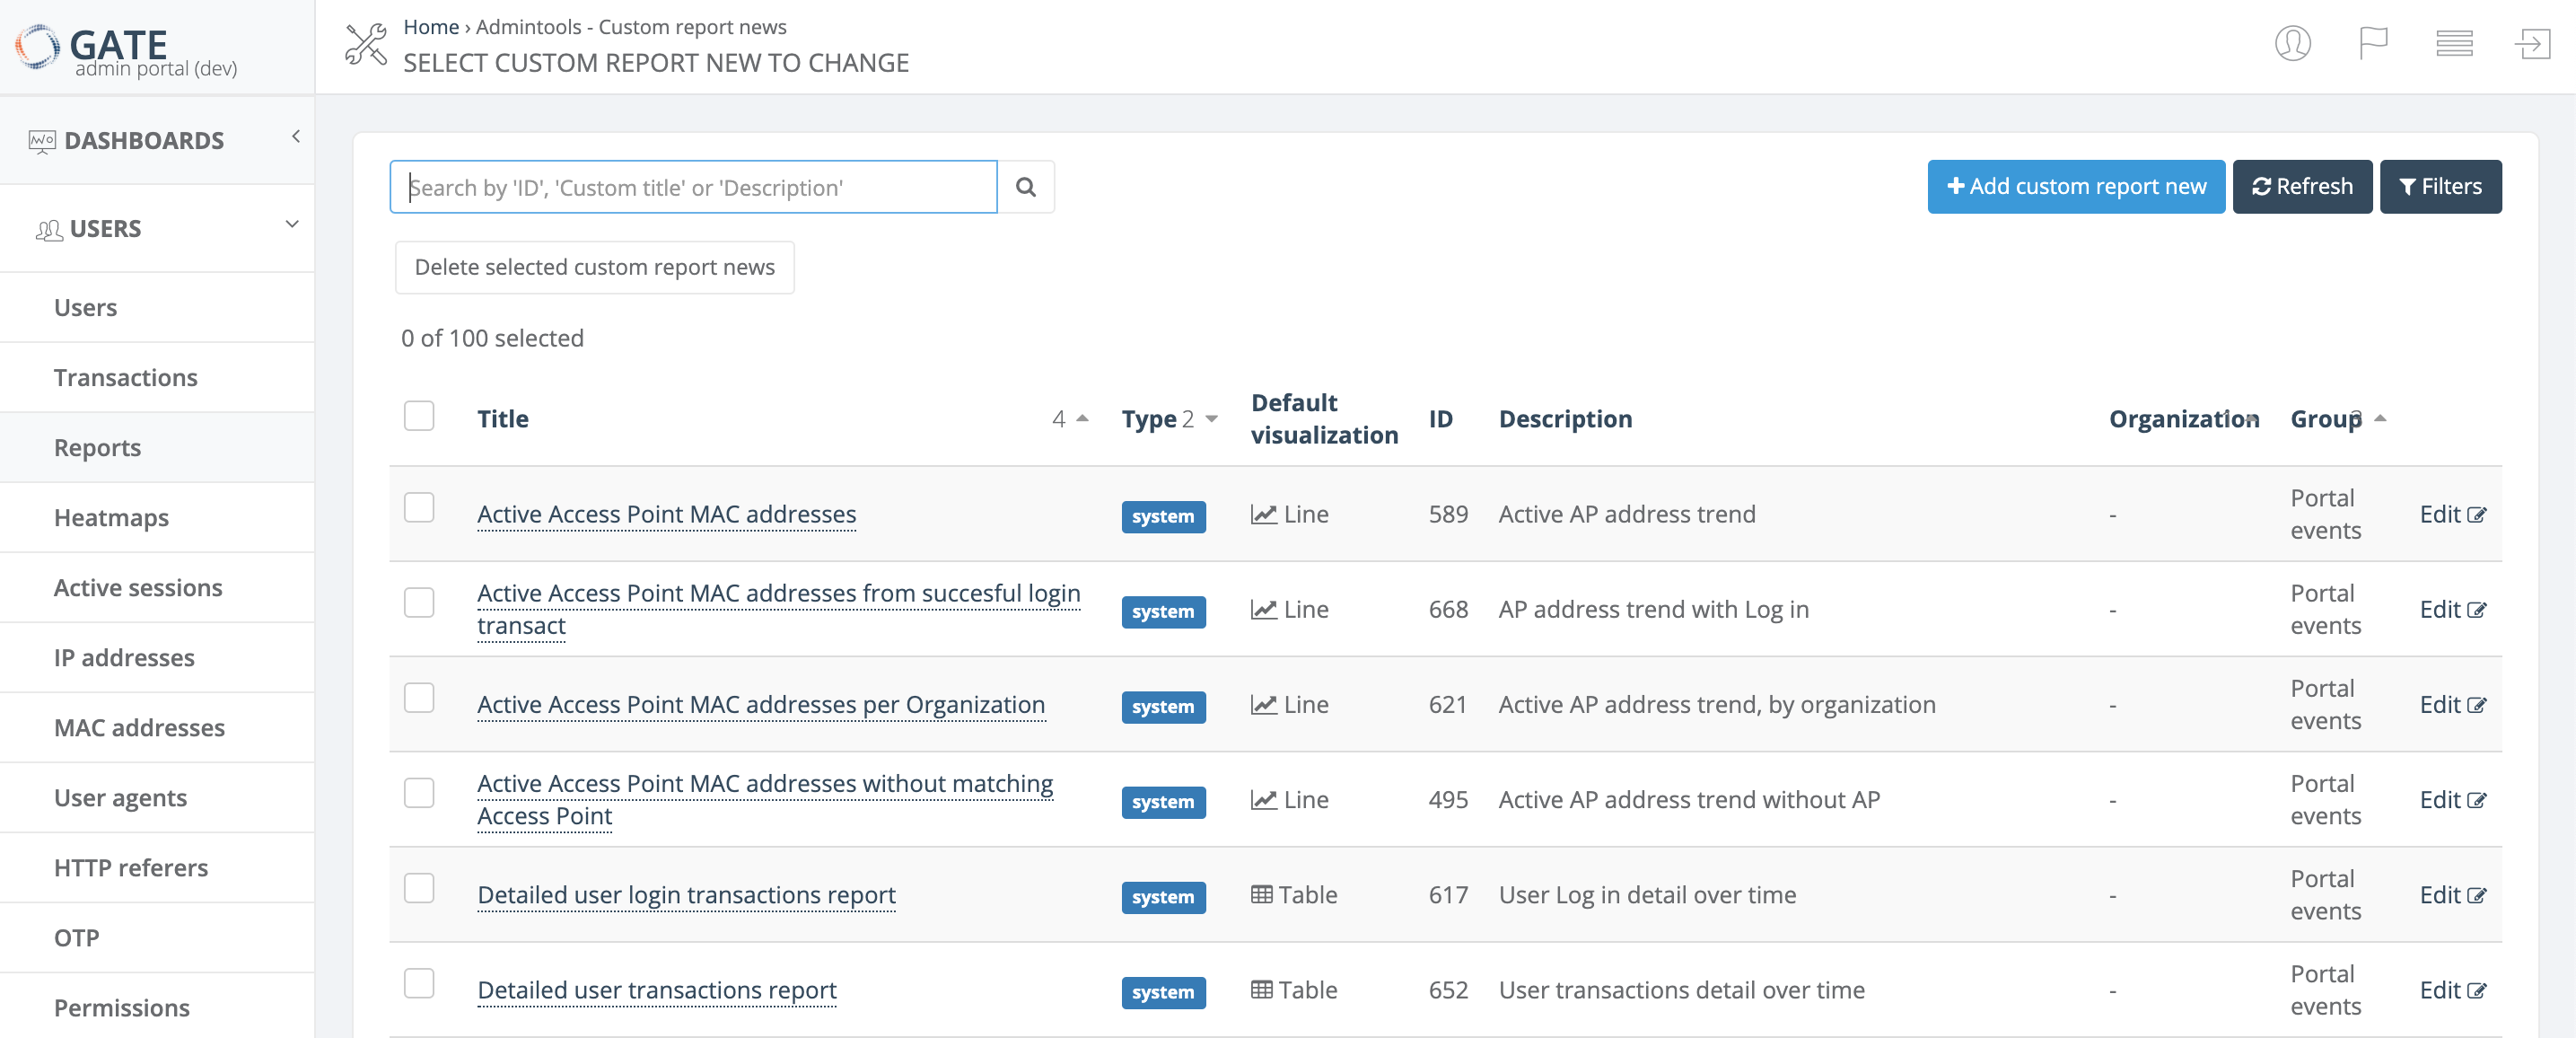](https://docs.zequenze.com/uploads/images/gallery/2020-10/1XJf5PDrnFLWYzBQ-report-search-new.png)
The Reports page in GATE provides a comprehensive view of all available reports with powerful search, filtering, and management capabilities. This page serves as your central hub for accessing both system reports and custom reports.
## Report List Columns
The reports list displays the following information for each report:
| Column | Description |
|--------|-------------|
| **Title** | The report name. See [detailed reference](https://docs.zequenze.com/books/gate/page/report-name-reference) for naming conventions |
| **Type** | Indicates whether the report is a system report or custom report |
| **Default visualization** | The default chart type used when displaying the report: Table, Line, Bar, Pie, or Heatmap |
| **ID** | Unique report identifier |
| **Description** | Brief description of the report's purpose and content. See [detailed reference](https://docs.zequenze.com/books/gate/page/report-name-reference) |
| **Organization** | The organization associated with the report |
| **Group** | Report category grouping. See [detailed reference](https://docs.zequenze.com/books/gate/page/report-name-reference) |
## Available Actions
### Search and Navigation
- **Search** - Find reports by Title, Description, Group, or ID. You can search using partial text matches or by a single word included in any of these fields
- **Refresh** - Update the current list to display the latest reports
- **Filters** - Narrow down the report list using multiple criteria:
- Group
- Report type (system or custom)
- Default visualization type
- Organization
### Report Management
- **Add new custom report** - Create a new custom report from scratch
- **Edit** - Modify an existing custom report (only available for custom reports)
- **Delete selected custom report** - Remove a custom report by selecting it using the checkbox on the left side of the row
> **Note**: System reports cannot be edited or deleted, only custom reports can be modified or removed.
# Users Reports
## Overview
This section provides a comprehensive list of user-related reports available in GATE. These reports help administrators monitor user activity, track login patterns, analyze connection trends, and troubleshoot authentication issues across the portal system.
All reports are categorized under the **Portal Events** group and provide various filtering and segmentation options to help you analyze user behavior and system performance.
## Available Reports
### Access Point Monitoring
| Report Name | Description | Group |
|-------------|-------------|-------|
| Active Access Point MAC addresses | Active AP address trend | Portal Events |
| Active Access Point MAC addresses from successful login transactions | AP address trend with login | Portal Events |
| Active Access Point MAC addresses per Organization | Active AP address trend, by organization | Portal Events |
| Active Access Point MAC addresses without matching Access Point | Active AP address trend without AP | Portal Events |
| List of active Access Point MAC addresses | Transactions by AP address over time | Portal Events |
### User Login Analytics
| Report Name | Description | Group |
|-------------|-------------|-------|
| Detailed user login transactions report | Subscriber login detail over time | Portal Events |
| Successful user login transactions | Login trend | Portal Events |
| Successful user login transactions average by organization | Average login by organization over time | Portal Events |
| Successful user login transactions by Access Point | Login trend, by Access Point | Portal Events |
| Successful user login transactions by Access Point installation type | Login trend, by Indoor/Outdoor AP | Portal Events |
| Successful user login transactions by Access Point installation type and page | Login trend, by Indoor/Outdoor AP and page | Portal Events |
| Successful user login transactions by Location | Login trend, by location | Portal Events |
| Successful user login transactions by Location group | Login trend, by location group | Portal Events |
| Successful user login transactions by Location group and state | Login trend, by location group and state | Portal Events |
| Successful user login transactions by device type | Login trend, by device type | Portal Events |
| Successful user login transactions by organization | Login trend, by organization | Portal Events |
| Successful user login transactions by page | Login trend, by page | Portal Events |
| Successful user login transactions by service | Login trend, by service | Portal Events |
| Successful user login transactions by service and page | Login trend, by service and page | Portal Events |
| Successful user login transactions by service, page and location | Login trend, by service, page and location | Portal Events |
| Successful user login transactions by service, page and location group | Login trend, by service, page and location group | Portal Events |
| Successful user login transaction rate per Access Point group and number of Access Points | Average login trend, by Access Point group | Portal Events |
| Successful user logins by OS family | Login by OS family over time | Portal Events |
### Connection Statistics
| Report Name | Description | Group |
|-------------|-------------|-------|
| Number of distinct MAC addresses with connections | AP address ID connections trend | Portal Events |
| Number of distinct MAC addresses with connections average by organization | AP address ID connections, by organization over time | Portal Events |
| Number of distinct MAC addresses with connections by organization | AP address ID connections trend, by organization | Portal Events |
| Number of distinct user classes with connections | Subscriber classes with connections trend | Portal Events |
| Number of distinct user external IDs with connections | External subscriber ID with connections trend | Portal Events |
| Number of distinct usernames with connections | Subscriber connections trend | Portal Events |
| Number of distinct usernames with connections by page | Subscriber connections trend, by page | Portal Events |
| Number of distinct usernames with connections per device type | Subscriber device trend | Portal Events |
| Number of users with connections | Session trend | Portal Events |
| Number of users with connections by AAA profile | Session trend, by AAA profile | Portal Events |
| Number of users with connections by Location | Session trend, by Location | Portal Events |
| Number of users with connections by Location group | Session trend, by Location group | Portal Events |
| Number of users with connections per device type | Session trend, by device type | Portal Events |
### User Segmentation
| Report Name | Description | Group |
|-------------|-------------|-------|
| Number of new, existing and total users with connections | Subscriber trend, by new/existing | Portal Events |
| Number of new, existing and total users with connections by AAA profile | Subscriber trend, by new/existing and AAA profile | Portal Events |
| Number of new, existing and total users with connections by Access Point group | Subscriber trend, by new/existing and AP group | Portal Events |
| Number of new, existing and total users with connections by Location | Subscriber trend, by new/existing and Location | Portal Events |
| Number of new, existing and total users with connections by Location group | Subscriber trend, by new/existing and Location group | Portal Events |
| Top users with connections | Top-ranked subscribers login over time | Portal Events |
### Transaction Analysis
| Report Name | Description | Group |
|-------------|-------------|-------|
| Detailed user transactions report | Subscriber transactions detail over time | Portal Events |
| Successful user captures by service | Subscriber capture trend, by service | Portal Events |
| Successful user transactions by Access Point group | Login trend, by AP group | Portal Events |
| Successful user transactions by Access Point with Location | Login trend, by AP and Location | Portal Events |
| Successful user transactions by Access Point with No Location | Login with no location trend, by AP | Portal Events |
| Successful user transactions by Location | Subscriber transactions trend, by location | Portal Events |
| Successful user transactions by Location group | Subscriber transactions trend, by location group | Portal Events |
| Successful user transactions by organization | Subscriber transactions trend, by organization | Portal Events |
| Successful user transactions by organization and type | Subscriber transactions trend, by organization and type | Portal Events |
| Successful user transactions by type | Subscriber transactions trend, by type | Portal Events |
| Successful user transactions by type and location | Subscriber transactions trend, by type and location | Portal Events |
| Successful user transactions by type and location group | Subscriber transactions trend, by type and location group | Portal Events |
| Successful user transactions by type and page | Subscriber transactions trend, by type and page | Portal Events |
| Successful user transactions by type and service | Subscriber transactions trend, by type and service | Portal Events |
| Successful user transactions by type, service and page | Subscriber transactions trend, by type, service and page | Portal Events |
| Successful user transactions by type, service, page and location | Subscriber transactions trend, by type, service, page and location | Portal Events |
| Successful user transactions by type, service, page and location group | Subscriber transactions trend, by type, service, page and location group | Portal Events |
| User transactions by service | Subscriber transactions trend, by service | Portal Events |
| User transactions by status | Subscriber transactions trend, by status | Portal Events |
| User transactions by type, service, page and status | Subscriber trend, by type, service, page and status | Portal Events |
### Error Reporting
| Report Name | Description | Group |
|-------------|-------------|-------|
| Error user transactions by status and error message | Transaction error message trend, by status | Portal Events |
| Error user transactions by status, error message and page | Transaction error message trend, by status and page | Portal Events |
| Error user transactions by type | Transaction error type trend | Portal Events |
| Error user transactions by type and location | Transaction error type trend, by location | Portal Events |
| Error user transactions by type and location group | Transaction error type trend, by location group | Portal Events |
| Error user transactions by type and page | Transaction error type trend, by page | Portal Events |
| Error user transactions by type and service | Transaction error type trend, by service | Portal Events |
| Error user transactions by type, service and page | Transaction error type trend, by service and page | Portal Events |
### Device and Browser Analytics
| Report Name | Description | Group |
|-------------|-------------|-------|
| User transactions by OS family | Subscriber OS family over time | Portal Events |
| User transactions by browser family | Subscriber browser family over time | Portal Events |
| User transactions by device brand | Subscriber device brand over time | Portal Events |
| User transactions by device brand and location | Subscriber device brand by location over time | Portal Events |
### Demographic Analysis
| Report Name | Description | Group |
|-------------|-------------|-------|
| User transactions by type and user's age | Subscriber transactions by type and age over time | Portal Events |
| User transactions by type and user's age (from birthday) | Subscriber transactions by type and age (from birthday) over time | Portal Events |
| User transactions by type and user's age range | Subscriber transactions by type and age range over time | Portal Events |
| User transactions by type and user's country | Subscriber transactions by type and country over time | Portal Events |
| User transactions by type and user's country and state | Subscriber transactions by type, country and state over time | Portal Events |
| User transactions by type and user's gender | Subscriber transactions by type and gender over time | Portal Events |
| User transactions by type and user's telephone country | Subscriber transactions by type and phone country code over time | Portal Events |
## Usage Notes
- All reports are real-time and can be filtered by date range
- Reports support multiple export formats for further analysis
- Demographic data is only available when users provide this information during registration
- Error reports help identify common authentication and connectivity issues
- Location-based reports require proper Access Point configuration with location assignments
# Configuración izzi
# Introducción - Accesos izzi
## Descripción General
Este capítulo contiene la documentación específica para el cliente **izzi** sobre el uso de la plataforma GATE de Zequenze. La plataforma GATE proporciona servicios AAA (Authentication, Authorization, Accounting) para la gestión de accesos, autenticación de usuarios y administración de servicios RADIUS.
## Tipos de Usuario
Para el cliente izzi se han configurado **dos tipos de acceso** con diferentes niveles de permisos:
### Usuario Admin izzi
**Permisos:** Completos (Crear, Modificar, Eliminar)
**Funcionalidades:**
- Gestión completa de clientes AAA/RADIUS (BNGs)
- Administración de usuarios autenticados
- Configuración de perfiles de velocidad con parámetros AVP/VSA
- Configuración de CoA (Change of Authorization) y DM (Disconnect Message)
- Acceso a reportes y análisis avanzados
- Configuración multi-vendor (Huawei, Nokia, Cisco)
### Usuario Read-Only izzi
**Permisos:** Solo lectura
**Funcionalidades:**
- Visualización de clientes AAA/RADIUS sin capacidad de modificación
- Consulta de usuarios autenticados y sus perfiles asignados
- Acceso a información para troubleshooting y diagnóstico
- Monitoreo de métricas y estadísticas
- Exportación de reportes (solo consulta)
## Información Técnica Específica para izzi
### Formato de Usuarios
- **Username estándar**: `NoCliente-SerieONT|Shelf/Slot/PON`
- **Ejemplo**: `25072102-ZTEGCF5FEB42|0/1/0`
### Organizaciones Configuradas
- **izzi FTTH**: Para servicios de fibra óptica y ONTs
- **izzi WiFi**: Para servicios Community WiFi/Offloading
- **izzi**: Para servicios que requieren ambas funciones
### Vendors Soportados
- **Huawei**
- **Nokia**
- **Cisco**
## Estructura de la Documentación
Este capítulo está organizado en las siguientes secciones:
1. **Introducción - Accesos izzi** (Esta página)
2. **Usuario Admin izzi** - Guía completa para usuarios administradores
3. **Usuario Read-Only izzi** - Guía para usuarios de consulta
4. **Guía de Uso izzi** - Casos prácticos y ejemplos específicos
## Requisitos Previos
Antes de utilizar la plataforma GATE, asegúrese de contar con:
- Credenciales específicas proporcionadas por Zequenze
- Acceso a internet para conectar con **https://GATE.zequenze.com**
- Navegador web actualizado (Chrome, Firefox, Safari, Edge)
- Conocimientos básicos de protocolos RADIUS y AAA
## Soporte Técnico
Para cualquier duda o problema técnico, contactar al equipo de soporte de Zequenze:
- **Email:** support@zequenze.com
- **Portal:** https://GATE.zequenze.com
- **Documentación técnica:** Disponible en cada sección de este capítulo
---
*Documentación actualizada: Julio 2025*
# Usuario Admin izzi
## Descripción General
El usuario Admin para izzi cuenta con permisos completos en la plataforma GATE, permitiendo crear, modificar y eliminar tanto clientes AAA para servicios RADIUS como usuarios autenticados en el sistema.
## Acceso a la Plataforma
### Inicio de Sesión
Para acceder al portal GATE:
1. **URL de acceso:** https://gate.zequenze.com
2. **Credenciales:** Utilizar las credenciales proporcionadas por Zequenze
[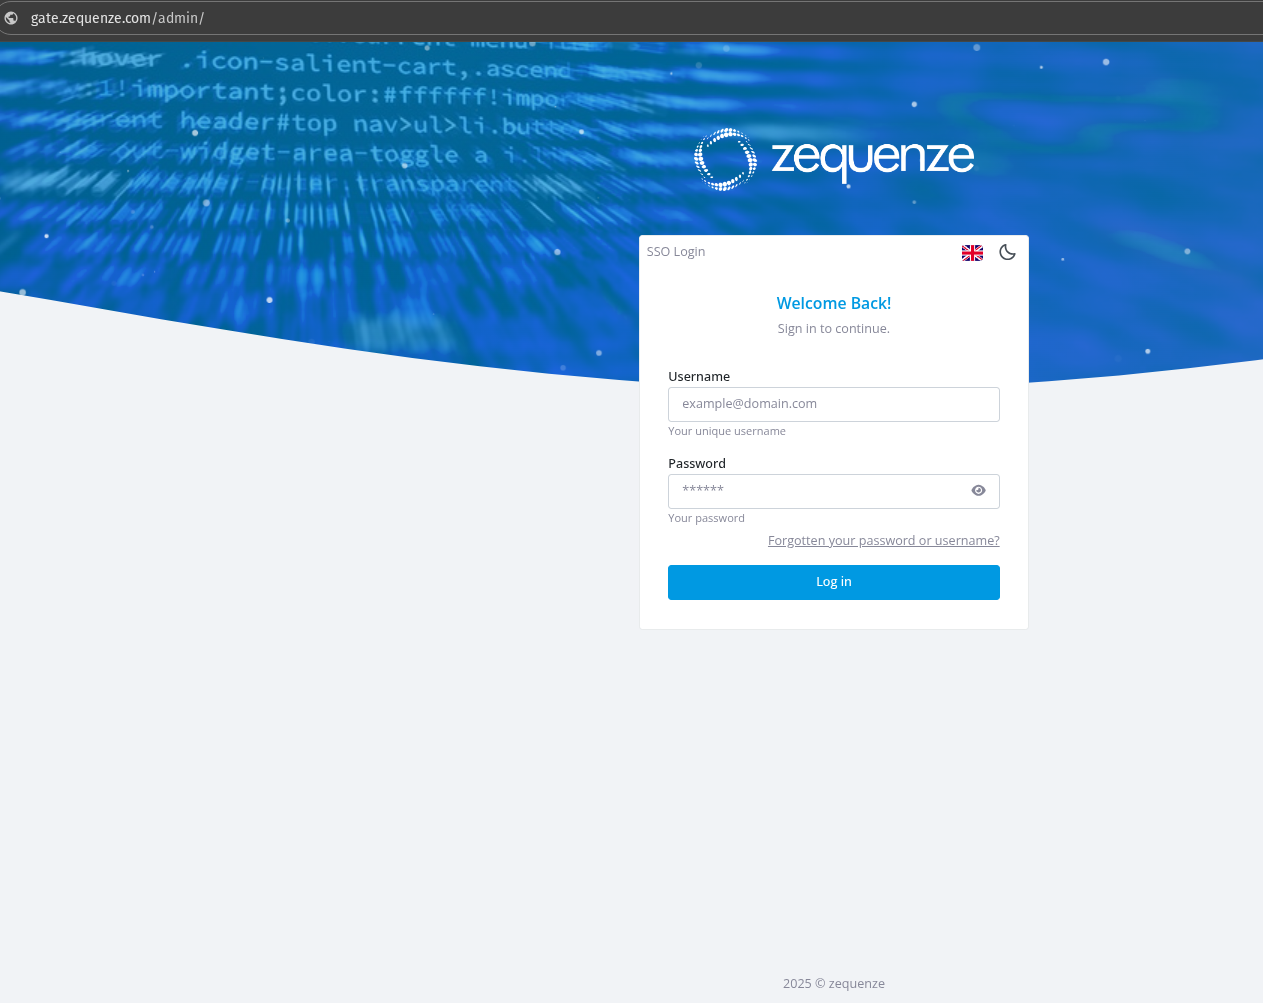](https://docs.zequenze.com/uploads/images/gallery/2025-07/HHTaFEna7DNlgtfI-imagen1.png)
### Panel Principal (Dashboard)
Una vez ingresadas las credenciales correctas, se mostrará el panel principal con las siguientes secciones:
[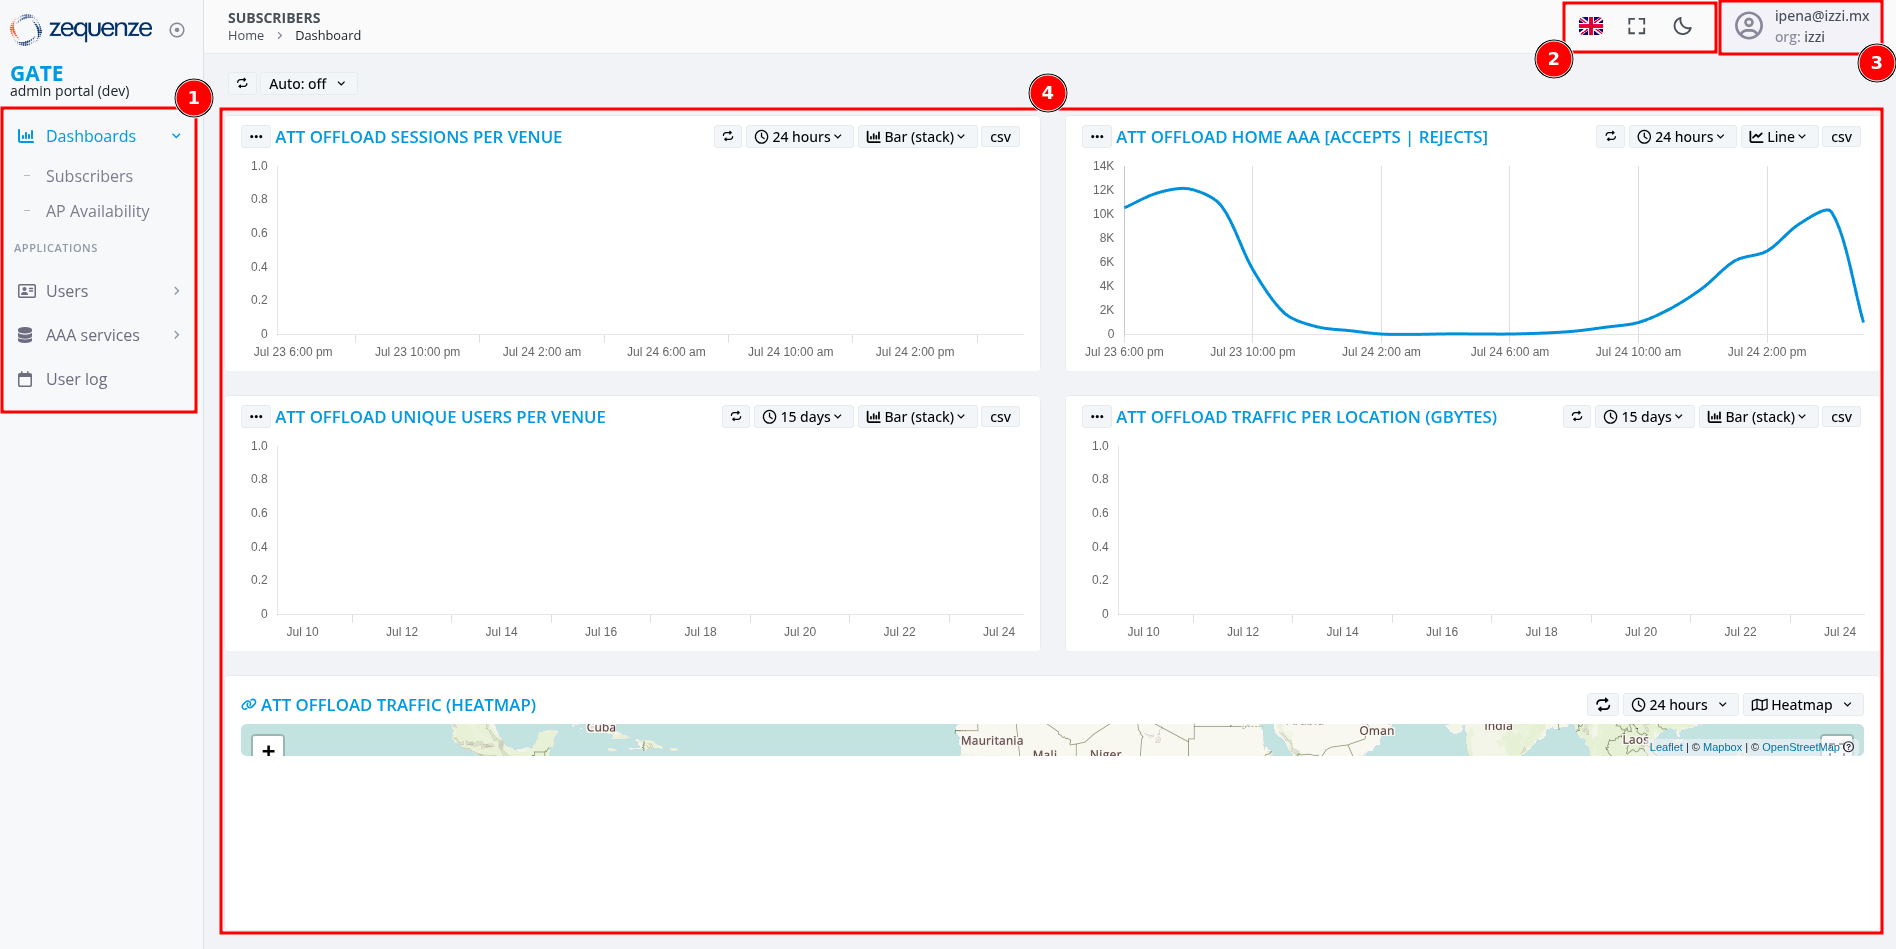](https://docs.zequenze.com/uploads/images/gallery/2025-07/sWDMzTQsqp1turyg-imagen2.png)
#### Elementos del Dashboard
**1. Menú Lateral Izquierdo**
- Acceso a Dashboards
- Gestión de usuarios autenticados
- Configuración de perfiles de velocidad y servicios RADIUS
- Log de usuarios o movimientos
**2. Barra Superior de Herramientas**
- **Idioma:** Cambio entre Inglés, Español o Portugués
- **Pantalla completa:** Activar/desactivar modo Full Screen
- **Tema:** Alternar entre tema Dark o Light
**3. Menú de Usuario**
- Opciones de perfil y configuración
- Configuración de zona horaria
- Activación de opciones avanzadas
**4. Dashboard Personalizable**
- Gráficas de métricas en tiempo real
- Widgets configurables según necesidades
- Visualización de datos de tráfico y usuarios
## Opciones de Usuario Admin
### Opciones de Perfil
Al hacer clic en el nombre de usuario (esquina superior derecha), se despliegan las siguientes opciones:
[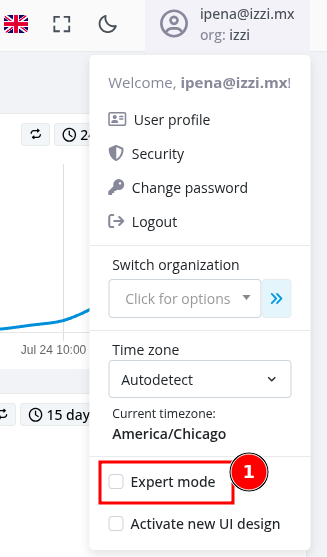](https://docs.zequenze.com/uploads/images/gallery/2025-07/rQHm9o9TL3qYMFiQ-imagen3.png)
#### Opciones Disponibles
- **User Profile:** Modificar nombre para mostrar y información personal
- **Security:** Configurar autenticación de dos factores (2FA)
- **Change Password:** Cambiar contraseña actual
- **Logout:** Cerrar sesión en la plataforma
- **Switch Organization:** Seleccionar organización específica (usuarios y clientes asociados)
- **Time Zone:** Configurar zona horaria preferida
- **Expert Mode:** Habilitar opciones avanzadas en el menú lateral
> **Nota:** La opción "Activate new UI design" solo aparece en ambiente de desarrollo (DEV) y no está disponible en producción.
### Activación del Modo Experto
**Es recomendable activar el "Expert Mode"** para acceder a todas las funcionalidades avanzadas disponibles para usuarios Admin. Esta configuración habilitará opciones adicionales en el menú lateral izquierdo.
## Gestión de Clientes AAA/RADIUS
### Acceso a la Sección de Clientes
Para gestionar clientes RADIUS en la plataforma:
1. En el **menú lateral izquierdo**, seleccionar **"AAA services"**
2. Hacer clic en **"Clients"** o **"Clientes"**
3. Presionar el botón **"Add"** o **"Agregar"** para crear un nuevo cliente
[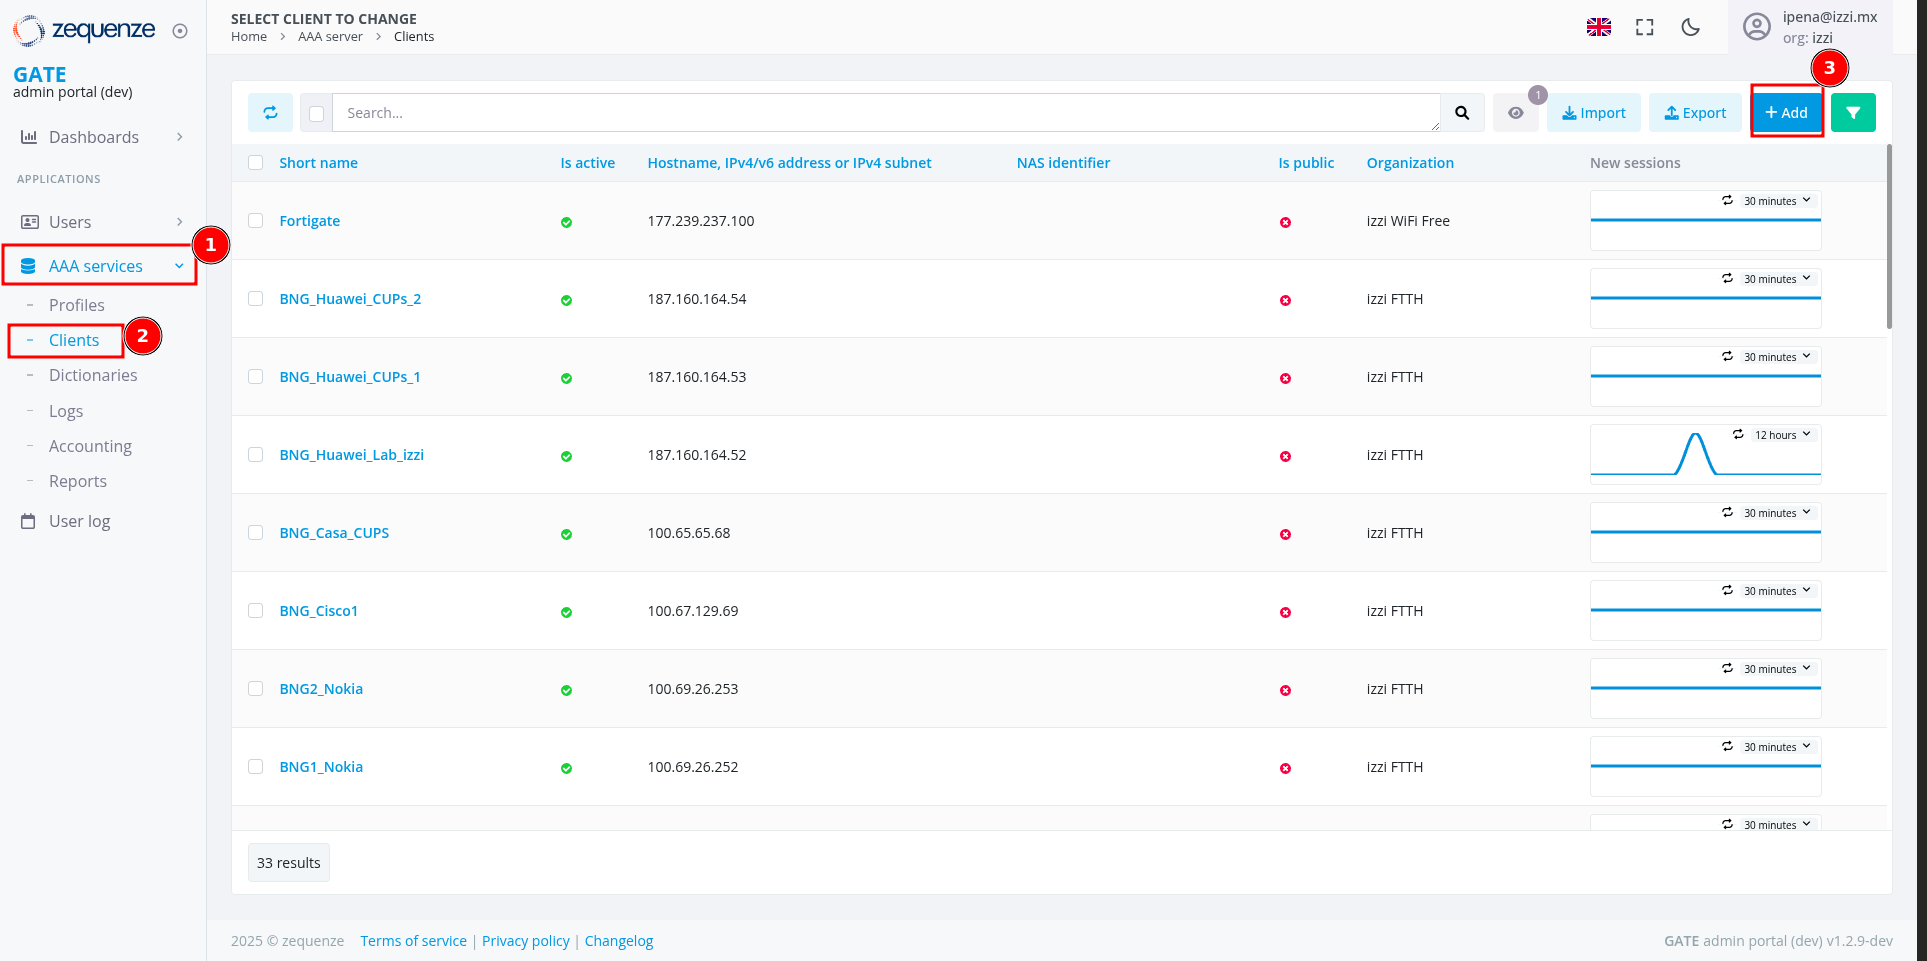](https://docs.zequenze.com/uploads/images/gallery/2025-07/nFd842OQMxrO0OrT-2-aaa-services.png)
Esta funcionalidad permite dar de alta equipos BNGs (Broadband Network Gateway) que enviarán mensajes RADIUS al servidor AAA de GATE.
### Configuración de Nuevo Cliente RADIUS
Al crear un nuevo cliente RADIUS, se debe completar el siguiente formulario:
[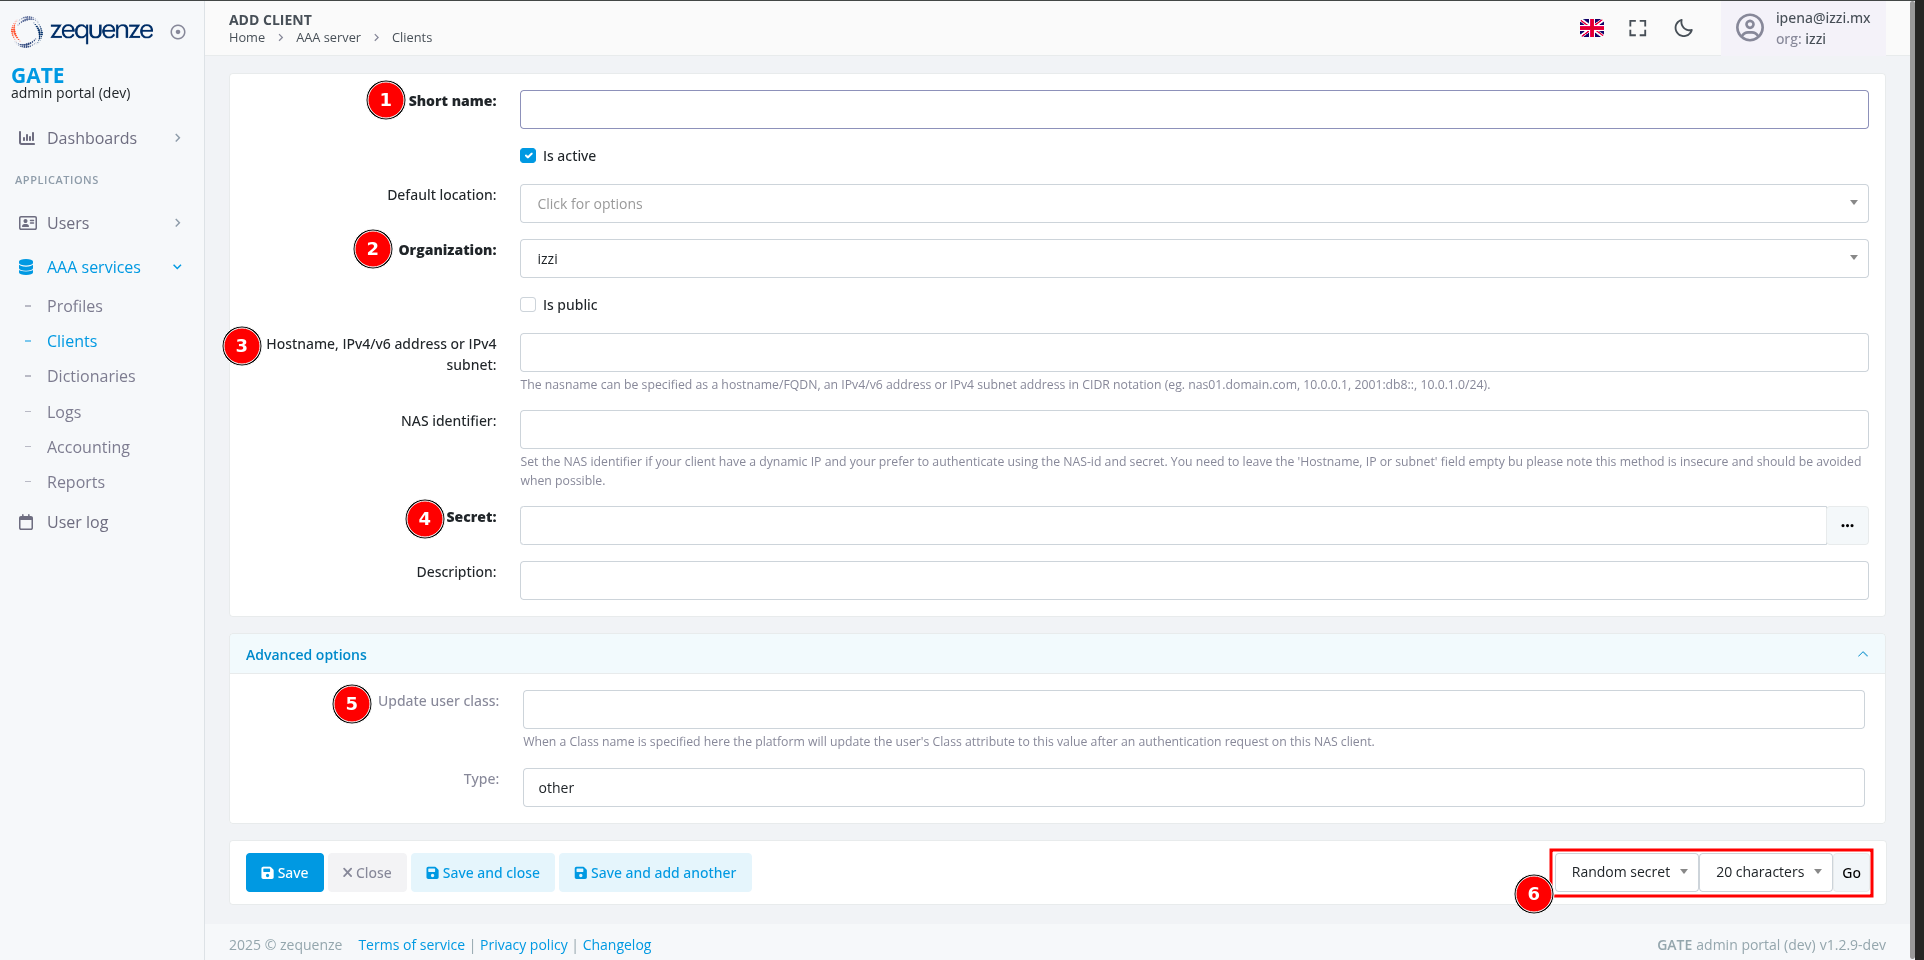](https://docs.zequenze.com/uploads/images/gallery/2025-07/R65RN7bCkgvSToyH-2-1-aaa-services-add.png)
#### Campos Obligatorios
**1. Short name**
- Nombre identificativo del cliente RADIUS
- Sin espacios, máximo 32 caracteres
- Ejemplo: `BNG_Huawei_Lab_izzi`
**2. Organization**
- Organización a la que pertenece el equipo:
- **"izzi FTTH"**: Para BNGs que autentican ONTs
- **"izzi WiFi"**: Para WAGs o Community WiFi/Offloading
- **"izzi"**: Para equipos que requieren ambas funciones
**3. Hostname, IPv4/v6 address or IPv4 subnet**
- Dirección IP (IPv4 o IPv6) desde donde el equipo enviará mensajes RADIUS
- Puede ser una IP específica o un rango de red
- Ejemplo: `10.10.20.20`
**4. Secret**
- Contraseña compartida entre el cliente y el servidor AAA
- Utilizada para autenticar la comunicación RADIUS
- Se puede generar automáticamente usando la opción en el punto 6
**5. Update user class (Opciones Avanzadas)**
- Campo para identificador único del BNG
- Utilizado para enviar parámetros AVP o VSA RADIUS específicos
- Ejemplo: `ClassUnique`
### Ejemplo de Configuración
[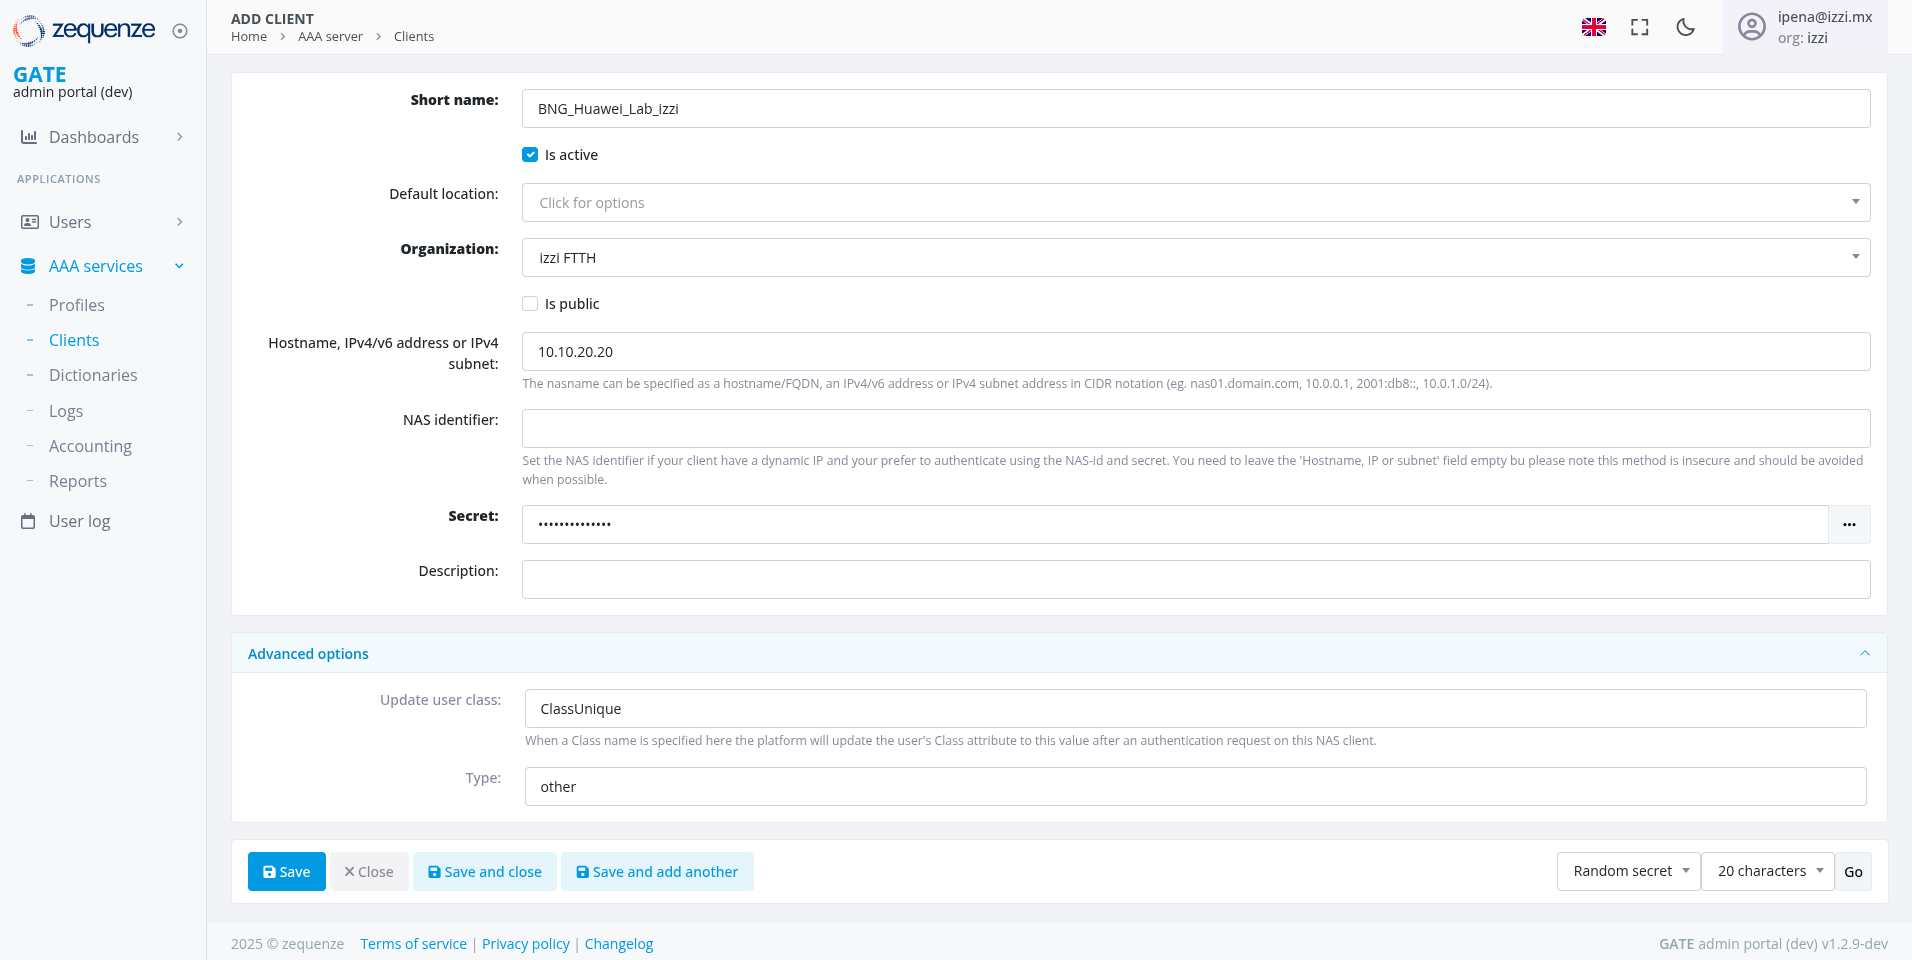](https://docs.zequenze.com/uploads/images/gallery/2025-07/8h0qntxlqmppdJc0-2-2-aaa-services-add.png)
Una vez completados todos los campos con los valores apropiados, hacer clic en **"Save"** o **"Guardar"** para crear el cliente RADIUS.
#### Opciones Adicionales
**Generación Automática de Secret:**
- En la parte inferior del formulario se encuentra la opción para generar contraseñas automáticamente
- Se puede seleccionar el tipo y longitud de la contraseña generada
- Recomendado para mayor seguridad
**Botones de Acción:**
- **Save**: Guardar cliente y regresar a la lista
- **Save and close**: Guardar y cerrar formulario
- **Save and add another**: Guardar y crear otro cliente inmediatamente
## Gestión de Perfiles de Usuario
### Acceso a la Configuración de Perfiles
Para gestionar perfiles de velocidad y atributos RADIUS:
1. En el **menú lateral izquierdo**, seleccionar **"AAA services"**
2. Hacer clic en **"Profiles"** o **"Perfiles"**
[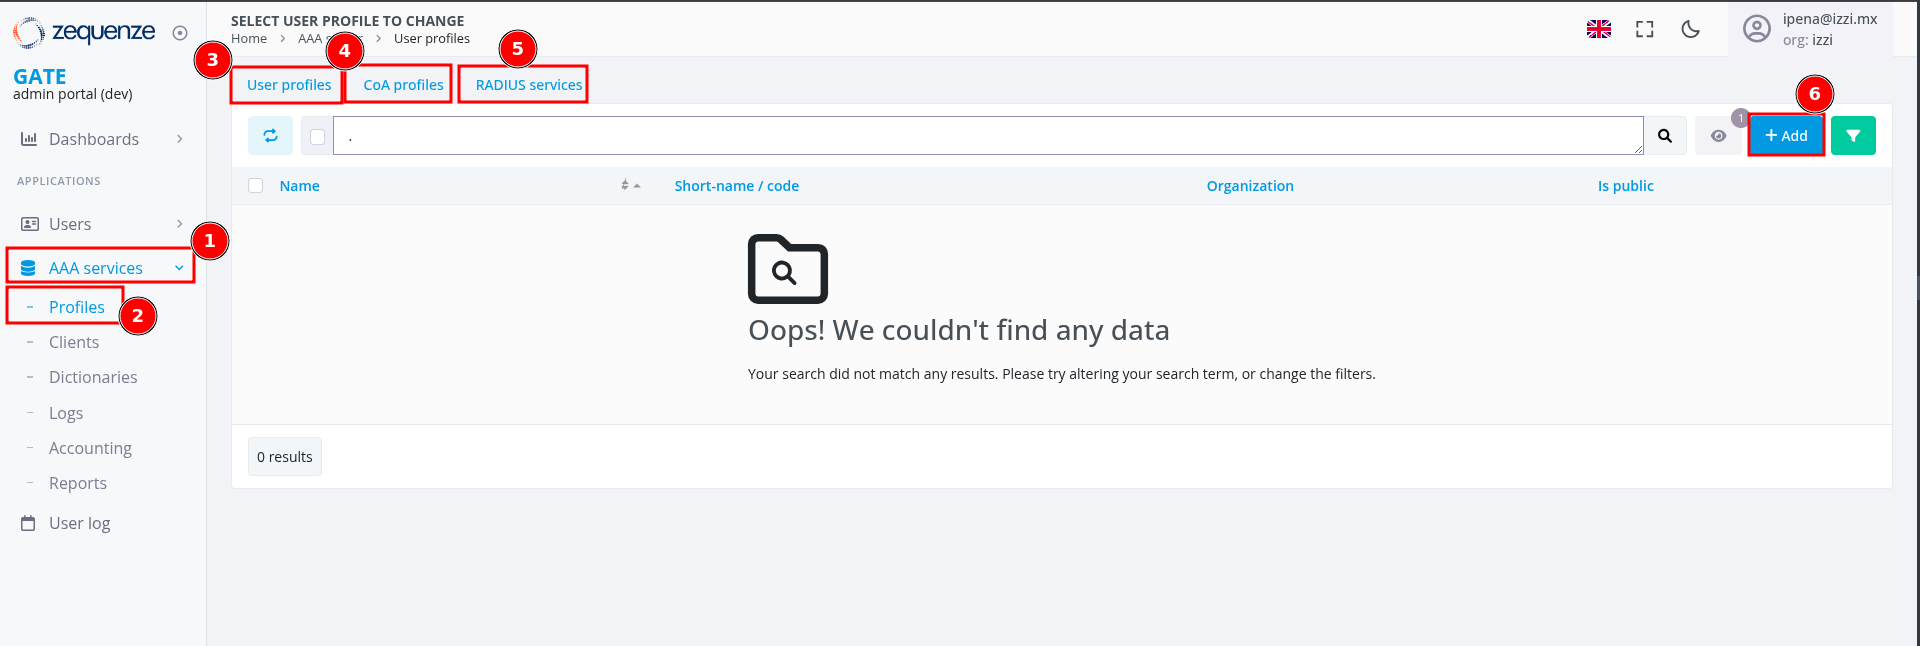](https://docs.zequenze.com/uploads/images/gallery/2025-07/XNMsjj2aXlvWjoD2-3-aaa-profiles.png)
#### Tipos de Perfiles Disponibles
- **User profiles**: Creación de perfiles con parámetros AVP o VSA RADIUS
- **CoA profiles**: Configuración de mensajes CoA (Change of Authorization) o DM (Disconnect Message)
- **RADIUS services**: *Función legacy sin uso actual*
- **Botón "Add"**: Para crear nuevos perfiles de velocidad
### Crear Nuevo Perfil de Usuario
Al hacer clic en **"Add"** se abrirá el formulario de configuración:
[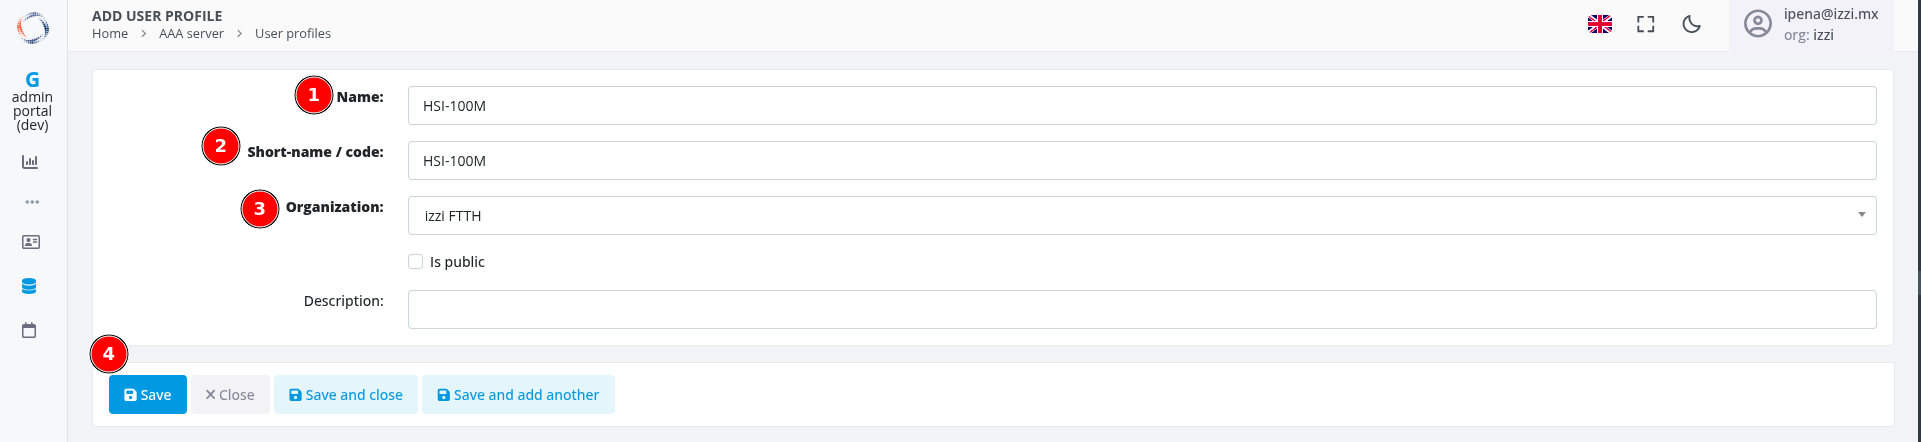](https://docs.zequenze.com/uploads/images/gallery/2025-07/NhndBfpzVBoGUQBi-3-1-aaa-profiles.png)
#### Configuración Básica
**1. Name**
- Nombre descriptivo del perfil
- Generalmente definido por el cliente al asignar usuarios
- Ejemplo: `HSI-100M`
**2. Short-name / code**
- Código corto identificativo
- Usar el mismo valor que el campo "Name"
- Ejemplo: `HSI-100M`
**3. Organization**
- Seleccionar la organización correspondiente
- Para servicios FTTH usar: **"izzi FTTH"**
**4. Botón "Save"**
- Guardar configuración básica para acceder a opciones avanzadas
### Configuración de Atributos del Perfil
Una vez guardado el perfil básico, aparecerán las opciones avanzadas:
[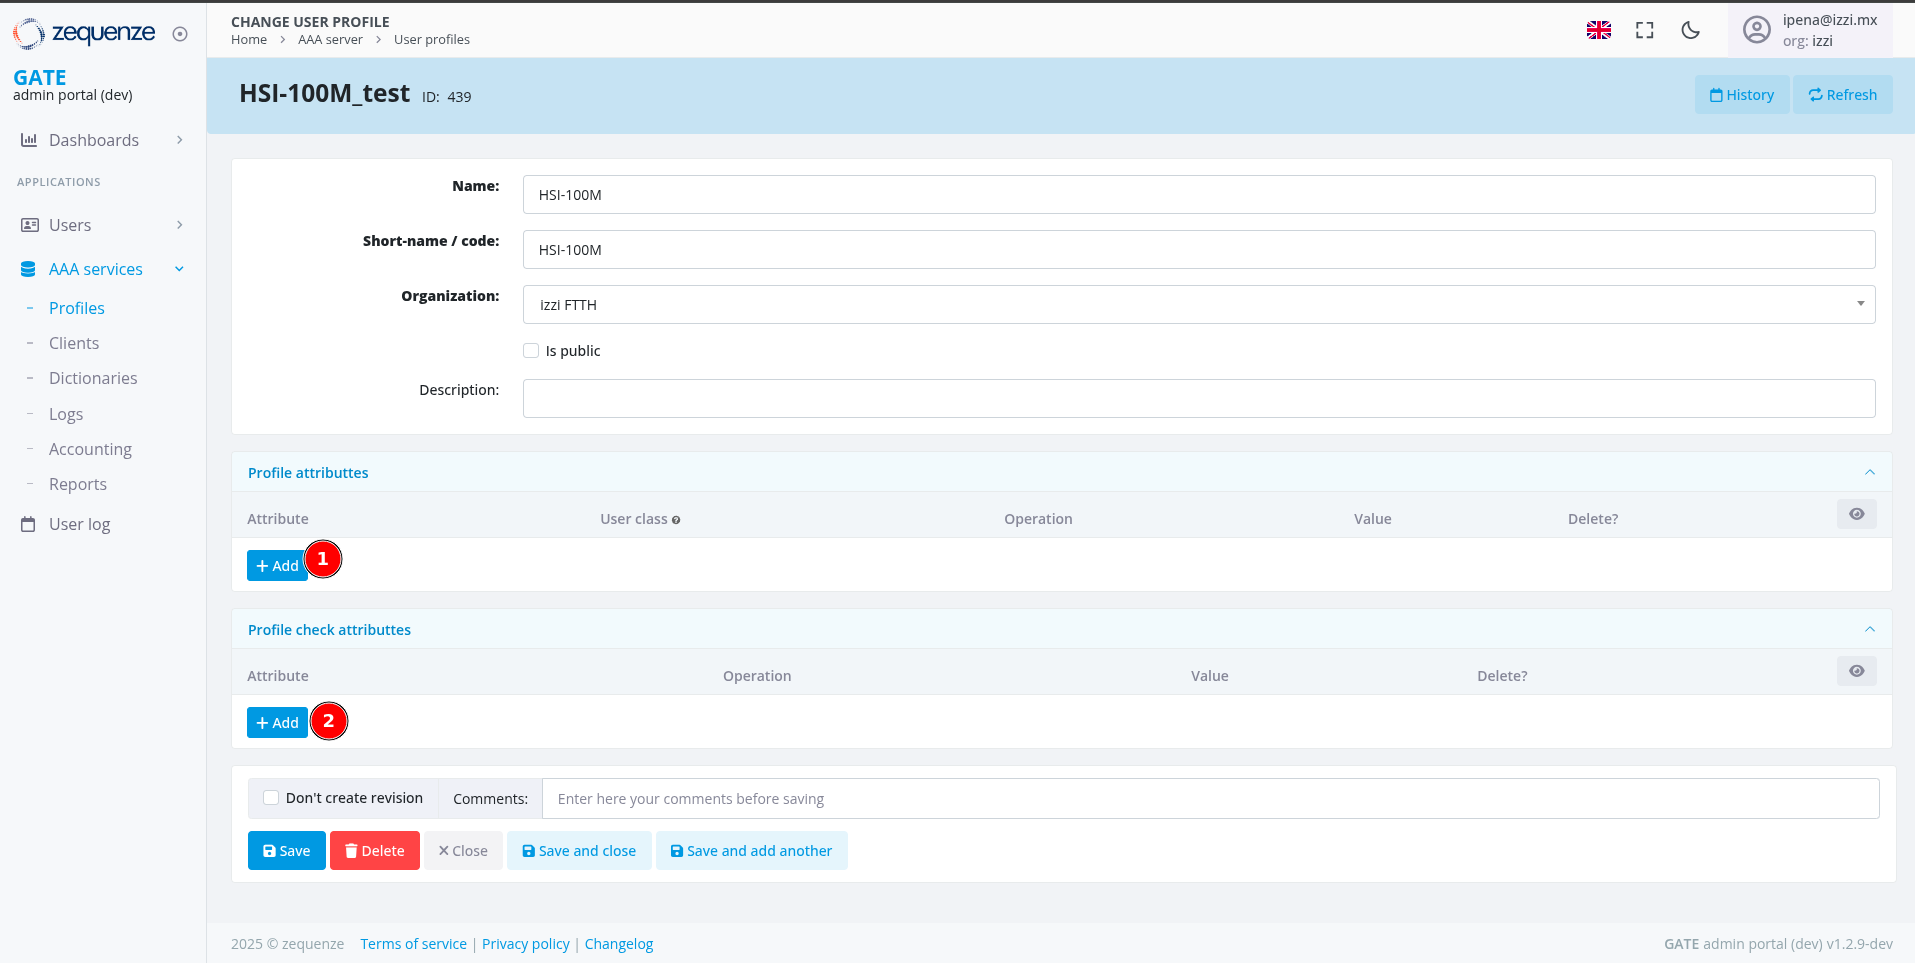](https://docs.zequenze.com/uploads/images/gallery/2025-07/cJQL2w3I5Ppyn1Rk-3-2-aaa-profiles.png)
#### Secciones de Configuración
**1. Profile attributes**
- Hacer clic en **"Add"** para agregar líneas de atributos AVP/VSA
- Estos atributos se envían en mensajes **"Access-Accept"**
**2. Profile check attributes**
- Hacer clic en **"Add"** para agregar criterios de validación
- Define condiciones para aplicar el perfil
### Configuración Detallada de Atributos
[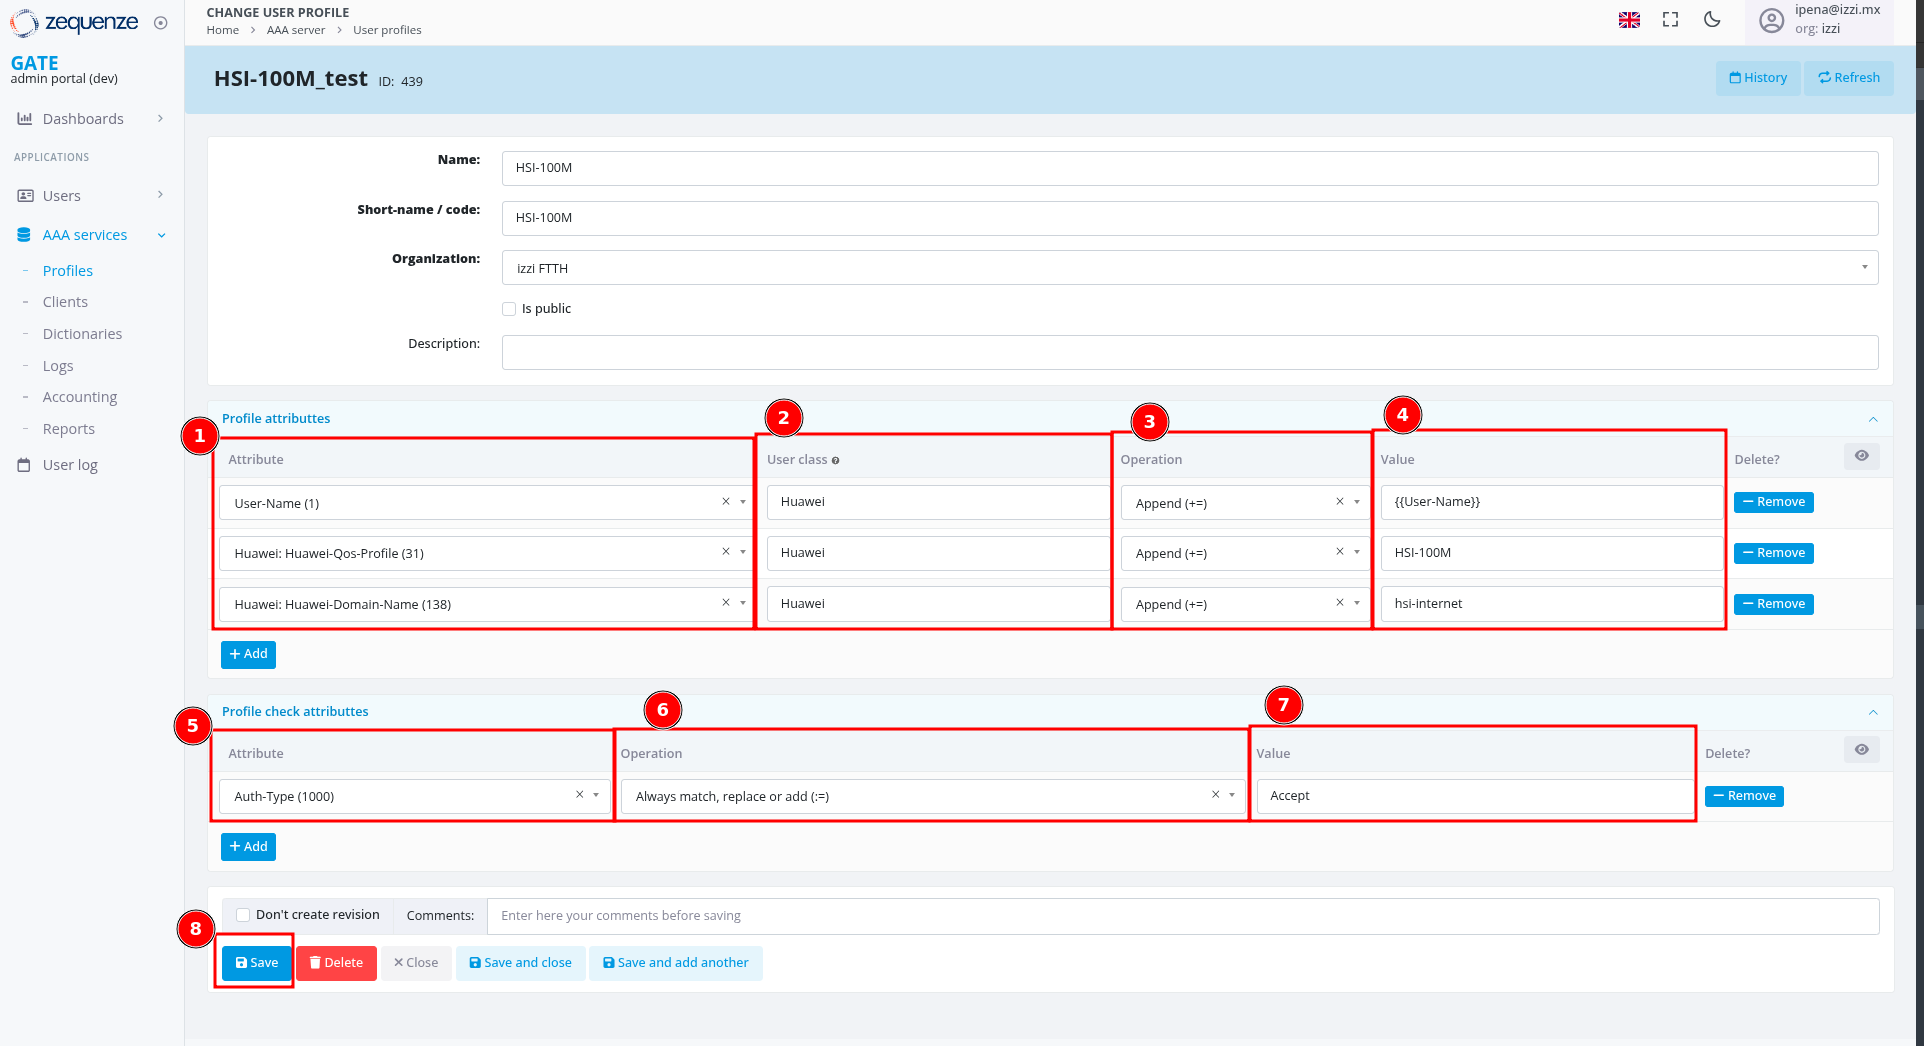](https://docs.zequenze.com/uploads/images/gallery/2025-07/tsUMFbPBO7CdcAOQ-3-3-aaa-profiles.png)
#### Profile Attributes (Respuesta Access-Accept)
**1. Attribute**
- Seleccionar atributo RADIUS (estándar o vendor-specific)
- Ejemplo: `User-Name (1)`, `Huawei-Qos-Profile (31)`
**2. User class**
- **Valor crítico**: Debe coincidir con el campo "Class" del cliente RADIUS
- Garantiza que solo se envíen atributos compatibles con el vendor específico
- Ejemplo: `Huawei`, `Nokia`, `Cisco`
**3. Operation**
- **Append (+=)**: Agregar el atributo a la respuesta
- **Replace or add (:=)**: Establecer valor específico
- **Append if not exist (=)**: Reemplazar valor existente
**4. Value**
- Valor a enviar en el Access-Accept
- Variables entre doble llaves: `{{User-Name}}`
- Valores fijos: `hsi-internet`, `sub-qos-policy-in-HSI-115M`, `HSI-100M`
#### Profile Check Attributes (Validación de Acceso)
**5. Attribute**
- Atributo a validar en la solicitud de acceso
- Ejemplo: `Auth-Type (1000)`
**6. Operation**
- **Always match, replace or add (:=)**: Condición de validación
- **Match if attribute value is equal to (==)**: Debe ser igual al valor especificado
- **Match if attribute value is different to (!=)**: Debe ser diferente al valor
**7. Value**
- Valor esperado para la validación
- Ejemplo: `Accept`, `Reject`
**8. Botón "Save"**
- Guardar toda la configuración del perfil
### Ejemplo de Perfil Multi-Vendor
[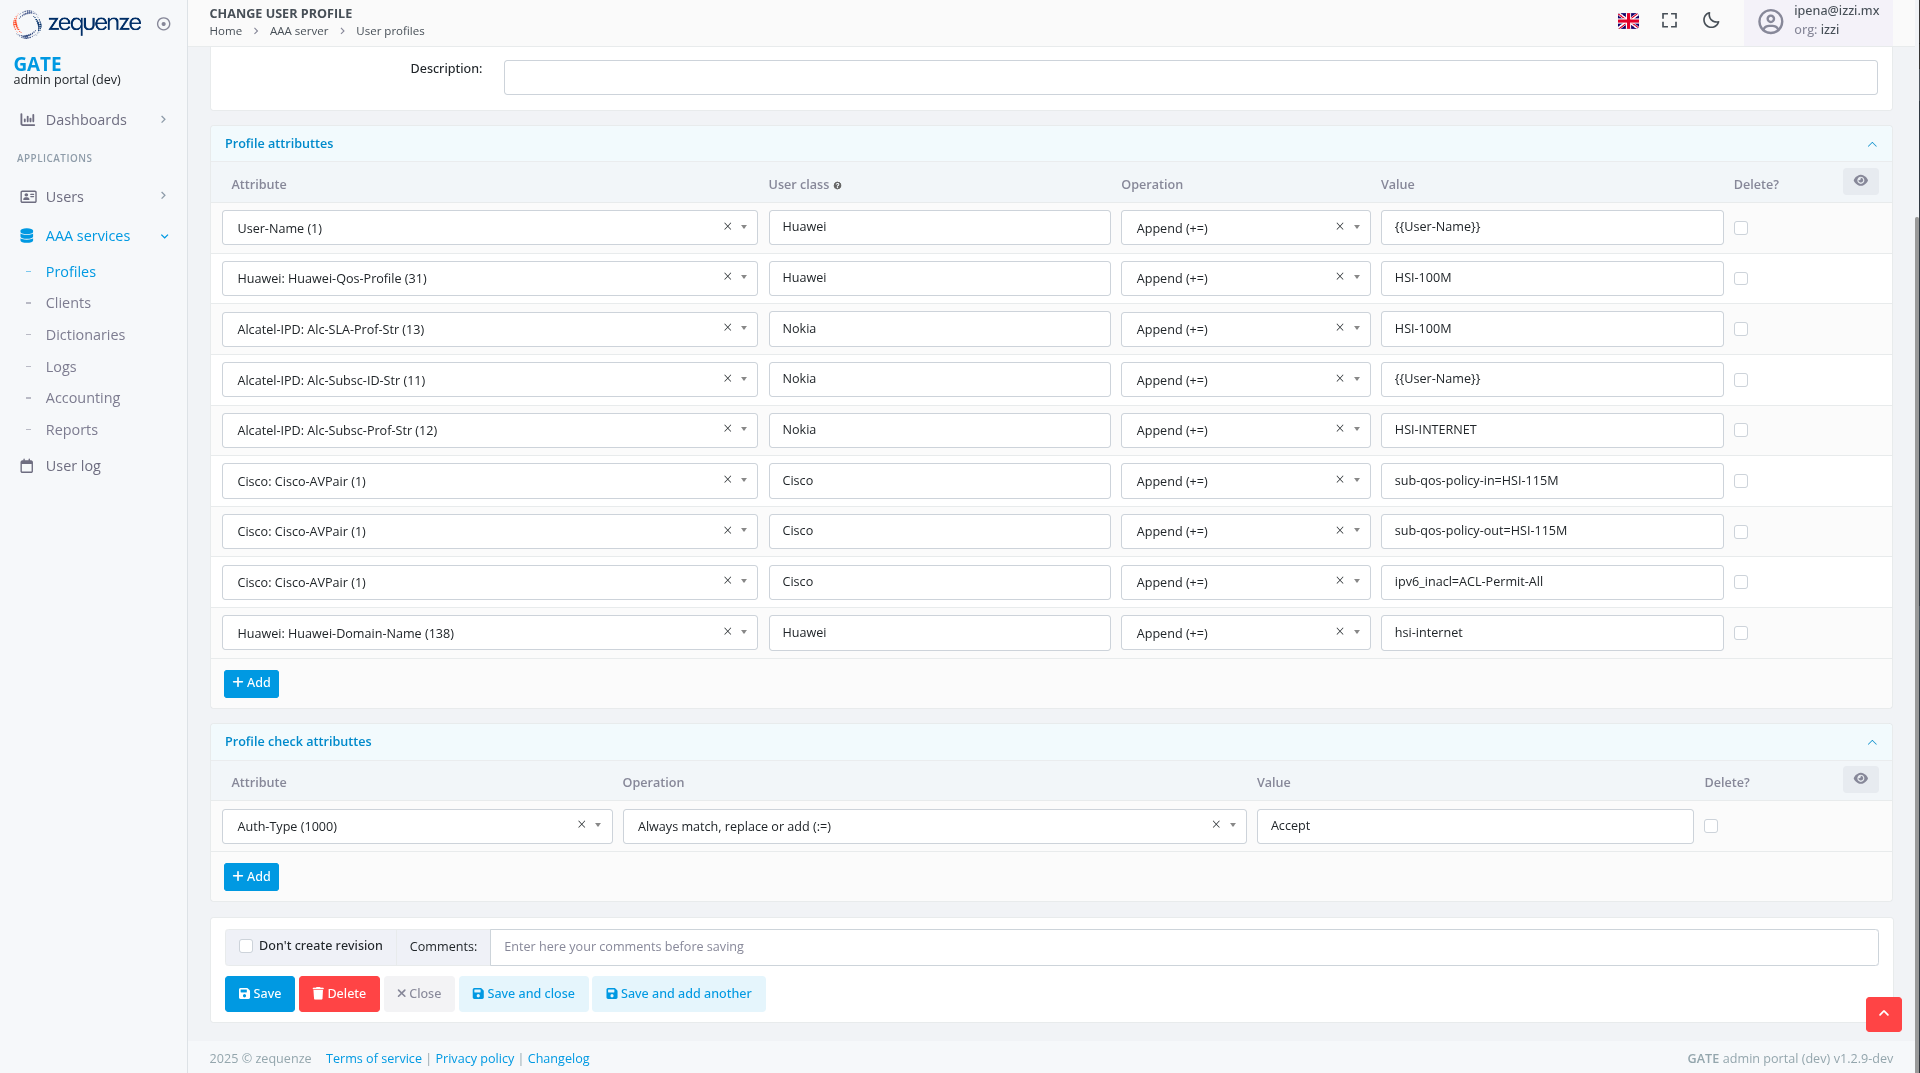](https://docs.zequenze.com/uploads/images/gallery/2025-07/vI1xsqcs4IBeRXXO-3-4-aaa-profiles.png)
Este ejemplo muestra un perfil configurado para múltiples vendors (Huawei, Nokia, Cisco) donde cada conjunto de atributos se aplica únicamente al equipo que coincida con el valor **"User class"** correspondiente, garantizando la interoperabilidad nativa de la plataforma.
## Administración de Usuarios
### Acceso a la Gestión de Usuarios
Para administrar usuarios autenticados o con acceso:
1. En el **menú lateral izquierdo**, seleccionar **"Users"**
2. Confirmar que se encuentra en la sub-opción **"Users"**
3. Hacer clic en el botón **"Add"** o **"Agregar"** para crear un nuevo usuario
[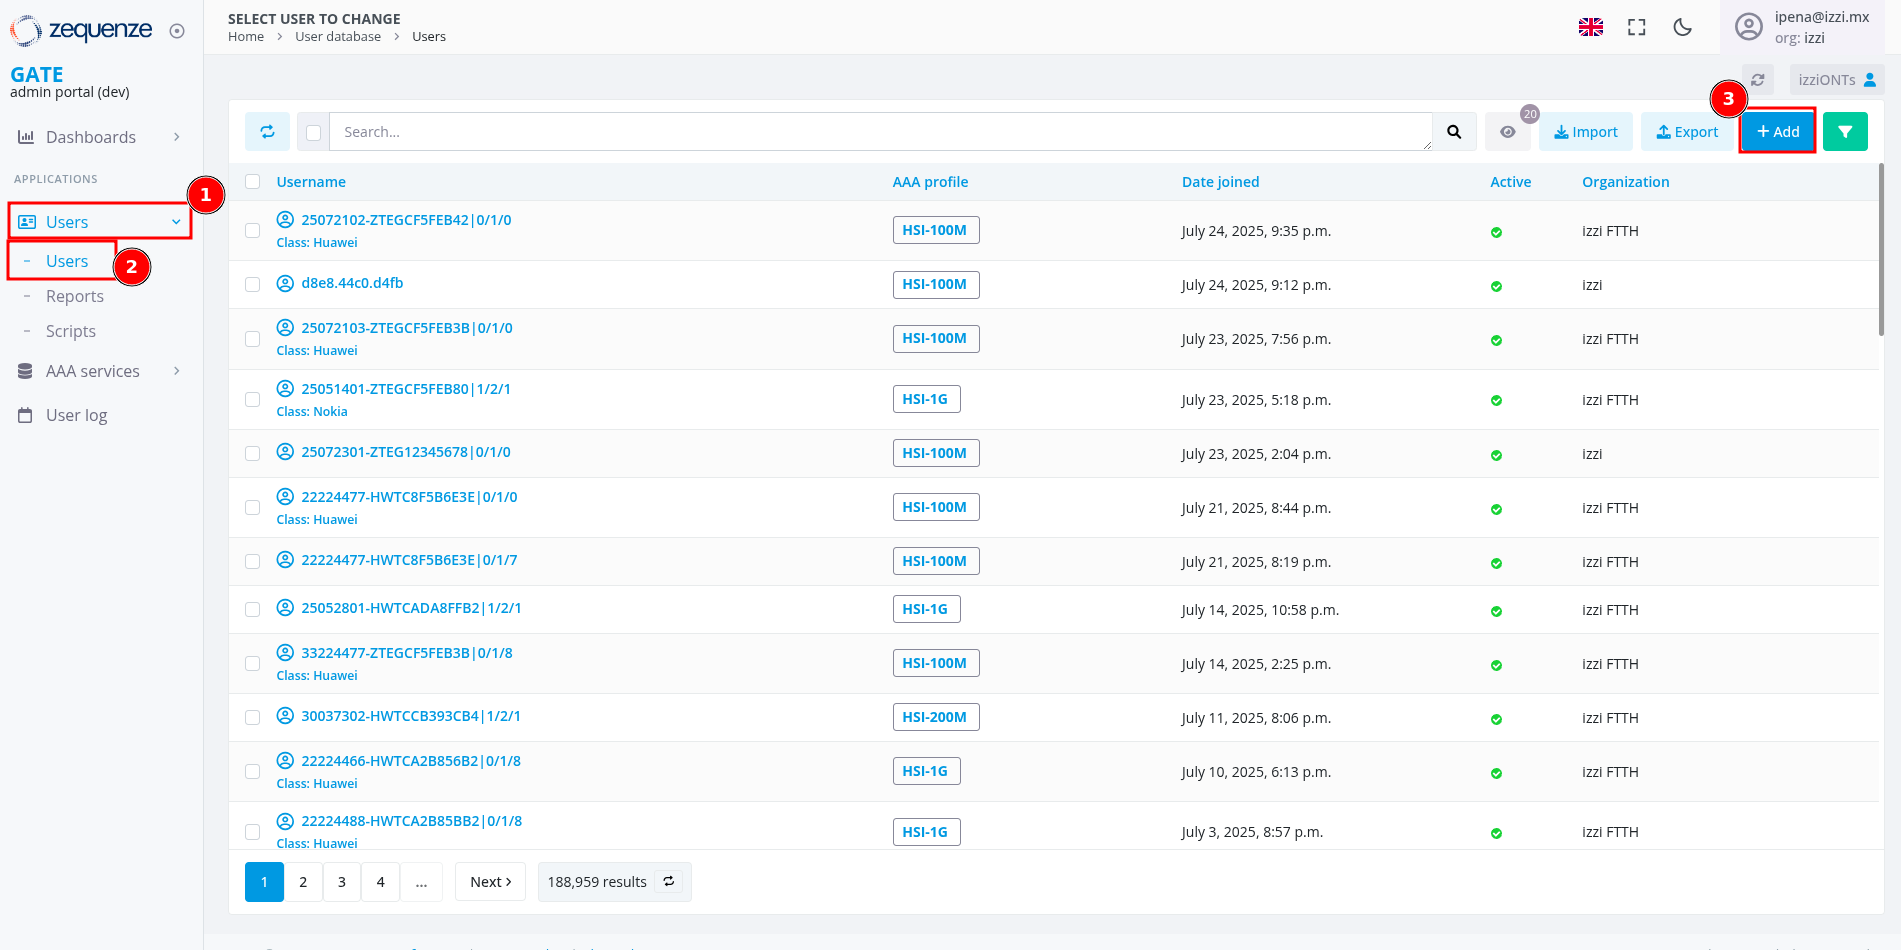](https://docs.zequenze.com/uploads/images/gallery/2025-07/v4Y8R9y9FNy4hji6-4-0-users-users.png)
Esta sección muestra todos los usuarios dados de alta con sus respectivos perfiles de velocidad asignados, incluyendo información como fecha de registro, estado activo y organización.
### Crear Nuevo Usuario
Al hacer clic en **"Add"** se abrirá el formulario de configuración:
[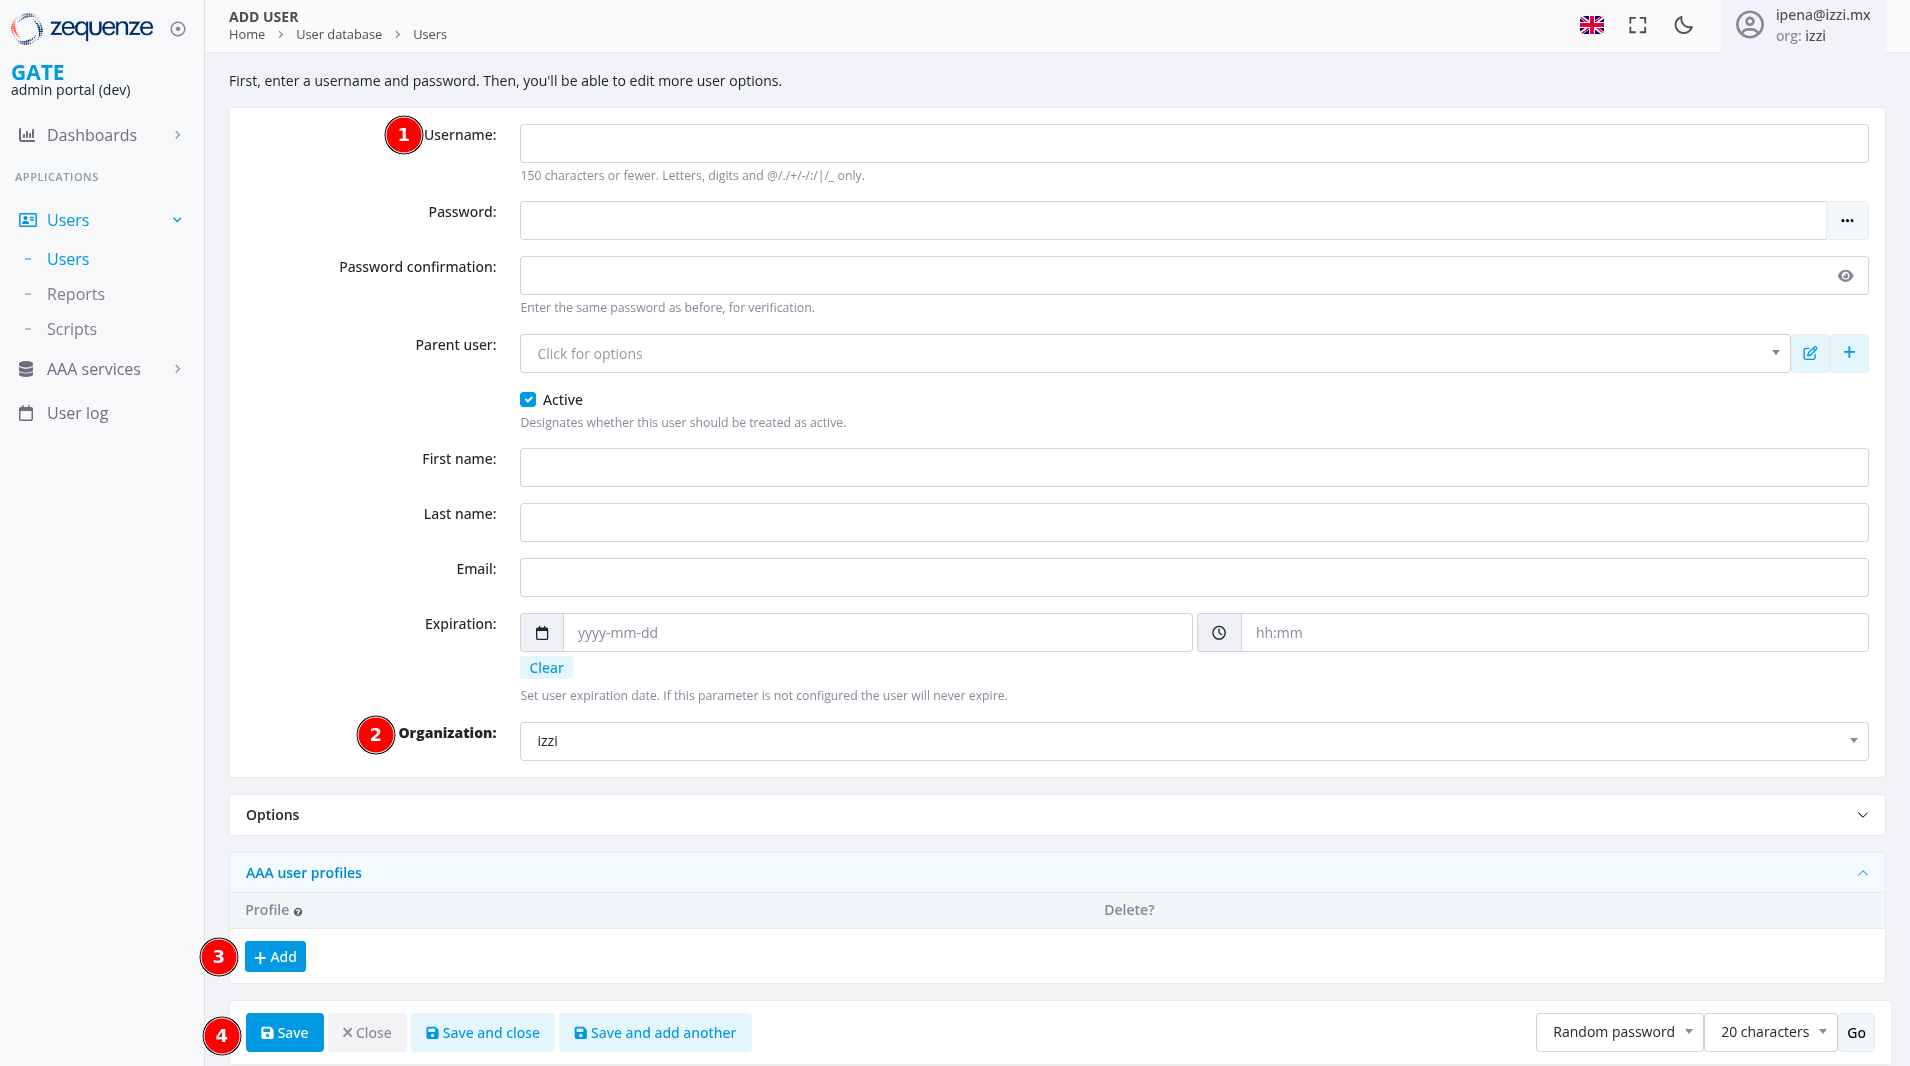](https://docs.zequenze.com/uploads/images/gallery/2025-07/BT0gMoLylPJIzFy4-4-1-users-users-add.png)
#### Configuración de Usuario
**1. Username**
- Campo principal para autenticación RADIUS
- **Formato para izzi**: `NoCliente-SerieONT|Shelf/Slot/PON`
- **Ejemplo**: `25072102-ZTEGCF5FEB42|0/1/0`
- Máximo 150 caracteres (letras, dígitos y caracteres especiales: @/+/-/|/_)
**2. Organization**
- Para servicios ONT/FTTH: Seleccionar **"izzi FTTH"**
- Para otros servicios: Usar organización correspondiente
**3. AAA user profiles**
- Hacer clic en **"Add"** para asignar perfil de velocidad
- Seleccionar el perfil creado previamente (ej: HSI-100M)
**4. Botón "Save"**
-
# Usuario Read-Only izzi
## Descripción General
El usuario Read-Only para izzi cuenta con permisos de **solo lectura** en la plataforma GATE, permitiendo visualizar y consultar información de clientes AAA/RADIUS y usuarios autenticados, pero **sin capacidad de modificar, crear o eliminar** elementos del sistema.
## Propósito del Acceso Read-Only
Este tipo de acceso está diseñado específicamente para:
- **Troubleshooting**: Diagnóstico de problemas de conectividad sin riesgo de modificaciones
- **Monitoreo**: Supervisión del estado de usuarios y equipos en tiempo real
- **Consulta**: Verificación de configuraciones de manera segura
- **Auditoría**: Revisión de configuraciones y estados actuales del sistema
## Acceso a la Plataforma
### Proceso de Inicio de Sesión
El proceso de autenticación es idéntico al usuario administrador:
1. **URL de acceso**: `https://gate.zequenze.com`
2. **Credenciales**: Utilizar las credenciales específicas para usuario Read-Only proporcionadas por Zequenze
> **Nota**: Una vez autenticado, el usuario tendrá acceso al mismo dashboard pero con funcionalidades limitadas a consulta únicamente.
## Consulta de Clientes RADIUS
### Acceso a la Lista de Clientes BNG
Para consultar los clientes RADIUS configurados:
1. En el **menú lateral izquierdo**, seleccionar **"AAA services"**
2. Hacer clic en **"Clients"** o **"Clientes"**
[![**[IMAGEN 24: Colocar aquí "1.0_Client_Radius.png" - Lista de clientes con acceso Read-Only]**](https://docs.zequenze.com/uploads/images/gallery/2025-07/scaled-1680-/53JiyJRXZ95GKckj-1-0-client-radius.png)](https://docs.zequenze.com/uploads/images/gallery/2025-07/53JiyJRXZ95GKckj-1-0-client-radius.png)
### Características del Acceso Read-Only
La interfaz presenta las siguientes limitaciones para usuarios de solo lectura:
- **Icono de candado**: Visible en la interfaz indicando permisos restringidos
- **Sin botón "Add"**: La opción para agregar nuevos clientes no está disponible
- **Solo visualización**: Acceso a información básica de todos los clientes existentes
### Información Visible de Clientes
La lista de clientes muestra los siguientes datos:
- Short name del cliente
- Estado (activo/inactivo)
- Dirección IP o subnet
- NAS identifier
- Organización asignada
### Vista Detallada de Cliente
Al hacer clic en un cliente específico para ver su configuración completa:
[![**[IMAGEN 25: Colocar aquí "1.1_Client_Radius.png" - Vista detallada de cliente Read-Only]**](https://docs.zequenze.com/uploads/images/gallery/2025-07/scaled-1680-/cW8om43OraATMUHN-1-1-client-radius.png)](https://docs.zequenze.com/uploads/images/gallery/2025-07/cW8om43OraATMUHN-1-1-client-radius.png)
#### Información Disponible para Consulta
**Configuración Básica**:
- Nombre del cliente
- Estado operativo
- Ubicación física
**Parámetros de Red**:
- Hostname
- Dirección IP/subnet
- Configuración de conectividad
**Configuración RADIUS**:
- NAS identifier
- Secret (oculto por seguridad)
- Parámetros de autenticación
**Configuración Organizacional**:
- Asignación a organización
- Update user class
- Configuraciones técnicas avanzadas
#### Limitaciones en Vista Detallada
- **Sin controles de edición**: No aparecen botones para modificar información
- **Solo lectura**: Toda la información es consultable únicamente
- **Sin opciones de guardado**: No hay botones "Save", "Delete" o similares
## Consulta de Usuarios Autenticados
### Acceso a la Lista de Usuarios
Para consultar usuarios autenticados en el sistema:
1. En el **menú lateral izquierdo**, seleccionar **"Users"**
2. Confirmar que se encuentra en la sección **"Users"**
[![**[IMAGEN 26: Colocar aquí "2.0_Users.png" - Lista de usuarios Read-Only]**](https://docs.zequenze.com/uploads/images/gallery/2025-07/scaled-1680-/lFphqlpARekTiuKO-2-0-users.png)](https://docs.zequenze.com/uploads/images/gallery/2025-07/lFphqlpARekTiuKO-2-0-users.png)
### Información de Usuarios Disponible
La lista de usuarios muestra:
- **Username**: Con formato izzi (`NoCliente-SerieONT|Shelf/Slot/PON`)
- **ID interno**: Identificador único del sistema
- **AAA profile**: Perfil de velocidad asignado (HSI-100M, HSI-1G, etc.)
- **Date joined**: Fecha de registro del usuario
- **Active**: Estado activo del usuario
- **Class**: Tipo de equipo (Huawei, Nokia, etc.)
### Herramientas de Consulta Disponibles
- **Search**: Búsqueda de usuarios específicos por diferentes criterios
- **Filter**: Filtrado por organización, perfil AAA, estado activo
- **Export**: Exportación de lista de usuarios (solo lectura)
- **Pagination**: Navegación entre páginas de resultados
### Vista Detallada de Usuario
Al seleccionar un usuario específico:
[![**[IMAGEN 27: Colocar aquí "2.1_Users.png" - Vista detallada de usuario Read-Only]**](https://docs.zequenze.com/uploads/images/gallery/2025-07/scaled-1680-/iLr3k1oHZ1LYvC8F-2-1-users.png)](https://docs.zequenze.com/uploads/images/gallery/2025-07/iLr3k1oHZ1LYvC8F-2-1-users.png)
#### Secciones de Información Detallada
**Account Information**:
- **Username**: Usuario configurado para autenticación RADIUS
- **Password**: Estado de configuración (configurado/no configurado, sin mostrar valor)
- **Parent user**: Usuario padre si aplica jerarquía
- **External ID**: Identificador externo del sistema
- **Class**: Tipo de equipo/vendor
- **Active**: Estado operativo del usuario
- **Organization**: Organización asignada
**AAA User Profiles**:
- **Perfiles asignados**: Visualización completa de perfiles de velocidad
- **Configuración detallada**: Parámetros técnicos de cada perfil
#### Restricciones en Vista Detallada
- **Sin capacidad de modificación**: No se pueden cambiar datos del usuario
- **Sin opciones de creación**: No aparece funcionalidad para crear nuevos usuarios
- **Sin eliminación**: No hay controles para eliminar usuarios existentes
- **Acceso de solo consulta**: Funcionalidad limitada a visualización y diagnóstico
## Capacidades de Diagnóstico
### Información Útil para Troubleshooting
El usuario Read-Only puede acceder a información crítica para diagnóstico:
**Estados de Conexión**:
- Verificación de usuarios activos en el sistema
- Consulta de perfiles de velocidad asignados
- Revisión de fechas de último acceso y actividad
**Configuraciones de Red**:
- Direcciones IP de clientes RADIUS
- Estados operativos de BNGs
- Asignaciones organizacionales y jerarquías
**Información Histórica**:
- Fechas de creación y última modificación
- Histórico de actualizaciones de configuración
- Trazabilidad de cambios realizados
### Limitaciones Importantes del Usuario Read-Only
Las siguientes funcionalidades **NO están disponibles** para usuarios de solo lectura:
- Creación de nuevos elementos (usuarios, clientes, perfiles)
- Modificación de configuraciones existentes
- Eliminación de usuarios o clientes RADIUS
- Acceso a configuraciones avanzadas (CoA, DM)
- Gestión completa de perfiles de usuario
- Modificación de parámetros RADIUS
## Comparación de Funcionalidades
| Funcionalidad | Usuario Admin | Usuario Read-Only |
|---------------|:-------------:|:-----------------:|
| **Visualizar clientes RADIUS** | ✅ | ✅ |
| **Crear/modificar clientes** | ✅ | ❌ |
| **Ver usuarios autenticados** | ✅ | ✅ |
| **Gestionar usuarios** | ✅ | ❌ |
| **Configurar perfiles AAA** | ✅ | ❌ |
| **Configurar CoA/DM** | ✅ | ❌ |
| **Exportar datos** | ✅ | ✅ |
| **Troubleshooting y consulta** | ✅ | ✅ |
## Casos de Uso Recomendados
### Diagnóstico de Conectividad
1. **Verificación de usuario**: Búsqueda de usuario específico por username
2. **Revisión de perfil**: Confirmación de perfil de velocidad asignado
3. **Validación de estado**: Verificación de que el usuario esté activo
4. **Consulta de BNG**: Revisión de configuración del cliente RADIUS correspondiente
### Monitoreo de Servicios
1. **Estado de equipos**: Verificación de BNGs activos/inactivos
2. **Usuarios conectados**: Monitoreo en tiempo real de usuarios activos
3. **Distribución de perfiles**: Verificación de asignación de velocidades
### Auditoría y Reportes
1. **Generación de reportes**: Exportación de listas de usuarios para análisis
2. **Verificación de configuraciones**: Revisión de parámetros sin riesgo de modificación
3. **Consulta de históricos**: Revisión de fechas de cambios y creación de elementos
---
**Conclusión**: El usuario Read-Only proporciona un acceso seguro y controlado para tareas de consulta, diagnóstico y monitoreo, eliminando completamente el riesgo de modificaciones accidentales en la plataforma GATE mientras mantiene acceso completo a toda la información necesaria para troubleshooting y auditoría.
# Guía de Uso izzi
## Descripción General
Esta guía presenta casos de uso prácticos y escenarios comunes para el manejo de la plataforma GATE por parte del cliente izzi. Los ejemplos están diseñados para ser útiles tanto para usuarios Admin como Read-Only, con indicaciones específicas sobre qué acciones están disponibles para cada tipo de usuario.
---
## Casos de Uso de Consulta
### Caso 1: Consulta de Logs de Autenticación
**Escenario:** Revisar el historial de intentos de autenticación de un BNG específico para identificar problemas de conectividad.
**Disponible para:** Usuario Admin ✅ y Read-Only 👁️
#### Acceso desde Cliente RADIUS
[![**[IMAGEN 28: Colocar aquí "1.0_CasoUso.png" - Selección de cliente RADIUS]**](https://docs.zequenze.com/uploads/images/gallery/2025-07/scaled-1680-/oh1DUda2dmb3HlAX-1-0-casouso.png)](https://docs.zequenze.com/uploads/images/gallery/2025-07/oh1DUda2dmb3HlAX-1-0-casouso.png)
1. **Acceder a Clientes**
- Menú lateral → AAA services → Clients
- Seleccionar cliente específico (ej: BNG_Huawei_CUPs_2)
2. **Consultar Logs AAA**
[![**[IMAGEN 29: Colocar aquí "1.1_CasoUso.png" - Pestaña AAA logs]**](https://docs.zequenze.com/uploads/images/gallery/2025-07/scaled-1680-/IUcMCN5NcQI7eXeg-1-1-casouso.png)](https://docs.zequenze.com/uploads/images/gallery/2025-07/IUcMCN5NcQI7eXeg-1-1-casouso.png)
- Hacer clic en pestaña **"AAA logs"**
- Ver registros de autenticación:
- **Date/time**: Momento del intento
- **User**: Username que intentó autenticar
- **Type**: Access-Accept ✅ o Access-Reject ❌
- **Client**: BNG de origen
3. **Detalles de Autenticación**
[![**[IMAGEN 30: Colocar aquí "1.2_CasoUso.png" - Detalles de log]**](https://docs.zequenze.com/uploads/images/gallery/2025-07/scaled-1680-/yBCTLgb5ZMQ7j4L2-1-2-casouso.png)](https://docs.zequenze.com/uploads/images/gallery/2025-07/yBCTLgb5ZMQ7j4L2-1-2-casouso.png)
- Hacer clic en fecha/hora específica
- **Información visible**:
- Username completo
- Tipo de respuesta (Access-Accept/Reject)
- Calling station (identificador del equipo)
- Cliente y NAS IP
- Organización asignada
[![**[IMAGEN 31: Colocar aquí "1.3_CasoUso.png" - Detalles técnicos RADIUS]**](https://docs.zequenze.com/uploads/images/gallery/2025-07/scaled-1680-/0Vu152X8wVRwqzHR-1-3-casouso.png)](https://docs.zequenze.com/uploads/images/gallery/2025-07/0Vu152X8wVRwqzHR-1-3-casouso.png)
4. **Detalles Técnicos RADIUS**
- **Sección "Log details"**: Información técnica detallada
- **Request**: Parámetros enviados por el BNG
- **Reply**: Respuesta enviada por GATE
- **Atributos RADIUS**: Class, User-Name, parámetros VSA
---
### Caso 2: Consulta de Accounting Records
**Escenario:** Revisar el consumo de datos y tiempo de conexión de usuarios desde un BNG específico.
**Disponible para:** Usuario Admin ✅ y Read-Only 👁️
[![**[IMAGEN 32: Colocar aquí "1.4_CasoUso.png" - Pestaña AAA accounting]**](https://docs.zequenze.com/uploads/images/gallery/2025-07/scaled-1680-/zfajgFrzor57ckK9-1-4-casouso.png)](https://docs.zequenze.com/uploads/images/gallery/2025-07/zfajgFrzor57ckK9-1-4-casouso.png)
1. **Acceder a Accounting**
- Desde la vista del cliente RADIUS
- Seleccionar pestaña **"AAA accounting"**
2. **Información de Accounting**
- **Date/time**: Momento del registro
- **Time**: Duración de la sesión
- **Status**: Estado de la sesión
- **User**: Usuario conectado
- **Input/Output bytes**: Tráfico consumido
[![**[IMAGEN 33: Colocar aquí "1.5_CasoUso.png" - Detalles de accounting]**](https://docs.zequenze.com/uploads/images/gallery/2025-07/scaled-1680-/DogmEtR7H8dtT2Uc-1-5-casouso.png)](https://docs.zequenze.com/uploads/images/gallery/2025-07/DogmEtR7H8dtT2Uc-1-5-casouso.png)
3. **Detalles de Sesión**
- Hacer clic en fecha/hora específica
- **Información detallada**:
- Session ID único
- Fechas de inicio y fin
- Tiempo total de conexión
- Bytes transferidos (entrada/salida)
- Información de calling station
---
### Caso 3: Búsqueda Global de Logs
**Escenario:** Buscar logs específicos en toda la plataforma usando filtros avanzados.
**Disponible para:** Usuario Admin ✅ y Read-Only 👁️
#### Logs de Autenticación
[![**[IMAGEN 34: Colocar aquí "2.0_CasosLogs.png" - Sección Logs global]**](https://docs.zequenze.com/uploads/images/gallery/2025-07/scaled-1680-/FWMSbUMMt7No2LkY-2-0-casoslogs.png)](https://docs.zequenze.com/uploads/images/gallery/2025-07/FWMSbUMMt7No2LkY-2-0-casoslogs.png)
1. **Acceder a Logs Globales**
- Menú lateral → AAA services → Logs
2. **Opciones de Búsqueda**
- **Barra de búsqueda (4)**: Buscar por username, IP, etc.
- **Filtros avanzados (3)**: Filtrar por:
- Date/time: Rango de fechas
- Type: Access-Accept, Access-Reject
- NAS Client: Cliente RADIUS específico
- User: Usuario particular
**Mejores Prácticas para Búsqueda Eficiente:**
- Usar filtros específicos antes de realizar búsquedas amplias
- Limitar rangos de tiempo para mejorar performance
- Combinar múltiples filtros para resultados precisos
- Exportar resultados para análisis offline
#### Accounting Records
[![**[IMAGEN 35: Colocar aquí "2.1_CasosAccounting.png" - Sección Accounting global]**](https://docs.zequenze.com/uploads/images/gallery/2025-07/scaled-1680-/l1uI032VGfjXiftx-2-1-casosaccounting.png)](https://docs.zequenze.com/uploads/images/gallery/2025-07/l1uI032VGfjXiftx-2-1-casosaccounting.png)
1. **Acceder a Accounting Global**
- Menú lateral → AAA services → Accounting
2. **Filtros Disponibles**
- **Búsqueda (4)**: Por usuario, cliente, etc.
- **Filtros avanzados (3)**:
- Start date/time: Rango temporal
- Session status: Estado de sesiones
- User: Usuario específico
- Parent user: Usuario padre
---
### Caso 4: Generación de Reportes de Tráfico
**Escenario:** Generar reporte de consumo de datos por organización y cliente RADIUS.
**Disponible para:** Usuario Admin ✅ y Read-Only 👁️
[![**[IMAGEN 36: Colocar aquí "3.0_Reports.png" - Sección Reports]**](https://docs.zequenze.com/uploads/images/gallery/2025-07/scaled-1680-/Ni9dOnsnn8iLOzrG-3-0-reports.png)](https://docs.zequenze.com/uploads/images/gallery/2025-07/Ni9dOnsnn8iLOzrG-3-0-reports.png)
1. **Acceder a Reports**
- Menú lateral → AAA services → Reports
- Explorar reportes predefinidos
2. **Seleccionar Reporte Específico**
[![**[IMAGEN 37: Colocar aquí "3.1_Reports.png" - Reporte de tráfico]**](https://docs.zequenze.com/uploads/images/gallery/2025-07/scaled-1680-/zODwRDH2yzZNwwA5-3-1-reports.png)](https://docs.zequenze.com/uploads/images/gallery/2025-07/zODwRDH2yzZNwwA5-3-1-reports.png)
- Ejemplo: **"Traffic per class, NAS-ID and Organization (GBytes)"**
- **Configurar filtros**:
- **Class**: Huawei (filtro aplicado)
- **Interval**: Período de tiempo (168 hours)
- **NAS Client**: BNG específico
- **Organization**: izzi FTTH
3. **Interpretar Resultados**
- **Gráfica temporal**: Picos de tráfico por horario
- **Tabla de datos**:
- Date/time: Período analizado
- Client: BNG origen
- Class: Tipo de equipo
- Organization: Organización
- In/Out/Total GBytes: Consumo de datos
**Información Disponible para Análisis:**
- Username con formato izzi
- Perfil de velocidad asignado
- Fecha de registro
- Estado actual
- Organización
- Tipo de equipo (Huawei, Nokia, etc.)
---
### Caso 5: Troubleshooting por Usuario Específico
**Escenario:** Diagnosticar problemas de un usuario particular revisando su historial completo.
**Disponible para:** Usuario Admin ✅ y Read-Only 👁️
[![**[IMAGEN 38: Colocar aquí "4.0_Users.png" - Búsqueda de usuario]**](https://docs.zequenze.com/uploads/images/gallery/2025-07/scaled-1680-/AK0ZKqPAhVwLrgVU-4-0-users.png)](https://docs.zequenze.com/uploads/images/gallery/2025-07/AK0ZKqPAhVwLrgVU-4-0-users.png)
1. **Localizar Usuario**
- Menú lateral → Users → Users
- **Buscar usuario**: `25072102-ZTEGCF5FEB42|0/1/0`
- Hacer clic en el usuario encontrado
#### Logs de Autenticación del Usuario
[![**[IMAGEN 39: Colocar aquí "4.1_Users_logs.png" - Logs por usuario]**](https://docs.zequenze.com/uploads/images/gallery/2025-07/scaled-1680-/7NvQYdb0t5Bi9vd7-4-1-users-logs.png)](https://docs.zequenze.com/uploads/images/gallery/2025-07/7NvQYdb0t5Bi9vd7-4-1-users-logs.png)
2. **Revisar AAA Logs**
- Pestaña **"AAA logs"** en la vista del usuario
- **Información visible**:
- Historial de autenticaciones
- Resultados (Access-Accept/Reject)
- BNG de origen por cada intento
- Calling station utilizada
#### Accounting del Usuario
[![**[IMAGEN 40: Colocar aquí "4.2_Users_acc.png" - Accounting por usuario]**](https://docs.zequenze.com/uploads/images/gallery/2025-07/scaled-1680-/BLcSn6FsnBDYznP5-4-2-users-acc.png)](https://docs.zequenze.com/uploads/images/gallery/2025-07/BLcSn6FsnBDYznP5-4-2-users-acc.png)
3. **Revisar AAA Accounting**
- Pestaña **"AAA accounting"**
- **Información de sesiones**:
- Duración de conexiones
- Consumo de datos por sesión
- Fechas de inicio/fin
- Estado de las sesiones
#### Análisis Completo del Usuario
**Información Consolidada:**
- **Patrón de conexiones**: Frecuencia y horarios
- **Problemas recurrentes**: Access-Reject repetidos
- **Consumo de datos**: Tendencias de uso
- **BNGs utilizados**: Equipos de origen
- **Perfil asignado**: Velocidad configurada
#### Proceso de Diagnóstico para Read-Only 👁️
**Verificar Usuario:**
- ✅ Buscar usuario: `25072102-ZTEGCF5FEB42|0/1/0`
- ✅ Confirmar estado: Activo/Inactivo
- ✅ Validar perfil: HSI-100M asignado
- ✅ Verificar organización: izzi FTTH
**Revisar Cliente RADIUS:**
- ✅ Buscar BNG con IP: 187.160.164.52
- ✅ Confirmar estado del cliente
- ✅ Validar organización correcta
**Información para Escalación:**
- ✅ Recopilar datos del usuario
- ✅ Identificar BNG origen
- ✅ Documentar configuraciones actuales
- ✅ Proporcionar información a usuario Admin
---
## Casos de Uso de Configuración
### Caso 1: Alta de Nuevo Cliente RADIUS (BNG)
**Escenario:** Se requiere dar de alta un nuevo BNG Huawei en la red de izzi para autenticación de ONTs.
**Disponible para:** Usuario Admin ✅ únicamente
#### Datos del Ejemplo:
- **Equipo**: BNG Huawei modelo MA5800
- **IP Address**: 192.168.100.50
- **Ubicación**: Nodo Guadalajara Norte
- **Servicio**: Autenticación ONTs FTTH
#### Proceso Paso a Paso:
1. **Acceder a Clientes RADIUS**
- Menú lateral → AAA services → Clients
- Clic en
# Advanced topics
# Captive Portal HTML/CCS code example
## Overview
Captive Portal templates in GATE can be customized in two ways:
- Through the GATE GUI interface
- By directly modifying the HTML/CSS code of the template
This page demonstrates the HTML/CSS implementation of the Hotel Template for captive portals.
## Hotel Template Preview
**Live Template:** [Captive Portal Hotel Template](https://gate-dev.zequenze.com/page/template-transparent_column-hotel1/)
[](https://docs.zequenze.com/uploads/images/gallery/2020-05/lffsAOJ5v3X0Thki-hotel1-little.jpg)
[](https://docs.zequenze.com/uploads/images/gallery/2020-05/lffsAOJ5v3X0Thki-hotel1-little.jpg)
[](https://docs.zequenze.com/uploads/images/gallery/2020-05/lffsAOJ5v3X0Thki-hotel1-little.jpg)
[](https://docs.zequenze.com/uploads/images/gallery/2020-05/lffsAOJ5v3X0Thki-hotel1-little.jpg)
## Complete HTML/CSS Code
Below is the complete HTML template code for the Hotel captive portal:
```html
{% extends "page/base.html" %}
{% load admin_static media i18n %}
{% block extrastyle %}
{% if page.variables.favicon %}
{% endif %}
{% endblock %}
{% block body_tag %}
{% endblock %}
{% block main %}
{% include "includes/social_detect.html" %}
{{ page.variables.title|default:'Lorem ipsum dolor'|safe }}
{{ page.variables.sub_title|default:'Lorem ipsum dolor'|safe }}
{% if page.variables.footer_text %}
{% if page.variables.footer_logo %}
{% endif %}
{{ page.variables.footer_text|default:'Lorem ipsum dolor sit amet, consectetur adipiscing elit sed do eiusmod tempor.'|safe }}
{% endif %}
{{ page.content|safe }}
{% endblock %}
{% block bottom_scripts %}
{% if page.variables.welcome_url %}
{% endif %}
{% if social_auth %}{% include "includes/social_auth.html" %}{% endif %}
{% if uam_api %}
{% include "includes/uam_default.html" %}
{% endif %}