MikroTik Captive Portal Integration Guide
Hotspot using MikroTik
This guide walks you through configuring a MikroTik router to work with GATE as an external captive portal. Users register by entering their email and name through the web portal, with information stored in GATE's database (AAA server) and sent back to the MikroTik device. The MikroTik then sends an Access-Request to the server, which responds with an Access-Accept, granting internet access.
Hardware & Software Requirements
- Model: RB952Ui-5ac2nD
- Architecture: mipsbe
- Firmware: 7.18.2
Configuration Overview
This configuration involves several key components:
- Bridge Setup - Creates a unified network interface
- Network Configuration - IP addressing, DHCP, and firewall rules
- RADIUS Integration - Connects to GATE's authentication server
- Hotspot Configuration - Portal pages, user profiles, and server setup
Bridge for Hotspot
The first step is creating a bridge interface to connect WiFi and Ethernet interfaces into a single network.
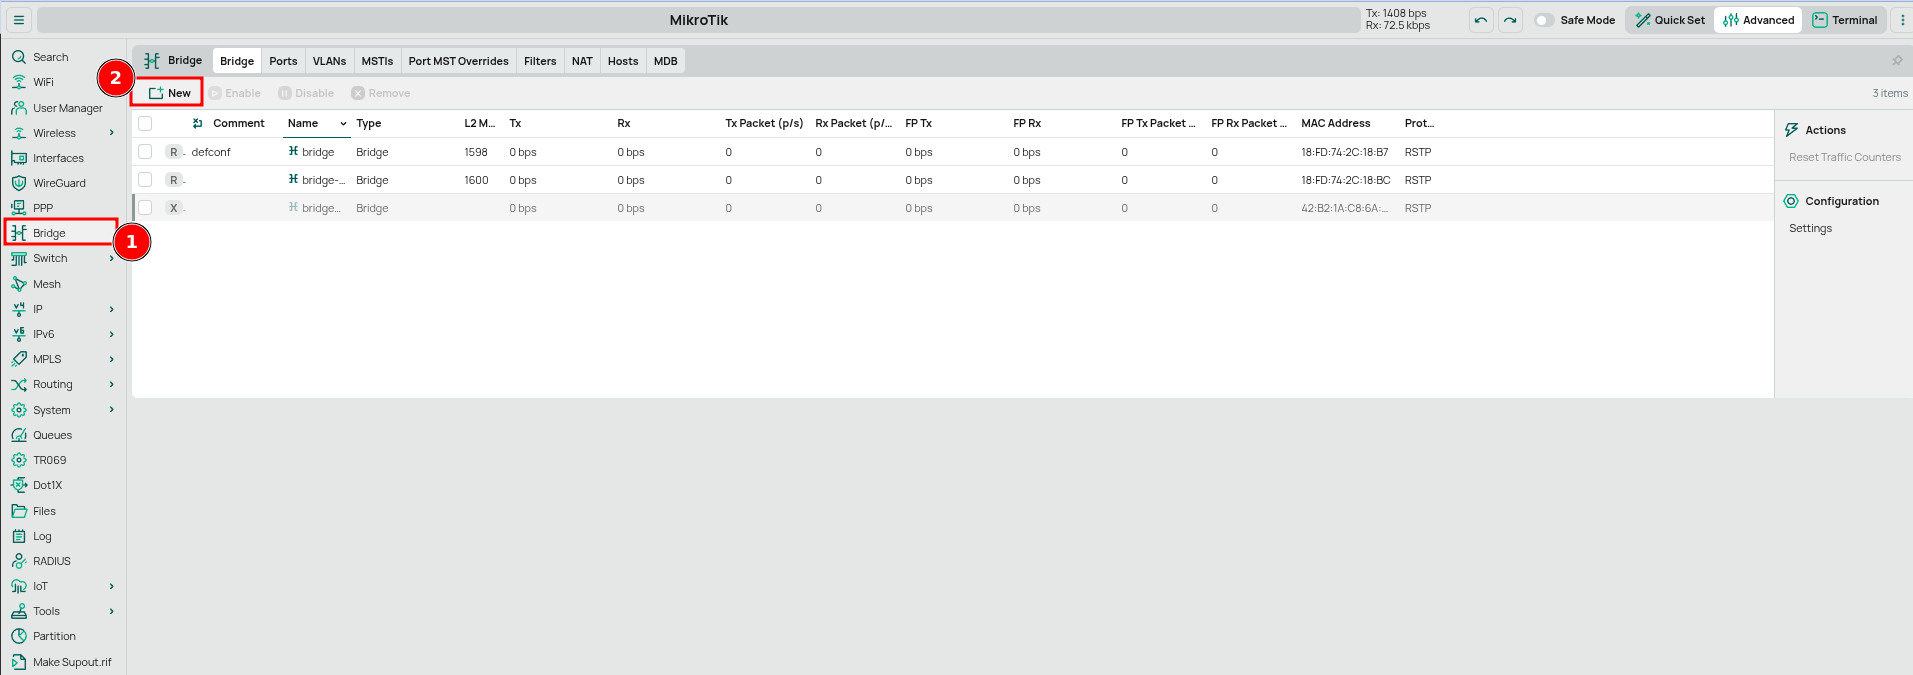
Creating a Bridge Interface
-
Navigate to Bridge in the left menu and click New

-
In the new interface form:
- Set Name to "bridge-for-hotspot"
- Leave other settings at default values
- Click Apply then OK


The bridge will connect your interfaces for hotspot functionality, allowing traffic to flow between interfaces and creating a unified network.
Assign WiFi Interfaces
Next, assign WiFi interfaces to the bridge to allow wireless clients to connect.
Adding WiFi Interfaces to the Bridge
-
Go to Bridge then click the Ports tab
-
For each wireless interface (wlan2GHz and wlan5GHz):
- Click on the interface
- From the Bridge dropdown, select "bridge-for-hotspot"
- Click Apply then OK

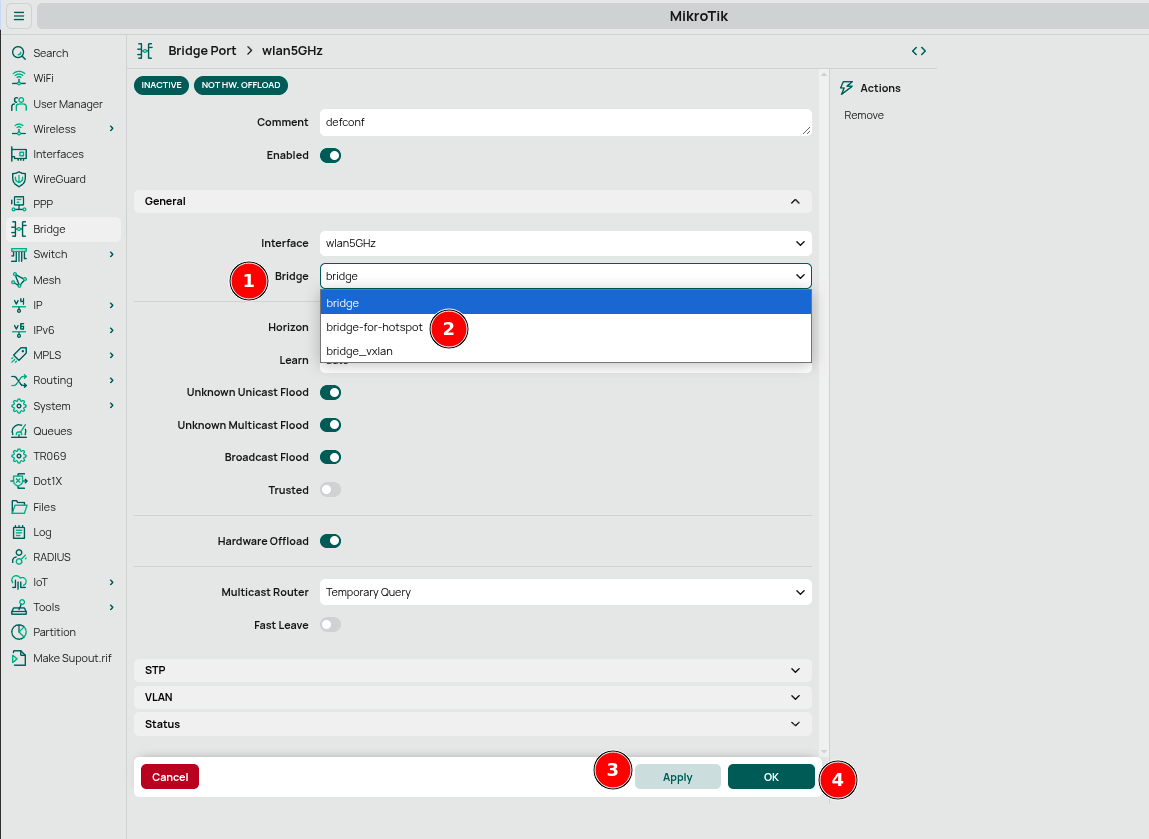
This creates a unified network for hotspot traffic, with all wireless clients connecting through these interfaces.
Network Configuration
Configure network settings to establish the foundation for your hotspot and ensure proper communication.
IP Address Assignment
First, assign an IP address to the bridge interface:
-
Go to IP → Addresses
-
Click New
-
Configure the following:
-
Address:
10.5.50.1/24 -
Network:
10.5.50.0 - Interface: "bridge-for-hotspot"
- Click Apply then OK

-
Address:
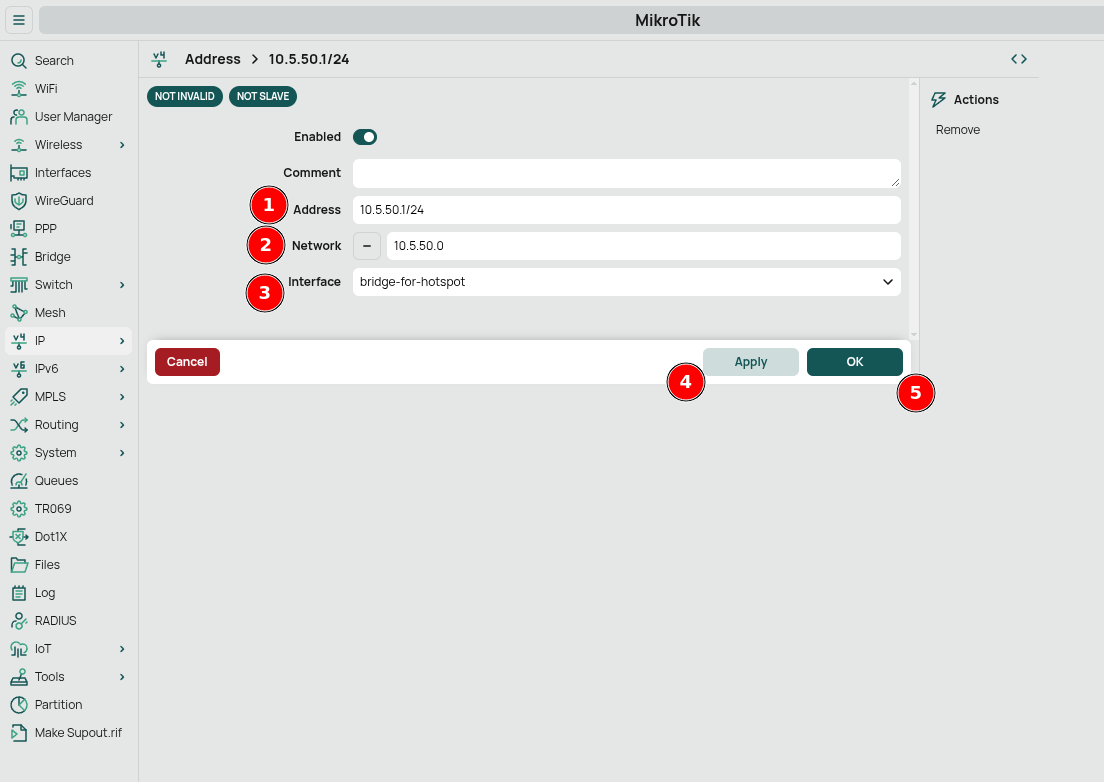
This IP address (10.5.50.1) will serve as the gateway for all devices connecting to your hotspot.
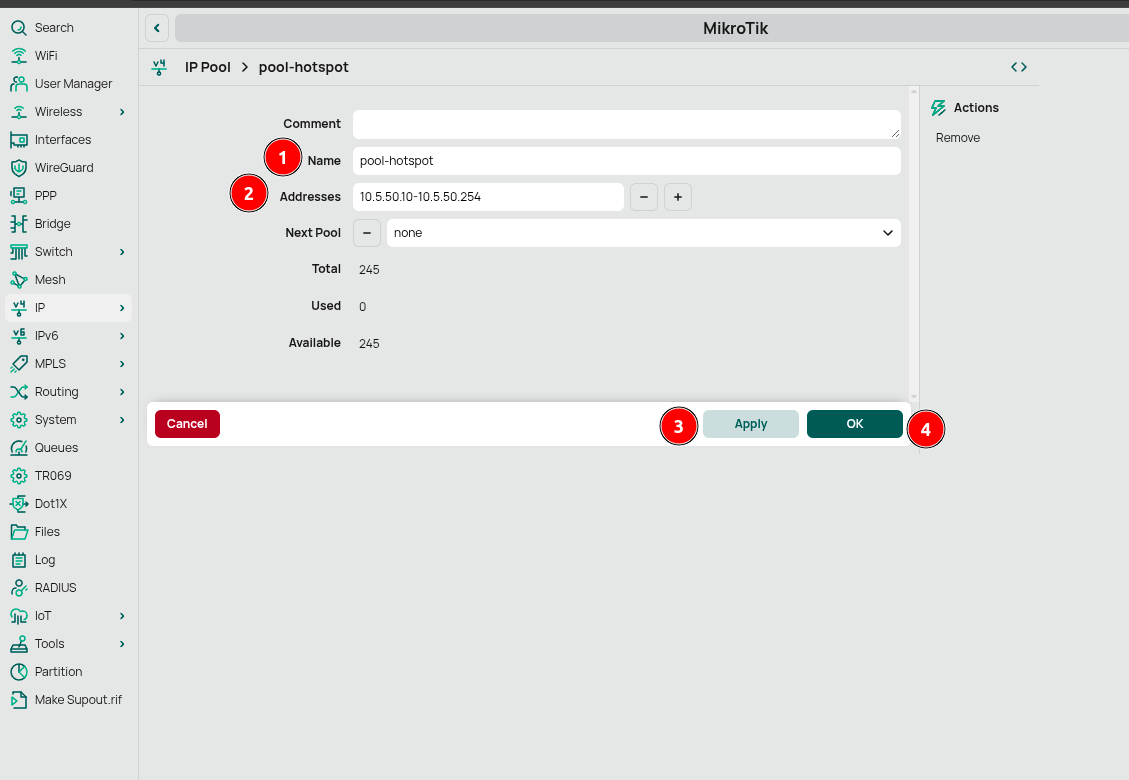
IP Pool Configuration
Create an address pool for the hotspot:
- Go to IP → Pool
- Click New
- Configure:
-
Name:
pool-hotspot -
Addresses:
10.5.50.10-10.5.50.254 - Click Apply then OK
-
Name:
DHCP Server Setup
Configure the DHCP server to automatically assign IP addresses to clients.
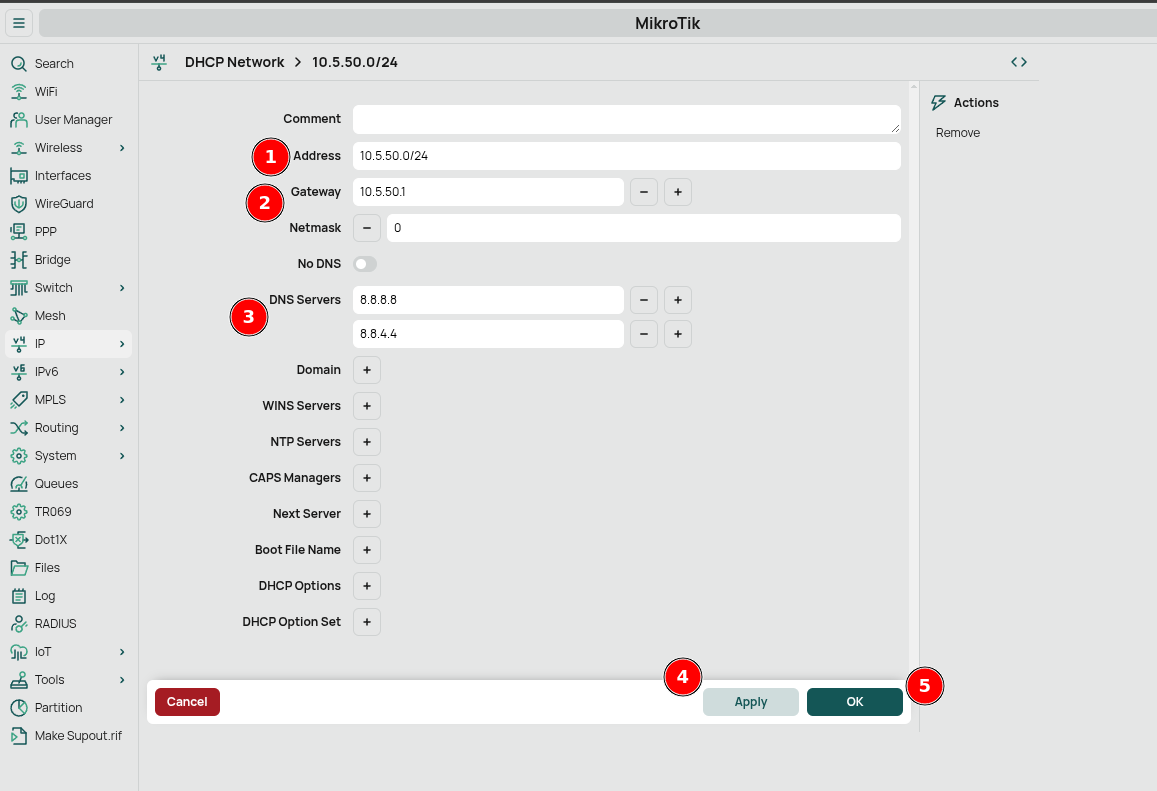
DHCP Networks
-
Go to IP → DHCP Server → Networks tab
-
Click New
-
Configure the network:
-
Address:
10.5.50.0/24 -
Gateway:
10.5.50.1 -
DNS Servers:
8.8.8.8,8.8.4.4(Google DNS) - Click Apply then OK

-
Address:
DHCP Server
-
Go to IP → DHCP Server → DHCP tab
-
Click New
-
Configure:
- Name: "hotspot-dhcp"
- Interface: "bridge-for-hotspot"
- Address Pool: "pool-hotspot"
- Leave other settings at defaults
- Click Apply then OK

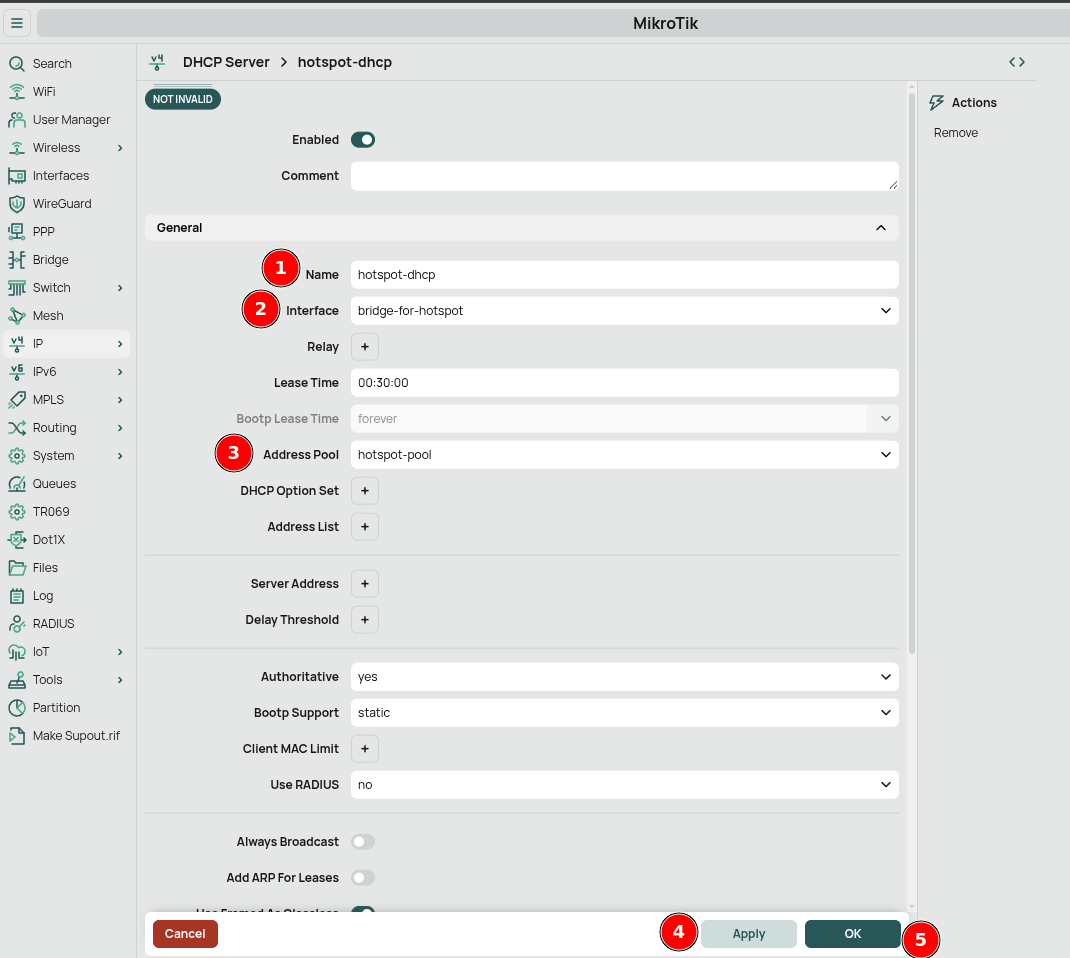
The DHCP server will now assign IP addresses to clients from the specified pool.
Firewall Configuration
Create a firewall rule to allow RADIUS authentication traffic:
-
Go to IP → Firewall → Filter Rules tab
-
Click New
-
Under General tab:
-
Chain:
input -
Protocol:
udp -
Dst. Port:
1812,1813,3799
-
Chain:
-
Under Action tab:
-
Action:
accept
-
Action:
-
Click Apply then OK

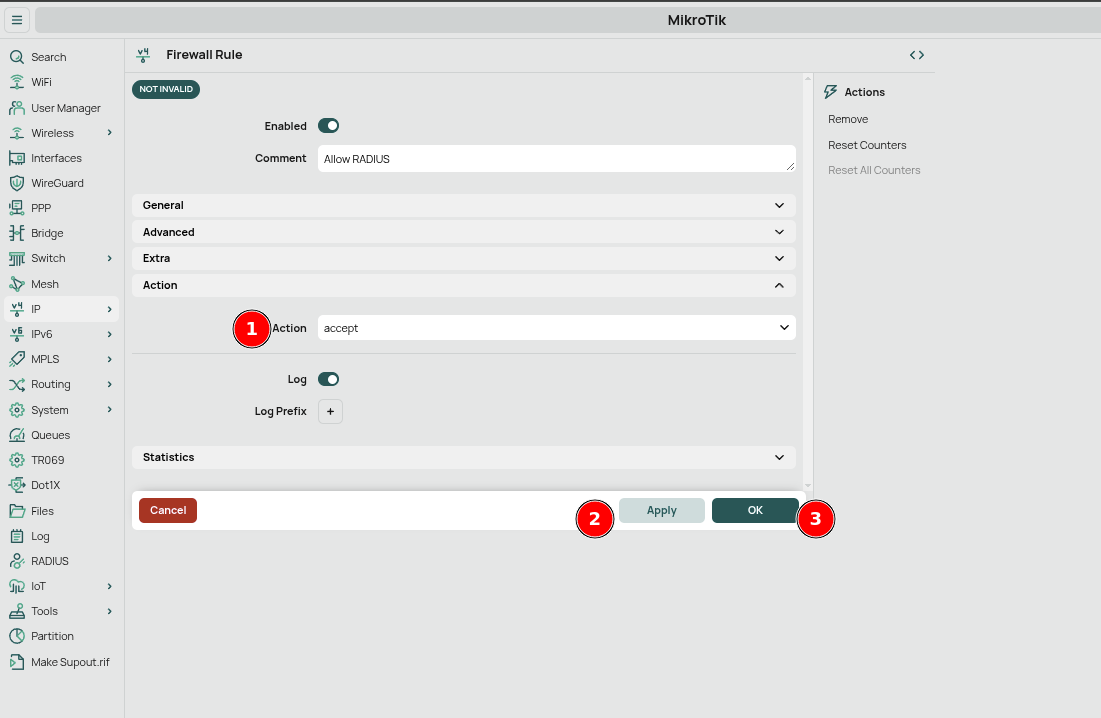
This rule allows communication between your MikroTik router and GATE's RADIUS server.
RADIUS Configuration
Configure RADIUS settings to connect to GATE's authentication server.
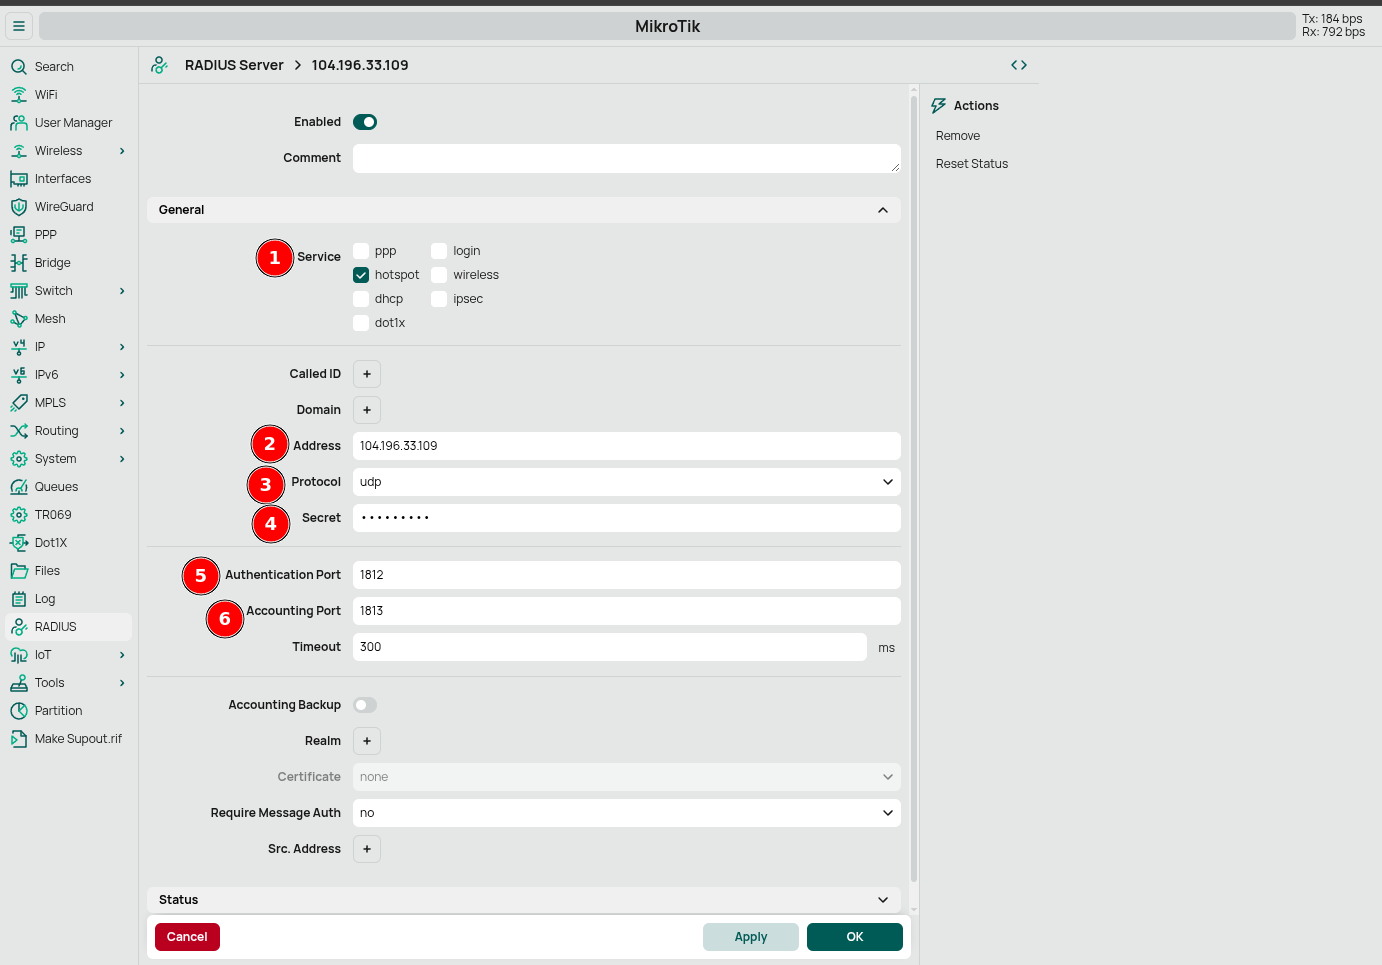
RADIUS Server Setup
-
Go to RADIUS and click New
-
Configure:
- Under Service, enable only hotspot
- Address: Enter your GATE server IP address
- Secret: Enter the shared secret password
-
Authentication Port:
1812 -
Accounting Port:
1813 - Click Apply then OK

RADIUS Incoming Configuration
-
Go to RADIUS and click Incoming
-
Configure:
- Enable Accept toggle
-
Port:
3799 - VRF: Select "main"
- Click Apply then OK

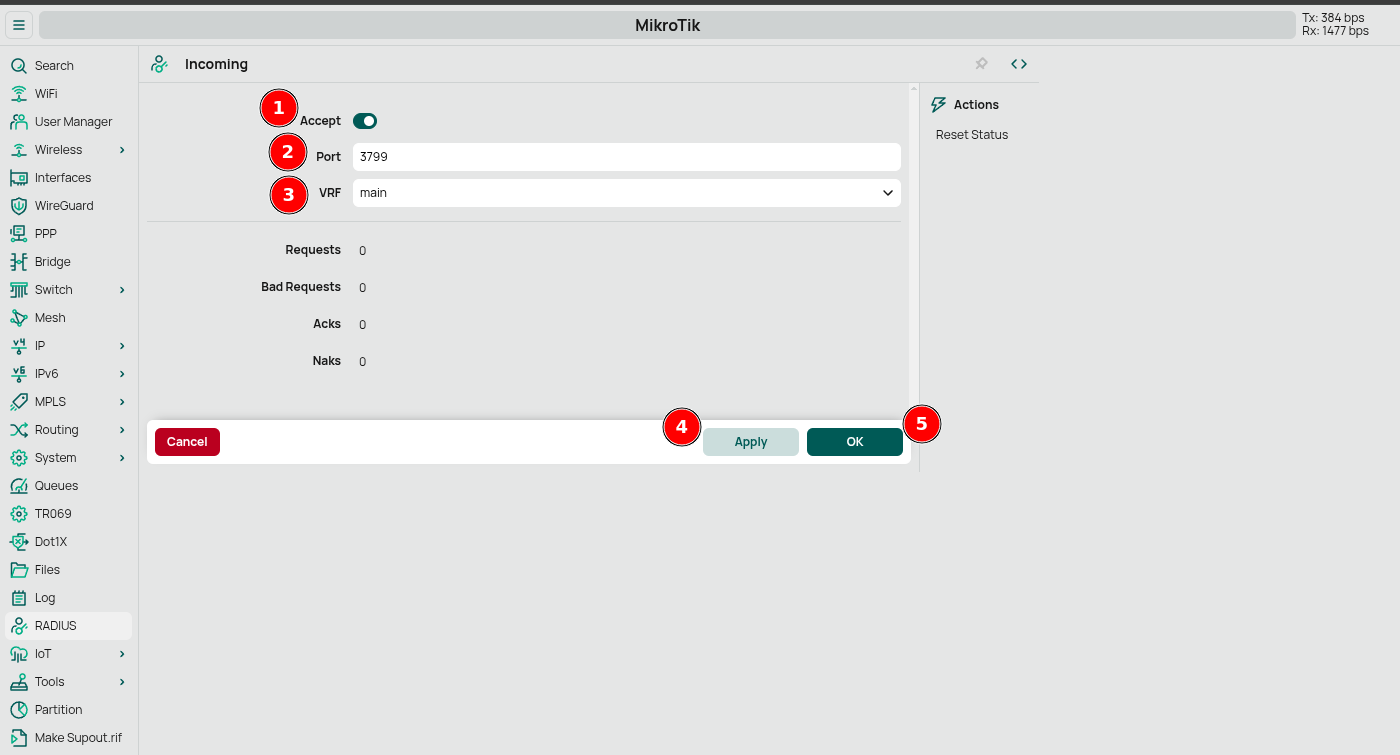
Understanding RADIUS Ports
- Port 1812 (Authentication): Validates user credentials
- Port 1813 (Accounting): Sends session data (connection time, data usage)
- Port 3799 (CoA): Allows dynamic session modification
Hotspot Configuration
The Hotspot feature provides controlled internet access through a captive portal system integrated with GATE.
Custom Portal Files
Create custom HTML files for the external captive portal integration:
Required Files
Create these three files locally with the content below:
login.html
<!DOCTYPE html>
<html>
<head>
  <title>Redirecting to Registration Portal</title>
  <meta http-equiv="refresh" content="0;url=https://gate-dev.zequenze.com/page/demo-mikrotik/?mac=$(mac)&ip=$(ip)">
  <meta charset="utf-8">
  <meta name="viewport" content="width=device-width, initial-scale=1">
</head>
<body>
  <div style="text-align: center; margin-top: 100px; font-family: Arial, sans-serif;">
    <h2>Redirecting to registration portal...</h2>
    <p>If you are not redirected automatically, please click <a href="https://gate-dev.zequenze.com/page/demo-mikrotik/?mac=$(mac)&ip=$(ip)">here</a>.</p>
  </div>
</body>
</html>
logout.html
<!DOCTYPE html>
<html>
<head>
  <title>Logged Out</title>
  <meta charset="utf-8">
  <meta name="viewport" content="width=device-width, initial-scale=1">
  <style>
    body { font-family: Arial, sans-serif; margin: 0; padding: 20px; }
    .container { max-width: 600px; margin: 0 auto; background-color: #f9f9f9; padding: 20px; border-radius: 5px; text-align: center; }
    .btn { display: inline-block; padding: 10px 20px; background-color: #0078d4; color: white; text-decoration: none; border-radius: 4px; margin-top: 20px; }
  </style>
</head>
<body>
  <div class="container">
    <h2>You have been logged out</h2>
    <p>Thank you for using our service.</p>
    <p>Session duration: $(uptime)</p>
    <p>Downloaded: $(bytes-in-nice) / Uploaded: $(bytes-out-nice)</p>
    <a href="$(link-login)" class="btn">Login Again</a>
  </div>
</body>
</html>
redirect.html
<!DOCTYPE html>
<html>
<head>
  <title>Redirecting</title>
  <meta http-equiv="refresh" content="0;url=https://gate-dev.zequenze.com/page/demo-mikrotik/?mac=$(mac)&ip=$(ip)">
  <meta charset="utf-8">
  <meta name="viewport" content="width=device-width, initial-scale=1">
</head>
<body>
  <div style="text-align: center; margin-top: 100px; font-family: Arial, sans-serif;">
    <h2>Redirecting to registration portal...</h2>
    <p>If you are not redirected automatically, please click <a href="https://gate-dev.zequenze.com/page/demo-mikrotik/?mac=$(mac)&ip=$(ip)">here</a>.</p>
  </div>
</body>
</html>
File Upload Process
- Connect to your MikroTik router using an FTP client
- Navigate to the
/flashdirectory - Create a new folder (e.g.,
myhotspot) - Upload all three HTML files to this folder
Important: Use FTP to preserve MikroTik variables like
$(mac)and$(ip). These variables are automatically replaced with actual values when users access the portal.
Walled Garden Configuration
Configure the Walled Garden to allow access to GATE's servers without authentication:
-
Go to IP → Hotspot → Walled Garden tab
-
Click New
-
Configure:
- Comment: "Wildcard zequenze"
-
Action:
allow -
Dst. Host:
*.zequenze.com - Click Apply then OK

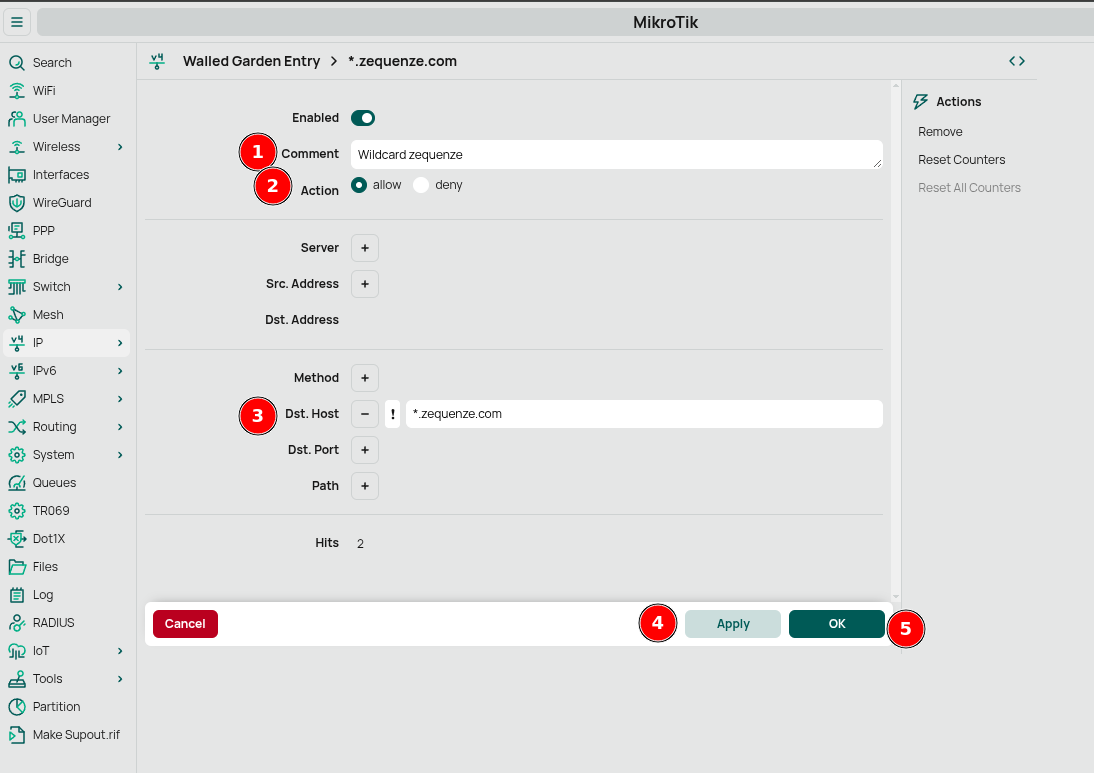
This ensures users can reach GATE's registration page before authentication.
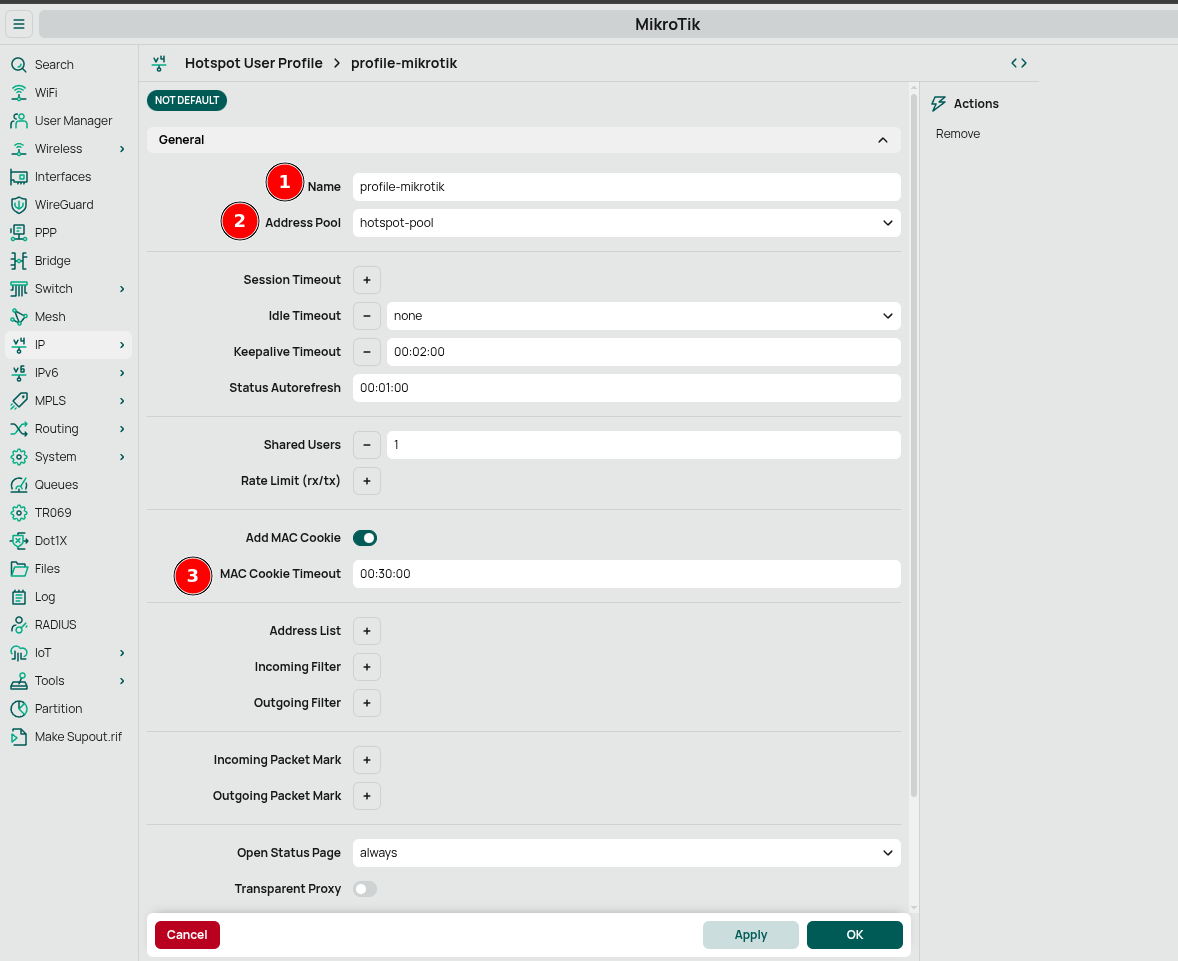
User Profiles
Create a user profile to define connection parameters:
-
Go to IP → Hotspot → User Profiles tab
-
Click New
-
Configure:
- Name: "profile-mikrotik"
- Address Pool: "pool-hotspot"
- MAC Cookie Timeout: "00:30:00" (30 minutes)
- Click Apply then OK

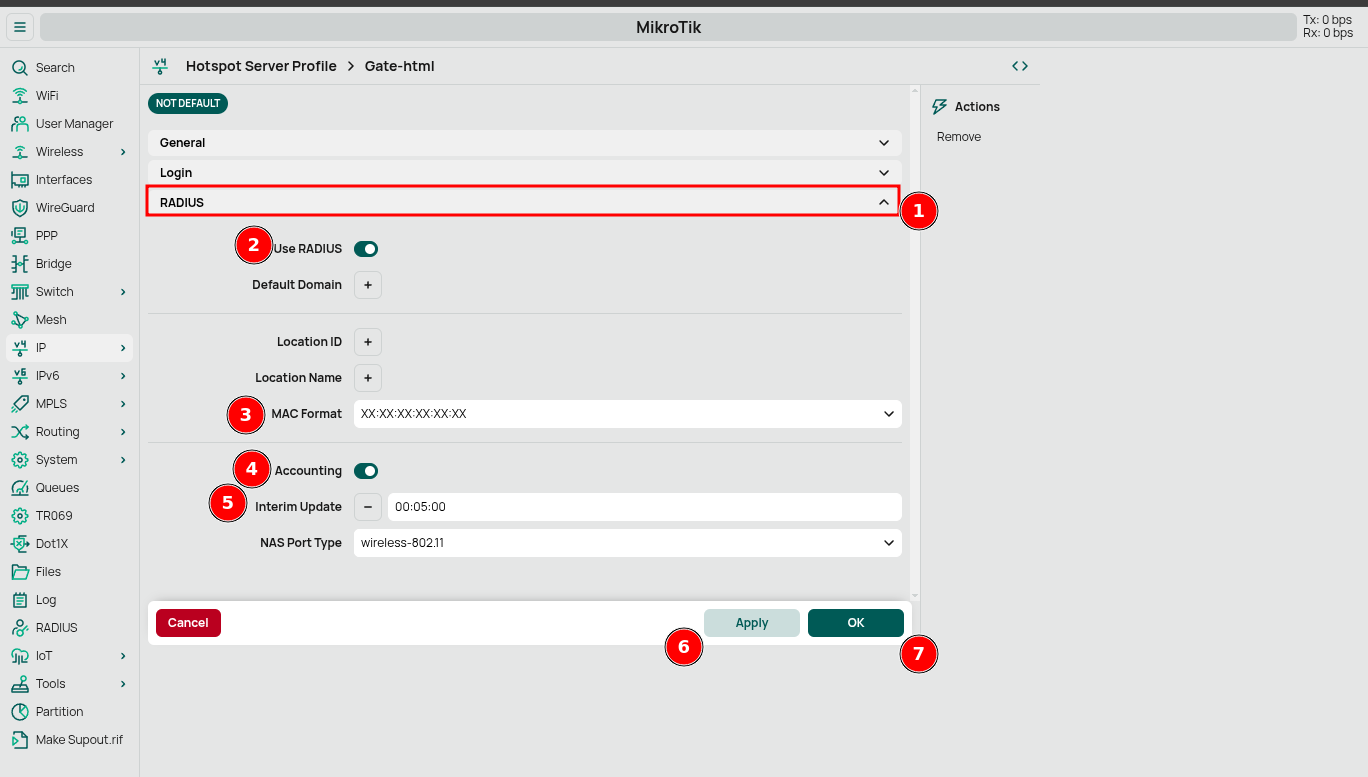
Server Profiles
Configure how the hotspot server operates:
-
Go to IP → Hotspot → Server Profiles tab
-
Click New
-
Configure the following sections:
General Settings:
- Name: "Gate-html"
- DNS Name: "hotspot.gateway"
- HTML Directory: "flash/myhotspot" (path to your uploaded files)
Login Settings:
- Enable HTTP CHAP
- Enable HTTP PAP
RADIUS Settings:
- Enable Use RADIUS
- MAC Format: "XX:XX:XX:XX:XX:XX"
- Enable Accounting
- Interim Update: "00:05:00" (5 minutes)
-
Click Apply then OK

Hotspot Server Creation
Create the actual hotspot server:
- Go to IP → Hotspot → Servers tab
- Click New
- Configure:
- Enable the Enabled toggle
- Name: "hotspot1"
Zequenze Web Portal Setup
Introduction
This guide walks you through the complete process of setting up a dynamic web portal for your MikroTik hotspot using Zequenze GATE. The MikroTik device will redirect users to this external web portal, where they can register or log in to access your network services.
Table of Contents
- Prerequisites
- Creating a Dynamic Form
- Creating AAA User Profiles
- Adding RADIUS Clients
- Creating Portal Pages
Prerequisites
Before beginning this setup, ensure you have:
- Access to Zequenze GATE admin portal
- Admin credentials with appropriate permissions
- A MikroTik device configured for external portal redirection
Creating a Dynamic Form
Dynamic forms collect user information during the registration process. This form will capture essential user data before granting network access.
Step 1: Access the Forms Section
![![Image: 1.1_form_1.png]](https://docs.zequenze.com/uploads/images/gallery/2025-05/9vstZOAQYpXIC2ec-1-1-form-1.png) Navigation path: Click (1) Portals in the sidebar, (2) Templates, (3) Forms tab, and (4) the Add button.
Navigation path: Click (1) Portals in the sidebar, (2) Templates, (3) Forms tab, and (4) the Add button.
Step 2: Configure Basic Form Information
- Enter a descriptive name for your dynamic form (e.g., "hotspot-mikrotik-form-v1")
- Review the JSON data section where form components will be added
- Select your organization from the dropdown menu
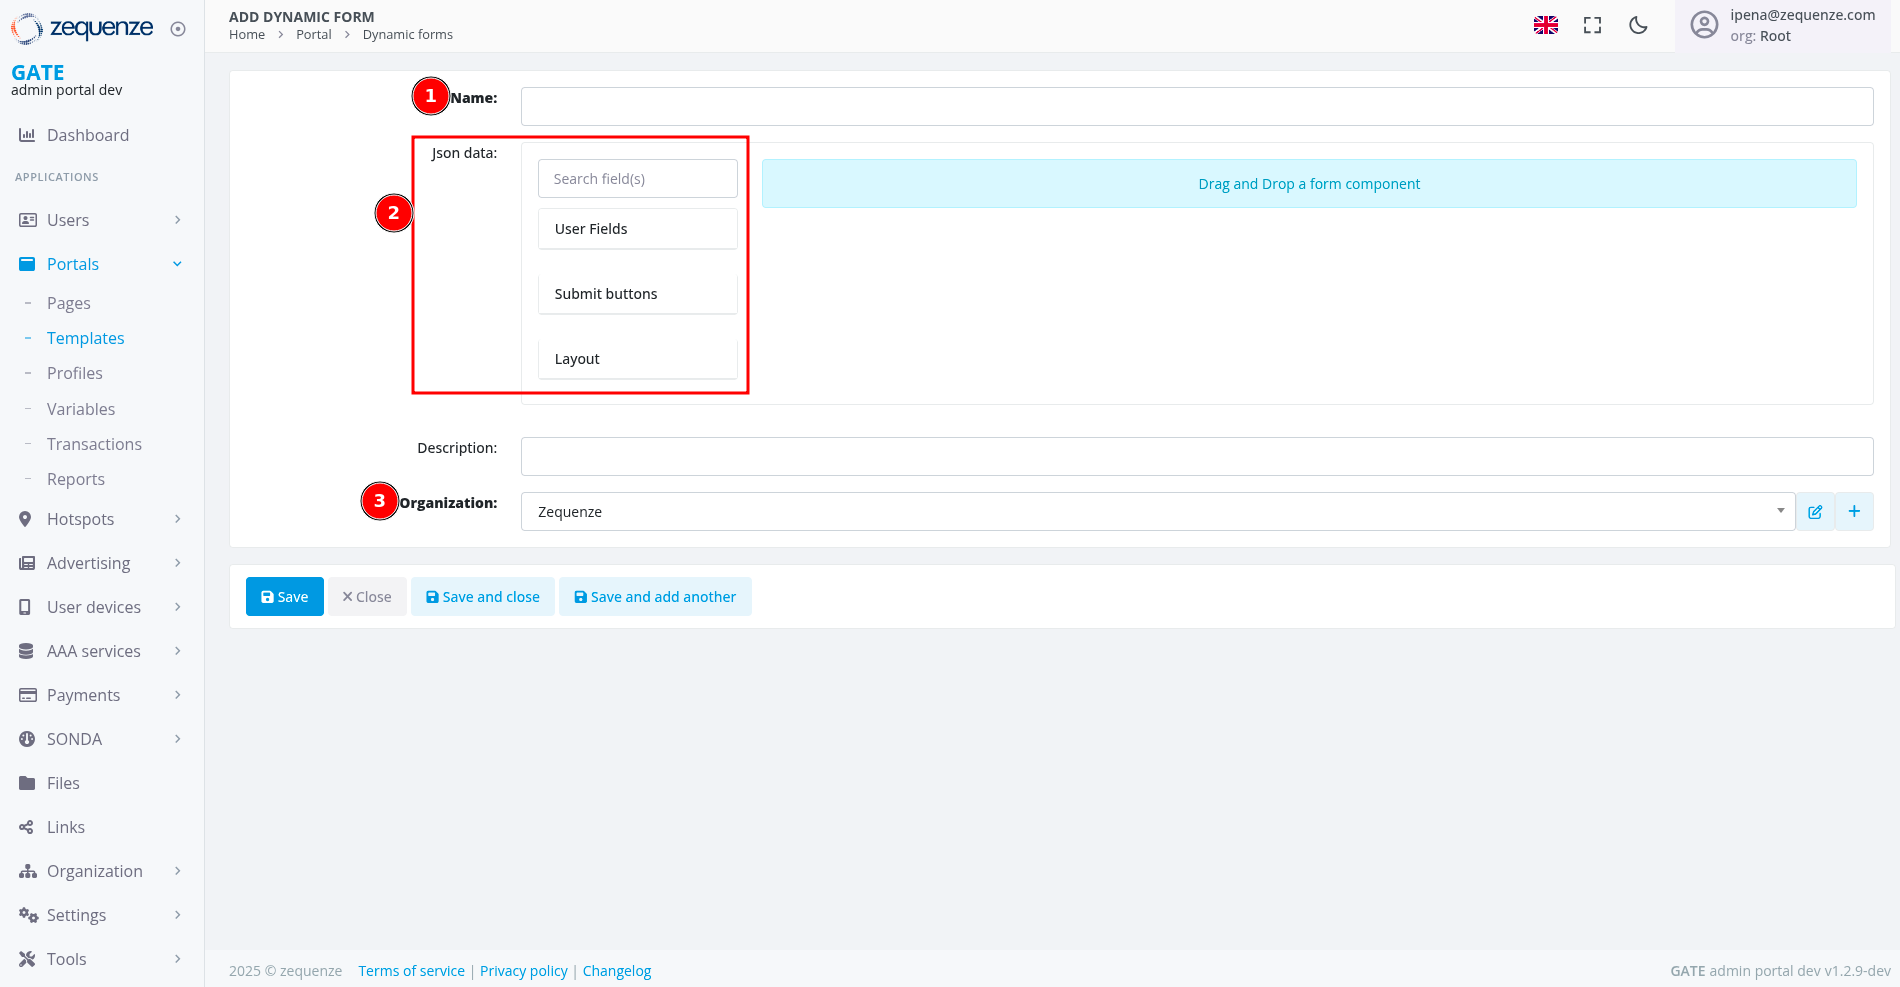 Form creation screen showing (1) Name field, (2) JSON data section, and (3) Organization selection.
Step 3: Add User Input Fields
Access User Fields Menu
- Click on User Fields in the left panel
![![Image: 1.1_form_3.png]](https://docs.zequenze.com/uploads/images/gallery/2025-05/bDyGAAPeym1hhk8X-1-1-form-3.png) User Fields menu option highlighted.
User Fields menu option highlighted.
Add Required Fields
- From the available user fields list, locate fields such as Email, First name, and Last name
- Drag and drop each desired field to the "Drag and Drop a form component" area
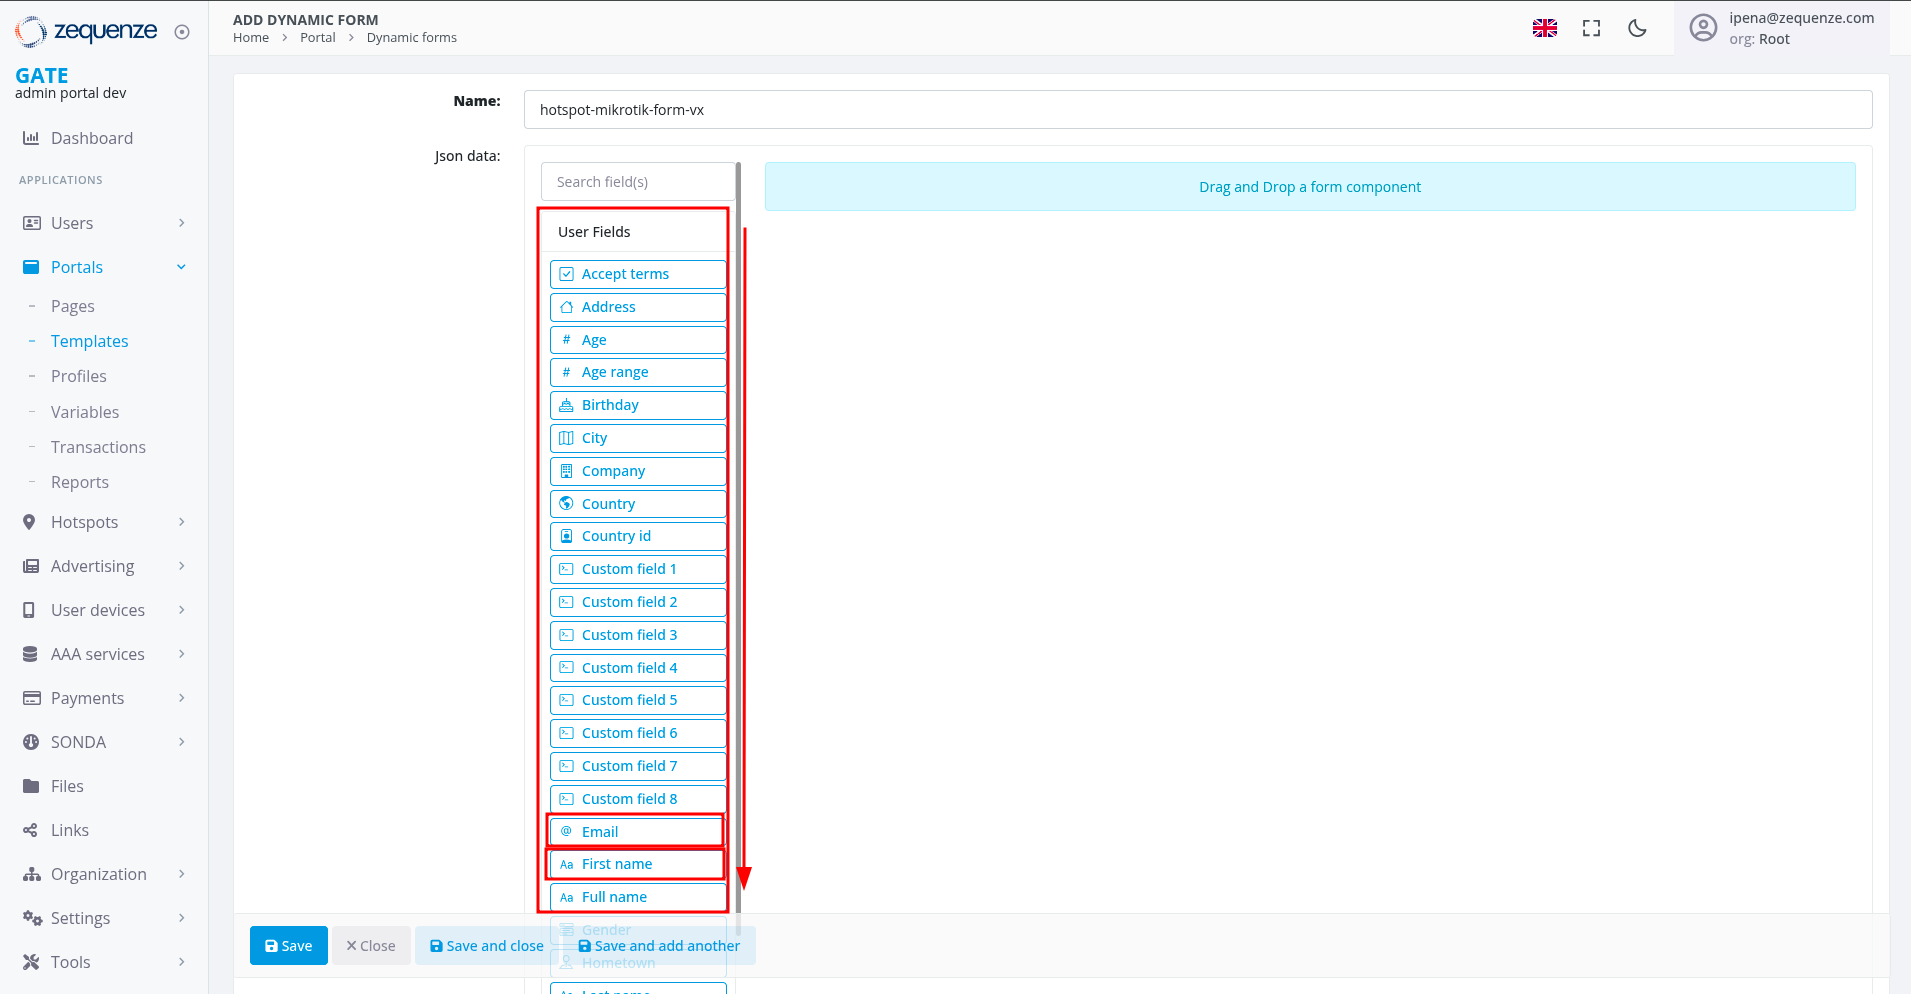 Available User Fields options list.
Configure Email Field
- Drag the Email field from the list to the form area
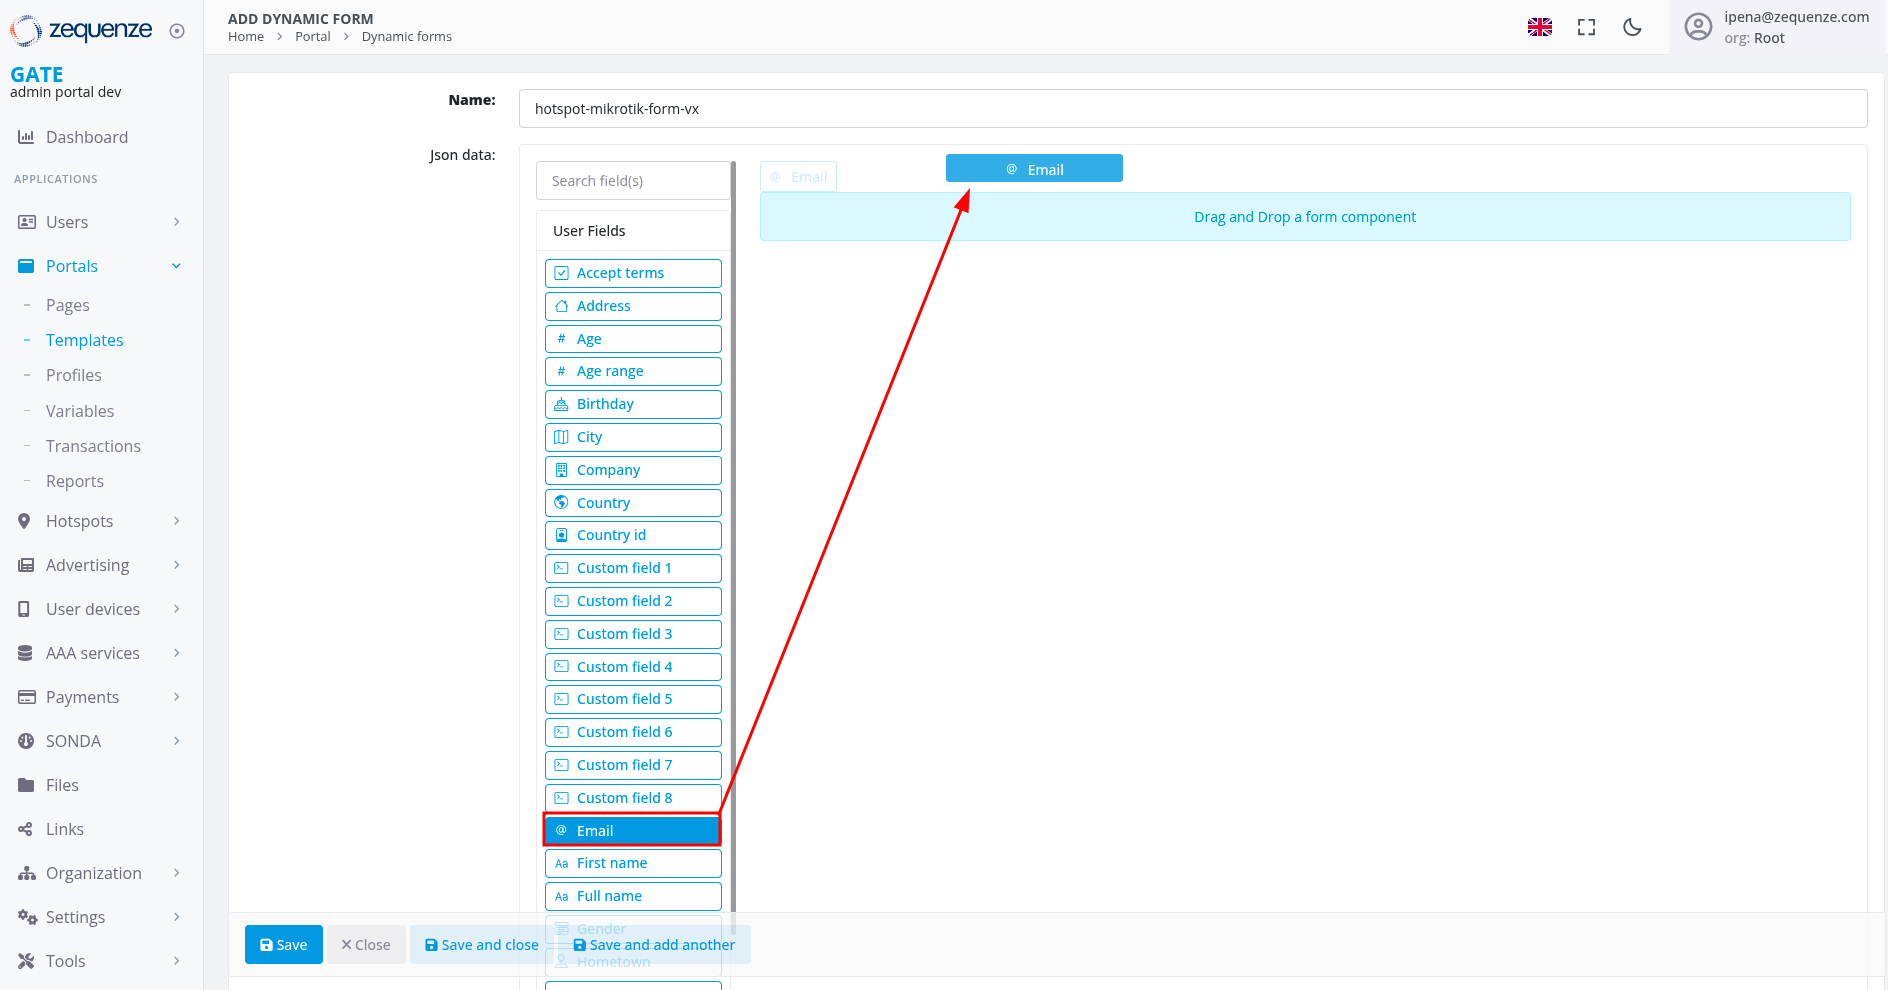 Dragging the Email field to the drop area.
- In the field properties popup:
- Click the API tab
- Verify or customize the Property Name (e.g., "email")
- Click Save
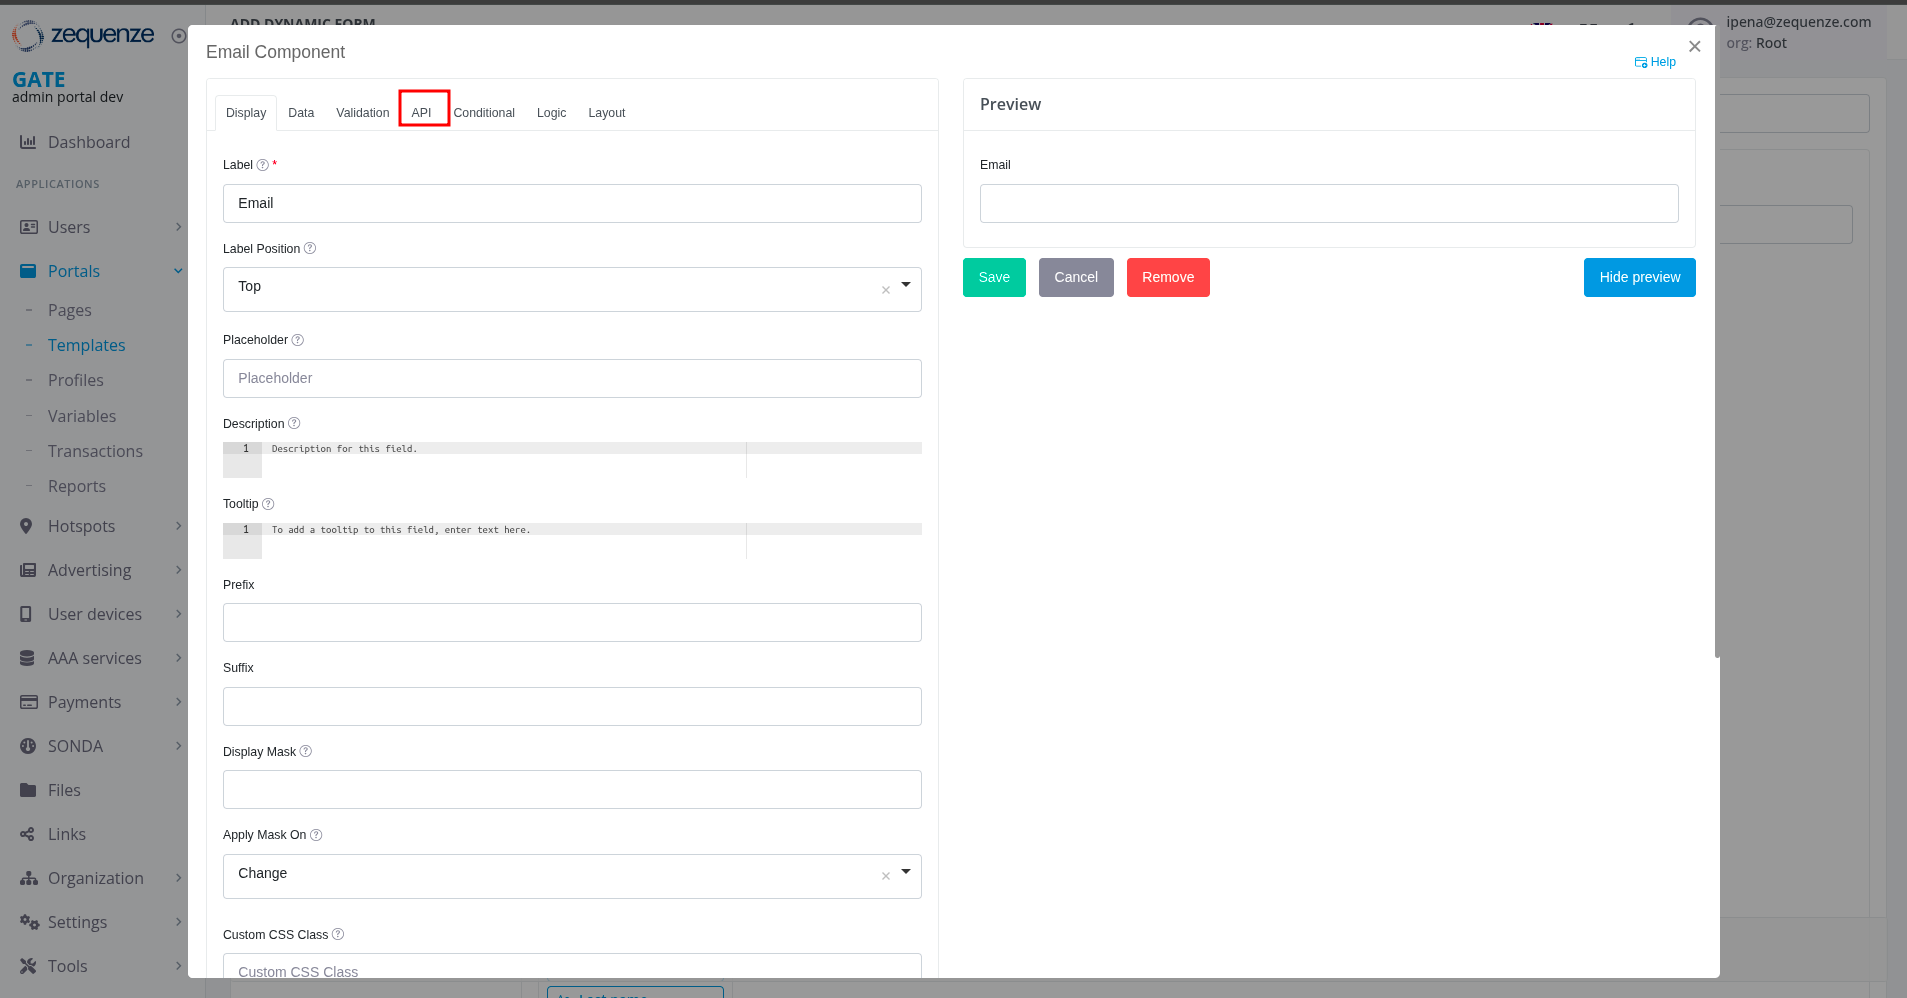 Selecting the API tab in field configuration.
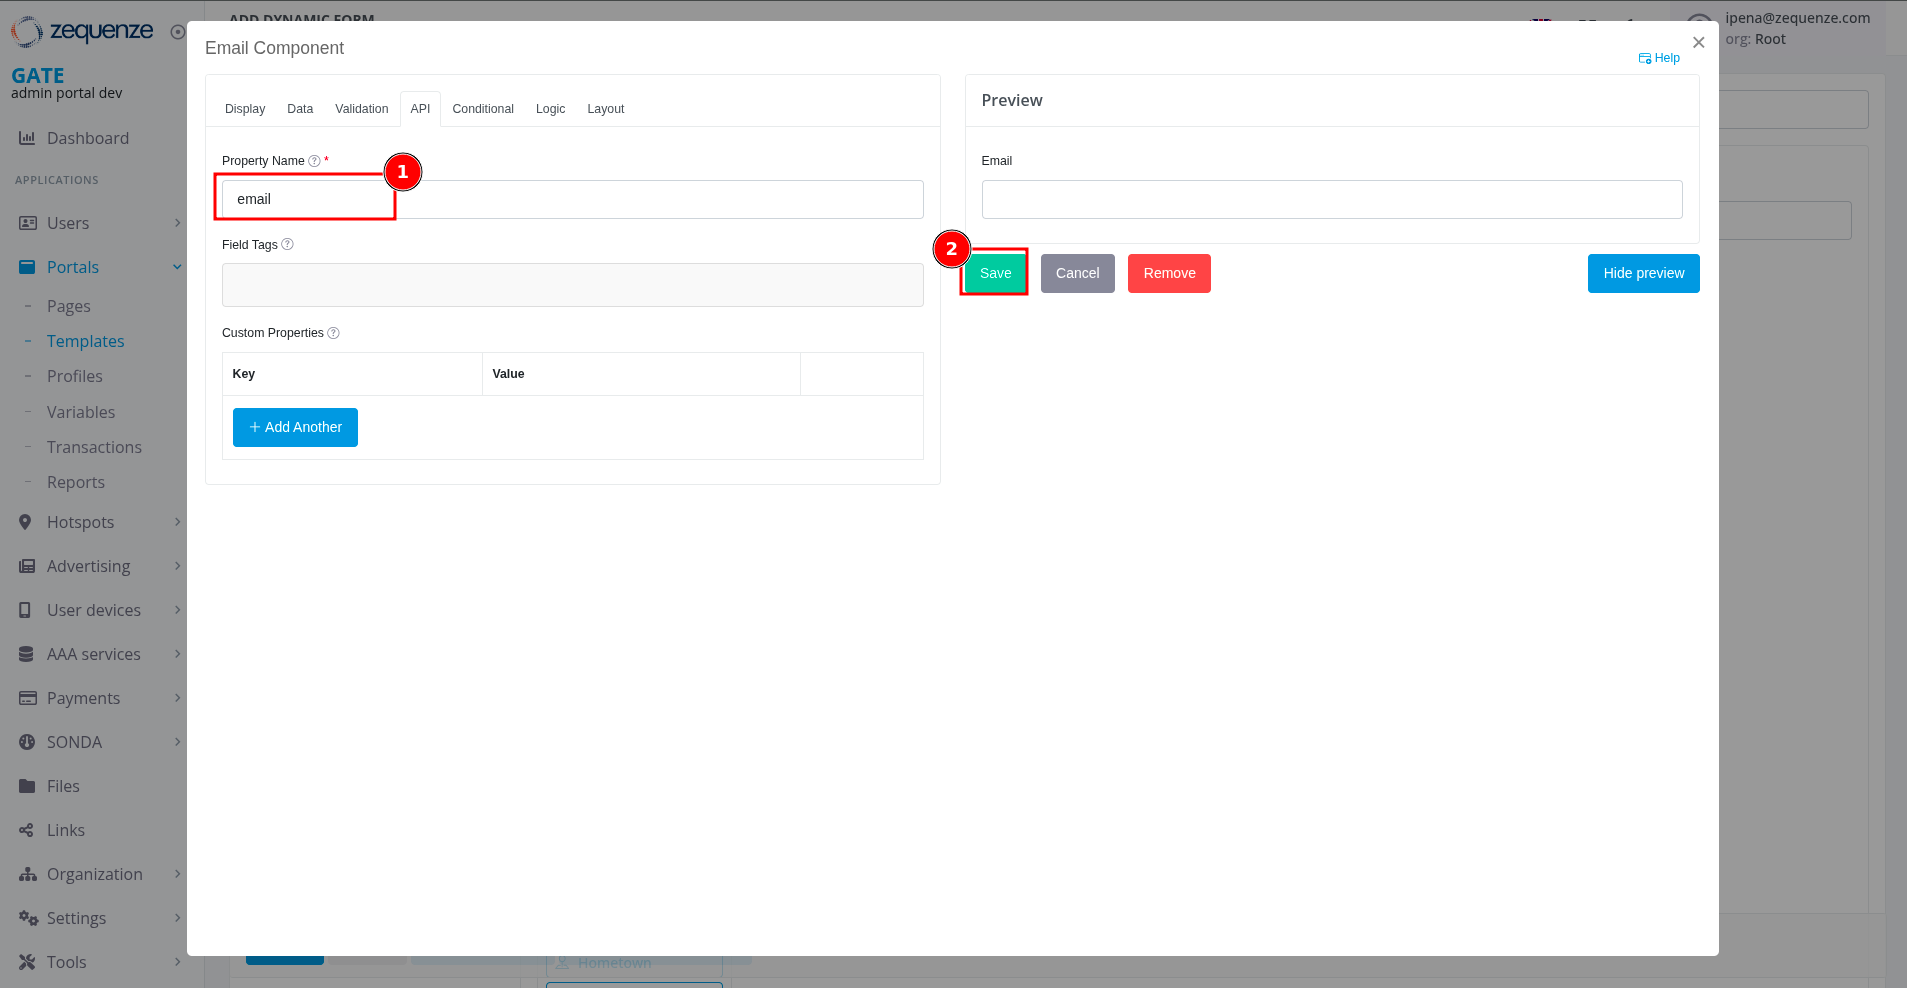 API configuration showing (1) Property Name field and (2) Save button.
- Repeat this process for First name and Last name fields
Step 4: Add Submit Button
- Click on Submit buttons in the left panel
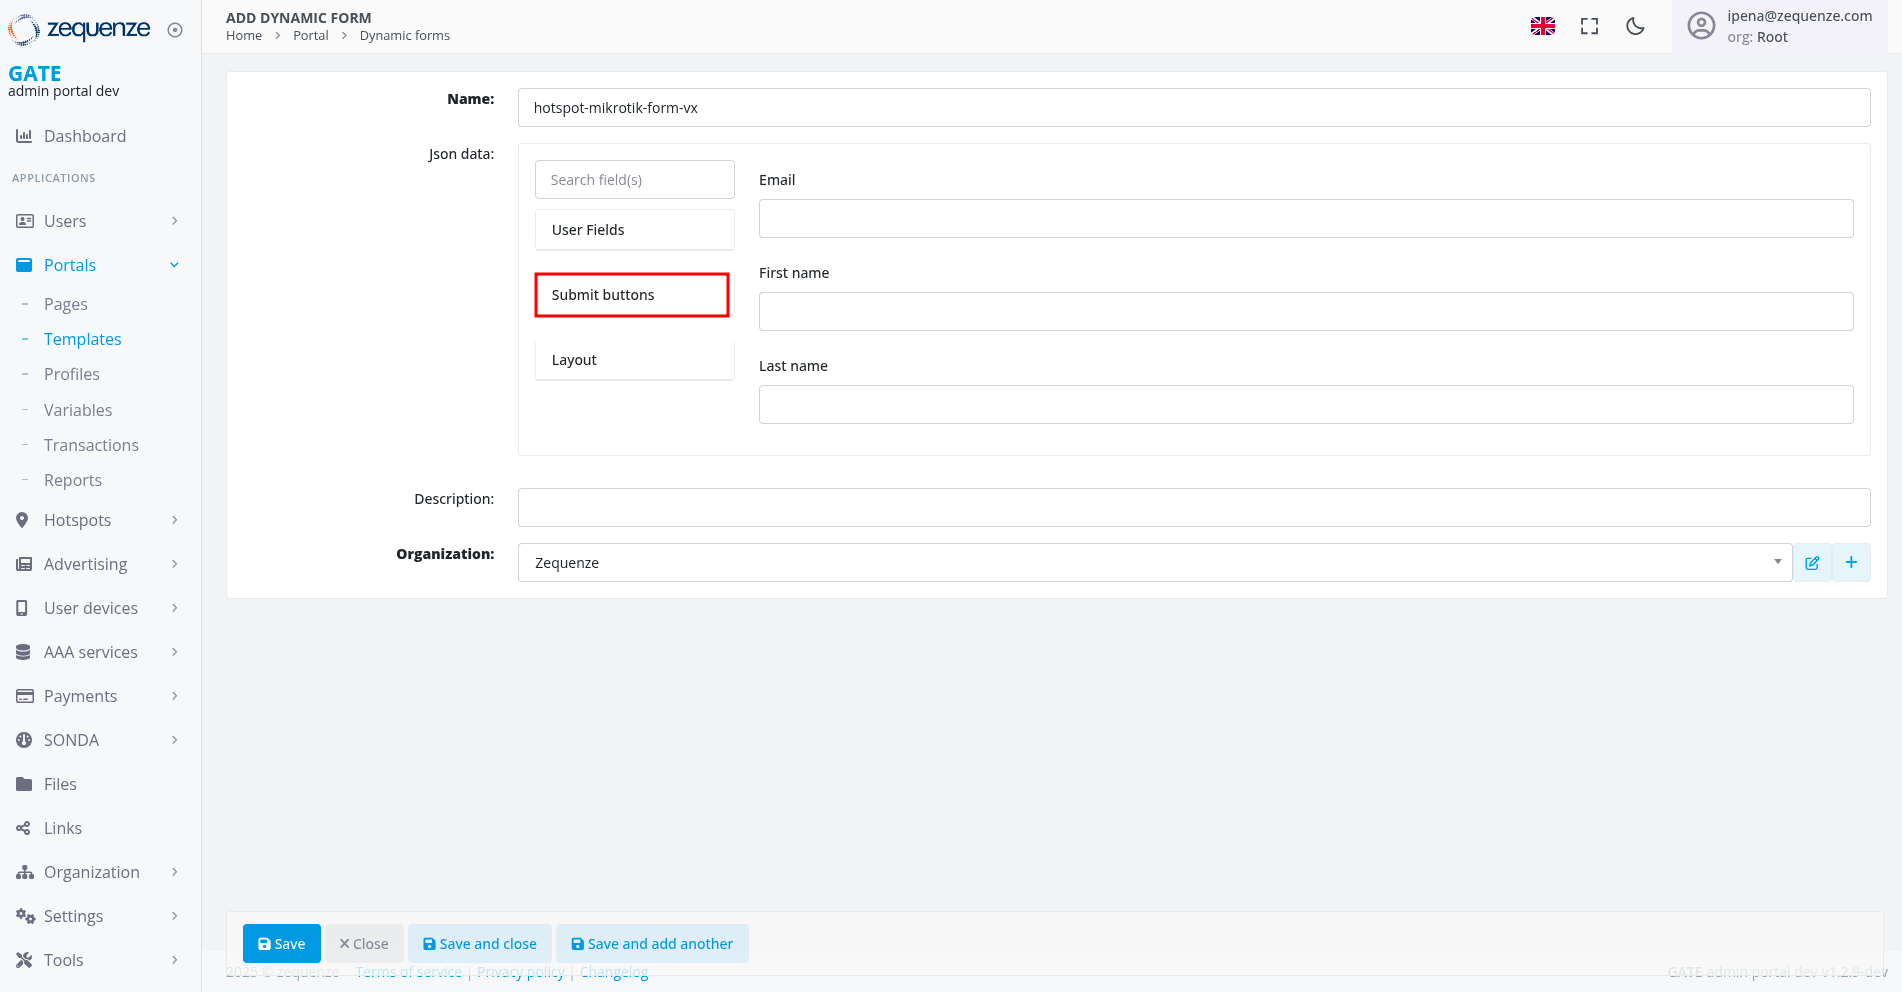 Submit buttons menu option.
- Drag and drop the Register button to the form area
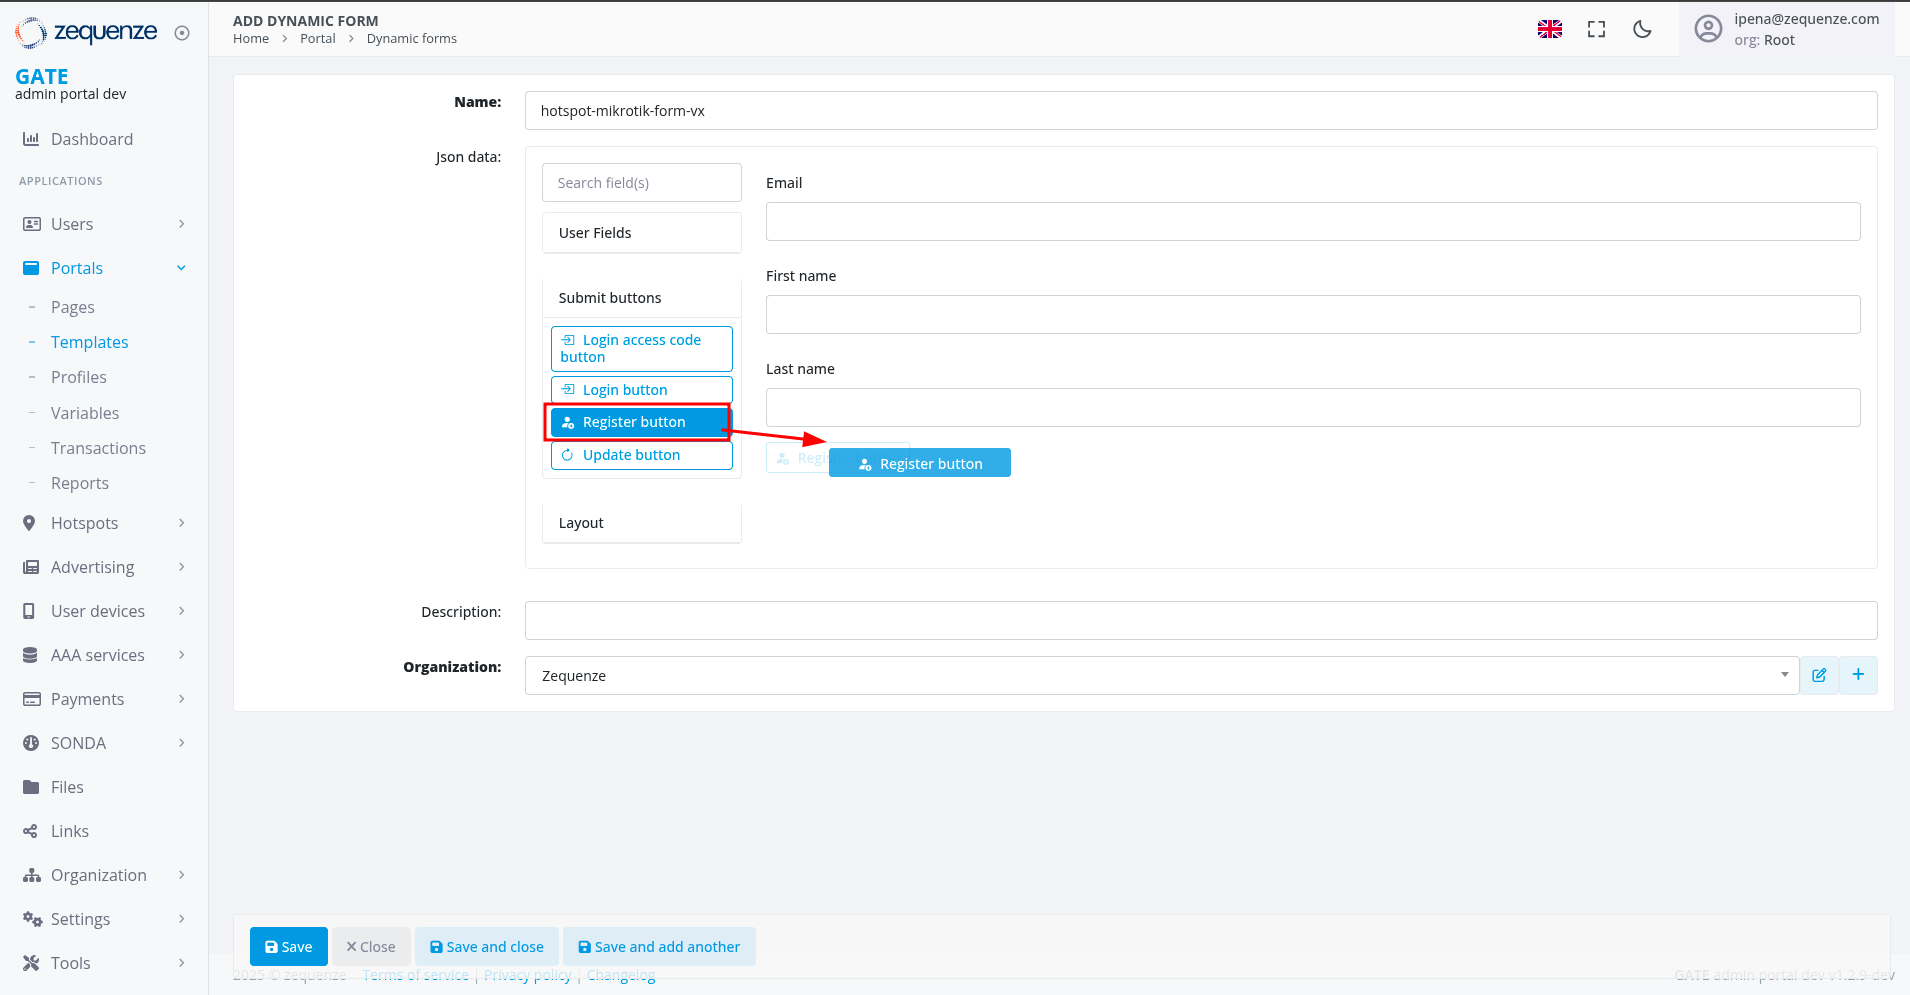 Selecting and dragging the Register button.
- Configure the register button:
- Click the API tab in the popup window
- Set the Property Name (e.g., "register_trigger")
- Click Save
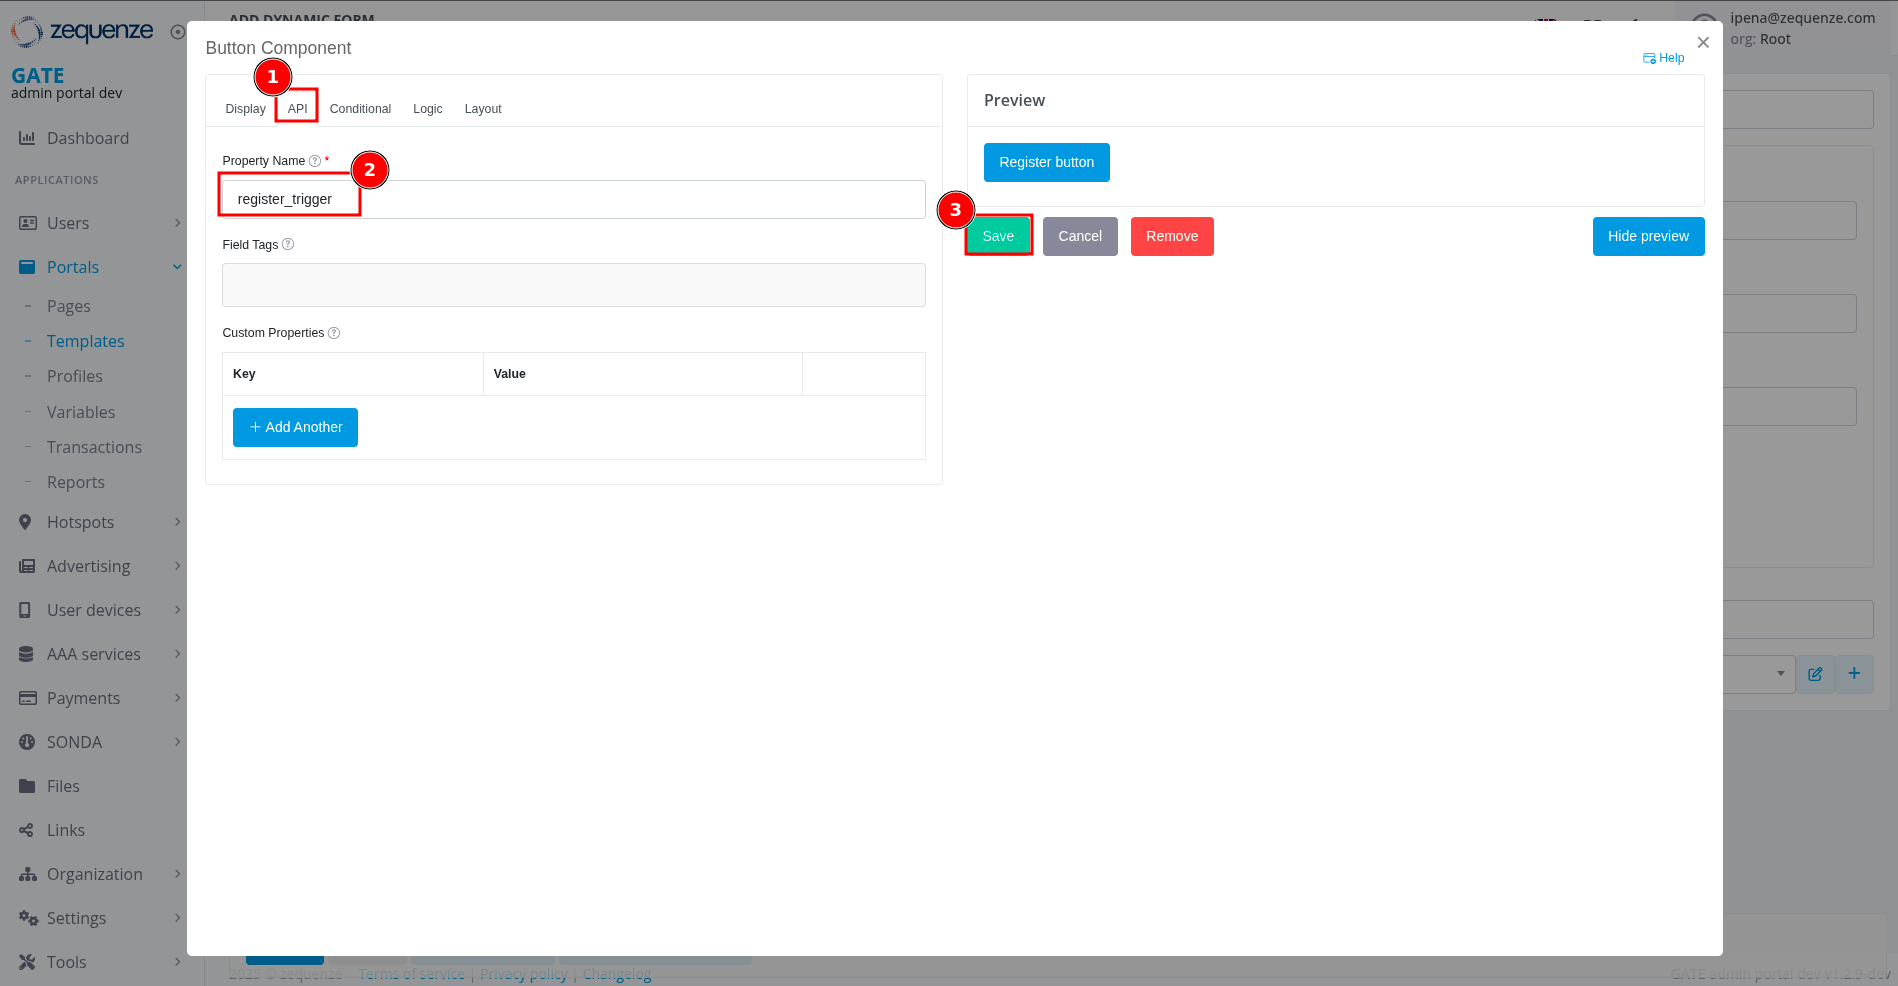 Button API configuration showing (1) API tab, (2) Property Name field, and (3) Save button.
Step 5: Save Your Dynamic Form
- Click the blue Save button at the bottom left of the screen
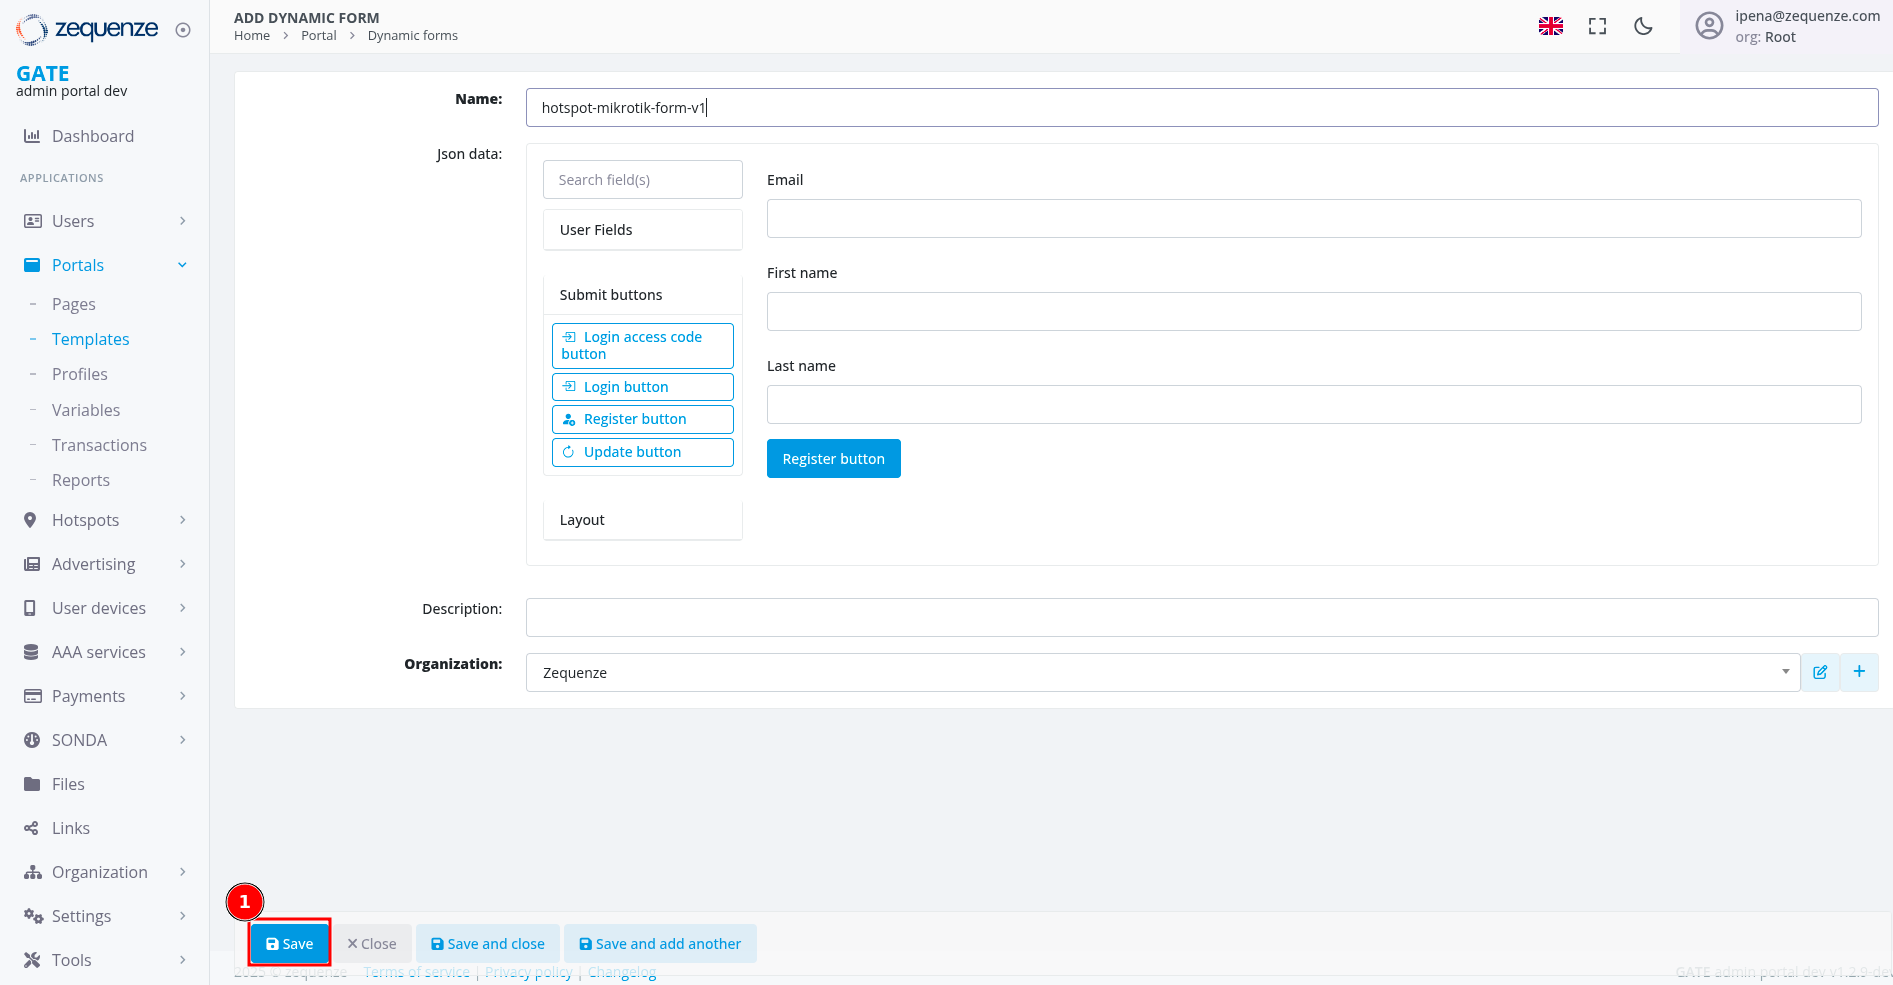 Save button highlighted at the bottom of the form creation screen.
- Verify successful creation - the form name and ID should appear at the top of the screen
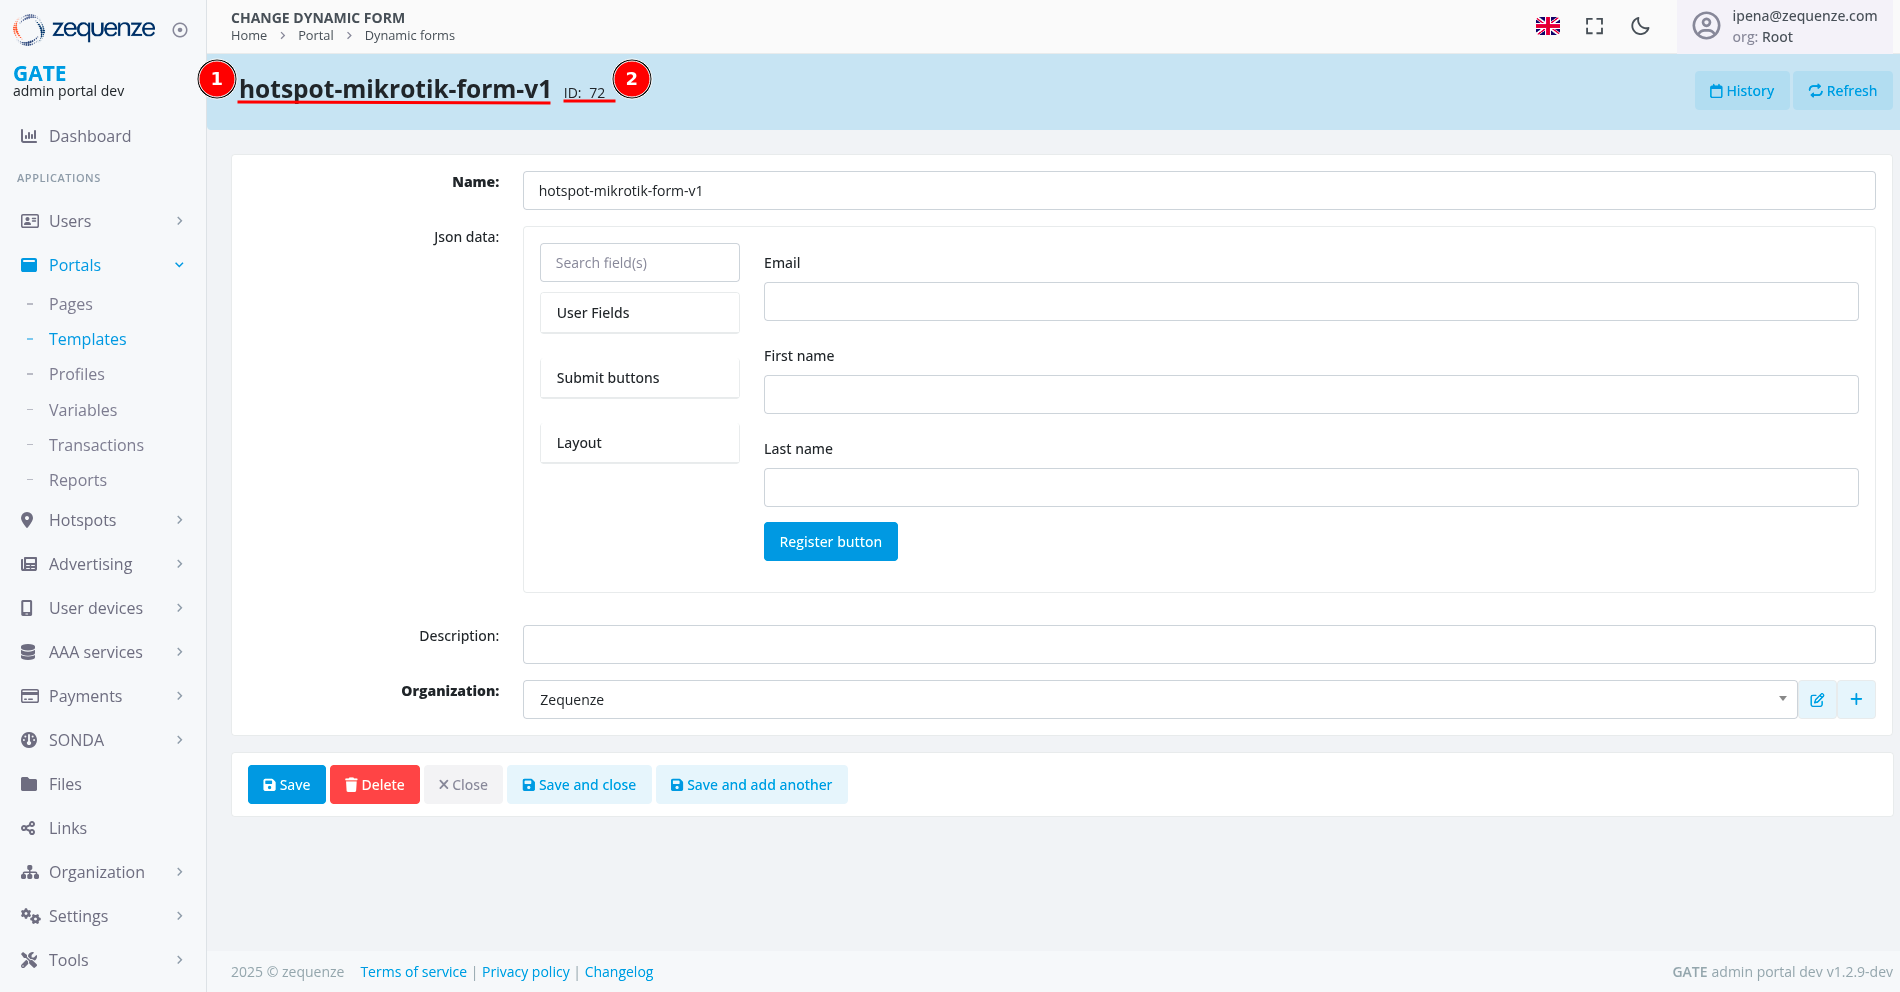 Saved form displaying (1) Form name and (2) Form ID at the top.
Form Verification Checklist
After saving, your dynamic form should include:
- ✅ Email field for user identification
- ✅ First name and Last name fields for personalization
- ✅ Register button for form submission
- ✅ Auto-generated form ID for system reference
Advanced Customization Options
You can enhance your form with additional features:
- Custom fields for collecting specific business information
- Multiple submit button types (Login, Update, etc.)
- Layout adjustments for improved user experience
- Validation rules for data quality control
Creating AAA User Profiles
AAA (Authentication, Authorization, and Accounting) user profiles define the network access parameters and bandwidth limitations that will be applied to users through RADIUS communication with your MikroTik device. These profiles use AVP (Attribute-Value Pair) attributes that will be sent to the MikroTik device.
Step 1: Access AAA User Profiles
- Click on AAA Services in the left sidebar menu
- Select Profiles from the submenu
- Click on the User profiles tab at the top
- Click the blue + Add button to create a new profile
 Navigation path: (1) AAA Services in sidebar, (2) Profiles, (3) User profiles tab, and (4) Add button.
Step 2: Configure Basic Profile Information
- Enter a descriptive name for your profile (e.g., "MikroTik 1Mbps Profile" - typically referencing the speed or specific AVP attributes)
- Set a Short-name / code for system reference (e.g., "mktk-1m")
- Select your organization from the dropdown menu
- Click the Save button
 Profile creation screen showing (1) Name field, (2) Short-name/code field, and (3) Organization selection.
Step 3: Add MikroTik RADIUS Attributes
After saving the basic profile information, configure the specific MikroTik attributes:
Required Attributes Configuration
-
Mikrotik: Rate-Limit (8)
- Set value to bandwidth limitation (e.g., "1M/1M" for 1 Mbps download/upload)
-
Mikrotik: Mikrotik-Group (3)
- Set value to "profile-mikrotik" (must match your MikroTik user profile name)
-
Auth-Type (1000)
- Set value to "Accept" for authentication verification
-
Click Save to apply all changes
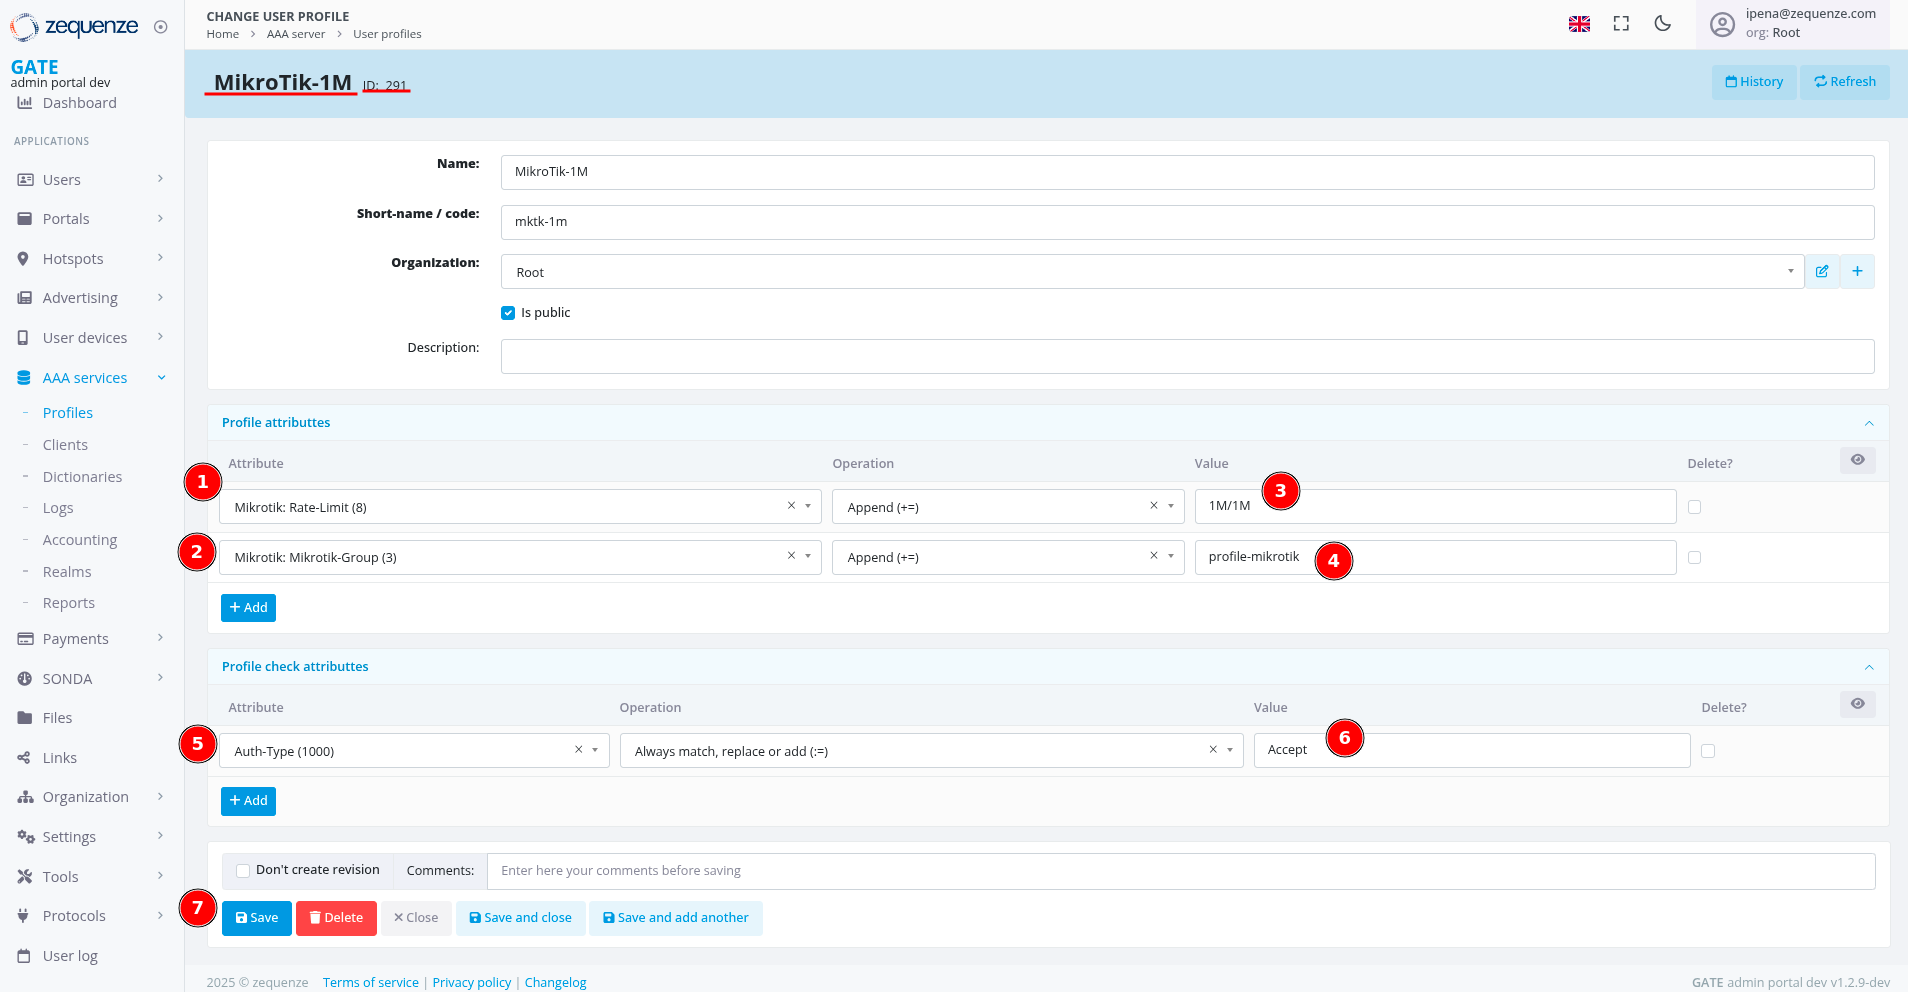 Attributes configuration showing (1) Rate-Limit attribute, (2) Mikrotik-Group attribute, (3) Rate-Limit value, (4) Mikrotik-Group value, (5) Auth-Type attribute, (6) Auth-Type value, and (7) Save button.
Important Configuration Notes
Critical: The "profile-mikrotik" value must match exactly with the user profile name created in your MikroTik device configuration.
Reference: For detailed MikroTik device configuration, see the official Zequenze documentation.
Bandwidth Configuration Examples
| Profile Type | Rate-Limit Value | Description |
|---|---|---|
| Basic | 1M/1M | 1 Mbps download/upload |
| Standard | 5M/5M | 5 Mbps download/upload |
| Premium | 10M/10M | 10 Mbps download/upload |
| Unlimited | 100M/100M | High-speed access |
Verification Checklist
After saving, verify your AAA user profile contains:
- ✅ Descriptive name and short-name code
- ✅ Rate-Limit attribute with bandwidth values
- ✅ Mikrotik-Group attribute linking to MikroTik profile
- ✅ Auth-Type attribute set to Accept
- ✅ Profile ID displayed at the top
Adding RADIUS Clients
RADIUS clients represent your MikroTik devices in the GATE platform, enabling secure authentication and authorization communication between GATE and your network infrastructure.
Step 1: Access AAA Clients Section
- Click on AAA Services in the left sidebar menu
- Select Clients from the submenu
- Click the blue + Add button to create a new RADIUS client
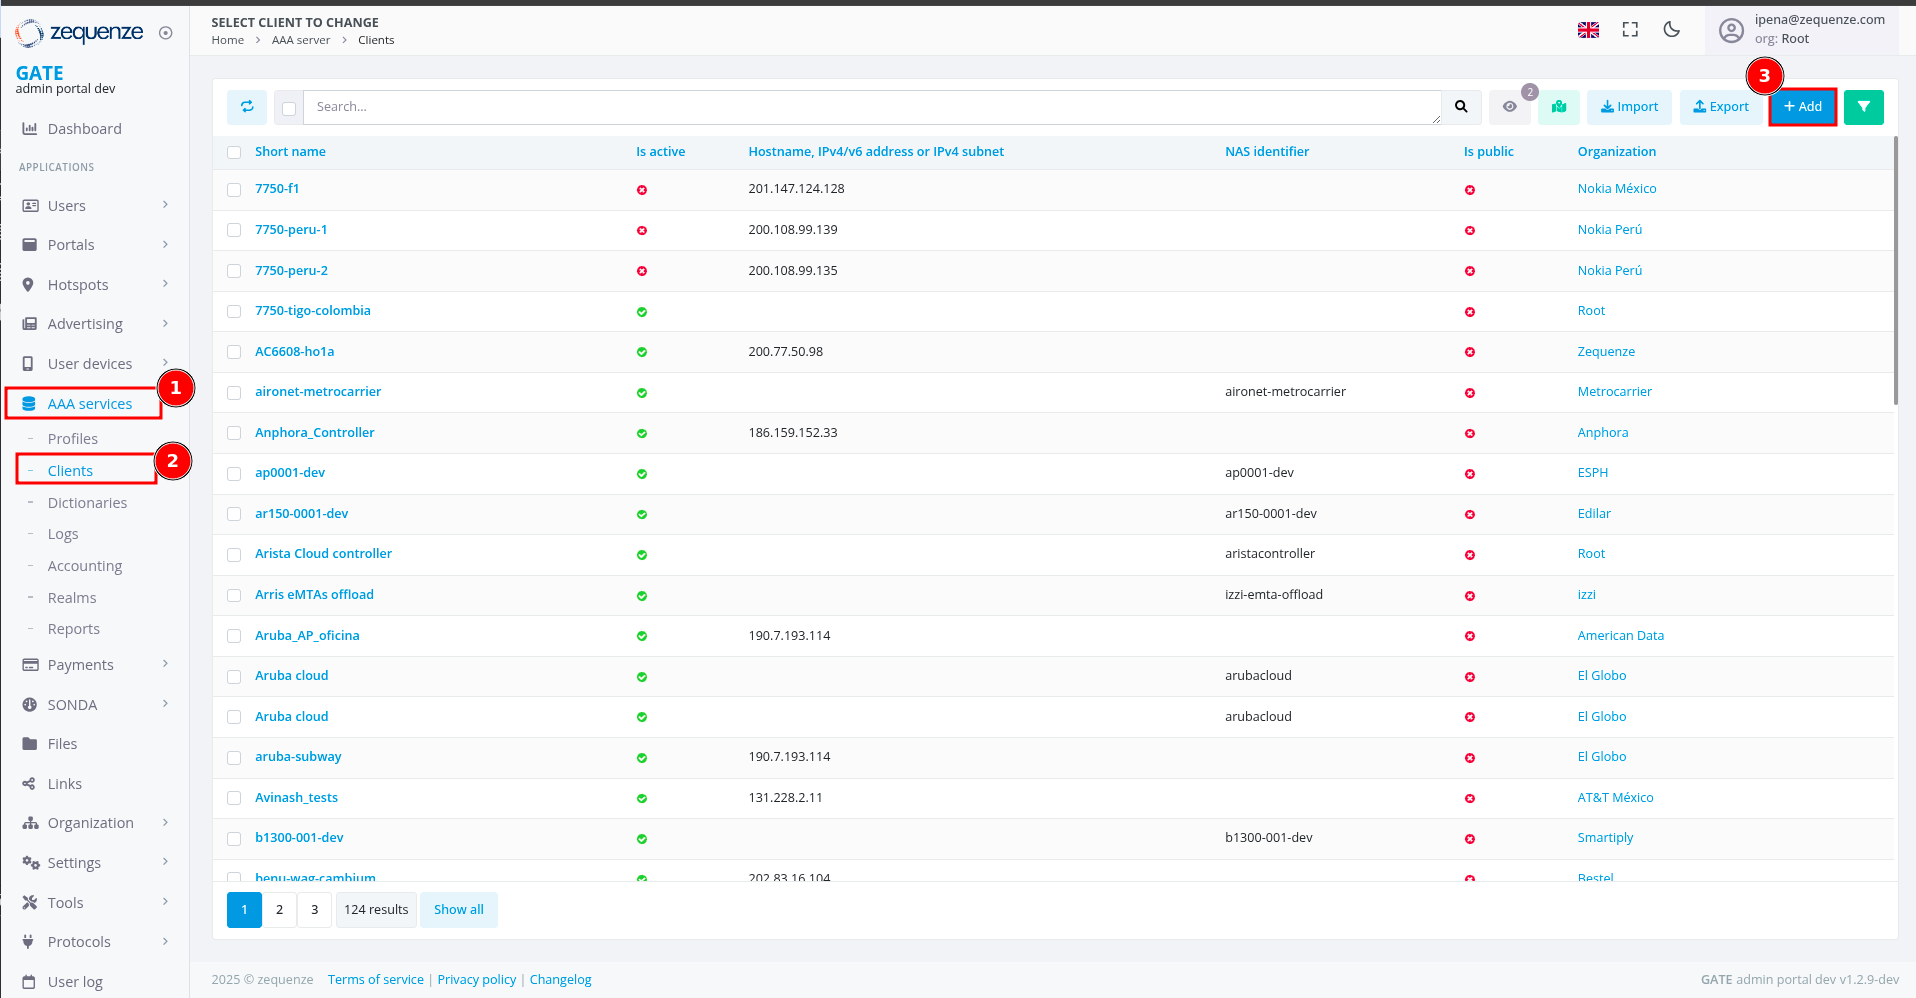 Navigation path: (1) AAA Services in sidebar, (2) Clients submenu, and (3) Add button.
Step 2: Configure RADIUS Client Parameters
- Short name: Enter an identifier for your MikroTik device (e.g., "mikrotik-hotspot-01")
- Organization: Select the appropriate organization from dropdown
- Hostname/IP Address: Enter your MikroTik device's IP address or hostname
- Secret: Create a strong shared secret for secure communication
- Enable debug: Check this option for development environments (disable in production)
- Click Save to create the RADIUS client
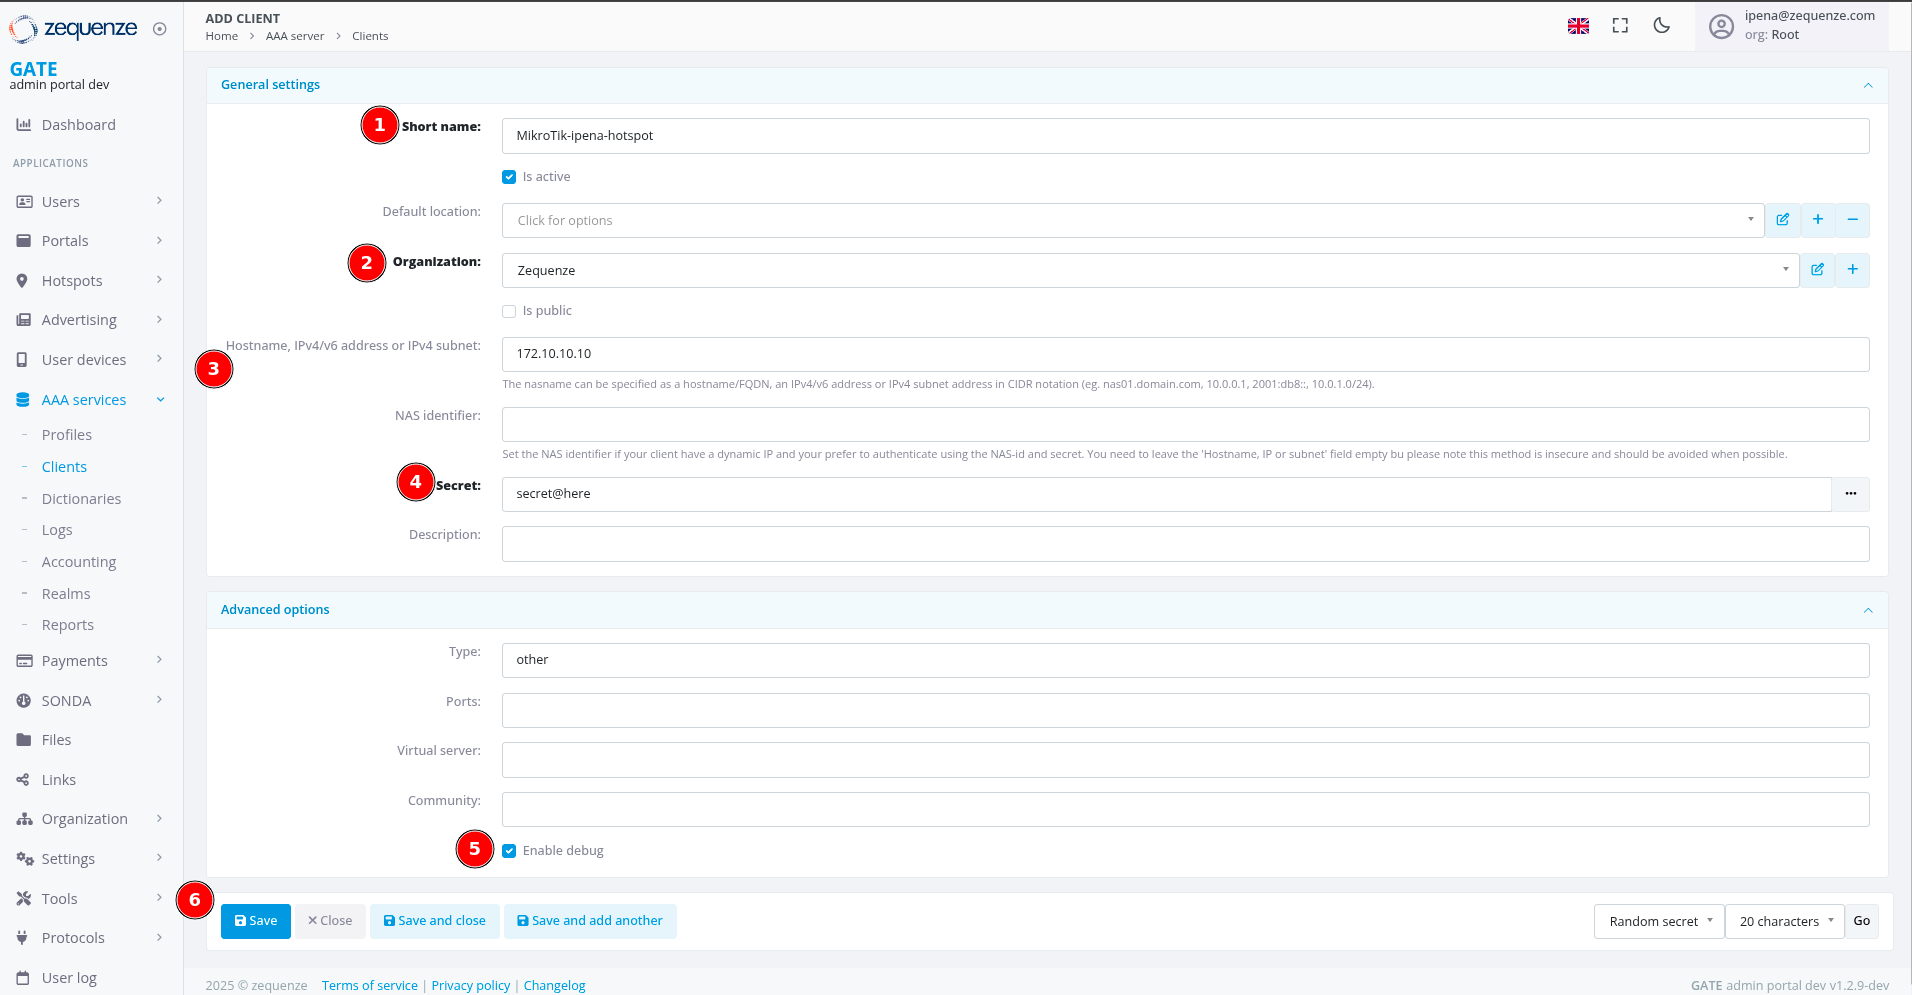 RADIUS client configuration showing (1) Short name, (2) Organization selection, (3) IP address field, (4) Secret field, (5) Enable debug checkbox, and (6) Save button.
Network Connectivity Requirements
Critical Network Note: The IP address must have direct connectivity with GATE for bidirectional communication. NAT configurations can block return traffic from GATE to MikroTik, causing authentication failures.
Security Best Practices
| Security Aspect | Recommendation |
|---|---|
| Secret Strength | Use minimum 16 characters with mixed case, numbers, and symbols |
| Secret Uniqueness | Use a unique secret for each RADIUS client to maintain security |
| Secret Matching | The secret used here must match exactly with the secret configured in your MikroTik RADIUS settings |
| Production Settings | Disable debug mode in production to reduce unnecessary logging |
| **Firewall |