# Profile
## Creating a New Profile
Before creating a profile, it's important to understand its purpose. Profiles are where you configure key device settings such as:
- WAN interface configurations
- Custom WiFi network names (e.g., "ISP-Provider-2.4GHz" for 2.4GHz networks)
- 5.0GHz network configurations
- Other device-specific parameters
This is where the magic happens when you want to create new interfaces or set up custom configurations for your devices.
### Steps to Create a Profile
1. Navigate to **Inventory** in the CONTROL portal
2. Click on **Profile**
3. Click the **Add** button
 ---
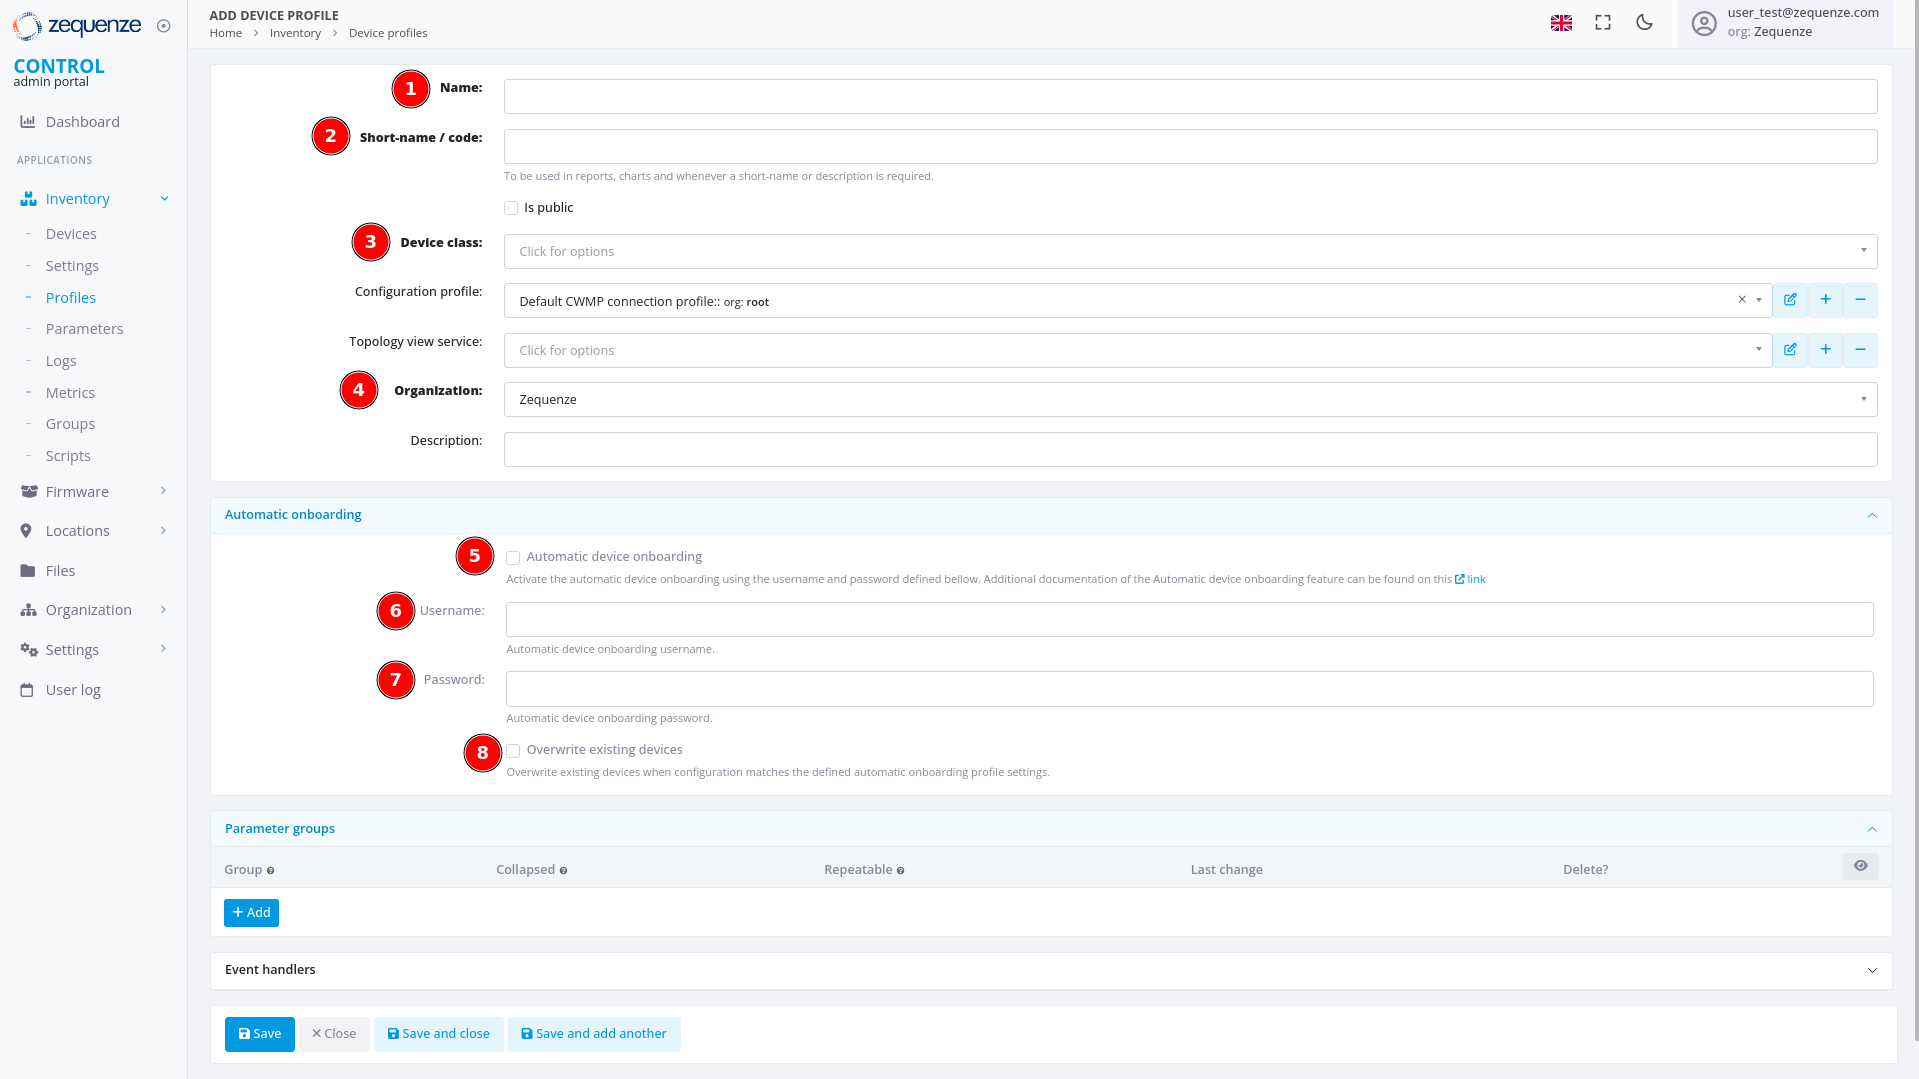
### Configuring Profile Settings
You will see the profile creation page with the following fields:
---
### Configuring Profile Settings
You will see the profile creation page with the following fields:
 #### Required Fields
1. **Name**
Enter a descriptive identifier for this profile. Best practice is to use the format: **"Vendor Model [Base]"**
Example: *"Nokia G-1425G-B [Base]"*
2. **Short-name / code**
Provide an abbreviated version of the profile name.
Example: *"Nokia-G-1425G"*
3. **Device class**
Select the appropriate device type from the following options:
- eMTA
- ONT
- DSL CPE
- Fixed Wireless Access CPE
- LTE CPE
- LTE MiFI
- STB
- WiFi eXtender
- WiFi Mesh AP
- WiFi Mesh (master)
- WiFi Mesh (slave)
- WiFi AP
- VoIP phone
- VoIP ATA
- LAN Switch
- Router
- Network appliance
- SONDA probe
- Transport gateway
- Other
4. **Organization**
If applicable, select which organization this profile belongs to.
#### Automatic Device Onboarding Settings
5. **Automatic device onboarding**
Enable this option to allow the CONTROL platform to automatically assign new credentials to devices. This ensures each device receives unique username and password combinations for enhanced security.
6. **User**
Enter the default username that matches the factory credentials on the device. This username must match what is configured on devices connecting to the CONTROL platform.
7. **Password**
Enter the default password that matches the factory credentials on the device. Both username and password must match for automatic profile assignment to work correctly.
8. **Overwrite existing devices**
Enable this option to allow devices that have been reset to factory credentials to reconnect to the CONTROL platform. This prevents connection rejection when a device already exists in the system and ensures that devices returning to factory settings can still connect without issues.
---
### Example Configuration
Below is an example of a completed profile configuration:
#### Required Fields
1. **Name**
Enter a descriptive identifier for this profile. Best practice is to use the format: **"Vendor Model [Base]"**
Example: *"Nokia G-1425G-B [Base]"*
2. **Short-name / code**
Provide an abbreviated version of the profile name.
Example: *"Nokia-G-1425G"*
3. **Device class**
Select the appropriate device type from the following options:
- eMTA
- ONT
- DSL CPE
- Fixed Wireless Access CPE
- LTE CPE
- LTE MiFI
- STB
- WiFi eXtender
- WiFi Mesh AP
- WiFi Mesh (master)
- WiFi Mesh (slave)
- WiFi AP
- VoIP phone
- VoIP ATA
- LAN Switch
- Router
- Network appliance
- SONDA probe
- Transport gateway
- Other
4. **Organization**
If applicable, select which organization this profile belongs to.
#### Automatic Device Onboarding Settings
5. **Automatic device onboarding**
Enable this option to allow the CONTROL platform to automatically assign new credentials to devices. This ensures each device receives unique username and password combinations for enhanced security.
6. **User**
Enter the default username that matches the factory credentials on the device. This username must match what is configured on devices connecting to the CONTROL platform.
7. **Password**
Enter the default password that matches the factory credentials on the device. Both username and password must match for automatic profile assignment to work correctly.
8. **Overwrite existing devices**
Enable this option to allow devices that have been reset to factory credentials to reconnect to the CONTROL platform. This prevents connection rejection when a device already exists in the system and ensures that devices returning to factory settings can still connect without issues.
---
### Example Configuration
Below is an example of a completed profile configuration:
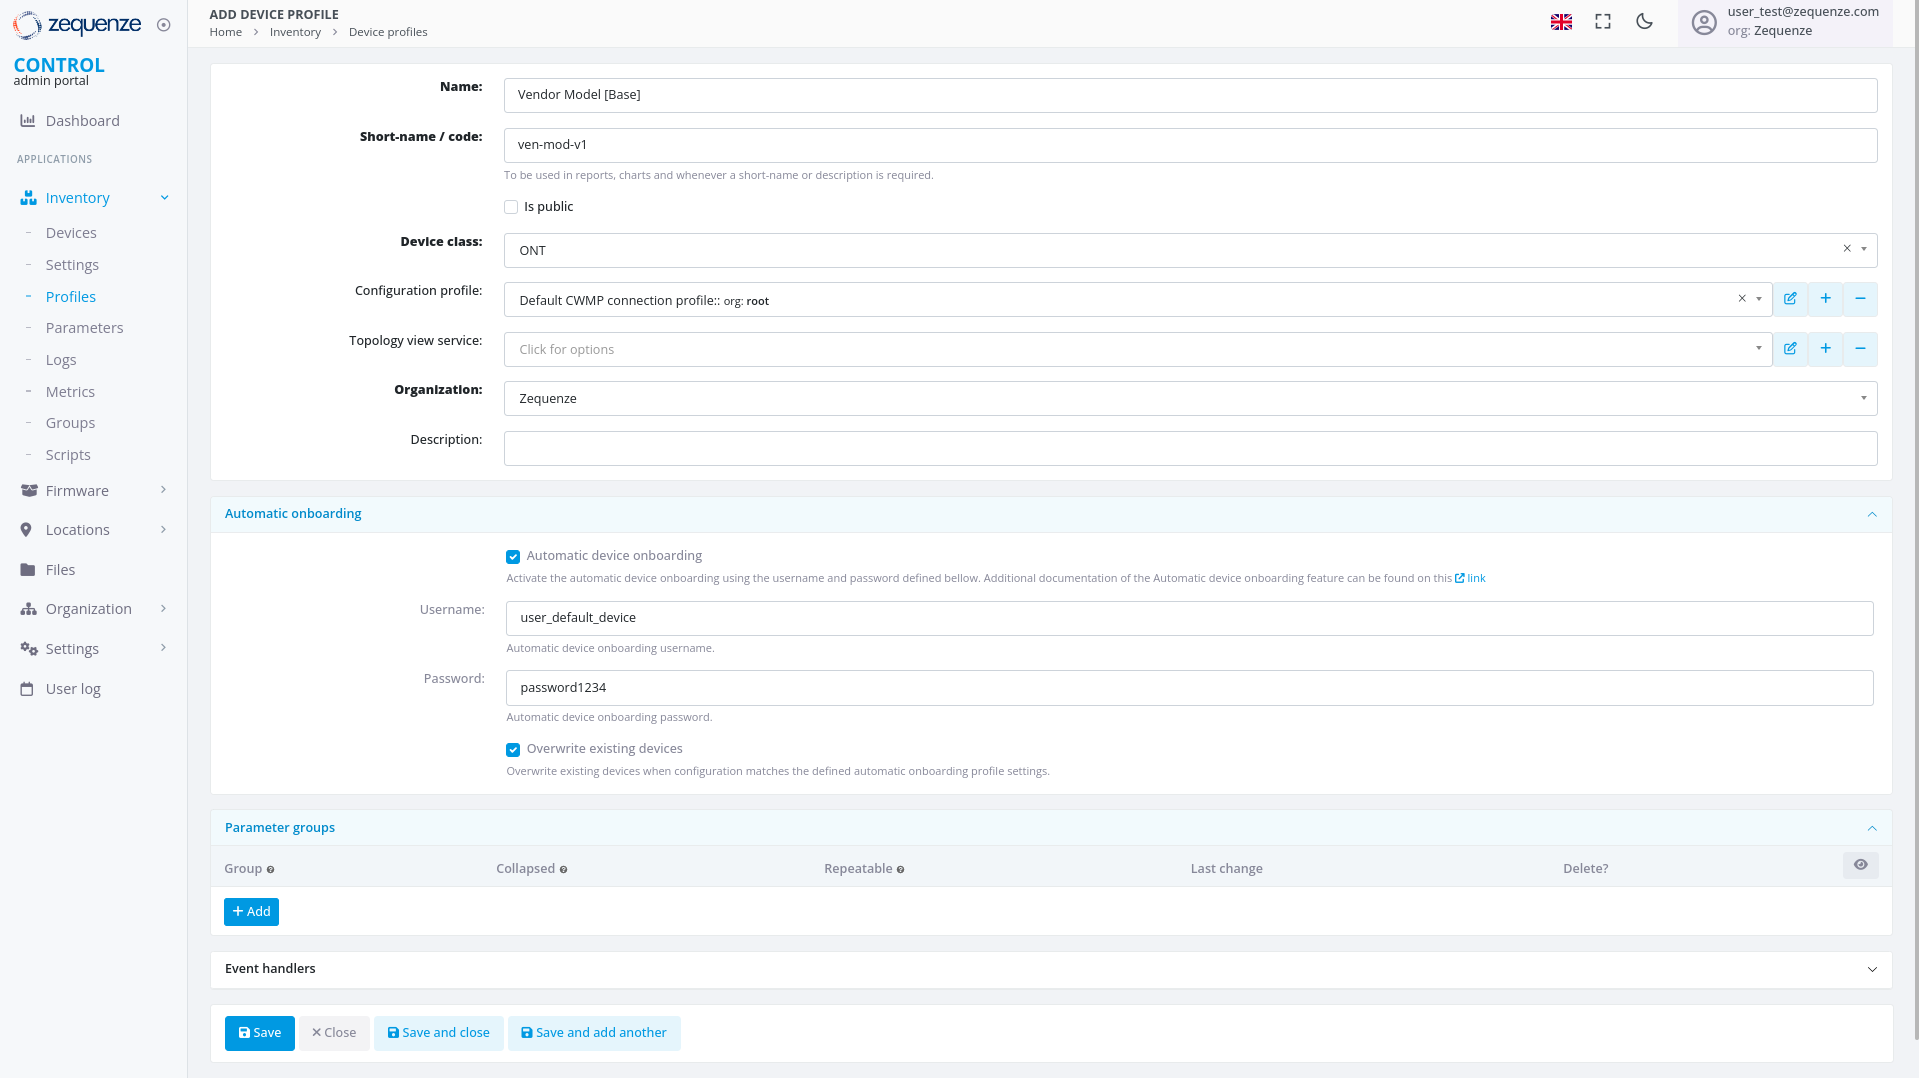 Once all fields are configured, click **"Save and close"** to create the profile.
---
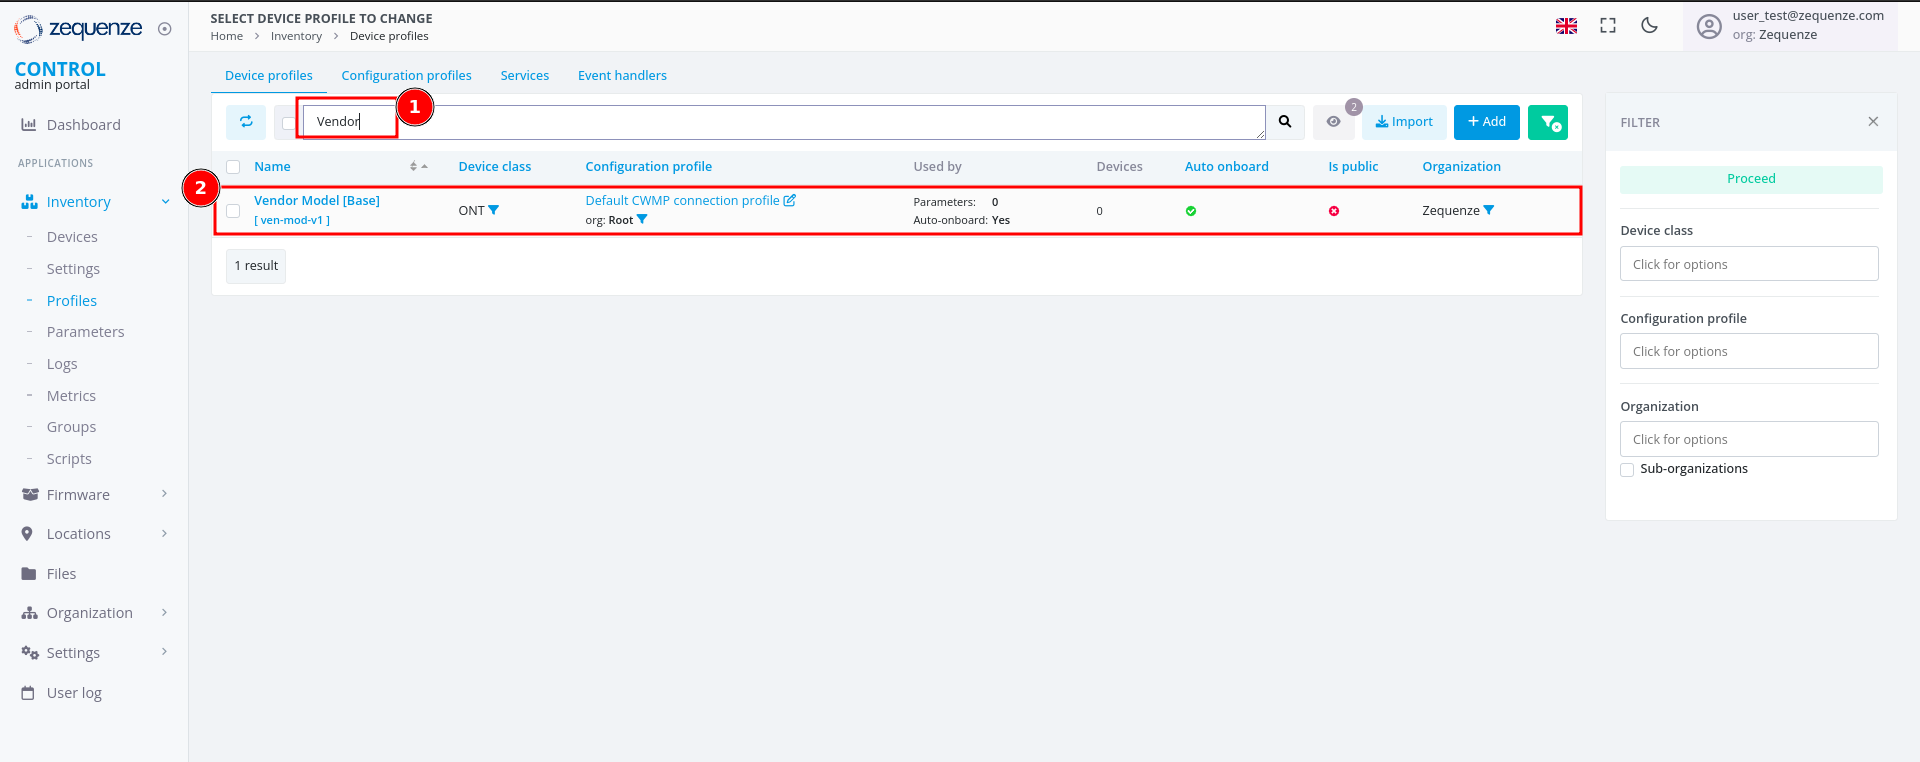
## Profile Created
After successfully creating the profile, you can:
1. **Filter by Name** - Use the search filter to locate your profile by its name
2. **View the Profile** - The newly created profile will appear in the profile list
Once all fields are configured, click **"Save and close"** to create the profile.
---
## Profile Created
After successfully creating the profile, you can:
1. **Filter by Name** - Use the search filter to locate your profile by its name
2. **View the Profile** - The newly created profile will appear in the profile list
 ---
## Next Steps
The next step is to configure a device with the credentials and URL settings.
---
## Next Steps
The next step is to configure a device with the credentials and URL settings.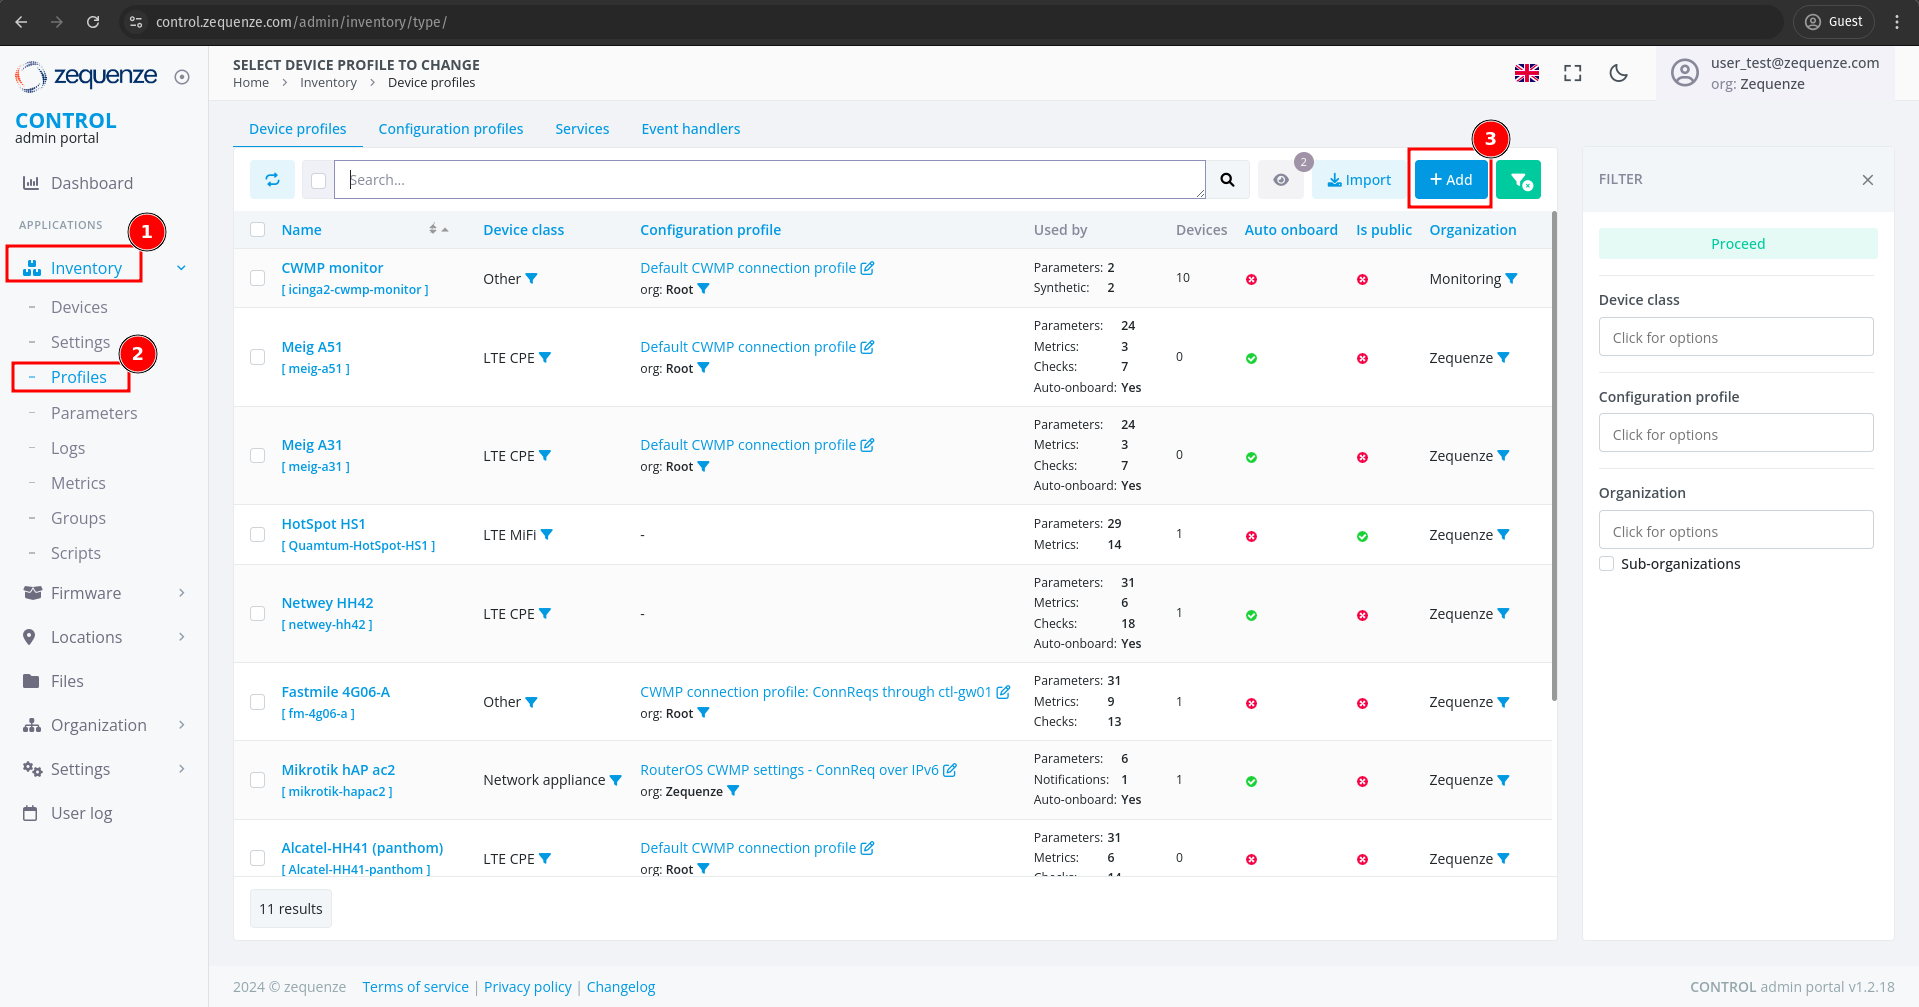
 #### Required Fields
1. **Name**
Enter a descriptive identifier for this profile. Best practice is to use the format: **"Vendor Model [Base]"**
Example: *"Nokia G-1425G-B [Base]"*
2. **Short-name / code**
Provide an abbreviated version of the profile name.
Example: *"Nokia-G-1425G"*
3. **Device class**
Select the appropriate device type from the following options:
- eMTA
- ONT
- DSL CPE
- Fixed Wireless Access CPE
- LTE CPE
- LTE MiFI
- STB
- WiFi eXtender
- WiFi Mesh AP
- WiFi Mesh (master)
- WiFi Mesh (slave)
- WiFi AP
- VoIP phone
- VoIP ATA
- LAN Switch
- Router
- Network appliance
- SONDA probe
- Transport gateway
- Other
4. **Organization**
If applicable, select which organization this profile belongs to.
#### Automatic Device Onboarding Settings
5. **Automatic device onboarding**
Enable this option to allow the CONTROL platform to automatically assign new credentials to devices. This ensures each device receives unique username and password combinations for enhanced security.
6. **User**
Enter the default username that matches the factory credentials on the device. This username must match what is configured on devices connecting to the CONTROL platform.
7. **Password**
Enter the default password that matches the factory credentials on the device. Both username and password must match for automatic profile assignment to work correctly.
8. **Overwrite existing devices**
Enable this option to allow devices that have been reset to factory credentials to reconnect to the CONTROL platform. This prevents connection rejection when a device already exists in the system and ensures that devices returning to factory settings can still connect without issues.
---
### Example Configuration
Below is an example of a completed profile configuration:
#### Required Fields
1. **Name**
Enter a descriptive identifier for this profile. Best practice is to use the format: **"Vendor Model [Base]"**
Example: *"Nokia G-1425G-B [Base]"*
2. **Short-name / code**
Provide an abbreviated version of the profile name.
Example: *"Nokia-G-1425G"*
3. **Device class**
Select the appropriate device type from the following options:
- eMTA
- ONT
- DSL CPE
- Fixed Wireless Access CPE
- LTE CPE
- LTE MiFI
- STB
- WiFi eXtender
- WiFi Mesh AP
- WiFi Mesh (master)
- WiFi Mesh (slave)
- WiFi AP
- VoIP phone
- VoIP ATA
- LAN Switch
- Router
- Network appliance
- SONDA probe
- Transport gateway
- Other
4. **Organization**
If applicable, select which organization this profile belongs to.
#### Automatic Device Onboarding Settings
5. **Automatic device onboarding**
Enable this option to allow the CONTROL platform to automatically assign new credentials to devices. This ensures each device receives unique username and password combinations for enhanced security.
6. **User**
Enter the default username that matches the factory credentials on the device. This username must match what is configured on devices connecting to the CONTROL platform.
7. **Password**
Enter the default password that matches the factory credentials on the device. Both username and password must match for automatic profile assignment to work correctly.
8. **Overwrite existing devices**
Enable this option to allow devices that have been reset to factory credentials to reconnect to the CONTROL platform. This prevents connection rejection when a device already exists in the system and ensures that devices returning to factory settings can still connect without issues.
---
### Example Configuration
Below is an example of a completed profile configuration:
 Once all fields are configured, click **"Save and close"** to create the profile.
---
## Profile Created
After successfully creating the profile, you can:
1. **Filter by Name** - Use the search filter to locate your profile by its name
2. **View the Profile** - The newly created profile will appear in the profile list
Once all fields are configured, click **"Save and close"** to create the profile.
---
## Profile Created
After successfully creating the profile, you can:
1. **Filter by Name** - Use the search filter to locate your profile by its name
2. **View the Profile** - The newly created profile will appear in the profile list
 ---
## Next Steps
The next step is to configure a device with the credentials and URL settings.
---
## Next Steps
The next step is to configure a device with the credentials and URL settings.