# IPsec Configuration
## Overview
This guide explains how to configure an IPsec VPN tunnel between RouterOS and CONTROL. The configuration process involves setting up both endpoints to establish a secure site-to-site connection.
---
## Part 1: RouterOS Configuration
### Initial Access
1. Log in to RouterOS using your default credentials
2. Navigate to **IP** → **IPsec** in the left-side menu
 ---
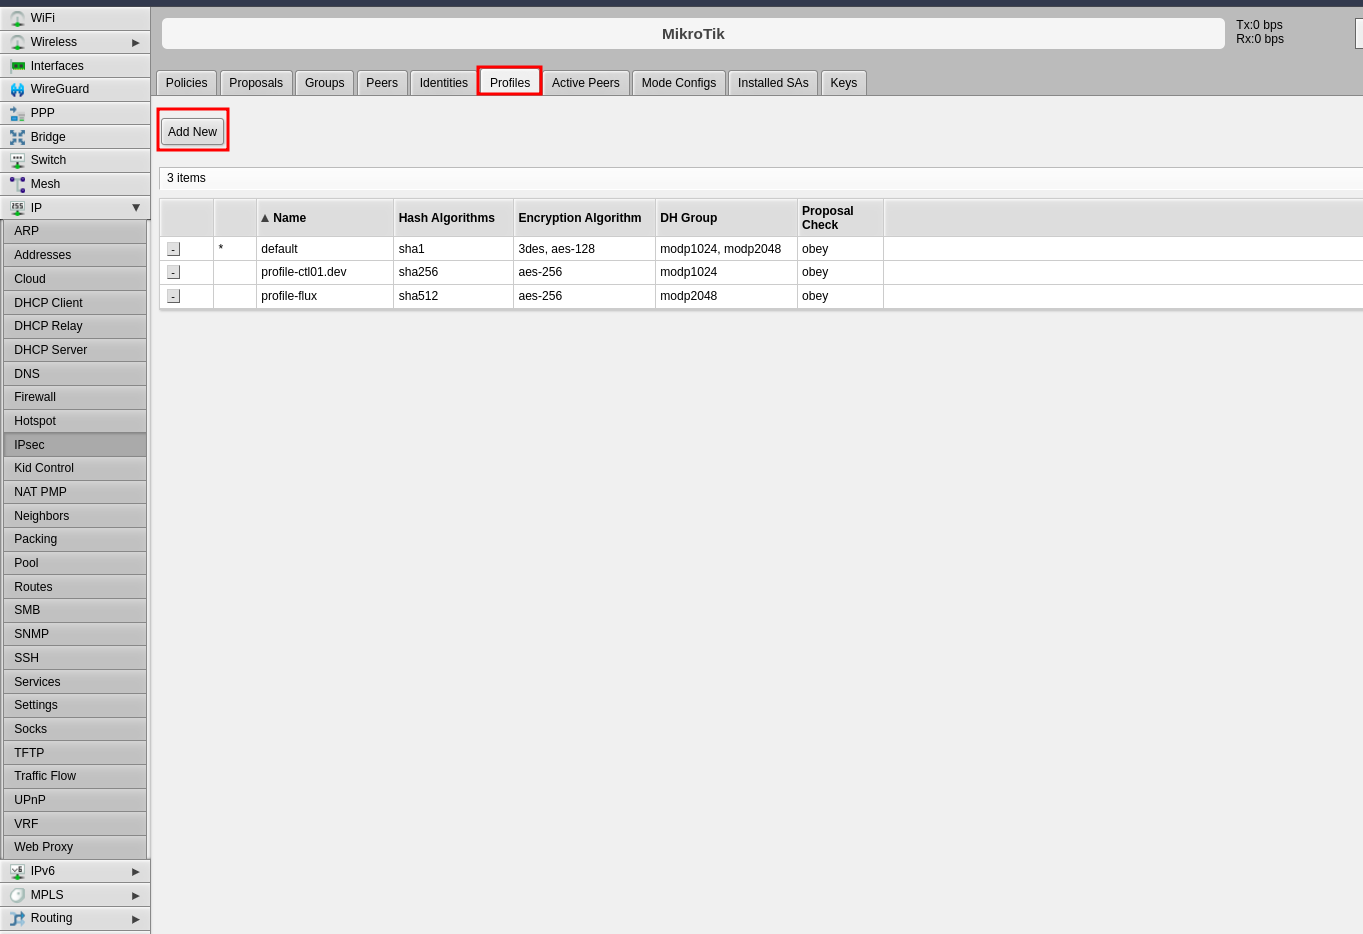
### Step 1: Configure Profiles (Phase 1)
The profile defines Phase 1 parameters for the IPsec connection.
1. Click the **Profiles** tab in the center panel
2. Click **Add New** to create a new profile
---
### Step 1: Configure Profiles (Phase 1)
The profile defines Phase 1 parameters for the IPsec connection.
1. Click the **Profiles** tab in the center panel
2. Click **Add New** to create a new profile
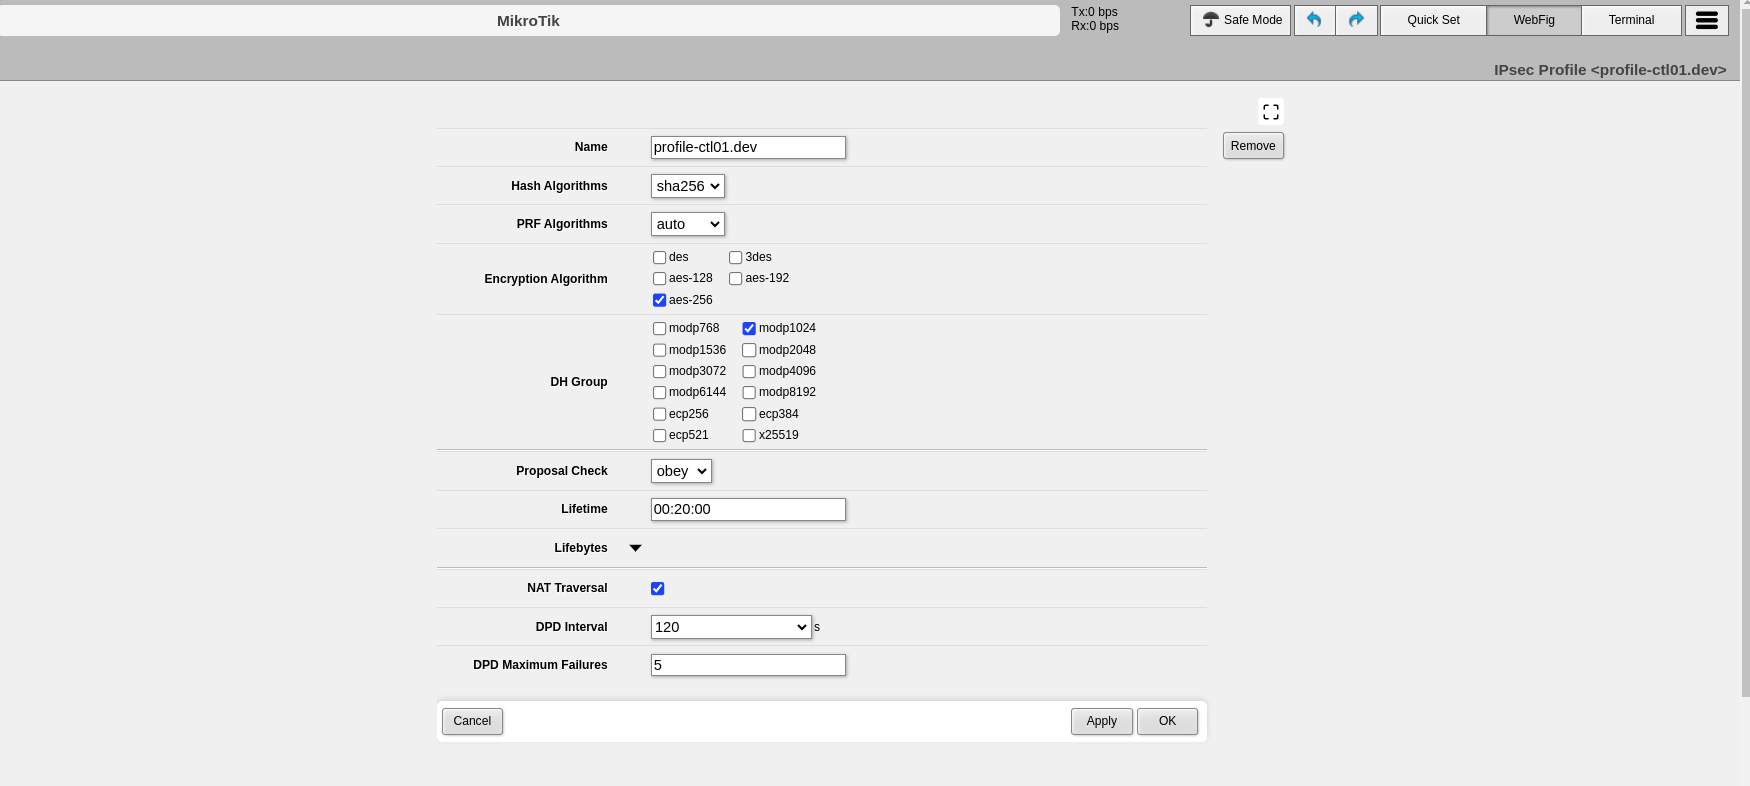
 3. Configure the following Phase 1 parameters:
- **Name**: Enter a descriptive name to identify the profile (e.g., "profile-to-ctl01.dev")
- **Hash Algorithms**: Select a hash algorithm that matches the configuration on the remote endpoint
- **Encryption Algorithm**: Choose an encryption algorithm that matches the remote endpoint configuration
- **Lifetime**: Leave the default value (measured in seconds)
- **NAT Traversal**: Enable this option if the router is behind NAT
- **DPD Interval**: Leave the default value for Dead Peer Detection and note this number
- **DPD Maximum Failures**: Leave the default value
4. Click **Apply**, then click **OK**
3. Configure the following Phase 1 parameters:
- **Name**: Enter a descriptive name to identify the profile (e.g., "profile-to-ctl01.dev")
- **Hash Algorithms**: Select a hash algorithm that matches the configuration on the remote endpoint
- **Encryption Algorithm**: Choose an encryption algorithm that matches the remote endpoint configuration
- **Lifetime**: Leave the default value (measured in seconds)
- **NAT Traversal**: Enable this option if the router is behind NAT
- **DPD Interval**: Leave the default value for Dead Peer Detection and note this number
- **DPD Maximum Failures**: Leave the default value
4. Click **Apply**, then click **OK**
 ---
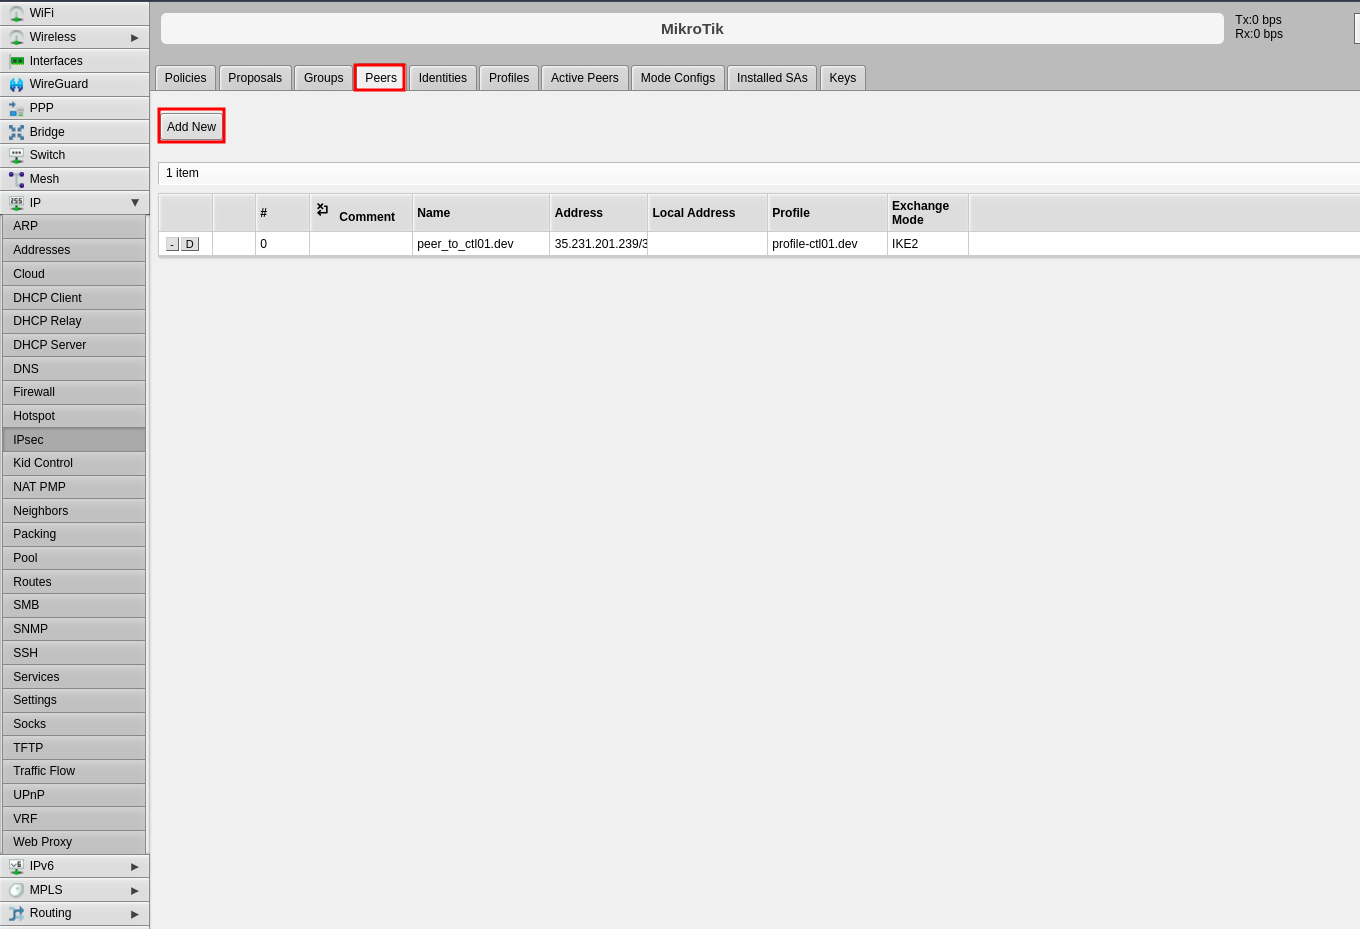
### Step 2: Configure Peers
The peer configuration defines the remote VPN endpoint.
1. Click the **Peers** tab
2. Click **Add New**
---
### Step 2: Configure Peers
The peer configuration defines the remote VPN endpoint.
1. Click the **Peers** tab
2. Click **Add New**
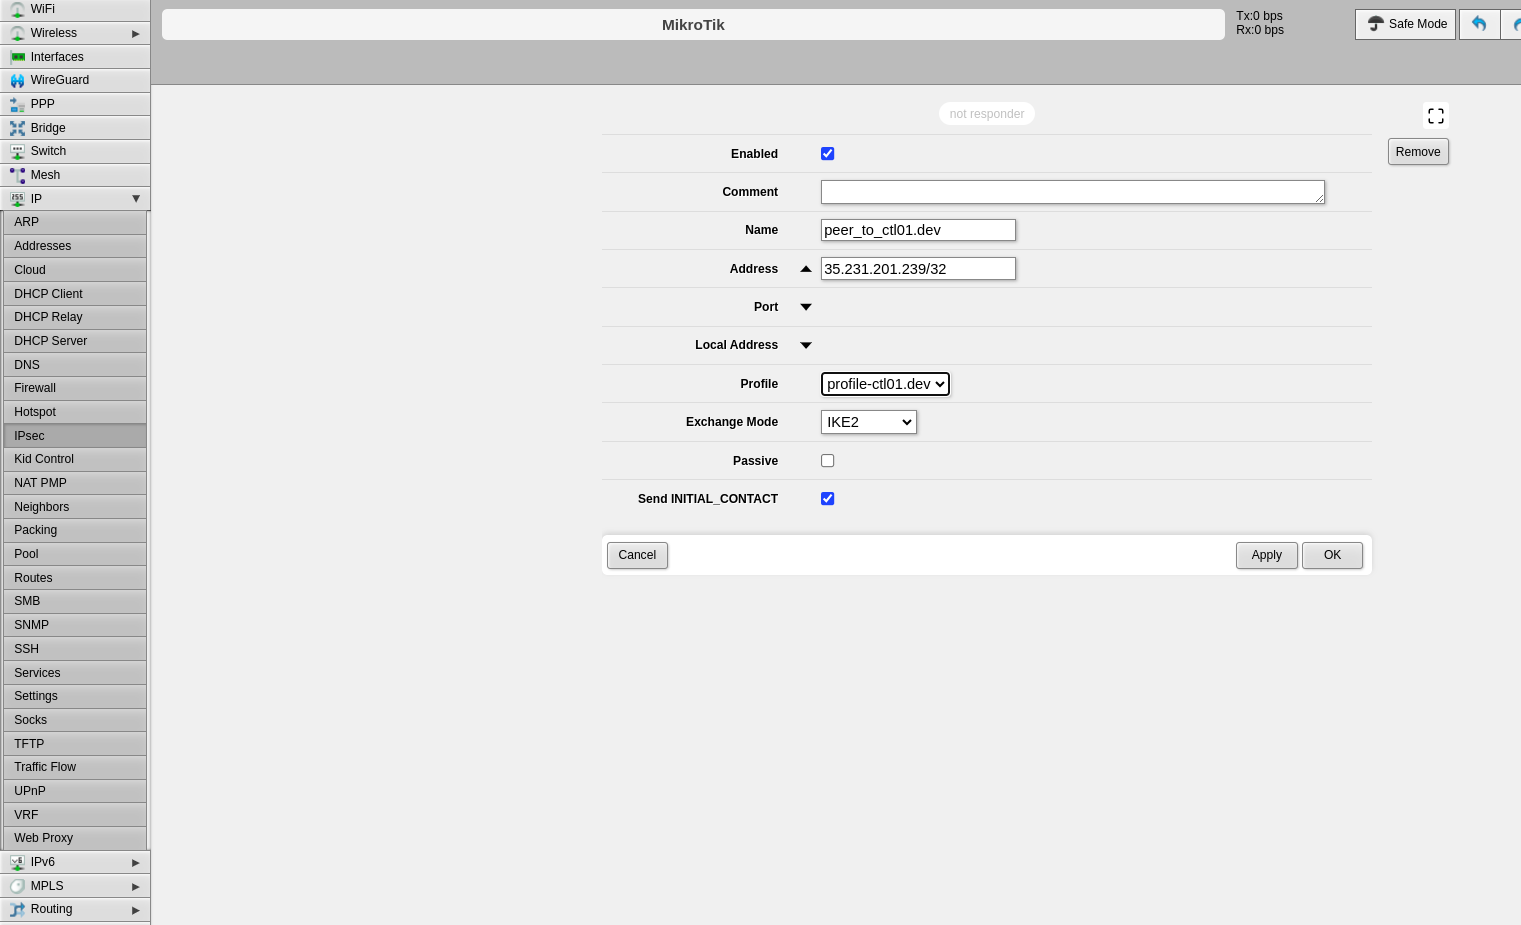
 3. Configure the following fields:
- **Name**: Enter a name to identify the remote peer
- **Address**: Enter the remote public IP address (e.g., 35.35.35.22/32)
- **Profile**: Select the profile created in Step 1
- **Exchange Mode**: Select the exchange mode (IKE2 is recommended)
4. Click **Apply**, then click **OK**
3. Configure the following fields:
- **Name**: Enter a name to identify the remote peer
- **Address**: Enter the remote public IP address (e.g., 35.35.35.22/32)
- **Profile**: Select the profile created in Step 1
- **Exchange Mode**: Select the exchange mode (IKE2 is recommended)
4. Click **Apply**, then click **OK**
 ---
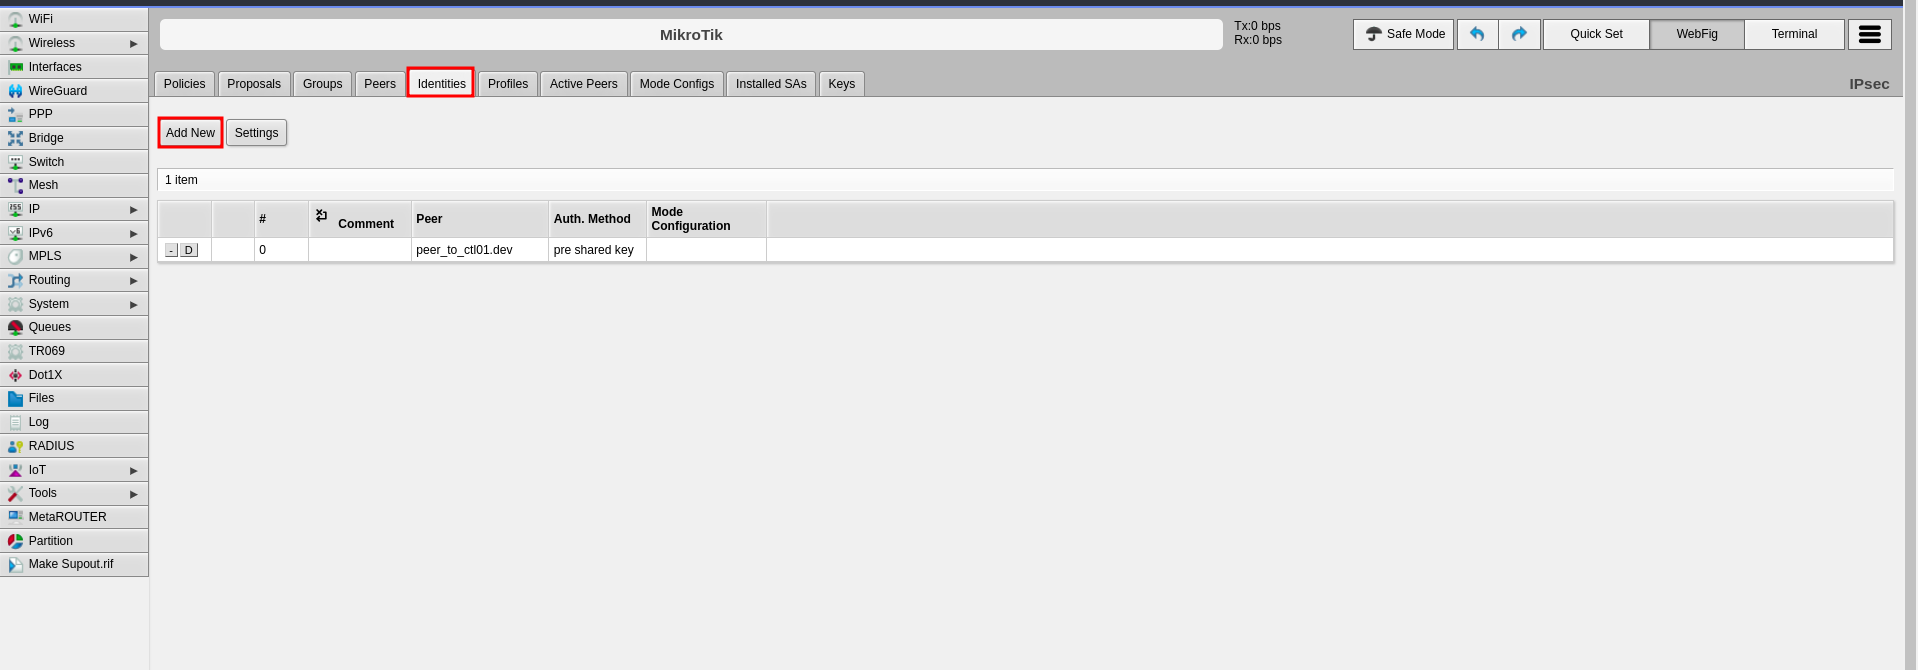
### Step 3: Configure Identities
The identities configuration defines authentication credentials.
1. Click the **Identities** tab
2. Click **Add New**
---
### Step 3: Configure Identities
The identities configuration defines authentication credentials.
1. Click the **Identities** tab
2. Click **Add New**
 3. Configure the following fields:
- **Peer**: Select the peer configured in Step 2
- **Auth. Method**: Select "pre shared key"
- **Secret**: Enter the pre-shared key that will be configured on both endpoints
4. Click **Apply**, then click **OK**
3. Configure the following fields:
- **Peer**: Select the peer configured in Step 2
- **Auth. Method**: Select "pre shared key"
- **Secret**: Enter the pre-shared key that will be configured on both endpoints
4. Click **Apply**, then click **OK**
 ---
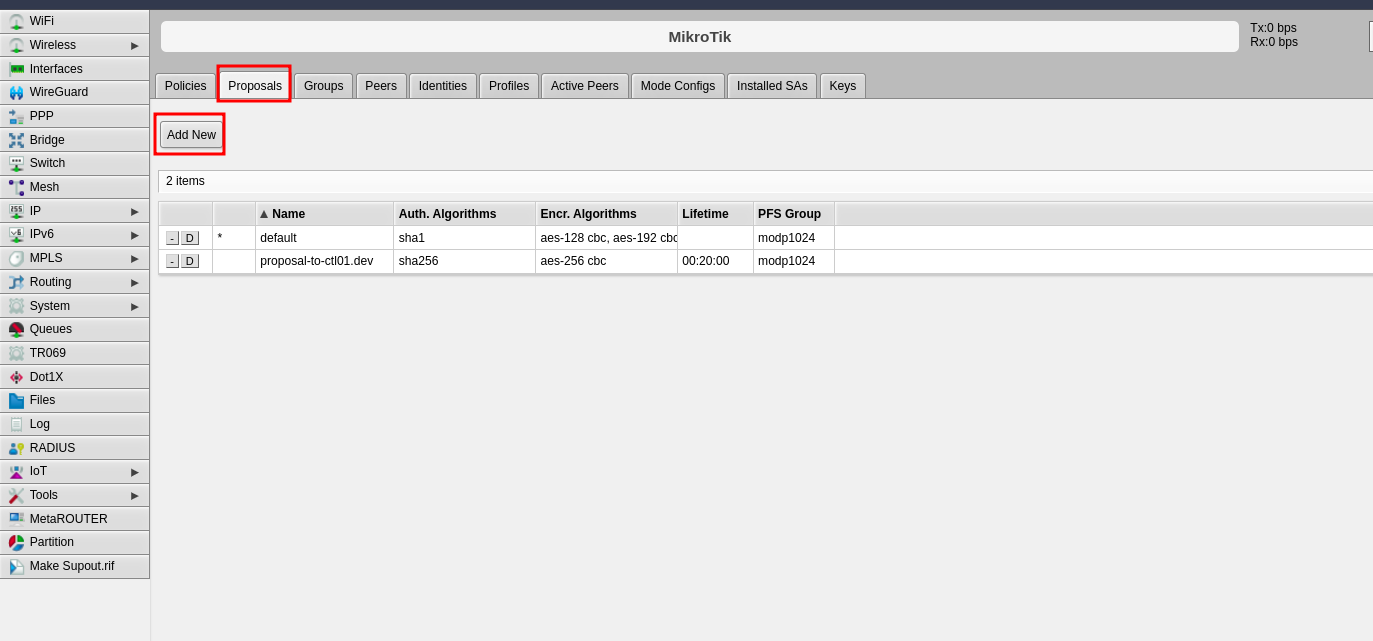
### Step 4: Configure Proposals (Phase 2)
The proposal defines Phase 2 parameters for the IPsec connection.
1. Click the **Proposals** tab
2. Click **Add New**
---
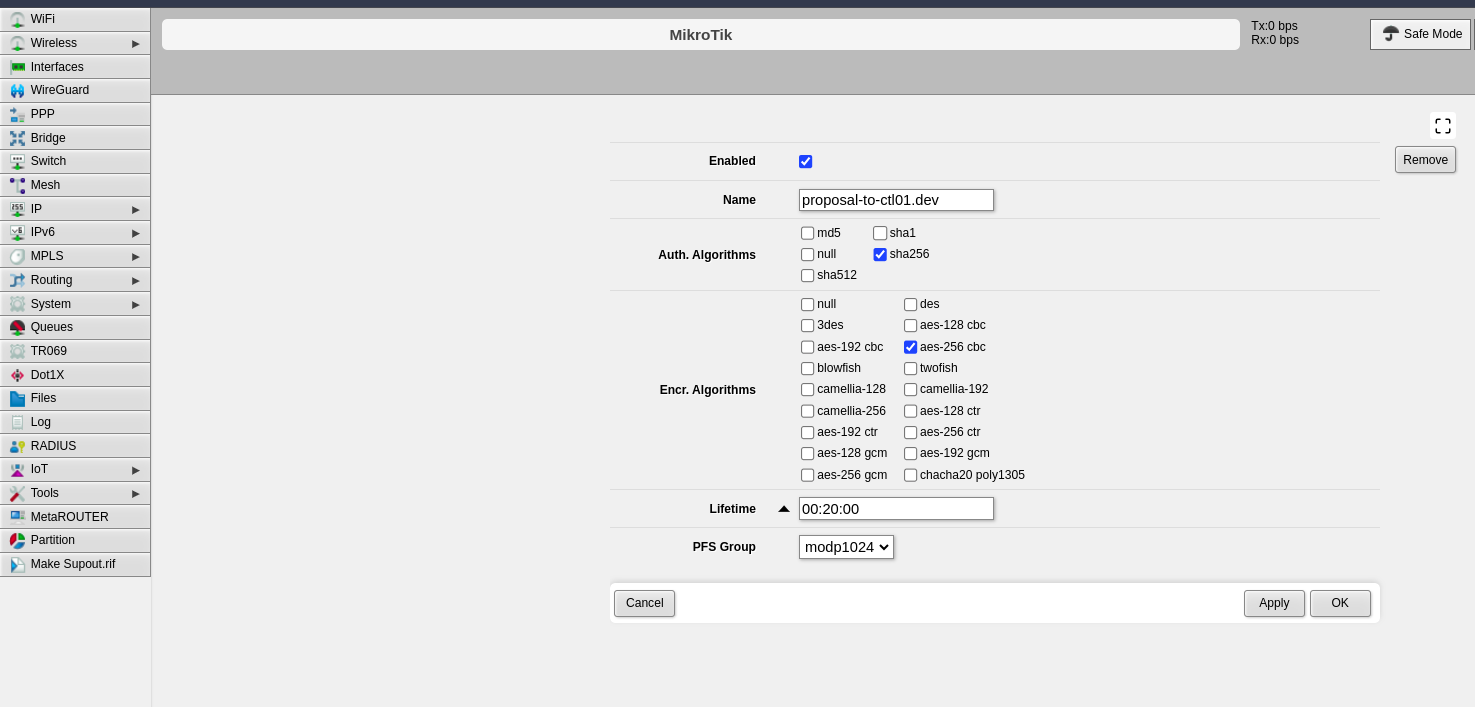
### Step 4: Configure Proposals (Phase 2)
The proposal defines Phase 2 parameters for the IPsec connection.
1. Click the **Proposals** tab
2. Click **Add New**
 3. Configure the following Phase 2 parameters:
- **Name**: Enter a name to identify this proposal
- **Auth. Algorithms**: Select the authentication algorithm to be used on both endpoints
- **Encr. Algorithms**: Select the encryption algorithm to be used on both endpoints
- **Lifetime**: Set the lifetime for Phase 2
- **PFS Group**: Select the Diffie-Hellman group for Perfect Forward Secrecy (PFS). This determines the session key generation during key exchange
4. Click **Apply**, then click **OK**
3. Configure the following Phase 2 parameters:
- **Name**: Enter a name to identify this proposal
- **Auth. Algorithms**: Select the authentication algorithm to be used on both endpoints
- **Encr. Algorithms**: Select the encryption algorithm to be used on both endpoints
- **Lifetime**: Set the lifetime for Phase 2
- **PFS Group**: Select the Diffie-Hellman group for Perfect Forward Secrecy (PFS). This determines the session key generation during key exchange
4. Click **Apply**, then click **OK**
 ---
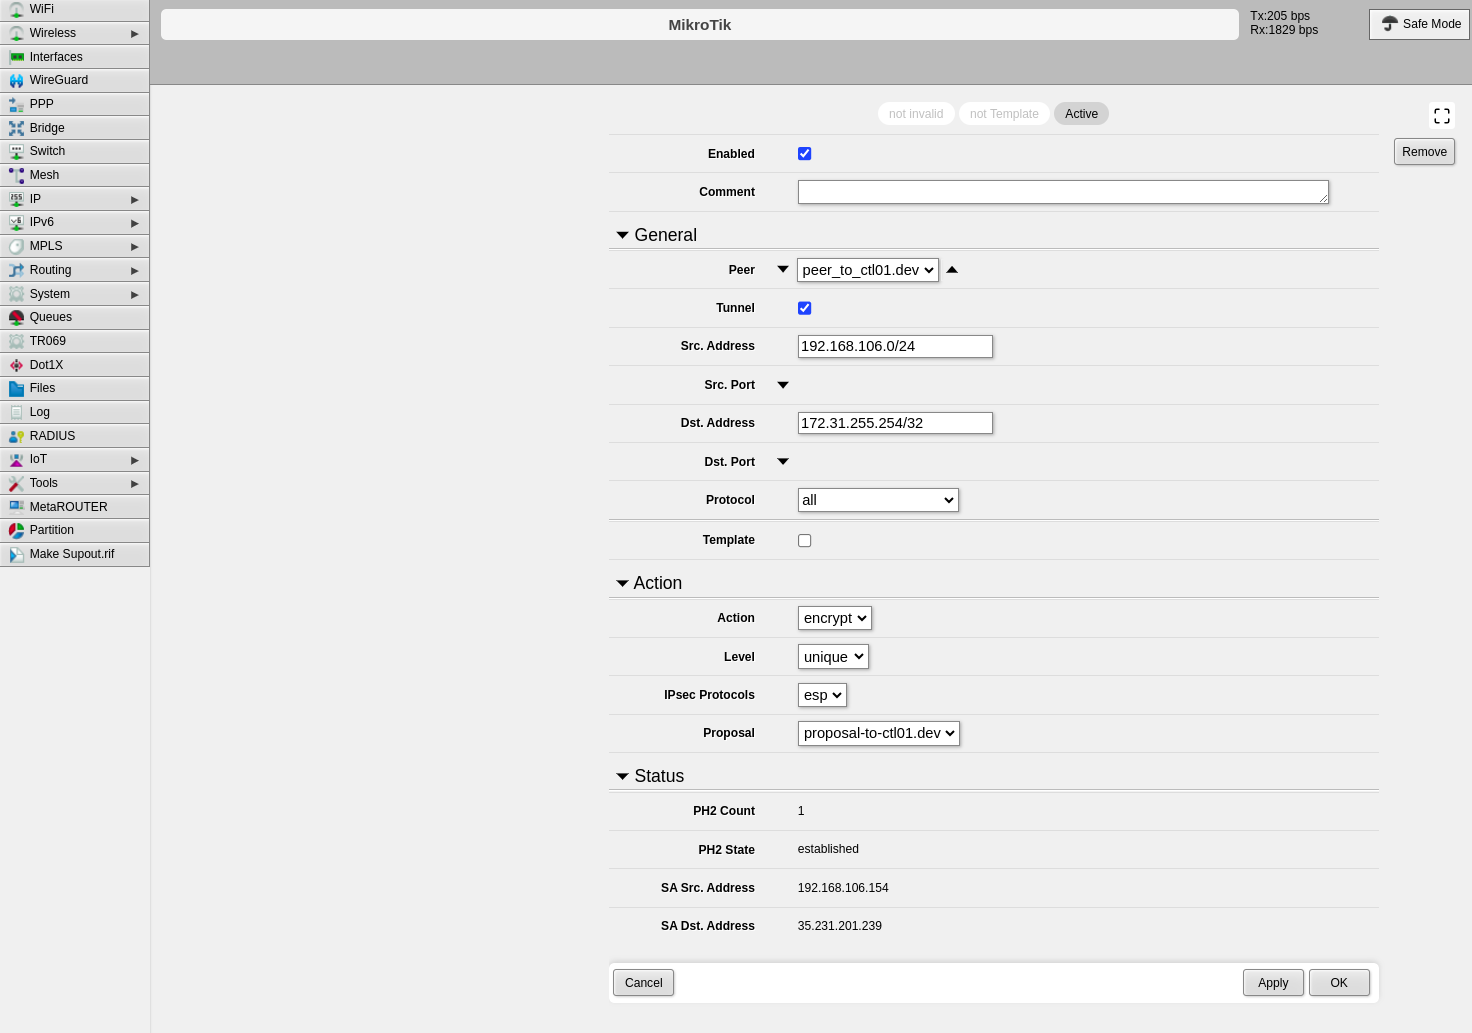
### Step 5: Configure Policies
The policy defines which traffic should pass through the VPN tunnel.
1. Click the **Policies** tab
2. Click **Add New**
---
### Step 5: Configure Policies
The policy defines which traffic should pass through the VPN tunnel.
1. Click the **Policies** tab
2. Click **Add New**
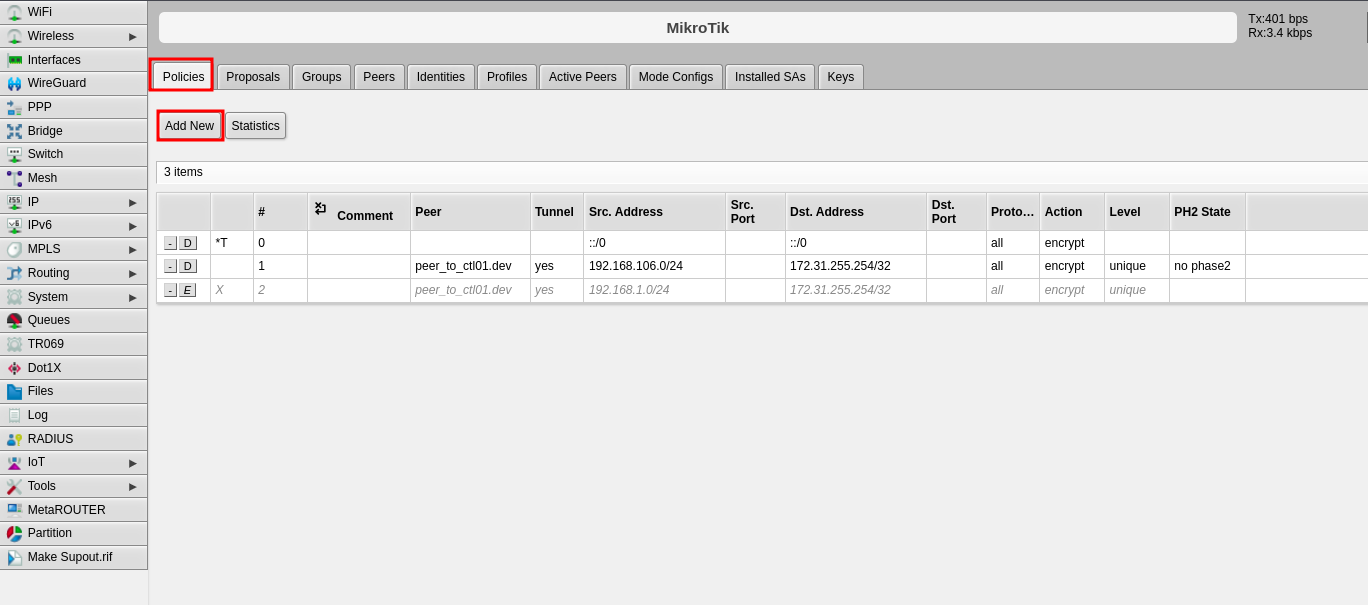 3. Configure the following fields:
- **Peer**: Select the peer configured in Step 2
- **Tunnel**: Enable this option to establish the tunnel between both sites
- **Src. Address**: Enter the local IP address or network that will pass through the tunnel
- **Dst. Address**: Enter the remote IP address or network that will be received from the other end
- **Level**: Select "unique"
- **Proposal**: Select the proposal created in Step 4
4. Click **Apply**, then click **OK**
3. Configure the following fields:
- **Peer**: Select the peer configured in Step 2
- **Tunnel**: Enable this option to establish the tunnel between both sites
- **Src. Address**: Enter the local IP address or network that will pass through the tunnel
- **Dst. Address**: Enter the remote IP address or network that will be received from the other end
- **Level**: Select "unique"
- **Proposal**: Select the proposal created in Step 4
4. Click **Apply**, then click **OK**
 ---
## Part 2: CONTROL Configuration
### Initial Navigation
1. Navigate to the **Links** section in the left-side menu
2. Select the **Services** tab at the top
3. Click the **+Add** button
---
## Part 2: CONTROL Configuration
### Initial Navigation
1. Navigate to the **Links** section in the left-side menu
2. Select the **Services** tab at the top
3. Click the **+Add** button
 ---
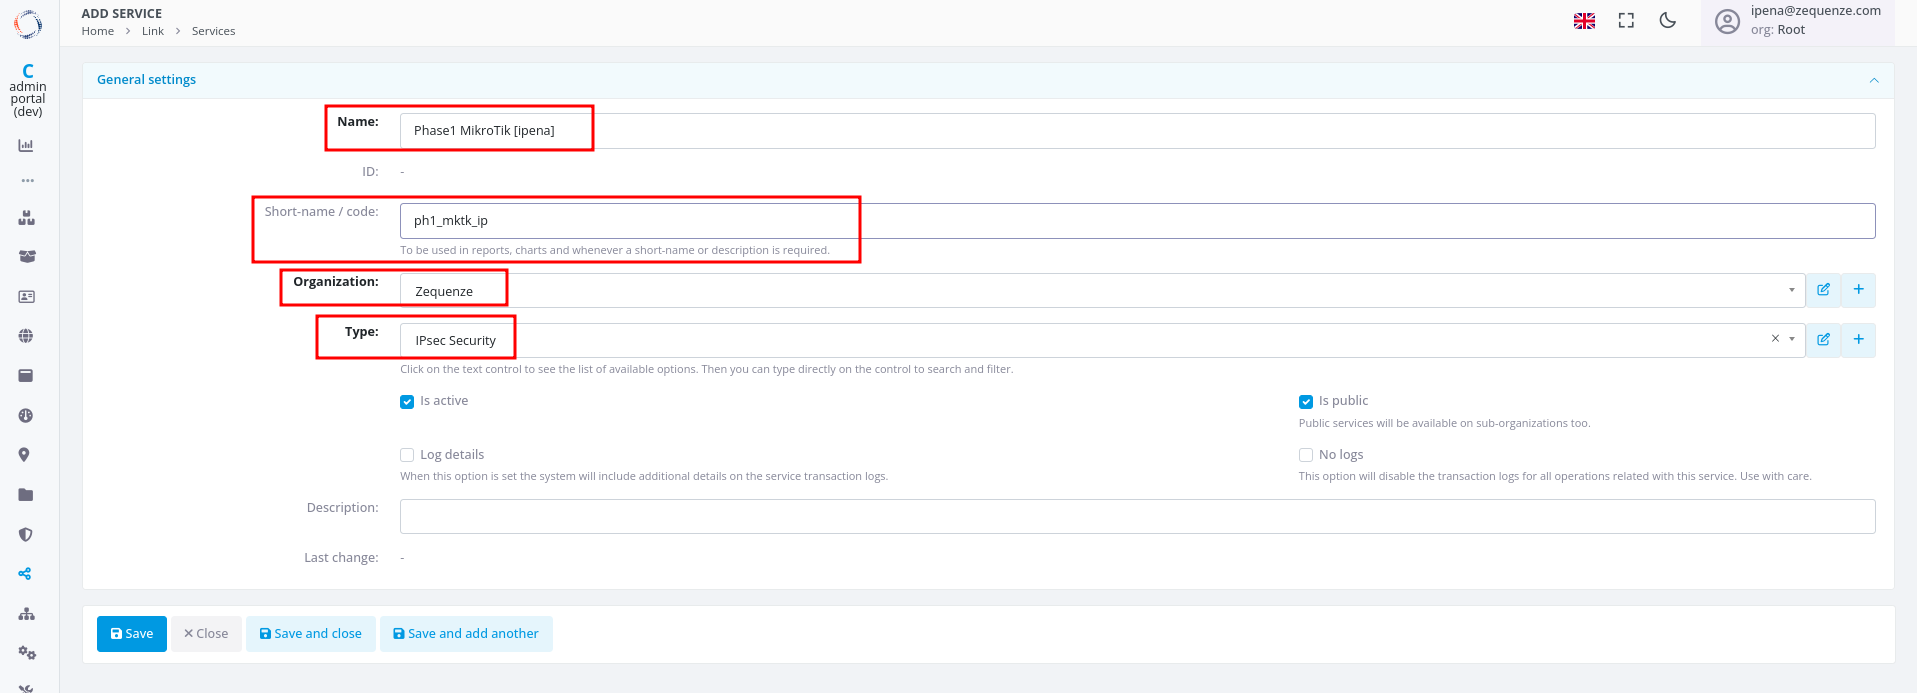
### Step 1: Create IPsec Security Service (Phase 1)
1. Configure the basic information:
- **Name**: Enter a name to identify Phase 1
- **Short-name/code**: Enter a short identifier for quick reference
- **Organization**: Select the organization that will use this connection
- **Type**: Select "IPsec Security"
2. Click **Save** at the bottom
---
### Step 1: Create IPsec Security Service (Phase 1)
1. Configure the basic information:
- **Name**: Enter a name to identify Phase 1
- **Short-name/code**: Enter a short identifier for quick reference
- **Organization**: Select the organization that will use this connection
- **Type**: Select "IPsec Security"
2. Click **Save** at the bottom
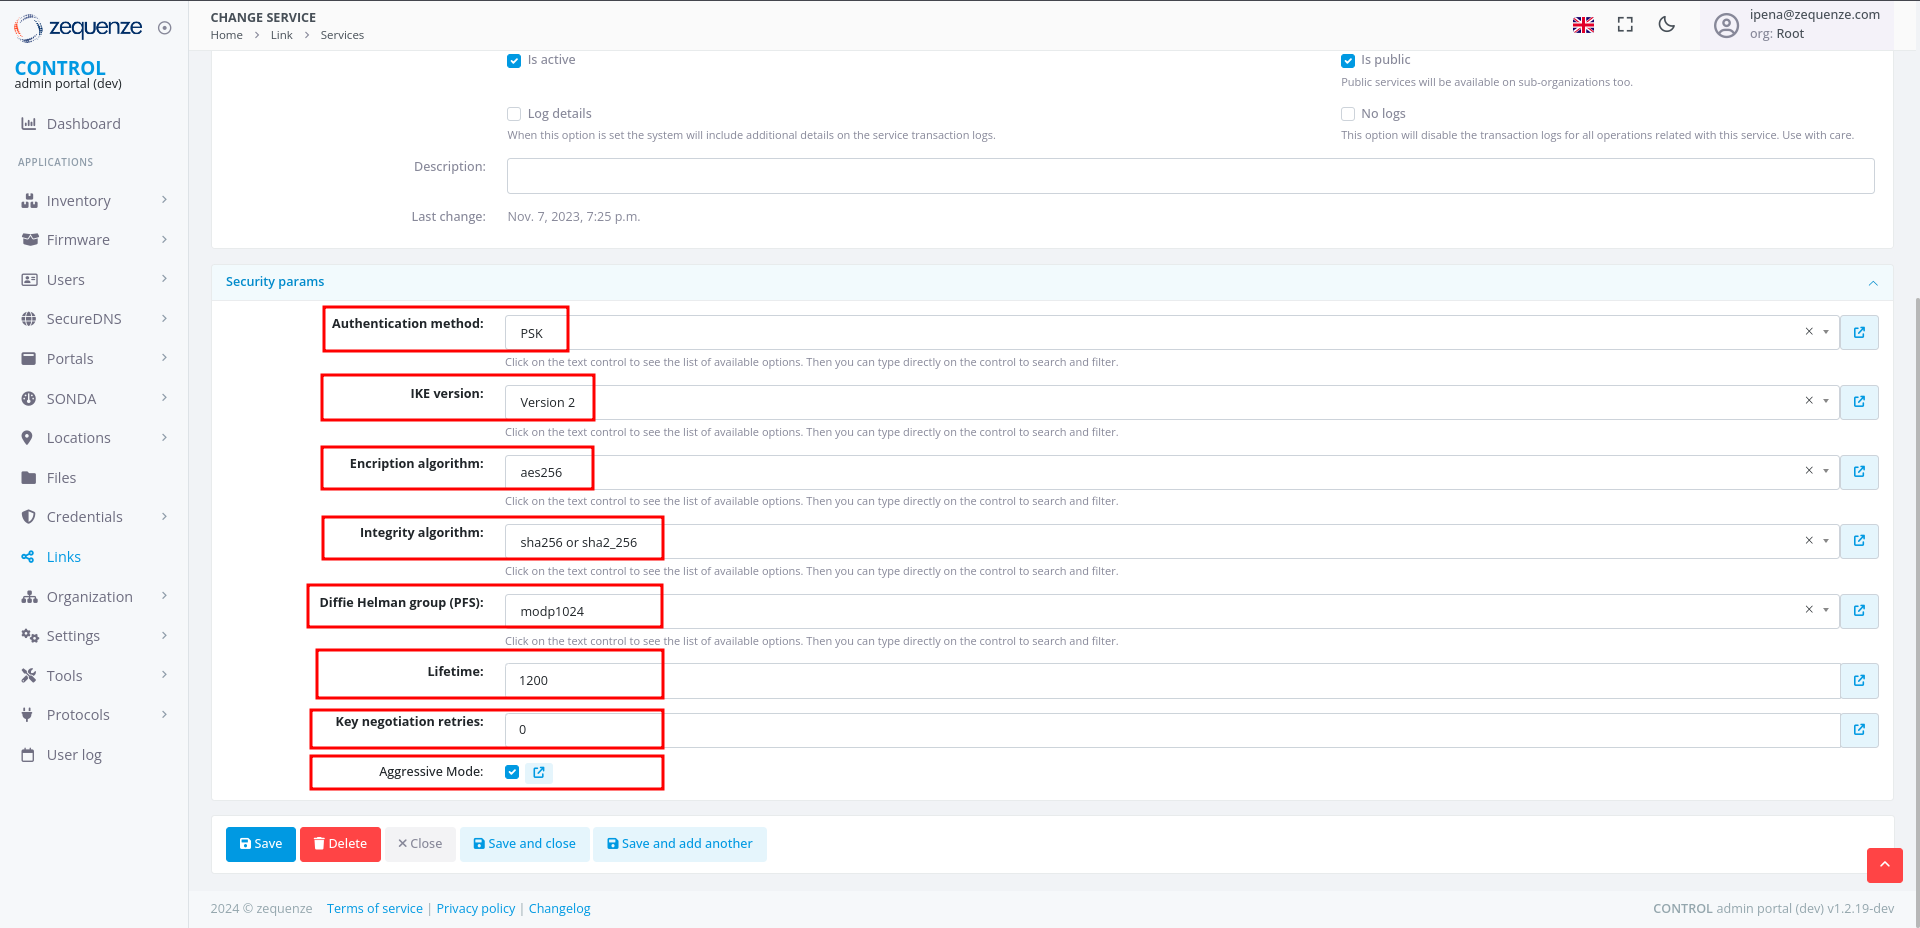
 3. Configure the Phase 1 parameters to match your RouterOS configuration:
- **Authentication method**: Select "PSK"
- **IKE version**: Select "Version 2"
- **Encryption algorithm**: Enter "aes256"
- **Integrity algorithm**: Enter "sha256" or "sha2_256"
- **Diffie Hellman group (PFS)**: Enter "modp1024"
- **Lifetime**: Enter 1200 (equivalent to 20 minutes)
- **Key negotiation retries**: Enter "0"
- **Aggressive Mode**: Enable this option
4. Click **Save and close** at the bottom
3. Configure the Phase 1 parameters to match your RouterOS configuration:
- **Authentication method**: Select "PSK"
- **IKE version**: Select "Version 2"
- **Encryption algorithm**: Enter "aes256"
- **Integrity algorithm**: Enter "sha256" or "sha2_256"
- **Diffie Hellman group (PFS)**: Enter "modp1024"
- **Lifetime**: Enter 1200 (equivalent to 20 minutes)
- **Key negotiation retries**: Enter "0"
- **Aggressive Mode**: Enable this option
4. Click **Save and close** at the bottom
 ---
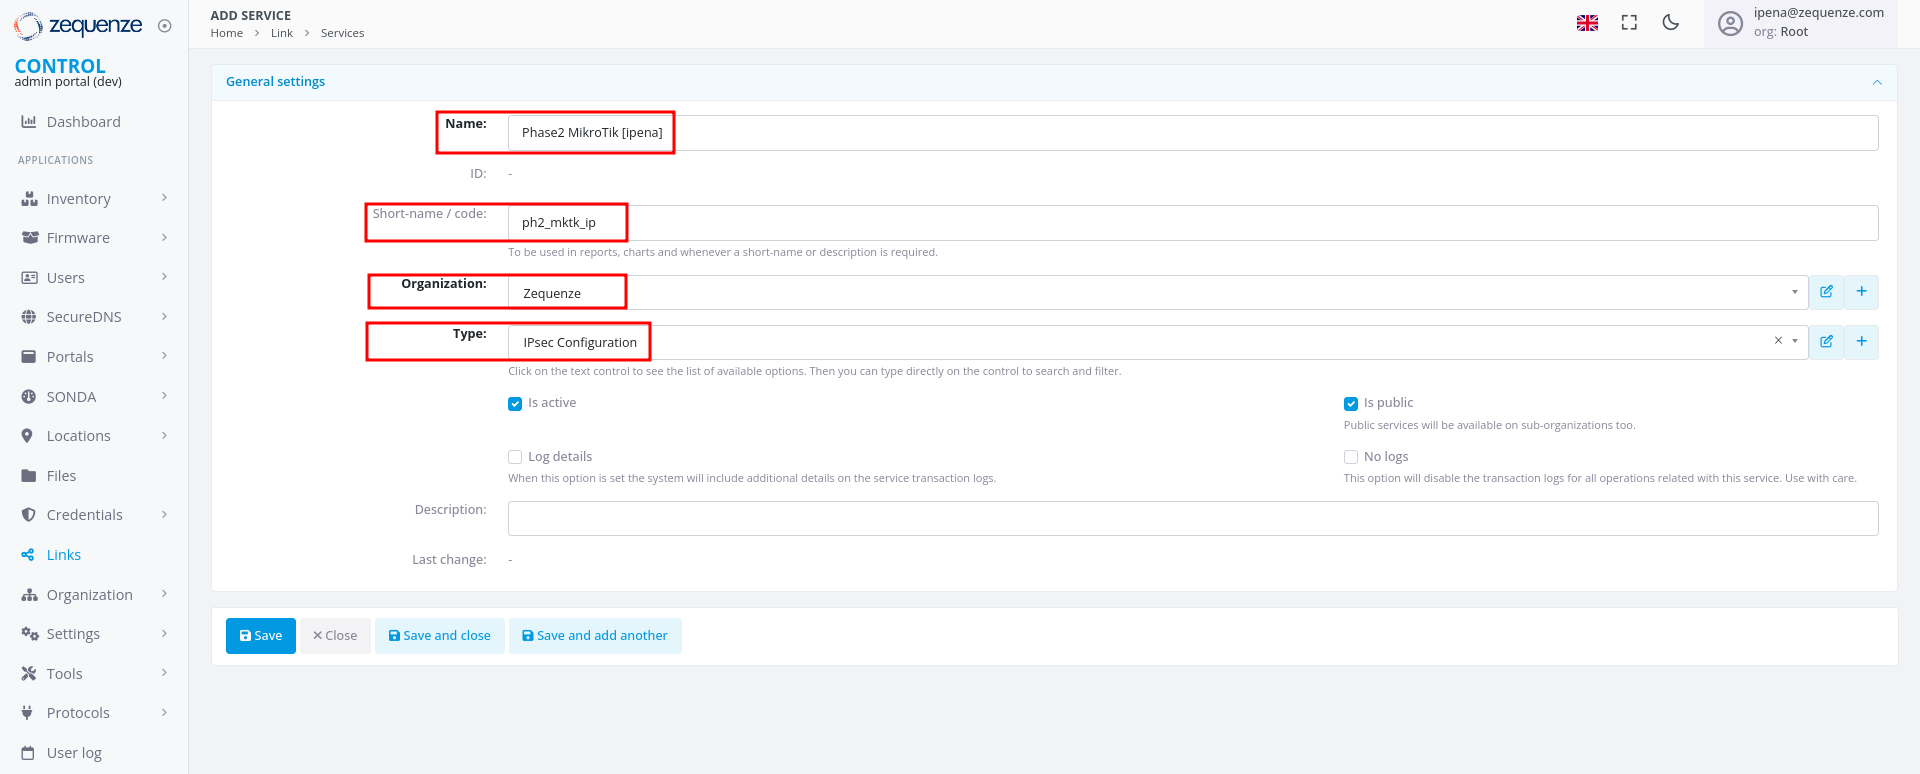
### Step 2: Create IPsec Configuration Service (Phase 2)
1. In the **Services** tab, click **+Add** again to create another service
2. Configure the basic information:
- **Name**: Enter a name to identify Phase 2
- **Short-name/code**: Enter a short identifier for quick reference
- **Organization**: Select the organization that will use this connection
- **Type**: Select "IPsec Configuration"
---
### Step 2: Create IPsec Configuration Service (Phase 2)
1. In the **Services** tab, click **+Add** again to create another service
2. Configure the basic information:
- **Name**: Enter a name to identify Phase 2
- **Short-name/code**: Enter a short identifier for quick reference
- **Organization**: Select the organization that will use this connection
- **Type**: Select "IPsec Configuration"
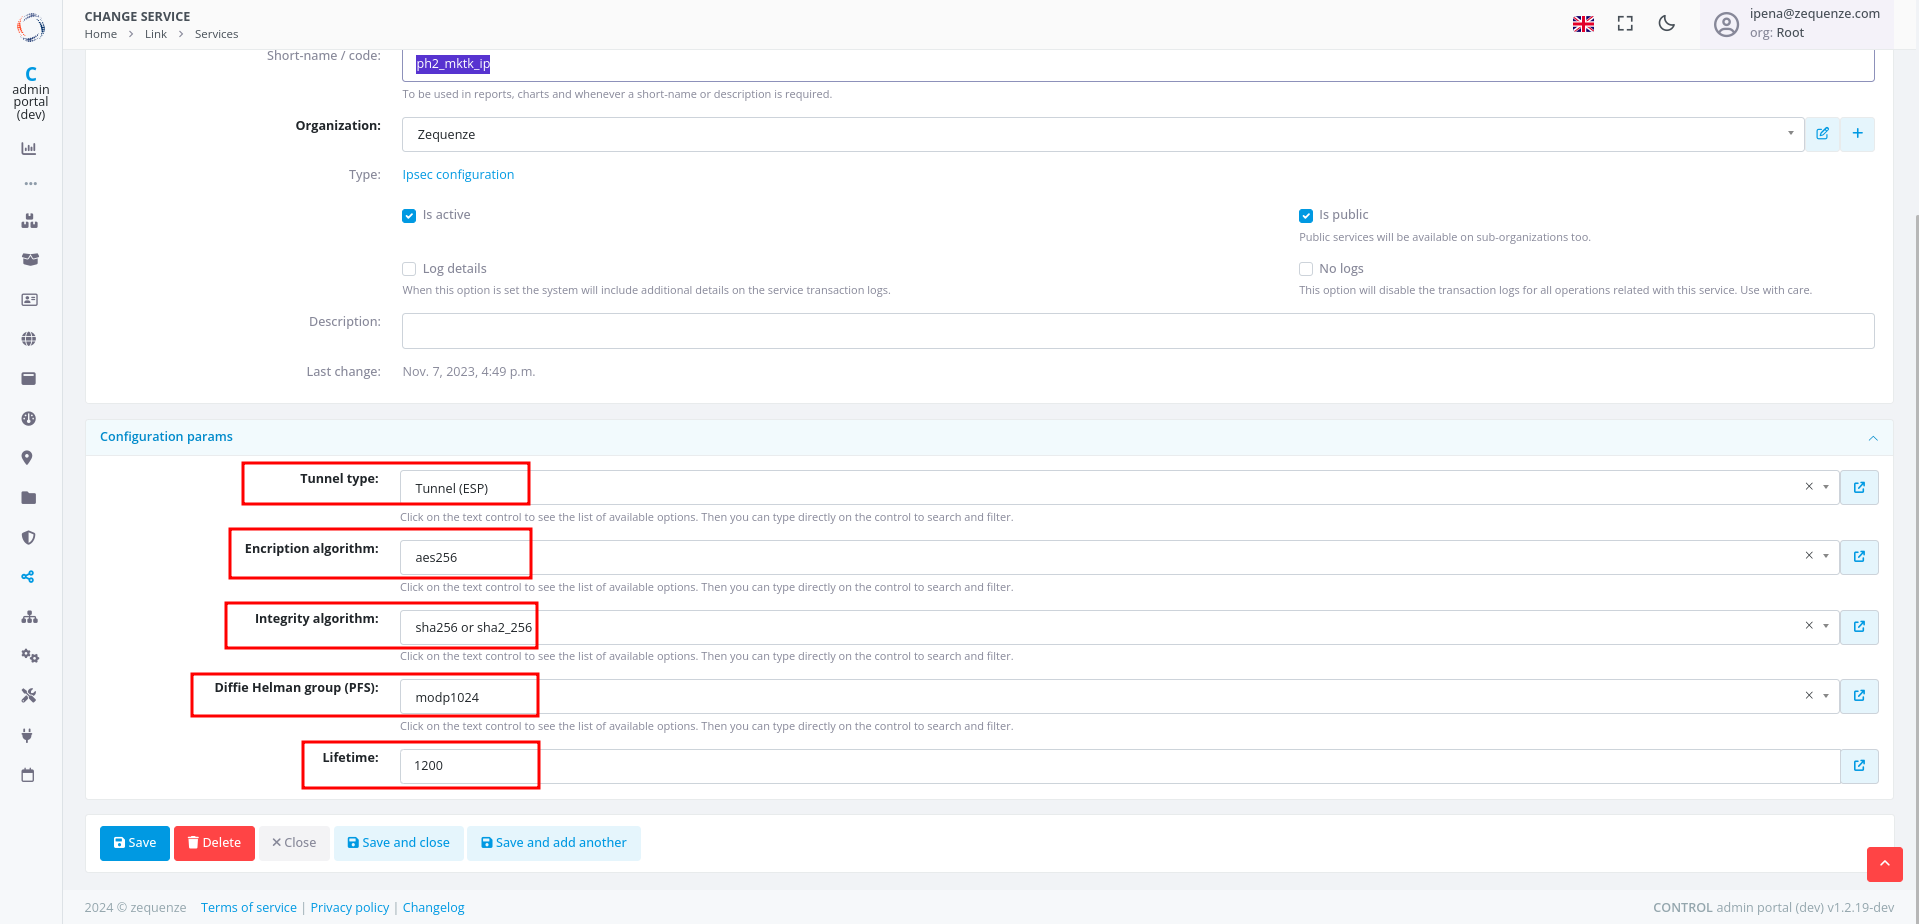
 3. Configure the Phase 2 parameters to match your RouterOS configuration:
- **Tunnel type**: Select "Tunnel (ESP)"
- **Encryption algorithm**: Enter "aes256"
- **Integrity algorithm**: Enter "sha256" or "sha2_256"
- **Diffie Hellman group (PFS)**: Enter "modp1024"
- **Lifetime**: Enter 1200 (equivalent to 20 minutes)
3. Configure the Phase 2 parameters to match your RouterOS configuration:
- **Tunnel type**: Select "Tunnel (ESP)"
- **Encryption algorithm**: Enter "aes256"
- **Integrity algorithm**: Enter "sha256" or "sha2_256"
- **Diffie Hellman group (PFS)**: Enter "modp1024"
- **Lifetime**: Enter 1200 (equivalent to 20 minutes)
 ---
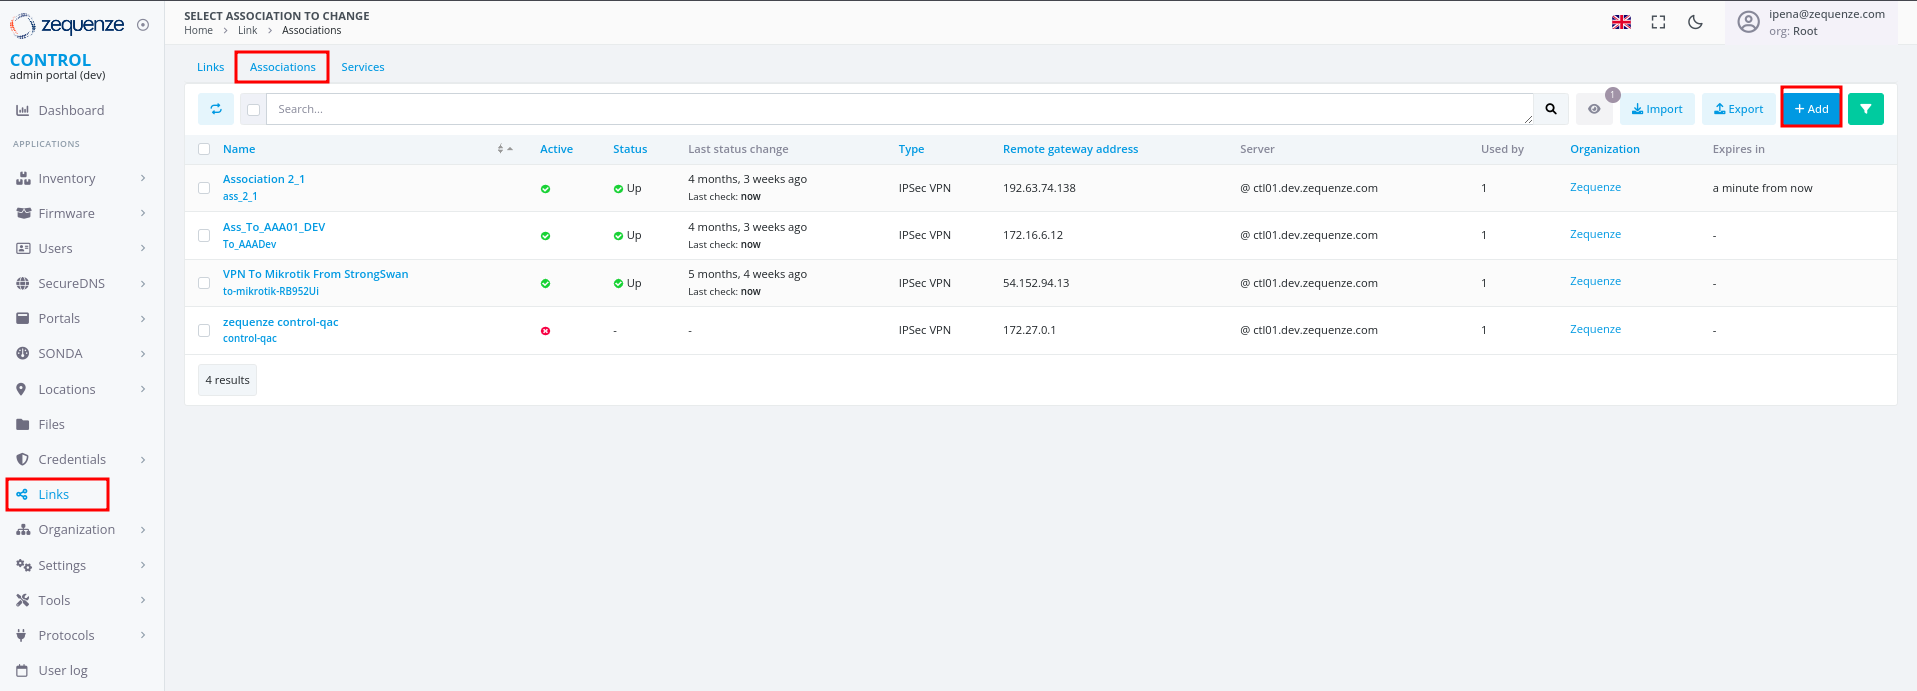
### Step 3: Create Association
1. In the **Links** section, select the **Association** tab
2. Click the **+Add** button
---
### Step 3: Create Association
1. In the **Links** section, select the **Association** tab
2. Click the **+Add** button
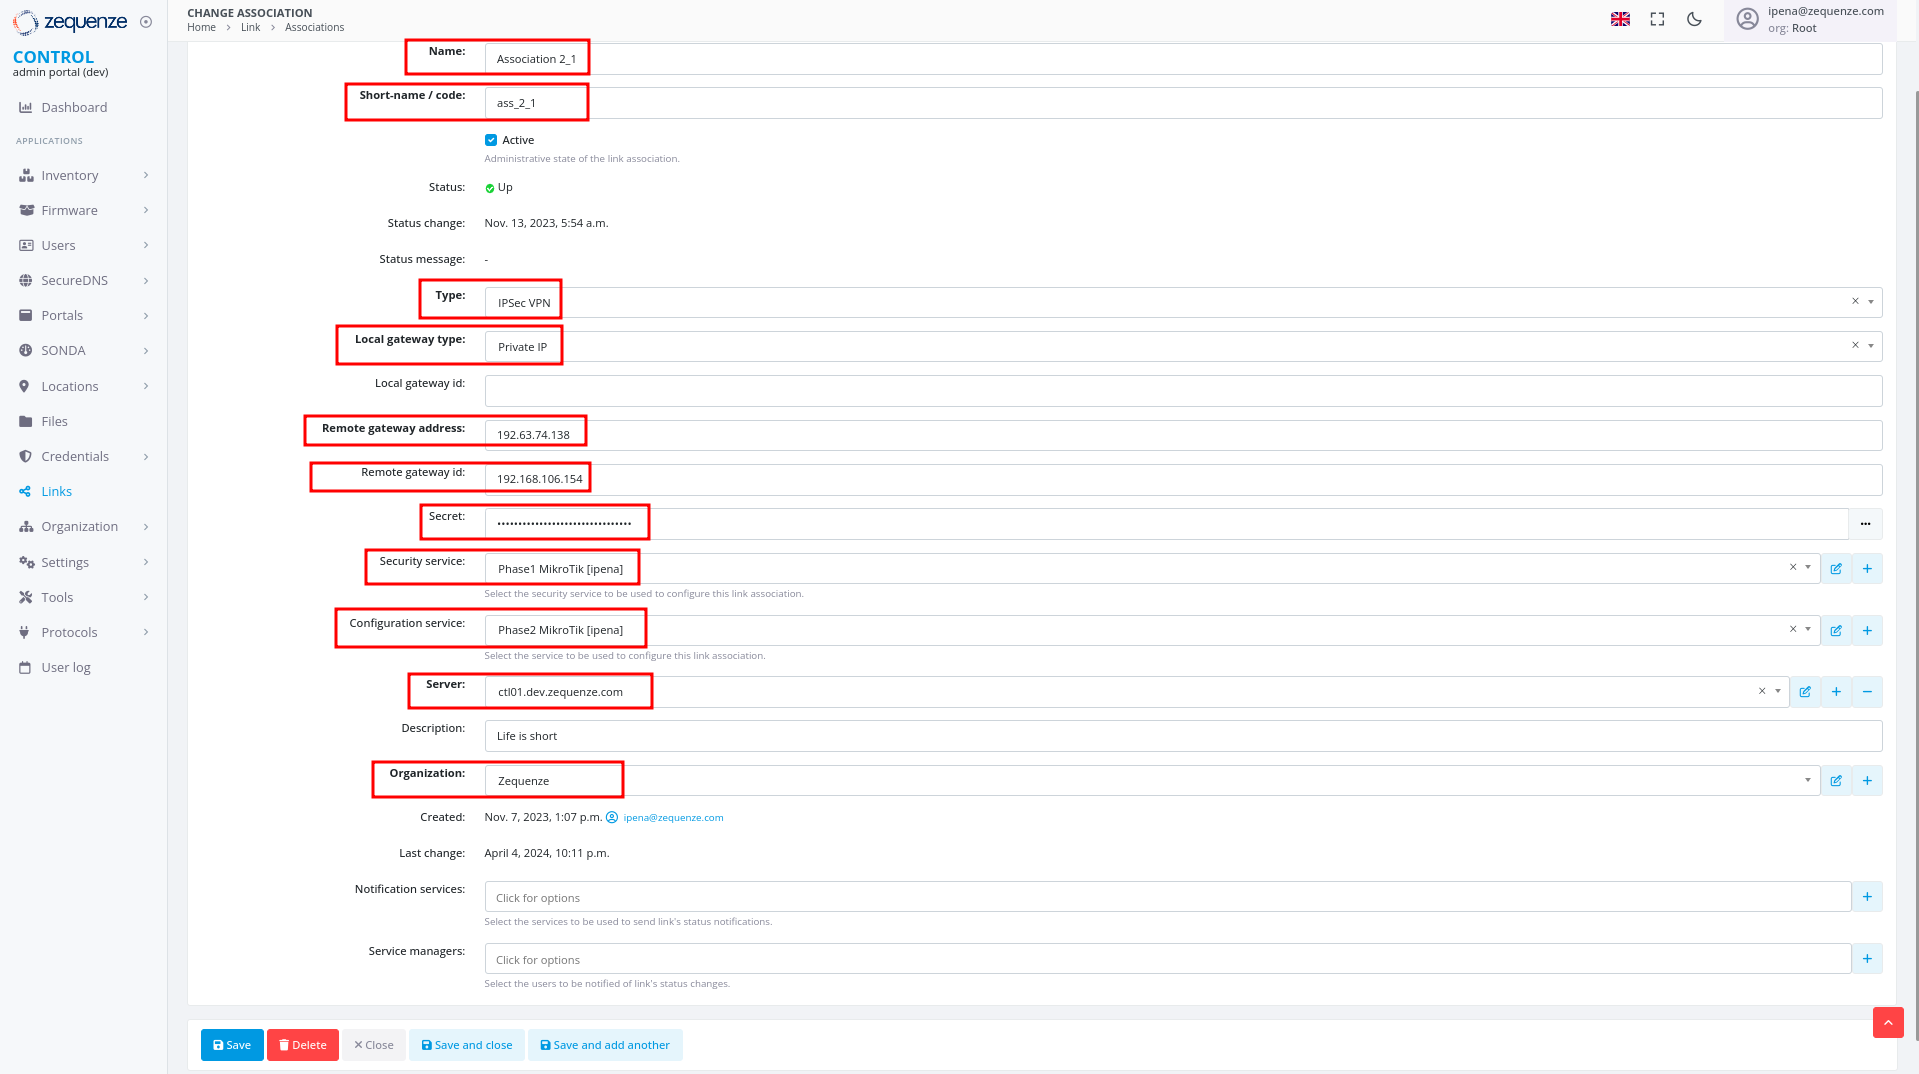
 3. Configure the following fields:
- **Name**: Enter a name to identify this association
- **Short-name / code**: Enter a short identifier for quick reference
- **Type**: Leave "IPSec VPN" selected
- **Local gateway type**: Leave "Private IP" selected
- **Remote gateway address**: Enter the remote public IP address you are connecting to
- **Remote gateway id**: Enter the WAN interface IP of the RouterOS device
- **Secret**: Enter the pre-shared key (must match the secret configured in RouterOS)
- **Security service**: Select the IPsec Security service created in Step 1
- **Configuration service**: Select the IPsec Configuration service created in Step 2
- **Server**: Select the internal server to use
- **Organization**: Select the organization that will use this connection
3. Configure the following fields:
- **Name**: Enter a name to identify this association
- **Short-name / code**: Enter a short identifier for quick reference
- **Type**: Leave "IPSec VPN" selected
- **Local gateway type**: Leave "Private IP" selected
- **Remote gateway address**: Enter the remote public IP address you are connecting to
- **Remote gateway id**: Enter the WAN interface IP of the RouterOS device
- **Secret**: Enter the pre-shared key (must match the secret configured in RouterOS)
- **Security service**: Select the IPsec Security service created in Step 1
- **Configuration service**: Select the IPsec Configuration service created in Step 2
- **Server**: Select the internal server to use
- **Organization**: Select the organization that will use this connection
 ---
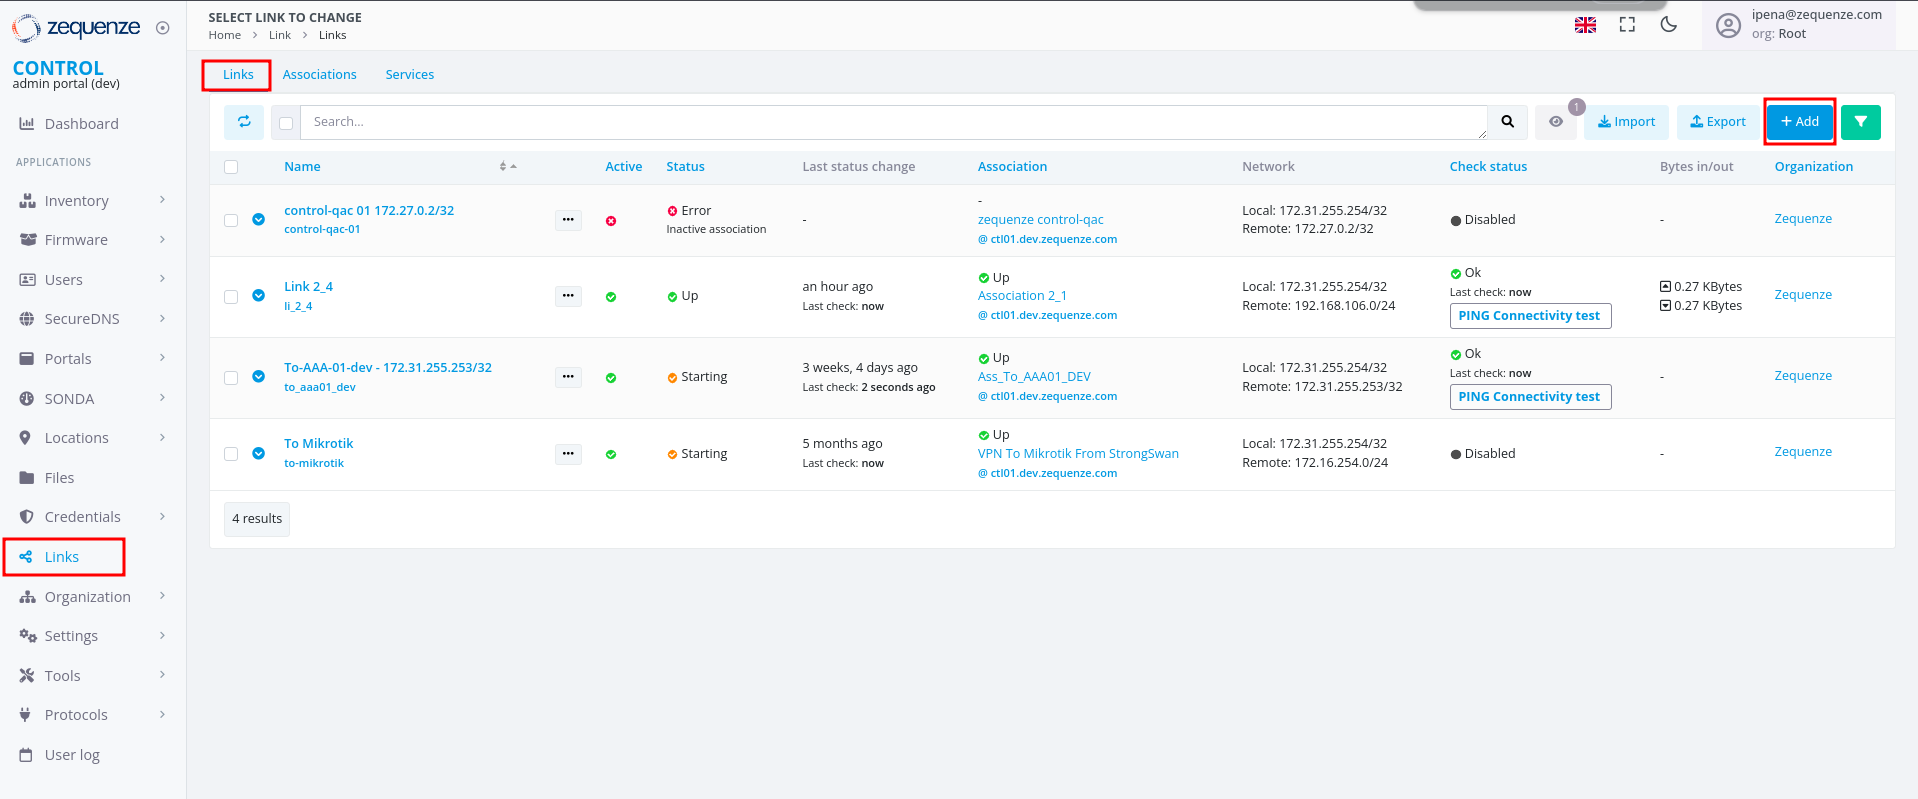
### Step 4: Create Link
1. In the **Links** section, ensure you are on the **Links** tab
2. Click the **+Add** button
---
### Step 4: Create Link
1. In the **Links** section, ensure you are on the **Links** tab
2. Click the **+Add** button
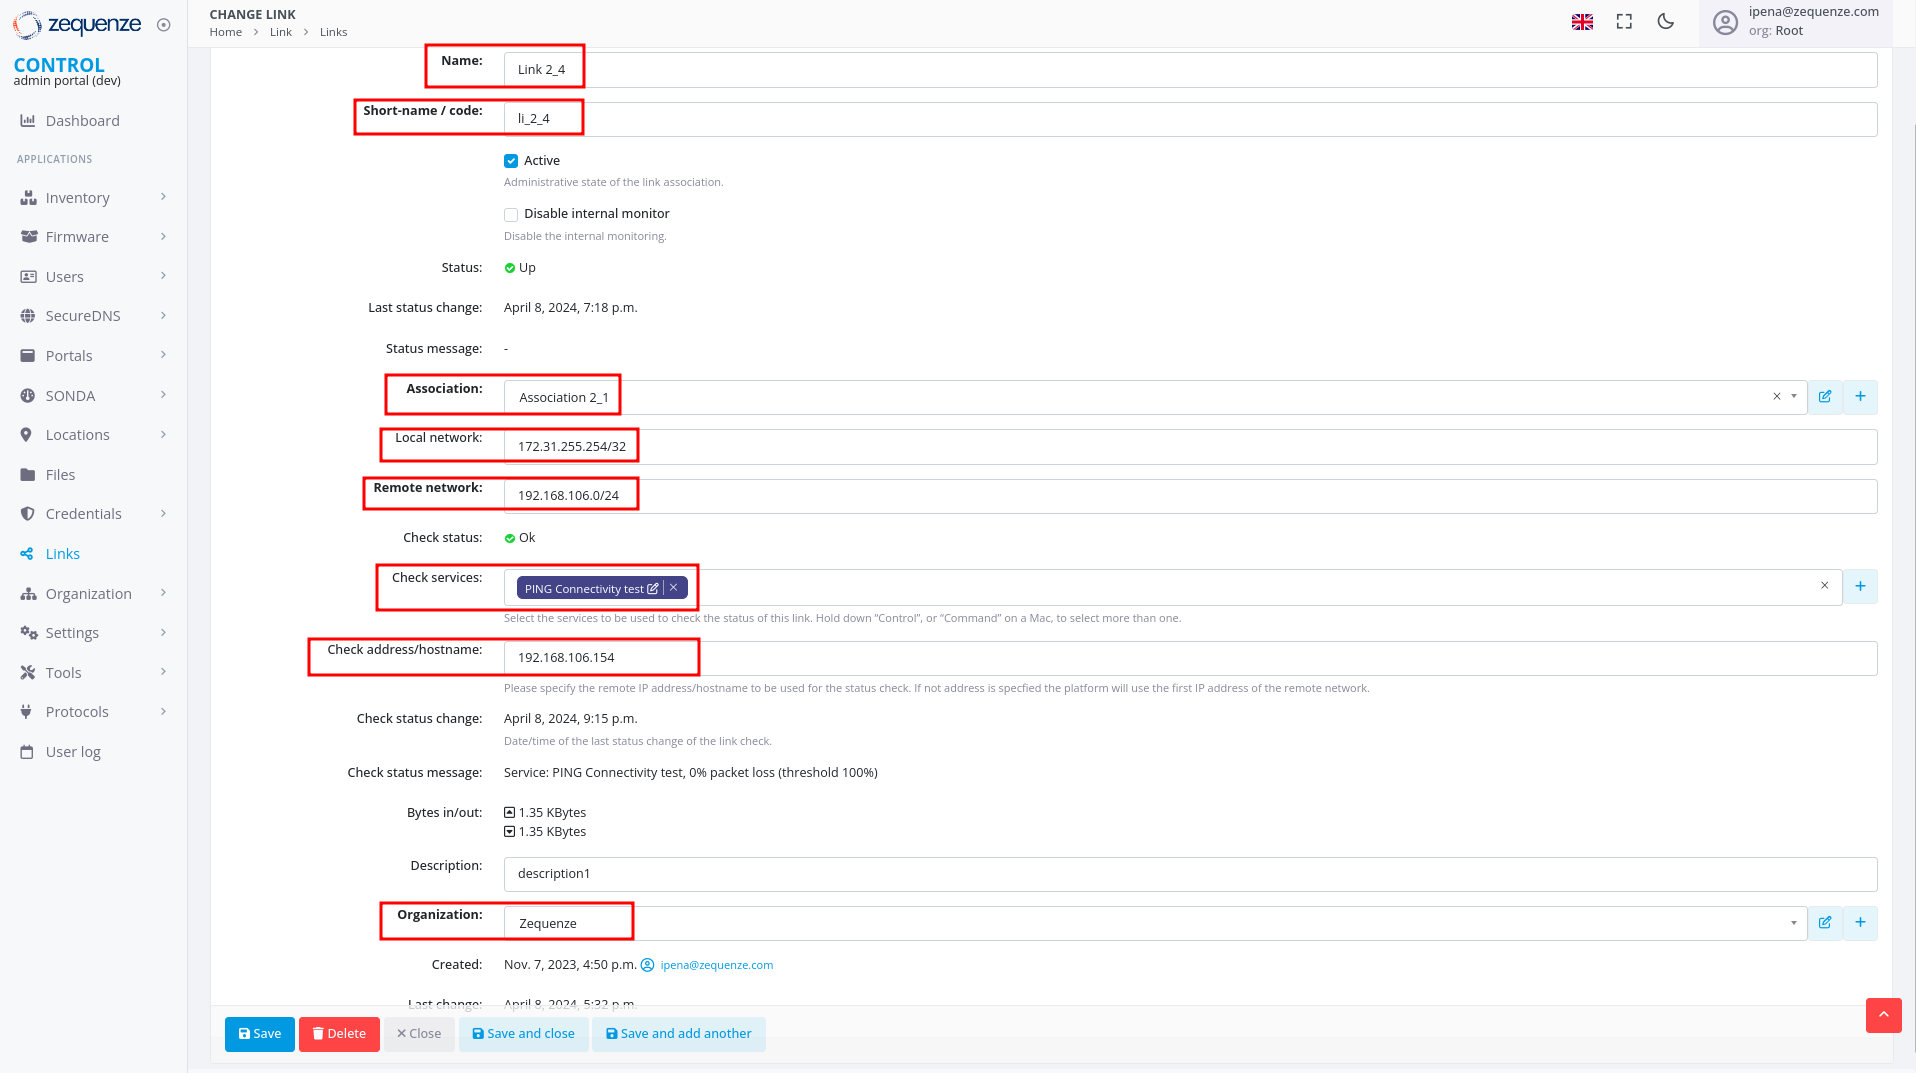
 3. Configure the following fields:
- **Name**: Enter a name to identify this link
- **Short-name / code**: Enter a short identifier
- **Active**: Enable this option to activate the link
- **Association**: Select the association created in Step 3
- **Local network**: Enter the local Zequenze IP address
- For CONTROL: typically `172.31.255.254/32`
- For GATE: typically `172.31.255.253/32`
- (Verify the correct IP internally before configuring)
- **Remote network**: Enter the remote network or IP address that will pass through the tunnel to Zequenze
- **Check services**: Select "PING Connectivity test" to validate tunnel communication
- **Check address/hostname**: Enter a remote IP address that is always active for connectivity testing (typically the remote gateway, e.g., 192.168.106.154)
- **Organization**: Select the organization that will use this VPN connectivity
3. Configure the following fields:
- **Name**: Enter a name to identify this link
- **Short-name / code**: Enter a short identifier
- **Active**: Enable this option to activate the link
- **Association**: Select the association created in Step 3
- **Local network**: Enter the local Zequenze IP address
- For CONTROL: typically `172.31.255.254/32`
- For GATE: typically `172.31.255.253/32`
- (Verify the correct IP internally before configuring)
- **Remote network**: Enter the remote network or IP address that will pass through the tunnel to Zequenze
- **Check services**: Select "PING Connectivity test" to validate tunnel communication
- **Check address/hostname**: Enter a remote IP address that is always active for connectivity testing (typically the remote gateway, e.g., 192.168.106.154)
- **Organization**: Select the organization that will use this VPN connectivity
 ---
## Verification and Summary
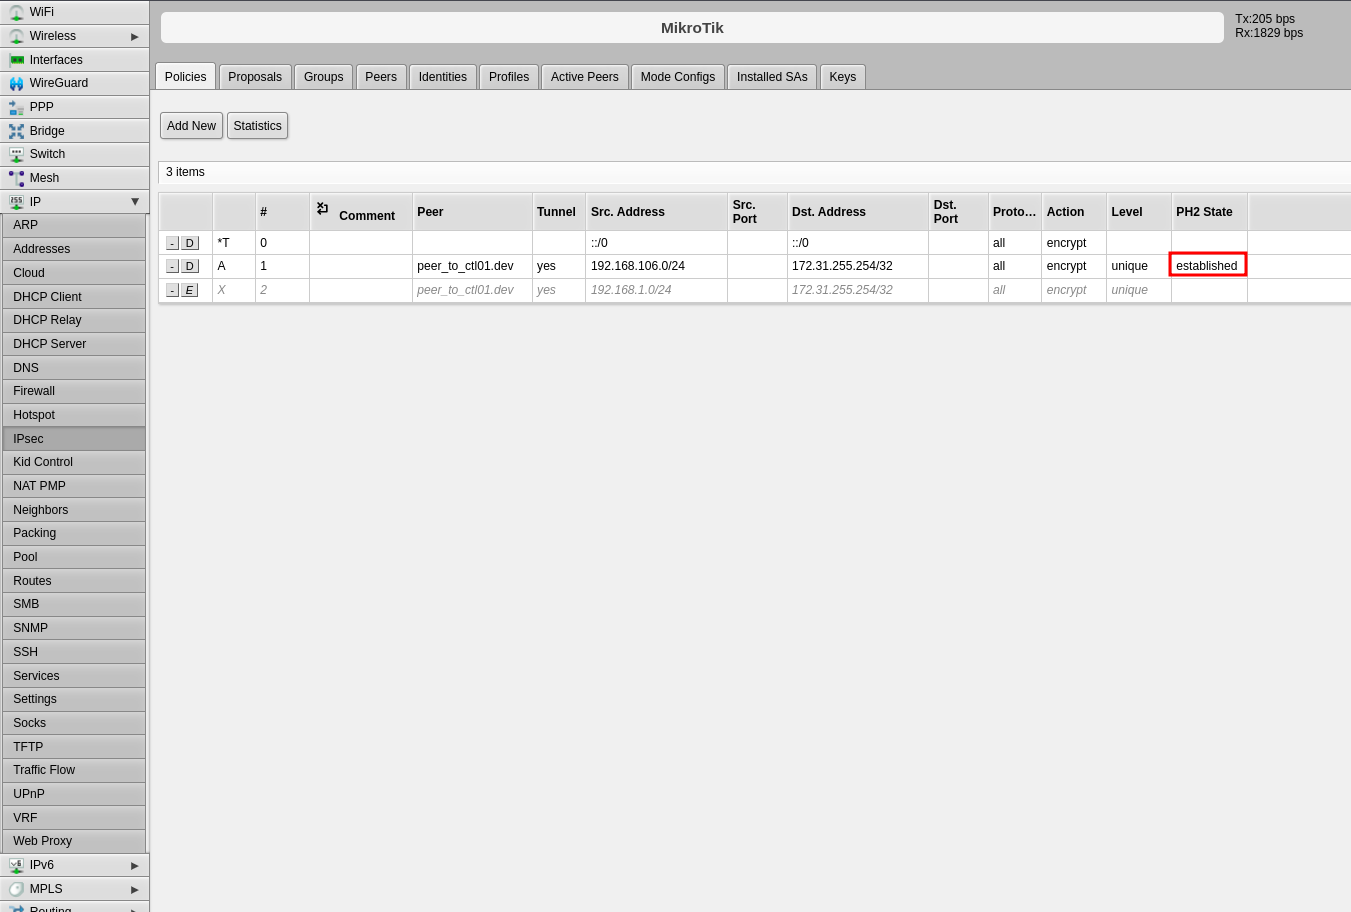
### RouterOS Connection Status
Once the configuration is complete, you should see the connection established in RouterOS as shown below:
---
## Verification and Summary
### RouterOS Connection Status
Once the configuration is complete, you should see the connection established in RouterOS as shown below:
 ### CONTROL Connection Status
The Link within CONTROL should appear as follows when successfully established:
### CONTROL Connection Status
The Link within CONTROL should appear as follows when successfully established:
 This completes the IPsec VPN tunnel configuration between RouterOS and CONTROL. The tunnel should now be active and passing traffic between the configured networks.
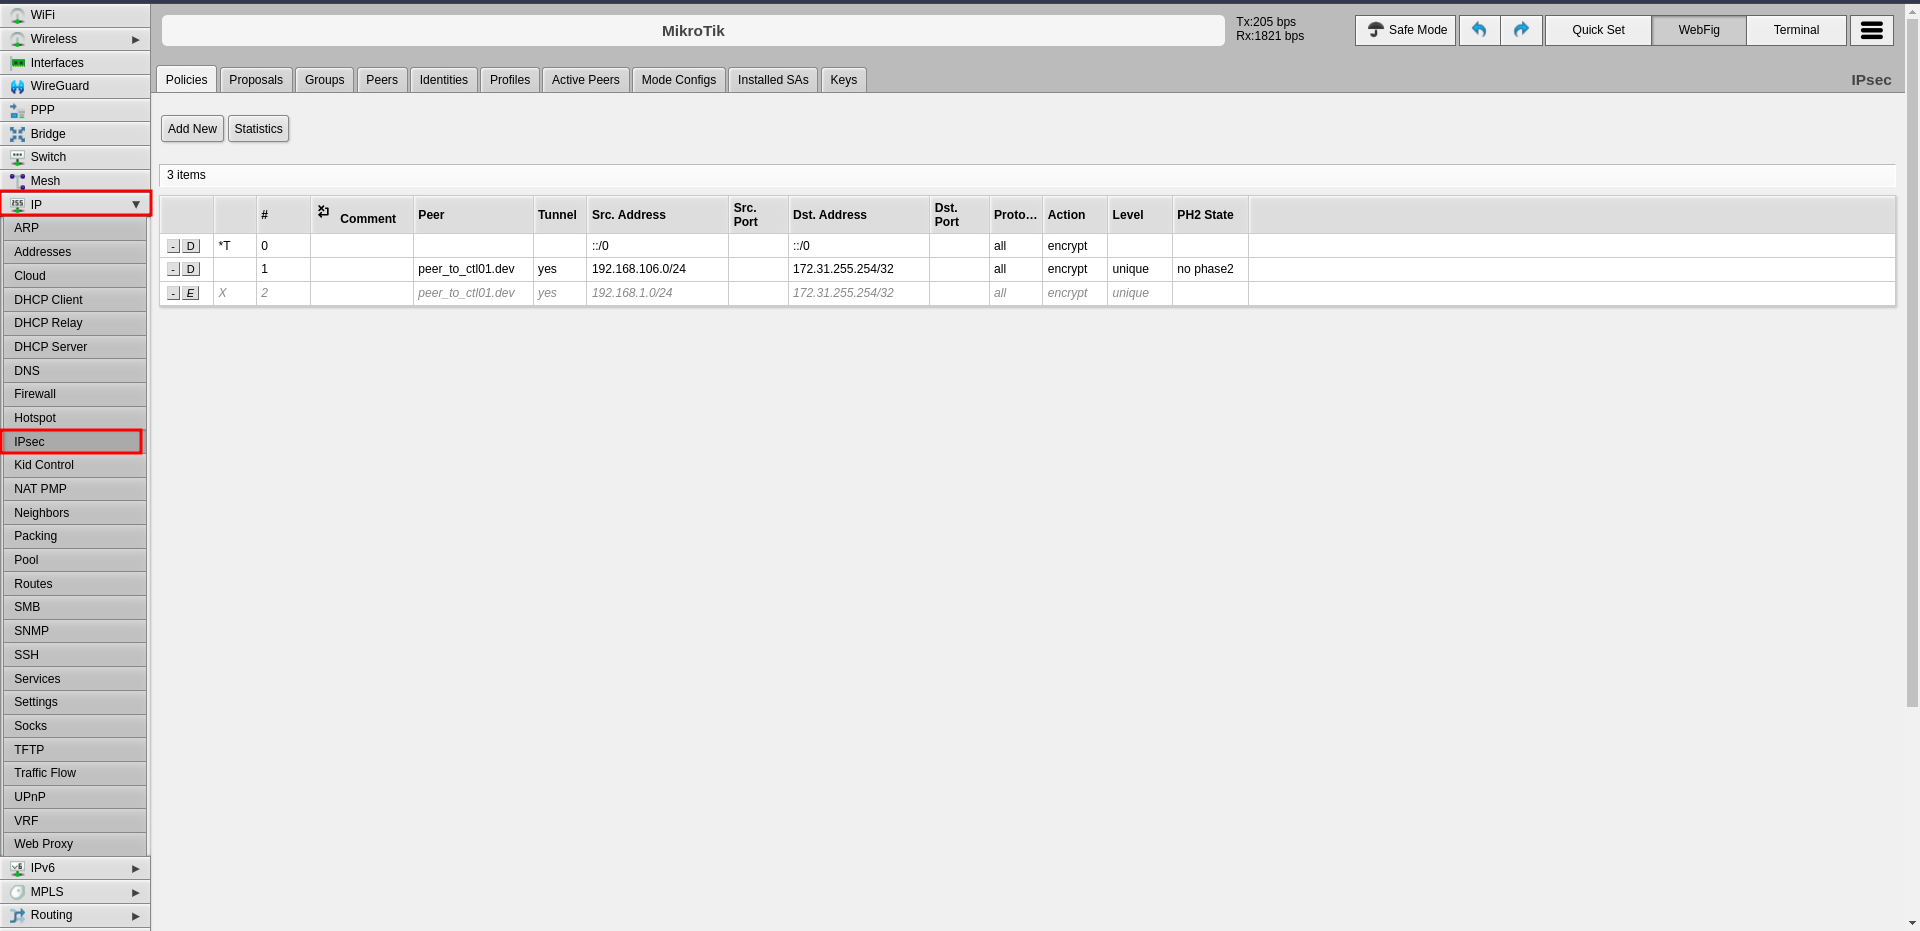
 3. Configure the following Phase 1 parameters:
- **Name**: Enter a descriptive name to identify the profile (e.g., "profile-to-ctl01.dev")
- **Hash Algorithms**: Select a hash algorithm that matches the configuration on the remote endpoint
- **Encryption Algorithm**: Choose an encryption algorithm that matches the remote endpoint configuration
- **Lifetime**: Leave the default value (measured in seconds)
- **NAT Traversal**: Enable this option if the router is behind NAT
- **DPD Interval**: Leave the default value for Dead Peer Detection and note this number
- **DPD Maximum Failures**: Leave the default value
4. Click **Apply**, then click **OK**
3. Configure the following Phase 1 parameters:
- **Name**: Enter a descriptive name to identify the profile (e.g., "profile-to-ctl01.dev")
- **Hash Algorithms**: Select a hash algorithm that matches the configuration on the remote endpoint
- **Encryption Algorithm**: Choose an encryption algorithm that matches the remote endpoint configuration
- **Lifetime**: Leave the default value (measured in seconds)
- **NAT Traversal**: Enable this option if the router is behind NAT
- **DPD Interval**: Leave the default value for Dead Peer Detection and note this number
- **DPD Maximum Failures**: Leave the default value
4. Click **Apply**, then click **OK**
 ---
### Step 2: Configure Peers
The peer configuration defines the remote VPN endpoint.
1. Click the **Peers** tab
2. Click **Add New**
---
### Step 2: Configure Peers
The peer configuration defines the remote VPN endpoint.
1. Click the **Peers** tab
2. Click **Add New**
 3. Configure the following fields:
- **Name**: Enter a name to identify the remote peer
- **Address**: Enter the remote public IP address (e.g., 35.35.35.22/32)
- **Profile**: Select the profile created in Step 1
- **Exchange Mode**: Select the exchange mode (IKE2 is recommended)
4. Click **Apply**, then click **OK**
3. Configure the following fields:
- **Name**: Enter a name to identify the remote peer
- **Address**: Enter the remote public IP address (e.g., 35.35.35.22/32)
- **Profile**: Select the profile created in Step 1
- **Exchange Mode**: Select the exchange mode (IKE2 is recommended)
4. Click **Apply**, then click **OK**
 ---
### Step 3: Configure Identities
The identities configuration defines authentication credentials.
1. Click the **Identities** tab
2. Click **Add New**
---
### Step 3: Configure Identities
The identities configuration defines authentication credentials.
1. Click the **Identities** tab
2. Click **Add New**
 3. Configure the following fields:
- **Peer**: Select the peer configured in Step 2
- **Auth. Method**: Select "pre shared key"
- **Secret**: Enter the pre-shared key that will be configured on both endpoints
4. Click **Apply**, then click **OK**
3. Configure the following fields:
- **Peer**: Select the peer configured in Step 2
- **Auth. Method**: Select "pre shared key"
- **Secret**: Enter the pre-shared key that will be configured on both endpoints
4. Click **Apply**, then click **OK**
 ---
### Step 4: Configure Proposals (Phase 2)
The proposal defines Phase 2 parameters for the IPsec connection.
1. Click the **Proposals** tab
2. Click **Add New**
---
### Step 4: Configure Proposals (Phase 2)
The proposal defines Phase 2 parameters for the IPsec connection.
1. Click the **Proposals** tab
2. Click **Add New**
 3. Configure the following Phase 2 parameters:
- **Name**: Enter a name to identify this proposal
- **Auth. Algorithms**: Select the authentication algorithm to be used on both endpoints
- **Encr. Algorithms**: Select the encryption algorithm to be used on both endpoints
- **Lifetime**: Set the lifetime for Phase 2
- **PFS Group**: Select the Diffie-Hellman group for Perfect Forward Secrecy (PFS). This determines the session key generation during key exchange
4. Click **Apply**, then click **OK**
3. Configure the following Phase 2 parameters:
- **Name**: Enter a name to identify this proposal
- **Auth. Algorithms**: Select the authentication algorithm to be used on both endpoints
- **Encr. Algorithms**: Select the encryption algorithm to be used on both endpoints
- **Lifetime**: Set the lifetime for Phase 2
- **PFS Group**: Select the Diffie-Hellman group for Perfect Forward Secrecy (PFS). This determines the session key generation during key exchange
4. Click **Apply**, then click **OK**
 ---
### Step 5: Configure Policies
The policy defines which traffic should pass through the VPN tunnel.
1. Click the **Policies** tab
2. Click **Add New**
---
### Step 5: Configure Policies
The policy defines which traffic should pass through the VPN tunnel.
1. Click the **Policies** tab
2. Click **Add New**
 3. Configure the following fields:
- **Peer**: Select the peer configured in Step 2
- **Tunnel**: Enable this option to establish the tunnel between both sites
- **Src. Address**: Enter the local IP address or network that will pass through the tunnel
- **Dst. Address**: Enter the remote IP address or network that will be received from the other end
- **Level**: Select "unique"
- **Proposal**: Select the proposal created in Step 4
4. Click **Apply**, then click **OK**
3. Configure the following fields:
- **Peer**: Select the peer configured in Step 2
- **Tunnel**: Enable this option to establish the tunnel between both sites
- **Src. Address**: Enter the local IP address or network that will pass through the tunnel
- **Dst. Address**: Enter the remote IP address or network that will be received from the other end
- **Level**: Select "unique"
- **Proposal**: Select the proposal created in Step 4
4. Click **Apply**, then click **OK**
 ---
## Part 2: CONTROL Configuration
### Initial Navigation
1. Navigate to the **Links** section in the left-side menu
2. Select the **Services** tab at the top
3. Click the **+Add** button
---
## Part 2: CONTROL Configuration
### Initial Navigation
1. Navigate to the **Links** section in the left-side menu
2. Select the **Services** tab at the top
3. Click the **+Add** button
 ---
### Step 1: Create IPsec Security Service (Phase 1)
1. Configure the basic information:
- **Name**: Enter a name to identify Phase 1
- **Short-name/code**: Enter a short identifier for quick reference
- **Organization**: Select the organization that will use this connection
- **Type**: Select "IPsec Security"
2. Click **Save** at the bottom
---
### Step 1: Create IPsec Security Service (Phase 1)
1. Configure the basic information:
- **Name**: Enter a name to identify Phase 1
- **Short-name/code**: Enter a short identifier for quick reference
- **Organization**: Select the organization that will use this connection
- **Type**: Select "IPsec Security"
2. Click **Save** at the bottom
 3. Configure the Phase 1 parameters to match your RouterOS configuration:
- **Authentication method**: Select "PSK"
- **IKE version**: Select "Version 2"
- **Encryption algorithm**: Enter "aes256"
- **Integrity algorithm**: Enter "sha256" or "sha2_256"
- **Diffie Hellman group (PFS)**: Enter "modp1024"
- **Lifetime**: Enter 1200 (equivalent to 20 minutes)
- **Key negotiation retries**: Enter "0"
- **Aggressive Mode**: Enable this option
4. Click **Save and close** at the bottom
3. Configure the Phase 1 parameters to match your RouterOS configuration:
- **Authentication method**: Select "PSK"
- **IKE version**: Select "Version 2"
- **Encryption algorithm**: Enter "aes256"
- **Integrity algorithm**: Enter "sha256" or "sha2_256"
- **Diffie Hellman group (PFS)**: Enter "modp1024"
- **Lifetime**: Enter 1200 (equivalent to 20 minutes)
- **Key negotiation retries**: Enter "0"
- **Aggressive Mode**: Enable this option
4. Click **Save and close** at the bottom
 ---
### Step 2: Create IPsec Configuration Service (Phase 2)
1. In the **Services** tab, click **+Add** again to create another service
2. Configure the basic information:
- **Name**: Enter a name to identify Phase 2
- **Short-name/code**: Enter a short identifier for quick reference
- **Organization**: Select the organization that will use this connection
- **Type**: Select "IPsec Configuration"
---
### Step 2: Create IPsec Configuration Service (Phase 2)
1. In the **Services** tab, click **+Add** again to create another service
2. Configure the basic information:
- **Name**: Enter a name to identify Phase 2
- **Short-name/code**: Enter a short identifier for quick reference
- **Organization**: Select the organization that will use this connection
- **Type**: Select "IPsec Configuration"
 3. Configure the Phase 2 parameters to match your RouterOS configuration:
- **Tunnel type**: Select "Tunnel (ESP)"
- **Encryption algorithm**: Enter "aes256"
- **Integrity algorithm**: Enter "sha256" or "sha2_256"
- **Diffie Hellman group (PFS)**: Enter "modp1024"
- **Lifetime**: Enter 1200 (equivalent to 20 minutes)
3. Configure the Phase 2 parameters to match your RouterOS configuration:
- **Tunnel type**: Select "Tunnel (ESP)"
- **Encryption algorithm**: Enter "aes256"
- **Integrity algorithm**: Enter "sha256" or "sha2_256"
- **Diffie Hellman group (PFS)**: Enter "modp1024"
- **Lifetime**: Enter 1200 (equivalent to 20 minutes)
 ---
### Step 3: Create Association
1. In the **Links** section, select the **Association** tab
2. Click the **+Add** button
---
### Step 3: Create Association
1. In the **Links** section, select the **Association** tab
2. Click the **+Add** button
 3. Configure the following fields:
- **Name**: Enter a name to identify this association
- **Short-name / code**: Enter a short identifier for quick reference
- **Type**: Leave "IPSec VPN" selected
- **Local gateway type**: Leave "Private IP" selected
- **Remote gateway address**: Enter the remote public IP address you are connecting to
- **Remote gateway id**: Enter the WAN interface IP of the RouterOS device
- **Secret**: Enter the pre-shared key (must match the secret configured in RouterOS)
- **Security service**: Select the IPsec Security service created in Step 1
- **Configuration service**: Select the IPsec Configuration service created in Step 2
- **Server**: Select the internal server to use
- **Organization**: Select the organization that will use this connection
3. Configure the following fields:
- **Name**: Enter a name to identify this association
- **Short-name / code**: Enter a short identifier for quick reference
- **Type**: Leave "IPSec VPN" selected
- **Local gateway type**: Leave "Private IP" selected
- **Remote gateway address**: Enter the remote public IP address you are connecting to
- **Remote gateway id**: Enter the WAN interface IP of the RouterOS device
- **Secret**: Enter the pre-shared key (must match the secret configured in RouterOS)
- **Security service**: Select the IPsec Security service created in Step 1
- **Configuration service**: Select the IPsec Configuration service created in Step 2
- **Server**: Select the internal server to use
- **Organization**: Select the organization that will use this connection
 ---
### Step 4: Create Link
1. In the **Links** section, ensure you are on the **Links** tab
2. Click the **+Add** button
---
### Step 4: Create Link
1. In the **Links** section, ensure you are on the **Links** tab
2. Click the **+Add** button
 3. Configure the following fields:
- **Name**: Enter a name to identify this link
- **Short-name / code**: Enter a short identifier
- **Active**: Enable this option to activate the link
- **Association**: Select the association created in Step 3
- **Local network**: Enter the local Zequenze IP address
- For CONTROL: typically `172.31.255.254/32`
- For GATE: typically `172.31.255.253/32`
- (Verify the correct IP internally before configuring)
- **Remote network**: Enter the remote network or IP address that will pass through the tunnel to Zequenze
- **Check services**: Select "PING Connectivity test" to validate tunnel communication
- **Check address/hostname**: Enter a remote IP address that is always active for connectivity testing (typically the remote gateway, e.g., 192.168.106.154)
- **Organization**: Select the organization that will use this VPN connectivity
3. Configure the following fields:
- **Name**: Enter a name to identify this link
- **Short-name / code**: Enter a short identifier
- **Active**: Enable this option to activate the link
- **Association**: Select the association created in Step 3
- **Local network**: Enter the local Zequenze IP address
- For CONTROL: typically `172.31.255.254/32`
- For GATE: typically `172.31.255.253/32`
- (Verify the correct IP internally before configuring)
- **Remote network**: Enter the remote network or IP address that will pass through the tunnel to Zequenze
- **Check services**: Select "PING Connectivity test" to validate tunnel communication
- **Check address/hostname**: Enter a remote IP address that is always active for connectivity testing (typically the remote gateway, e.g., 192.168.106.154)
- **Organization**: Select the organization that will use this VPN connectivity
 ---
## Verification and Summary
### RouterOS Connection Status
Once the configuration is complete, you should see the connection established in RouterOS as shown below:
---
## Verification and Summary
### RouterOS Connection Status
Once the configuration is complete, you should see the connection established in RouterOS as shown below:
 ### CONTROL Connection Status
The Link within CONTROL should appear as follows when successfully established:
### CONTROL Connection Status
The Link within CONTROL should appear as follows when successfully established:
 This completes the IPsec VPN tunnel configuration between RouterOS and CONTROL. The tunnel should now be active and passing traffic between the configured networks.