Customer Engineering
- ACS Operational Launch Checklist
- Configuring STUN (UDP-based connection request)
- FAQ ACS | MVNO ALTAN
- How to onboard devices into zequenze CONTROL ACS
- How to setup a webserver for TR-143 Performance Tests
ACS Operational Launch Checklist
Overview
This checklist ensures a successful ACS operational launch for CONTROL. Complete each step in sequence before deploying devices to end-customers.
Prerequisites Checklist
1. Device Testing and Integration
All devices must be tested and integrated in the development platform before proceeding to production.
Development Platform: control-dev.zequenze.com
Ensure all device profiles are validated and functioning correctly in this environment.
2. DNS Configuration
Configure your own FQDN pointing to Zequenze's production environment. This allows your devices to use a domain under your management.
Typical DNS Configuration:
acs.myMVNO.com CNAME control.zequenze.com.
Replace myMVNO.com with your actual domain name.
3. TR-069 Credentials Configuration
All devices (modems) must have TR-069 credentials properly configured with the following parameters:
-
URL:
https://acs.myMVNO.com/cwmp - Username: To be agreed (typically the same as used in the development platform)
- Password: To be agreed (typically the same as used in the development platform)
Important: These TR-069 settings must be configured by default in the device's firmware/software. This ensures that devices continue reporting to the ACS platform even after a factory reset.
Production Validation Testing
Before deploying to end-customers, perform the following validation tests on the production environment. This step requires completion of steps 1-3 above.
Required Validation Tests
- Configure test modem — Ensure the modem has Internet access and can reach the ACS
- Validate onboarding — Verify proper device onboarding and visualization through both WebGUI and REST API
- Validate operations — Test configuration changes and operational commands (Reboot, Factory Reset)
- Validate use cases — Test any additional validations or specific use cases required for your deployment
All tests must complete successfully before proceeding to deployment.
Deployment Authorization
Once all validation tests are successful, you are authorized to begin deploying devices to end-customers.
Final Verification:
- ✓ All devices validated in development platform
- ✓ FQDN created and DNS configured
- ✓ Modems configured with correct TR-069 credentials
- ✓ Production validation tests completed successfully
Configuring STUN (UDP-based connection request)
Overview
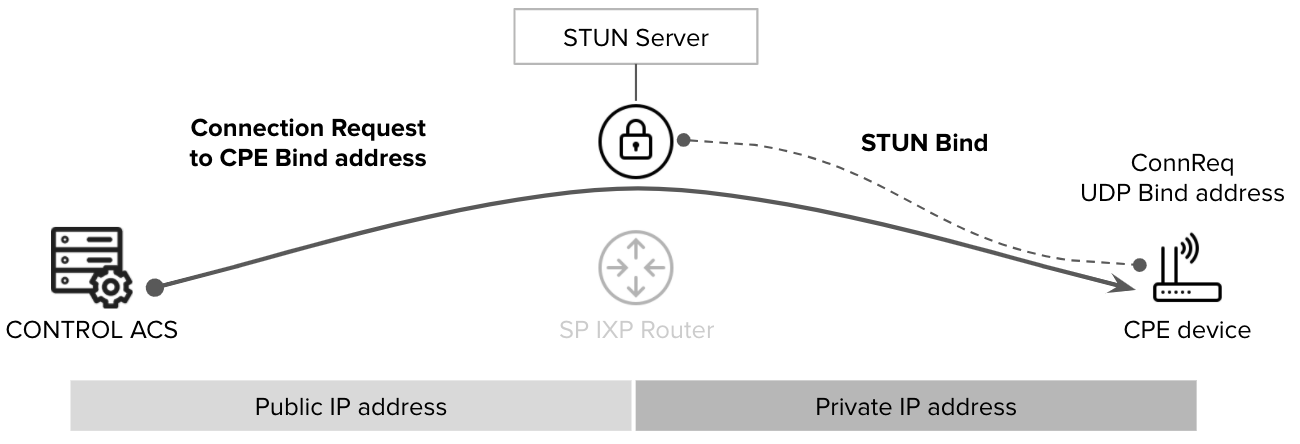
STUN (Session Traversal Utilities for NAT) is a TR-069 connection-request helper protocol that enables the ACS (Auto Configuration Server) to reach CPE (Customer Premises Equipment) devices that cannot be accessed via direct HTTP requests. STUN is typically required when the CPE is located behind a firewall or a NAT (Network Address Translation) process.
Configuration Requirements
To enable STUN functionality, both the CONTROL ACS platform and the CPE must be properly configured.
CPE Configuration
Configuring STUN on the CPE is straightforward and requires only two parameters:
- STUN Server FQDN: The Fully Qualified Domain Name of the STUN server
- Port: The UDP port number for STUN communication
Development Environment Settings
For testing and development purposes, use the following configuration:
STUN Server: control-stun-dev.zequenze.com
Port: 3478
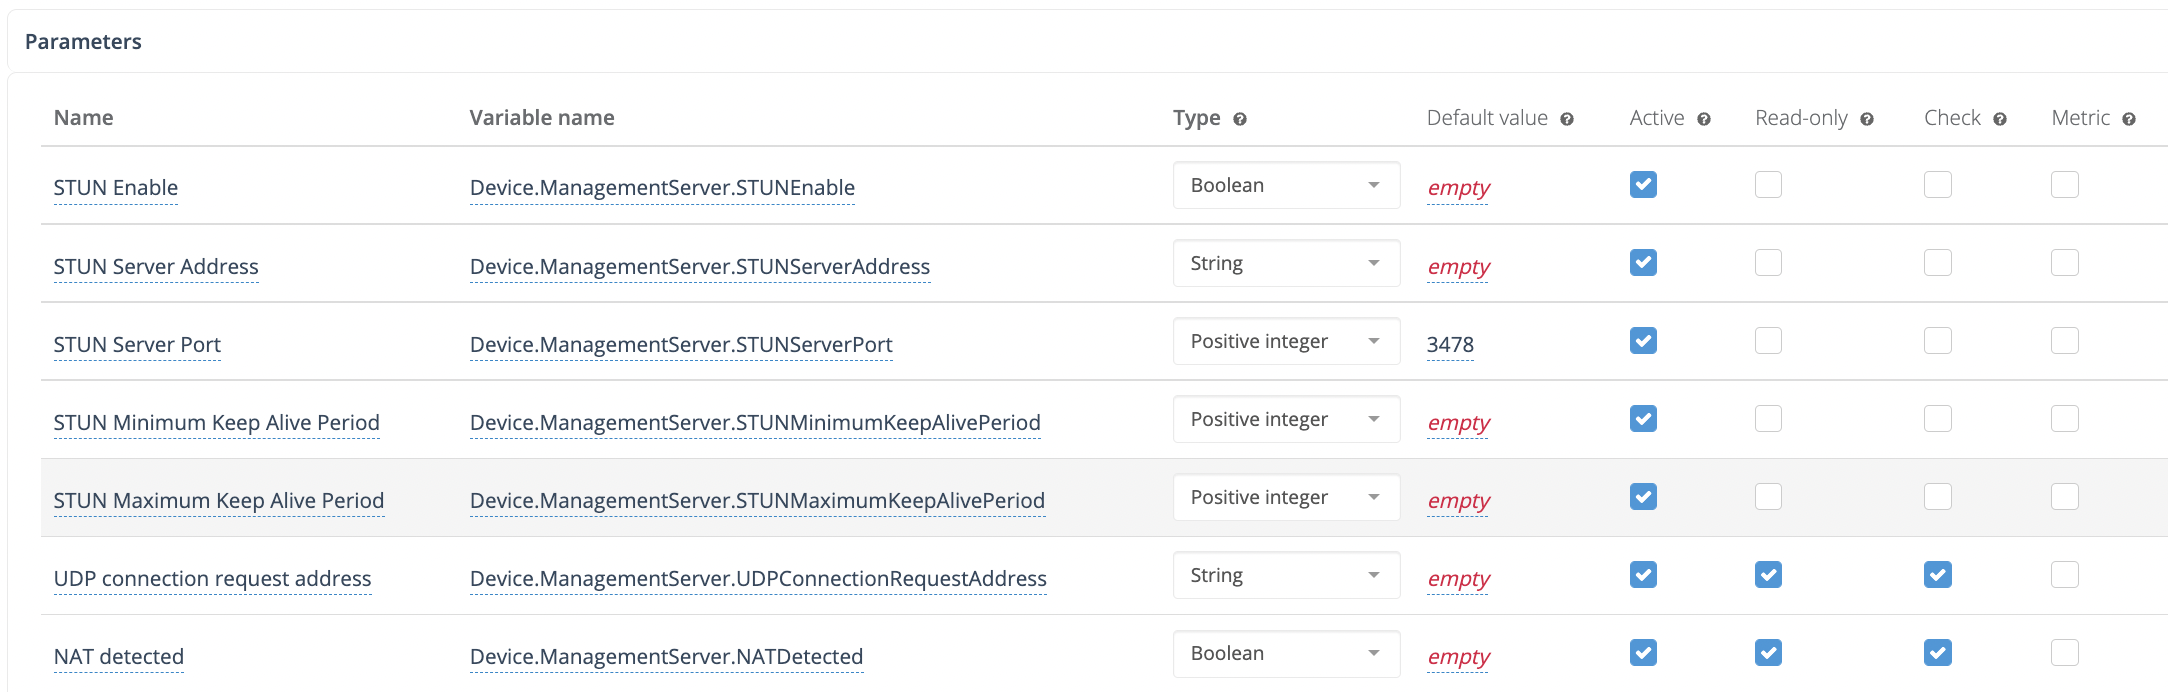
CONTROL ACS Configuration
On the CONTROL ACS platform, STUN-related variables must be added to the Device Profile. A typical configuration example:
How STUN Connection Requests Work
Once STUN is configured on both the ACS and CPE:
- The CPE establishes a UDP binding with the STUN server
- The CPE reports this UDP binding address to the ACS using the TR-181 parameter:
Device.ManagementServer.UDPConnectionRequestAddress - The ACS uses this reported address for all subsequent connection-request procedures
This mechanism allows the ACS to communicate with CPE devices even when they are not directly accessible via traditional HTTP connection requests.
FAQ ACS | MVNO ALTAN
Plataforma ACS Zequenze para MVNO ALTAN
Preguntas Frecuentes
¿Qué es y para qué sirve la plataforma ACS Zequenze?
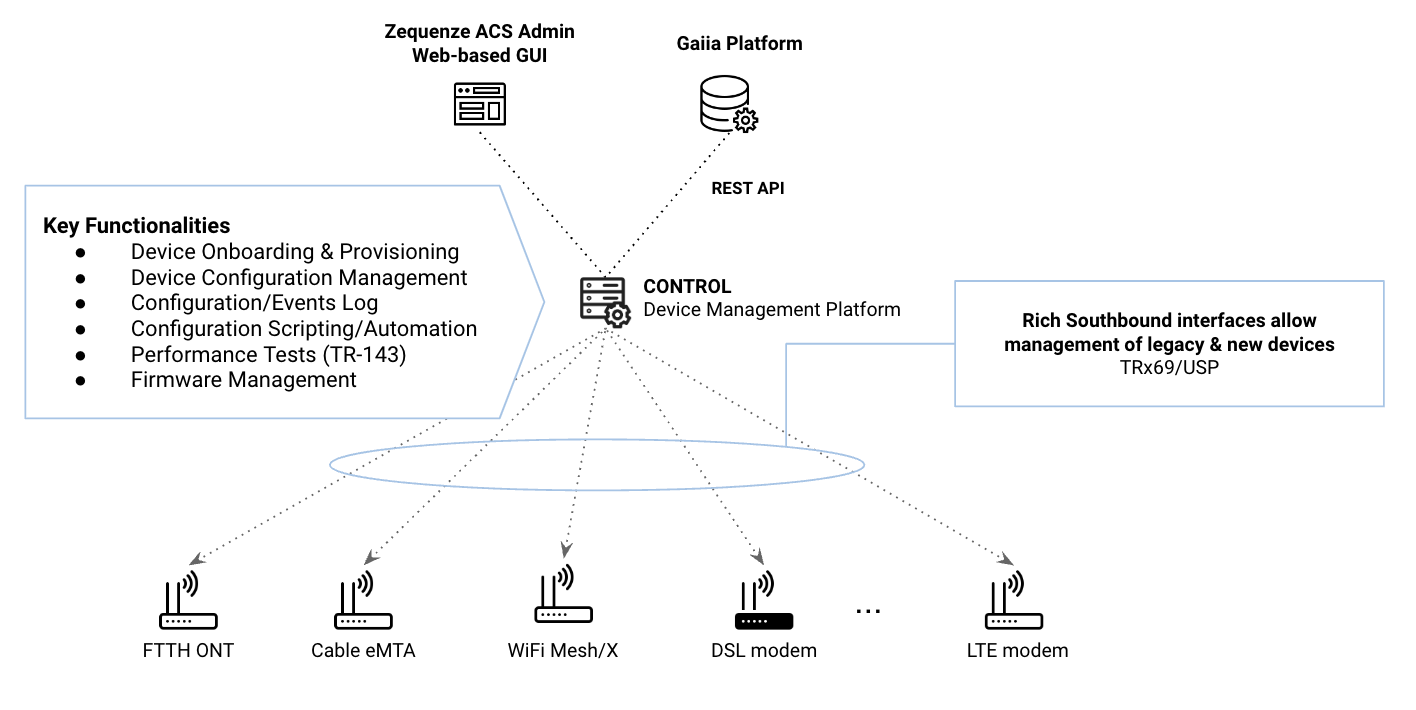
La plataforma ACS Zequenze permite al MVNO gestionar y operar los dispositivos de cliente (por ejemplo, módems) de forma remota, segura y automatizada.
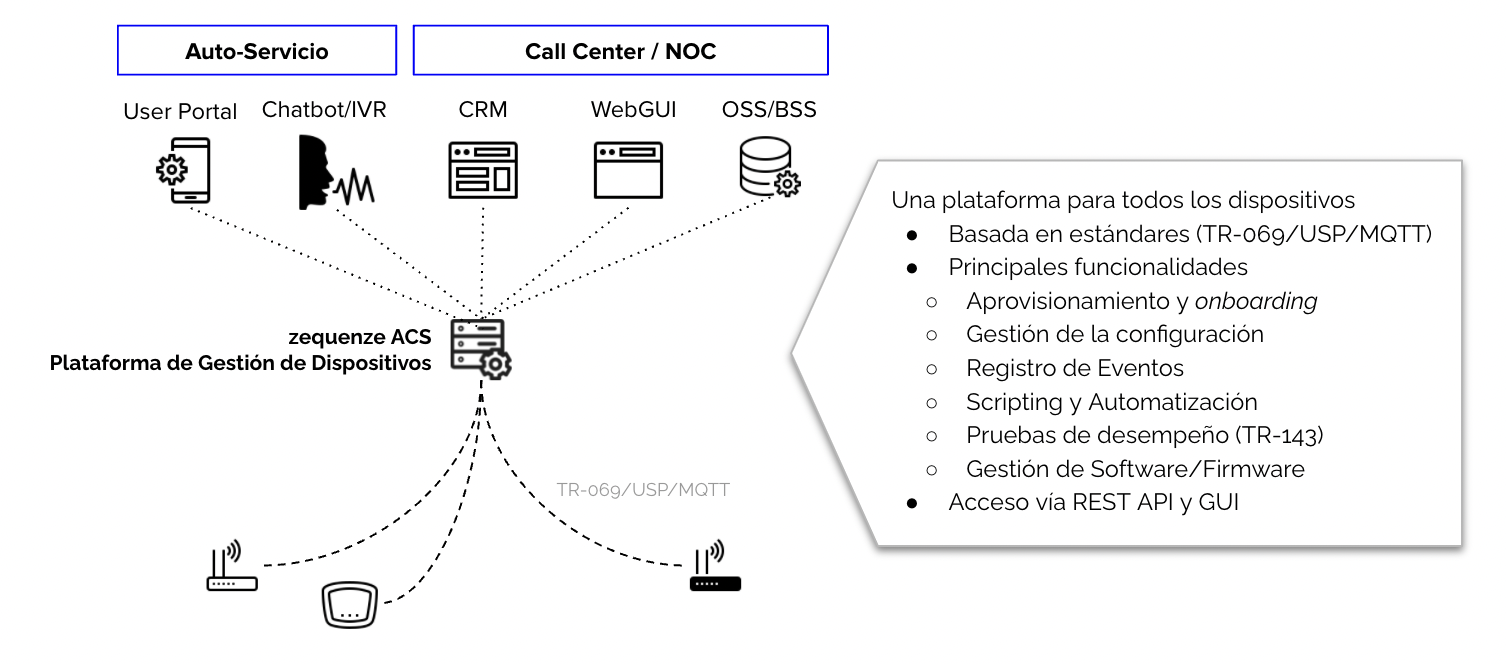
Principales funcionalidades
Las principales tareas que se pueden realizar y automatizar a través de la plataforma ACS Zequenze son:
- Aprovisionamiento y onboarding de dispositivos en la plataforma
- Visualización de la configuración y valores operacionales del módem (por ejemplo, red LTE, red WiFi)
- Cambios en la configuración de los dispositivos (por ejemplo, nombre/contraseña WiFi, canal de red WiFi)
- Operaciones de Reboot y Factory Reset en el dispositivo
- Gestión de actualizaciones de firmware/software de los dispositivos
- Gestión de pruebas de desempeño (Download, Upload, Delay/Jitter) en los dispositivos
Reportes y analíticos
Adicionalmente, la plataforma provee extensos reportes y analíticos sobre los dispositivos, incluyendo:
- Estatus en tiempo real de los dispositivos (con conectividad a Internet)
- Analíticos sobre marca y modelo de dispositivos en la red
- Analíticos sobre versión de software en los dispositivos
- Analíticos en tiempo real sobre parámetros LTE de los dispositivos (RSSI, SINR, otros)
Interfaces de gestión
Como se indica en el diagrama anterior, la gestión de los dispositivos está disponible mediante:
- WebGUI: Para operadores NOC o Ingeniería
- REST API: Para integración con plataformas CRM o similares (por ejemplo, operadores de Call Center)
¿Qué necesito para gestionar mis dispositivos con la plataforma ACS Zequenze?
El único requisito es que los dispositivos de usuario (módems) soporten el protocolo estándar TR-069 y que estén apropiadamente configurados para reportar hacia la plataforma ACS Zequenze.
Configuración para pruebas
Para fines de pruebas, los dispositivos pueden ser fácilmente configurados para reportar a la plataforma con solo estos tres parámetros:
-
URL:
https://prueba-altan.zequenze.com/ - Usuario: a ser acordado
- Contraseña: a ser acordado
Configuración para producción
Una vez validada la integración de cada tipo de dispositivo, se podrá acordar el mecanismo con el cual se configurarán en forma masiva los dispositivos de usuarios. Los métodos más típicos son:
Para nuevos dispositivos:
- Pre-configuración TR-069 vía firmware/software en el dispositivo (URL, Usuario, Contraseña)
Para dispositivos existentes:
- Actualización del firmware/software (FOTA) que integre la apropiada configuración TR-069 del dispositivo (URL, Usuario, Contraseña)
¿Puedo migrar mis dispositivos de un ACS existente a la plataforma ACS Zequenze?
Absolutamente.
Una de las ventajas del protocolo utilizado por las plataformas ACS (TR-069) es que es estándar y no permite hacer lock-in de los clientes en una plataforma ACS en particular.
Una vez que se valide la integración de tus dispositivos con la plataforma ACS Zequenze, podremos establecer un plan para esta migración, lo cual es tan sencillo como:
- Cambiar el URL del ACS en tus dispositivos (vía la plataforma ACS actual), o bien
- Reconfigurar el FQDN del URL al que apuntan tus dispositivos actualmente
¿Cómo gestiono mis dispositivos vía la plataforma ACS Zequenze?
Según lo mencionado anteriormente, la plataforma provee interfaces WebGUI y REST API para la gestión de los dispositivos.
¿Qué diferencia la solución ACS Zequenze de otras soluciones del mercado?
Podemos resumir las principales diferencias en dos áreas:
Relacionadas a la plataforma ACS
- Plataforma de última generación hospedada en la nube pública que permite escalar desde pocos miles a millones de dispositivos gestionados
- Plataforma ya integrada con la red ALTAN y con la mayoría de los dispositivos (módems) HBB existentes en la red
- Plataforma multi-organizacional, que permite la existencia de diferentes organizaciones administrativas (jerárquicas) para los dispositivos y usuarios de la misma
- Diferentes tipos de privilegios para usuarios de la plataforma (solo lectura, gestión básica, gestión avanzada)
- Flexibilidad en la definición de los perfiles de dispositivos, pudiendo adaptarnos a cualquier modelo de datos del fabricante (TR-098, TR-181, TR-135, etc.)
- Herramientas de automatización y scripting, permitiendo realizar cambios de configuración o generación de reportes específicos sobre una población del parque de dispositivos
Relacionadas a Zequenze como empresa
- Amplia experiencia de trabajo con operadores de telecomunicaciones en México y Latinoamérica
- Soporte técnico experto local, con profundo entendimiento y experiencia en gestión de dispositivos (TR-069, USP, MQTT, etc.)
- Estamos comprometidos con el mejor servicio a nuestros clientes y nunca anteponemos la burocracia a la eficiencia
- Somos 10x más ágiles que cualquier suministrador clásico de soluciones de software para telecomunicaciones
Si deseas conocer más de Zequenze, te invitamos a visitar nuestro website https://zequenze.com
Checklist y próximos pasos
Si deseas evaluar o implementar la plataforma ACS Zequenze, puedes contactarnos directamente escribiéndonos a team@zequenze.com
Por favor incluye la siguiente información:
- Nombre del MVNO e información de contacto
- Estimación de número de dispositivos activos al mes
- Tipos/Marcas de dispositivos (módems)
Importante: No olvides confirmar que cuentan con el soporte de TR-069 con el fabricante/suministrador del módem
How to onboard devices into zequenze CONTROL ACS
Overview
Onboarding devices into Zequenze CONTROL is a straightforward process. This guide provides the key considerations and steps to successfully connect your devices to the CONTROL Access Control Server (ACS).
Key Concepts
Before beginning the onboarding process, understand these fundamental aspects:
-
Cloud-Based Architecture: Zequenze ACS is hosted in the Public Cloud (AWS/GCP), so all devices must have Internet connectivity to communicate with the platform.
-
TR-069 Protocol: The protocol follows a client-to-server model where devices (CPEs) periodically report to the ACS at intervals defined by the Report Interval parameter. For a comprehensive understanding of TR-069, refer to this tutorial.
-
Remote Management: Once successfully onboarded, the ACS enables remote configuration and management of CPEs using TR-069 variables supported by each device. These variables are defined in TR-098/TR-181 Data Models and can be managed through the ACS platform GUI or REST API.
Requirements
Mandatory Parameters
For a CPE to communicate with the ACS platform via TR-069, configure the following four (4) parameters:
-
ACS URL: The FQDN where devices will initiate TR-069 sessions.
-
Username & Password: Onboarding credentials used by the CPE to authenticate with the ACS platform.
-
Report Interval: Time interval (in seconds) for periodic Inform messages from the CPE to the ACS platform.
-
Internet Connectivity: Required for cloud-based ACS access. Note: Some CPEs, such as FTTH ONTs, may require specific WAN VLAN configuration to permit TR-069 traffic.
DNS Configuration
Internet Service Providers (ISPs) must define their own FQDN as a CNAME record pointing to the Zequenze ACS platform. For example:
acs.myISP.com CNAME A control.zequenze.com.
Configuration
Default TR-069 Parameters
Once DNS is configured, set up your devices with the following default TR-069 configuration:
-
URL:
https://acs.myISP.com/cwmp - Username: Provided by Zequenze (unique per device model)
- Password: Provided by Zequenze (unique per device model)
- Report Interval: Provided by Zequenze (typically 7200 seconds)
Configuration Methods
There are two (2) primary methods for mass-configuring default TR-069 settings on devices:
-
Vendor Integration: Request your CPE vendor to embed this information into the device's software default values.
-
DHCP Option 43: Use DHCP Option 43 to provision TR-069 parameters automatically.
For more details on ACS Discovery methods, consult this tutorial.
Important Considerations
CRITICAL: Verify that the default TR-069 configuration persists after a factory reset. This ensures devices remain under ACS management even after being reset to factory defaults.
Validation
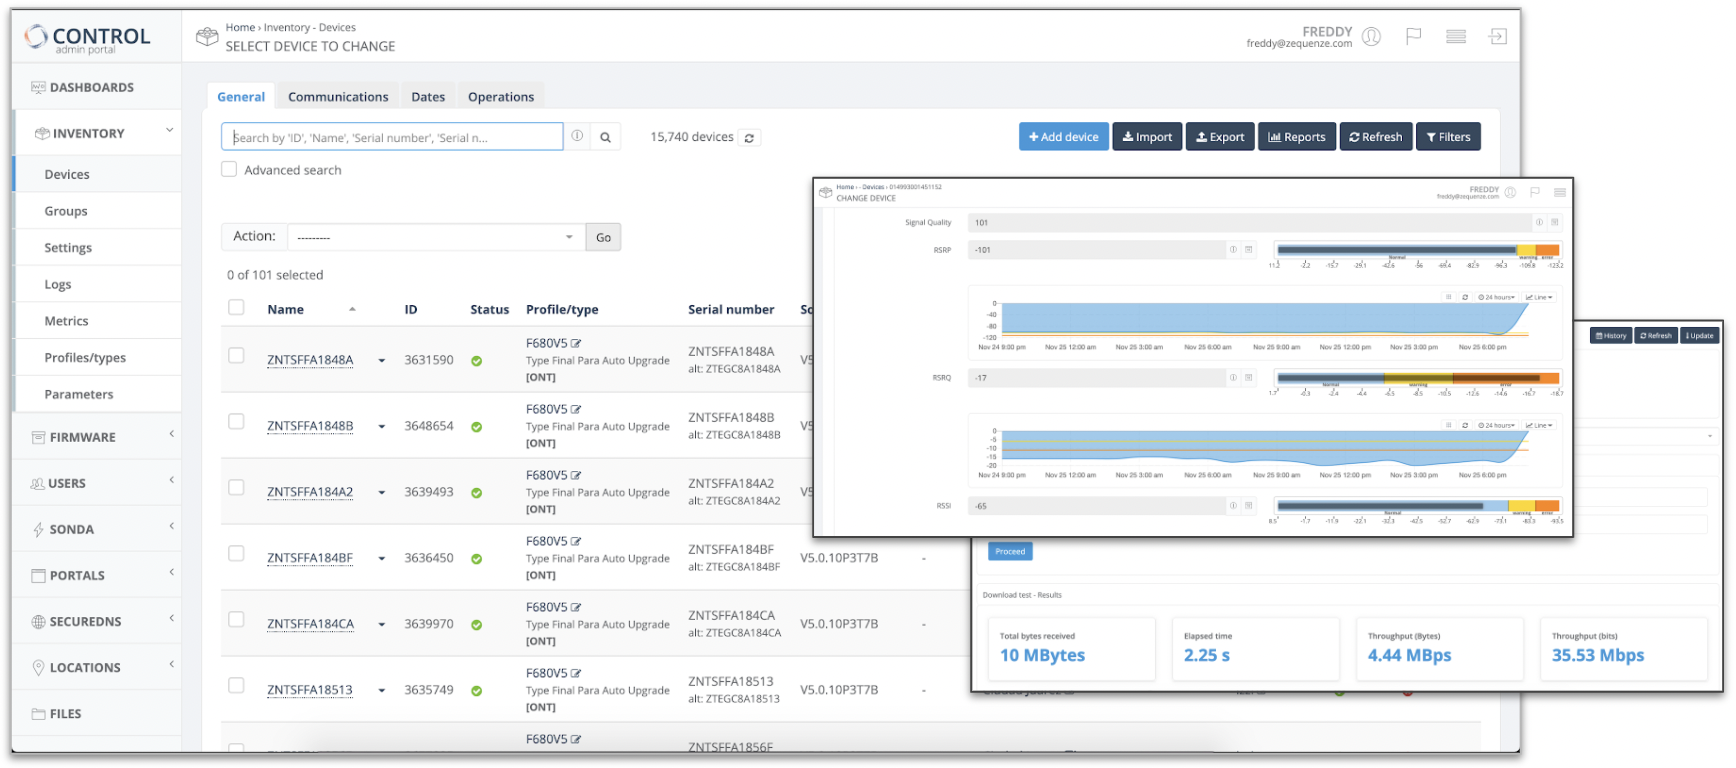
Verifying Successful Onboarding
Once properly configured with Internet access, devices will automatically onboard to the platform. Successfully onboarded devices appear in the Inventory view of the CONTROL GUI:
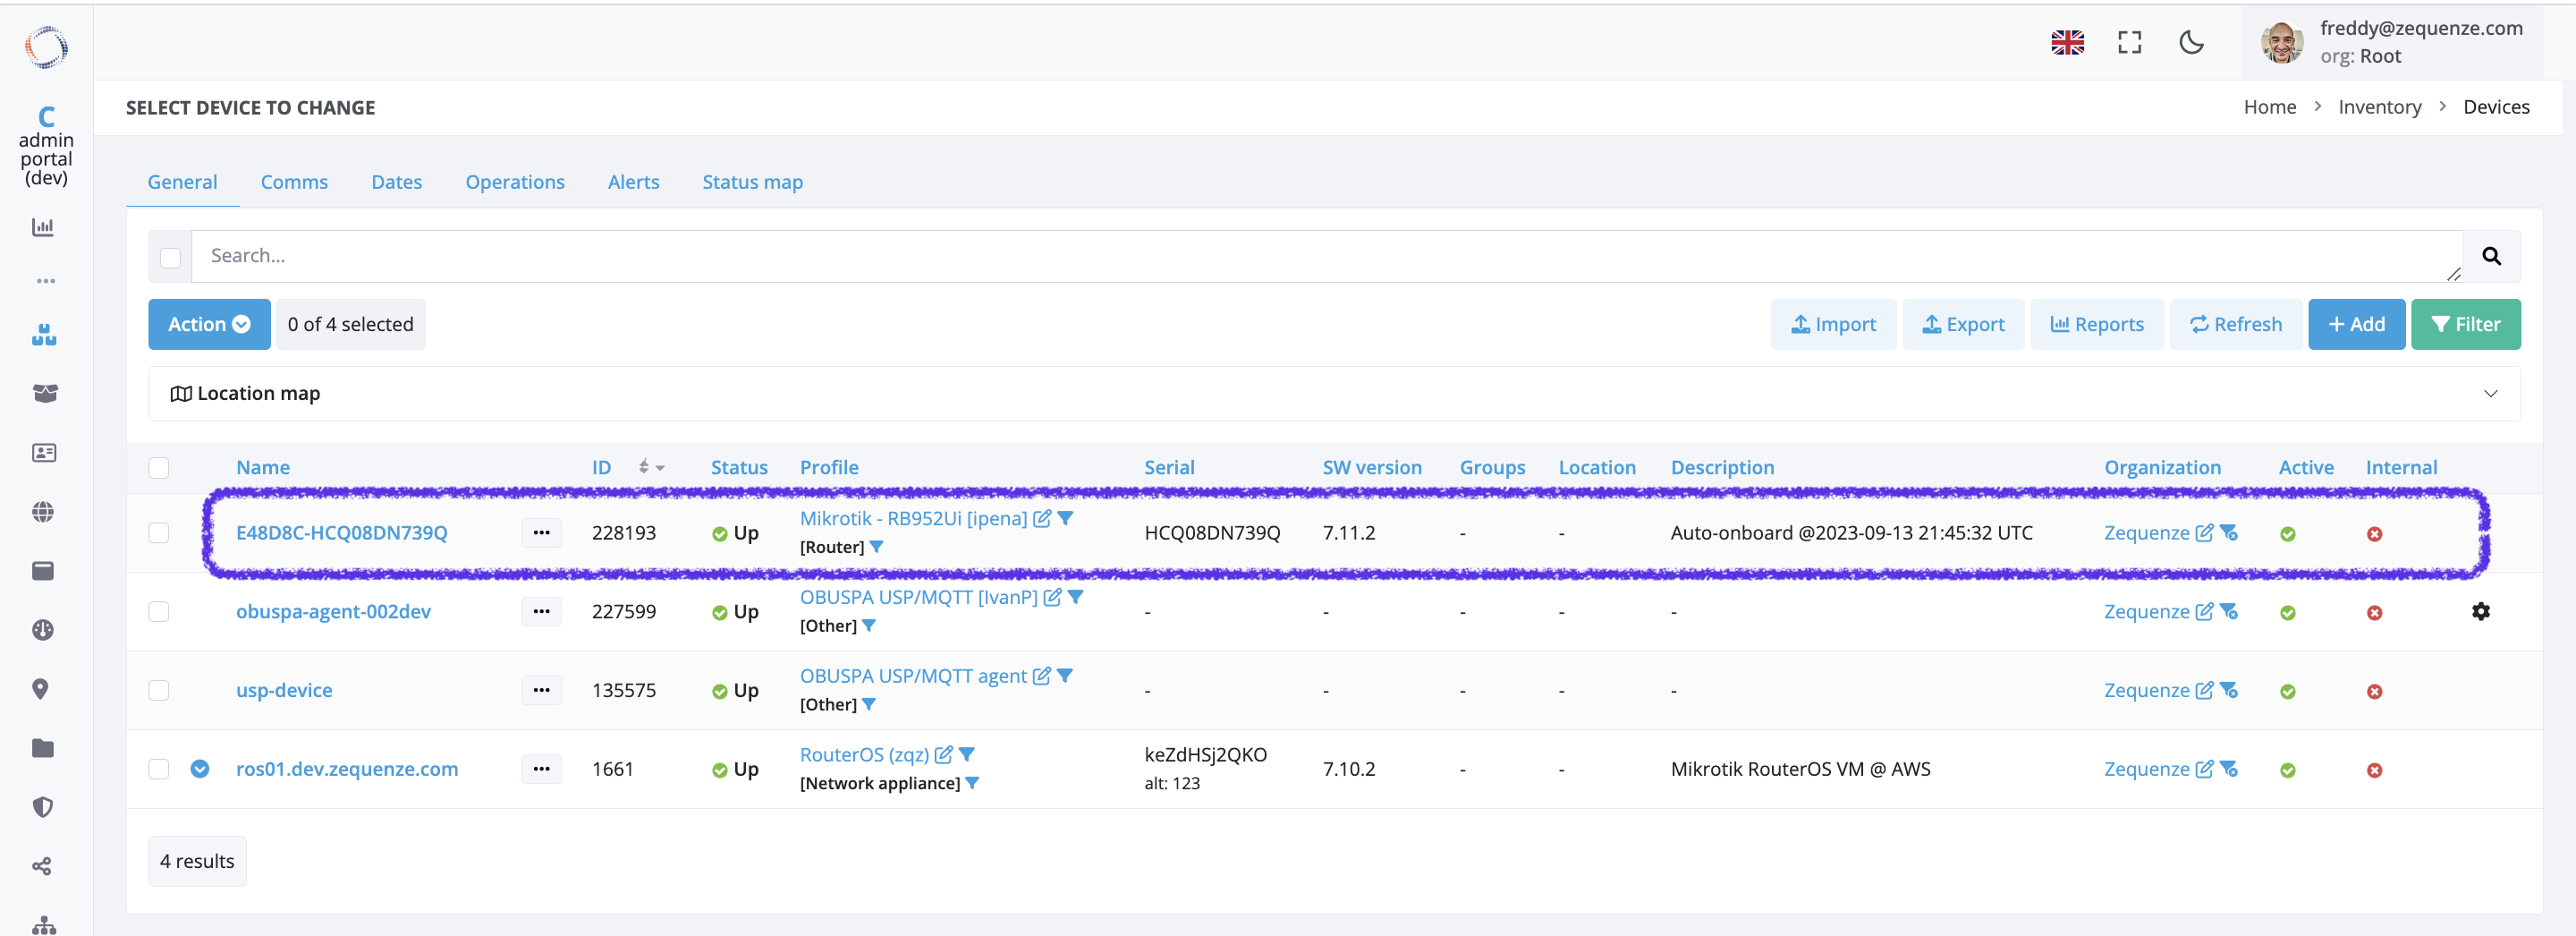
Inventory View Fields
The following table explains the information displayed in the Inventory view:
| Field | Description |
|---|---|
| Name | Unique device name in the platform. Automatically generated as the concatenation of Device OUI + Serial Number. Upon initial onboarding with model-specific credentials, the ACS assigns unique Username/Password credentials to each device. |
| ID | Device's unique identifier within the ACS platform. |
| Status | Indicates whether the device is currently reporting periodically to the platform. |
| Profile | CWMP (TR-069) profile assigned to this device. Each device model uses a specific profile based on its data model, which can be customized per customer requirements. |
| Serial | Device serial number. |
| Groups | Logical groups to which the device belongs. |
| Location | Physical location assigned to the device. |
| Description | Notes and metadata about the device. By default, the initial onboarding timestamp is recorded here. |
Troubleshooting
Common Issues
If a configured device does not automatically onboard, verify the following:
-
ACS URL Configuration: Confirm the ACS URL is correctly set on the device (check in the device's GUI or management interface).
-
Credentials: Verify that Username and Password are properly configured on the device (check in the device's GUI or management interface).
-
Internet Connectivity: Ensure the device has active Internet access. Note: Some CPEs, particularly FTTH ONTs, require specific WAN VLAN configuration to allow TR-069 traffic through the network.
Additional Support
If you continue experiencing onboarding issues after performing these checks, our team is available to assist with detailed troubleshooting. Please contact us for specialized support.
How to setup a webserver for TR-143 Performance Tests
TR-143 defines the standard framework for running performance tests from a CPE (Customer Premises Equipment) through the TR-069 protocol. Specifically for the Download and Upload tests, the CPE requires a functional HTTP server to either download or upload files to compute current throughput and measure network performance.
This guide explains how to configure a web server that supports both download and upload functionality for TR-143 performance testing when using CONTROL.
Requirements
- Linux server (this guide uses Ubuntu 24.04 LTS)
- Root or sudo access
- Network connectivity between the CPE and the server
Installation Steps
Install Nginx
Update the package list and install Nginx:
sudo apt update
sudo apt install nginx
Create Directory Structure
Create the necessary directories for downloads, uploads, and temporary files:
sudo mkdir -p /var/www/files
sudo mkdir -p /var/www/files/download
sudo mkdir -p /var/www/files/upload
sudo mkdir -p /var/www/files/tmp
Set the correct ownership for the web server:
sudo chown -R www-data:www-data /var/www/files
Configure Nginx
Edit the Nginx configuration file located at `/etc/nginx/sites-available/default` with the following content:
server {
    listen 80;
    server_name noname;
    root /var/www/files/download;

    location / {
        autoindex off;
    }

    client_max_body_size 100M;

    location /upload {
        client_body_temp_path /tmp;
        alias /var/www/files/upload;
        dav_methods PUT;
        dav_access user:rw group:rw all:r;
    }
}
Configuration notes:
listen 80— Server listens on HTTP port 80root /var/www/files/download— Root directory for download filesclient_max_body_size 100M— Maximum upload file size set to 100MBdav_methods PUT— Enables HTTP PUT method for file uploadslocation /upload— Dedicated endpoint for upload operations
Apply Configuration
Verify the configuration syntax:
sudo nginx -t
If the configuration is valid, restart Nginx to apply changes:
sudo systemctl restart nginx
Testing the Setup
Download Test
To test download functionality, first create a test file in the download directory (e.g., `100MB.bin`), then download it from a client machine:
wget http://<server_ip_address>/100MB.bin
Upload Test
To test upload functionality, upload a file from your local machine to the server (uploading a file named **`test-upload.bin`** from your local host to the server):
curl -X PUT --data-binary @test-upload.bin http://<server_ip_address>/upload/test-upload.bin
Replace `` with your server's actual IP address and ensure the test file exists locally before running the upload command.
Troubleshooting
- Verify Nginx is running: `sudo systemctl status nginx`
- Check Nginx error logs: `sudo tail -f /var/log/nginx/error.log`
- Ensure firewall allows HTTP traffic on port 80
- Verify file permissions in `/var/www/files` directories