# Configuration
# Automatic Onboarding
## Overview
Many agent-based standard protocols used to manage networking devices recommend using unique credentials (username/password, keys, etc.) for each managed device. This recommendation enhances security and enables individual device identification during message exchanges. However, it introduces additional complexity, as each managed device must be pre-provisioned with unique credentials before deployment.
The **Automatic Onboarding** feature in CONTROL simplifies this pre-configuration process. It allows devices to initially connect using a common set of credentials, which are then automatically replaced with individual credentials after the first successful connection.
## Accessing Automatic Onboarding Settings
**Automatic Onboarding** options are configured per **Device Profile / Type** and can be accessed through:
**Inventory** > **Profile / type**
[](https://docs.zequenze.com/uploads/images/gallery/2020-04/wWoEoIPix5B3GXzW-image-1587160794119.png)
For detailed information about accessing **Device Profile / Type** configuration screens, refer to the [**Device Profile / Type** configuration](/books/control/page/device-profile-configuration/) section.
## Configuration
### Enabling Automatic Onboarding
To configure and activate **Automatic Onboarding** for a specific **Device Profile / Type**:
1. Navigate to the **Device Profile / Type** configuration screen
2. Locate the **Automatic onboarding section**
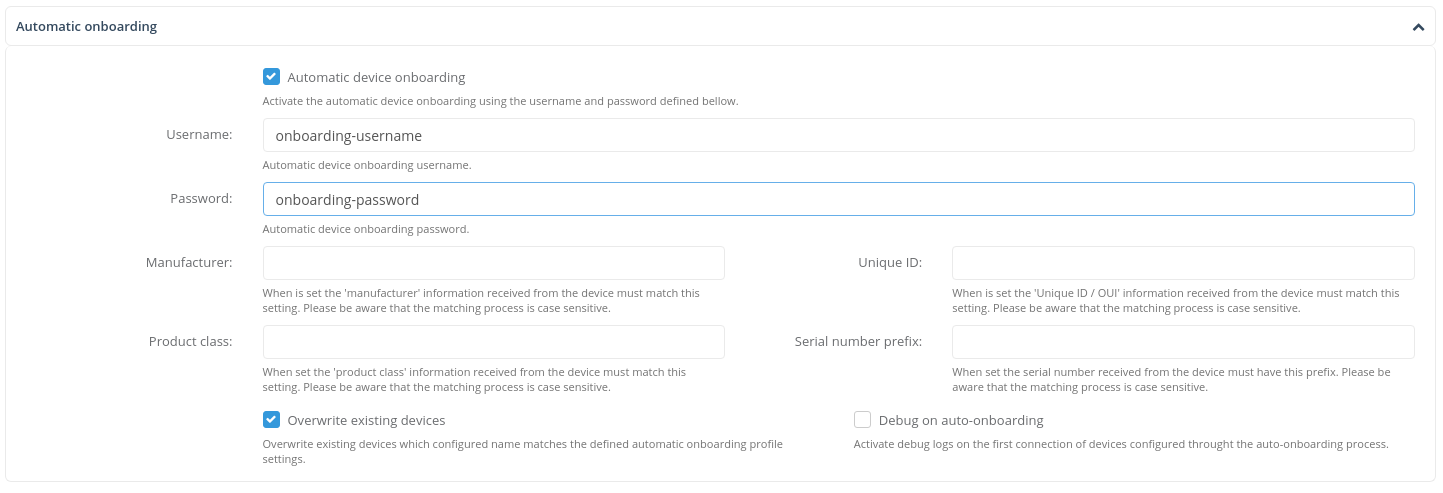
3. Enable the *Automatic device onboarding* checkbox
4. Populate the following required fields:
- **Username**: The pre-defined username that devices will use during initial authentication
- **Password**: The pre-defined password that devices will use during initial authentication
Once configured, any device connecting to the platform with these credentials will be automatically onboarded and assigned to the corresponding **Device Profile / Type**.
### Device Identification Fields
The following optional fields provide additional validation and identification criteria for connecting devices:
- **Manufacturer**: Filters devices by manufacturer name
- **Unique ID**: Specifies a unique identifier for device matching
- **Product class**: Filters devices by product class designation
- **Serial number prefix**: Matches against the beginning characters of the device serial number
#### Identification Rules
- **Case sensitivity**: All identification field matching is case-sensitive
- **Prefix matching**: For *Serial number prefix*, the system matches the specified text against the left-most characters of the received serial number
- **Protocol dependency**: Identification fields are management protocol-dependent and must be provided in the first message from the managed device (e.g., the *Inform* message for devices managed through *TR-069*)
#### Example
If the *Manufacturer* field is set to `Zequenze`, the **Automatic Onboarding** process for this **Device Profile / Type** will only apply to devices that identify themselves with `Zequenze` in their manufacturer field.
## Advanced Configuration
Additional **Automatic Onboarding** configurations can be customized through:
- **Connection Profile** objects for each **Device Profile / Type**
- **Connection service** objects for each **Device Profile / Type**
TBC
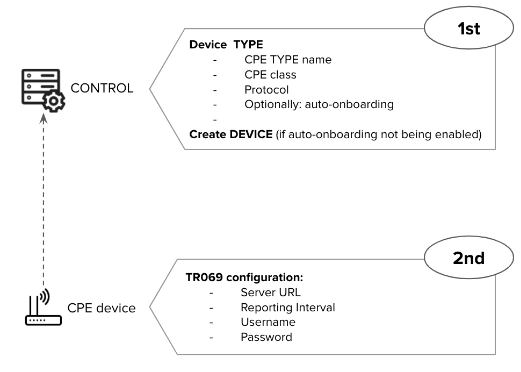
# CONTROL Configuration basics
## Overview
Enabling devices to be managed by the CONTROL platform can be accomplished through a few simple steps. This guide covers the basic configuration requirements to onboard devices into CONTROL.
## Configuration Steps
### Step 1: Create a Device Profile
Before adding devices, you must first create a Device Profile (also called Device Type) that defines the characteristics of the devices you want to manage.
**Required fields:**
- CPE Profile/Type name
- CPE class
- Protocol
**Optional fields:**
- Auto-onboarding
### Step 2: Create the Device
If auto-onboarding is not enabled, you need to manually create each device that will be managed by CONTROL.
**Required fields:**
- CPE name
- CPE Profile/Type
- Username
- Password
**Note:** This step can be skipped if auto-onboarding is enabled in the Device Profile.
## Next Steps
Once you have completed these configuration tasks, proceed to [configure the CPE to become managed by the CONTROL platform](https://docs.zequenze.com/books/control/page/how-to-configure-a-cpe-to-become-managed-by-control).
## Understanding Device Profiles
### First-Time Device Onboarding
When onboarding a device type for the first time, you must create and customize a Device Profile (Profile/Type) that will serve as a template for all devices of the same type.
### Profile Reusability
Once a Device Profile is created, it can be reused for all new devices of the same type. Devices can be added to CONTROL through:
- Manual creation in the platform
- Batch creation
- Auto-onboarding (if enabled)
All devices will automatically use the appropriate Device Profile based on their type.
### Profile Updates
Any changes made to a Device Profile—such as improvements or fixes—will be automatically applied to all devices that use that Profile/Type. This ensures consistent configuration across all devices of the same type without requiring individual device updates.
# Device Profile configuration
## Overview
In the CONTROL platform, every device defined in the **Inventory** is assigned to a specific **Device Profile/Type**. These profiles function as shared templates that define the characteristics and behavior of devices. Device Profiles streamline device management by establishing consistent configurations across multiple devices.
## Key Components
A Device Profile/Type defines the following core features related to device configuration and behavior:
### Connection Profile
Specifies the management protocol and associated settings used to communicate with and manage devices assigned to this profile.
### Default Firmware
Defines the predetermined firmware version that can be used to update managed devices to a specific software version. This ensures consistent firmware deployment across devices sharing the same profile.
### Automatic Onboarding
Configures automatic onboarding rules specific to this Device Profile/Type. These rules streamline the process of adding new devices to the system by applying predefined settings automatically.
### Parameter Groups
Contains the collection of **Parameters** defined in this profile template, including their individual settings and configurations. Parameter Groups organize device-specific settings into logical categories for easier management.
## Purpose
Device Profiles serve as reusable templates that standardize device configuration, simplify management workflows, and ensure consistency across your device inventory.
# Firmware Management
## Overview
CONTROL ACS provides comprehensive **Firmware Management** functionality to automate firmware updates across your device fleet. The system is configured through two main areas:
- **Device Profile / Types** (`Inventory > Profile / types`)
- **Firmware Library** (`Firmware > Images`)
This page explains how to configure and use these features to manage firmware versions automatically.
---
## Device Profiles / Types
Navigate to **Inventory > Profiles / types** to configure firmware management settings for each device type.
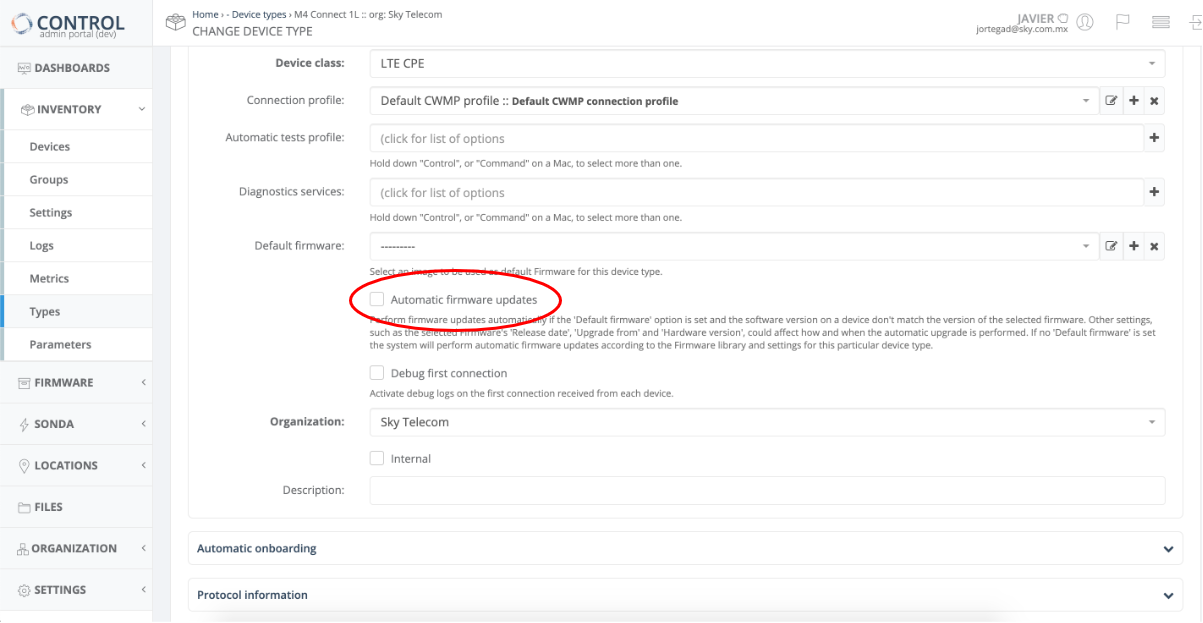
### Enabling Automatic Firmware Upgrades
Within any **Device Profile / Type** definition, you can activate automatic firmware upgrades by enabling the **Automatic Firmware Upgrades** checkbox:
### How It Works
Once the **Automatic Firmware Upgrades** checkbox is enabled, CONTROL ACS will automatically manage firmware updates based on your configuration:
**With Default Firmware Image specified:**
- CONTROL ACS checks if a device matches the criteria and selection parameters of the configured *Default firmware* image
- If matched, the system initiates a firmware upgrade (or downgrade) automatically
**Without Default Firmware Image:**
- CONTROL ACS searches the **Firmware Library** (`Firmware > Images`) for applicable firmware images
- Advanced rules and policies configured in the library determine which firmware to apply
---
## Firmware Library
The Firmware Library (`Firmware > Images`) allows you to manage firmware images with granular control over distribution and applicability.
### Firmware Image Configuration
Each firmware image in the library can be configured with the following settings:
- **Image mnemonic** — Friendly name and description for the image
- **Image location** — Storage location options:
- ACS platform (suitable for smaller deployments)
- Local HTTP/FTP server (recommended for large-scale distributions)
- **Firmware applicability rules** — Control when firmware applies based on:
- Device hardware version
- Current device firmware version
- Release date
- Additional criteria
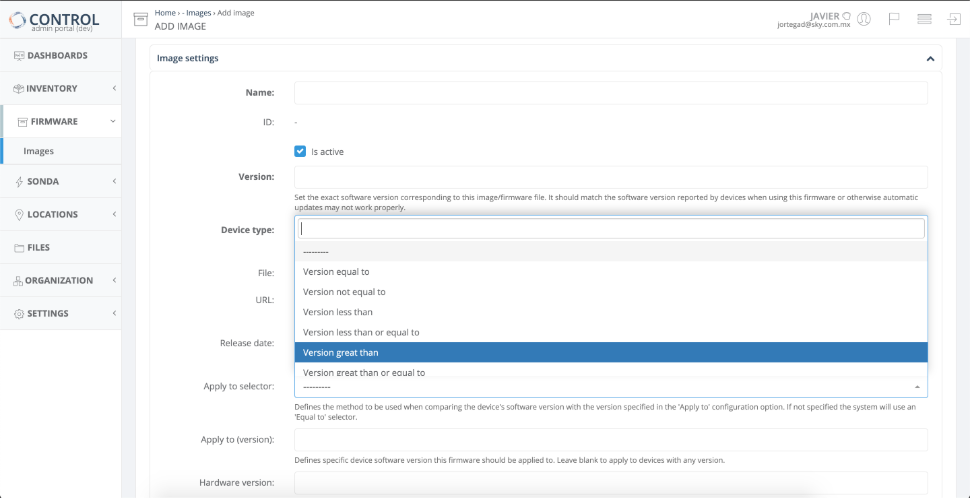
### Adding a Firmware Image
1. Click the **Add Image** button at the top right of the interface:
2. Configure the image settings on the **Add Image** page:
### Firmware Image Parameters
| Parameter | Description |
|-----------|-------------|
| **Name** | Mnemonic identifier for the firmware image |
| **Version** | Version number of the firmware image |
| **Device Profile** | Select the Device Profile this image applies to from the dropdown menu |
| **Upgrade Profile** | *To be confirmed* |
| **File or URL** | Upload the firmware file through the GUI or specify an HTTP/FTP URL where the image is located
**Note:** Using a local Service Provider HTTP/FTP server is **STRONGLY recommended** for massive firmware updates |
| **Release Date** | Optional. If specified, automatic updates will only be applied after this date |
| **Apply to Selector** | Comparison method used when matching the device's software version against the 'Apply to' version
Default: 'Equal to' |
| **Apply to (version)** | Target device software version for this firmware
Leave blank to apply to devices with any version |
| **Hardware Version** | Target device hardware version for this firmware
Leave blank to apply to devices with any hardware version |
---
## Version Comparison Algorithm
CONTROL ACS uses a direct character-by-character comparison algorithm to determine version precedence.
### Comparison Examples
The algorithm evaluates versions as follows:
- `v1.0.1` is a **lower** version than `v1.0.10`
- `v1.0.1a` is a **lower** version than `v1.0.1b`
- `v1.0.1a` is a **greater** version than `v1.0.1`
### Important Consideration
The algorithm treats `v1.0.1a` as a higher version than `v1.0.1`, which may not be the desired behavior in all scenarios.
**Workaround:** Add an underscore character to ensure correct version ordering:
- `v1.0.1_` is a **lower** version than `v1.0.1a`
This allows you to maintain the expected version hierarchy when alphabetic suffixes are used.
---
## Firmware Selection Logic
*To be confirmed*
---
## Upgrade Profiles
Navigate to **Firmware > Profiles** to manage upgrade profiles.
*To be confirmed*
# Parameter configuration
## Overview
The Parameter configuration screen allows you to define and manage all parameters associated with a specific Device Profile/Type or template in CONTROL.
## Accessing the Parameter Configuration Screen
There are two ways to access the Parameter configuration screen:
### Method 1: Via the Inventory Menu
Navigate to **Inventory** > **Parameters** from the main menu.
[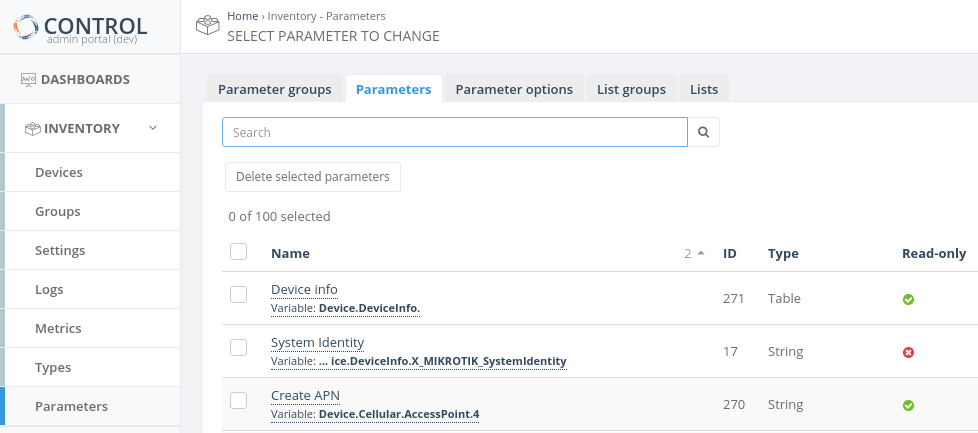](https://docs.zequenze.com/uploads/images/gallery/2020-03/CJD3QjD9gW30bmS0-image-1585057914708.png)
**Note:** Click on the parameter name in the first column to access the Parameter configuration screen.
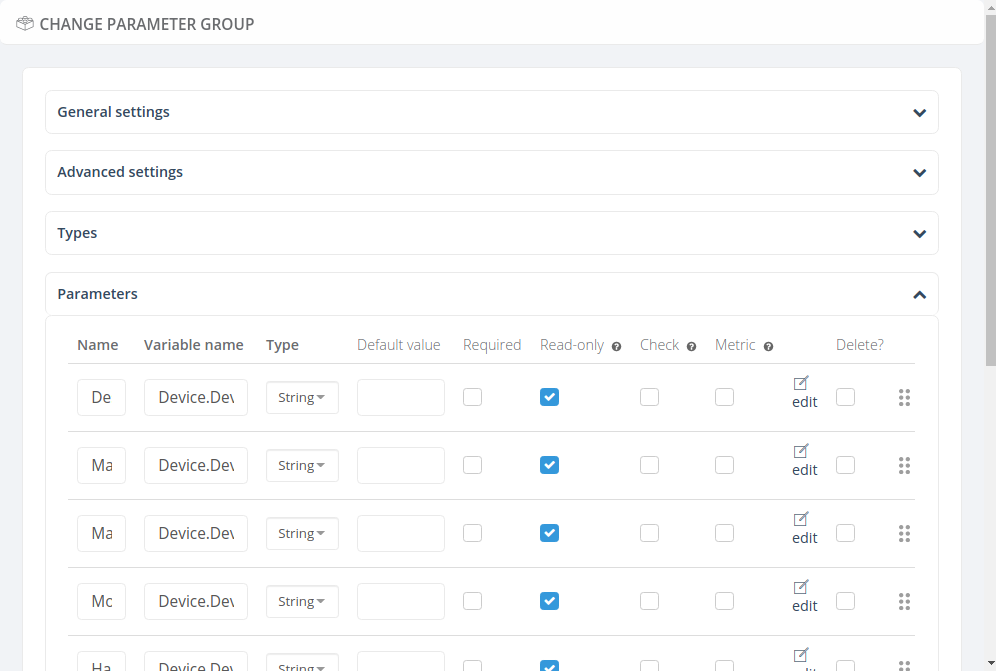
### Method 2: Via Device Profile/Type
1. Navigate to **Inventory** > **Profile/Type**
2. Select the desired Profile/Type object
3. Locate the corresponding Group
[](https://docs.zequenze.com/uploads/images/gallery/2020-03/9uu5AuY0h9jFPQ6c-image-1585612515164.png)
4. Click the edit button ([](https://docs.zequenze.com/uploads/images/gallery/2020-03/H4oW2yNJeHm8Aq0e-image-1585614107767.png)) for the group you want to configure
[](https://docs.zequenze.com/uploads/images/gallery/2020-03/UMtVOu8y3qybQ0Nz-image-1585613937369.png)
5. A popup window will display the Parameter list for the selected group
[](https://docs.zequenze.com/uploads/images/gallery/2020-03/vaVefH1DtWAr8B2d-image-1585615613868.png)
6. Click the **edit** link on the left side of the Parameter table to access the configuration screen
## Configuration Screen Structure
The Parameter configuration screen is organized into two main sections:
### General Settings
Contains the basic configuration options required to define the fundamental characteristics of the Parameter that will be managed by the platform.
### Advanced Settings
Provides optional configuration options for advanced Parameter management features.
## Required and Important Settings
*To be completed.*
# Connection Retries & Time-Out
## Descripción General
Esta documentación describe cómo configurar los parámetros de **tiempo de espera (timeout)** y **reintentos (retries)** para Connection Request en la plataforma ACS CONTROL de Zequenze.
### Contexto del Cambio
En versiones anteriores, estos parámetros estaban definidos de forma implícita en el código con los siguientes valores:
- **Timeout:** 3 segundos
- **Reintentos:** 2 intentos
Con la implementación actual, estos parámetros pueden configurarse por perfil de conexión, permitiendo ajustarlos según las necesidades específicas de cada cliente.
---
## Configuración de Parámetros
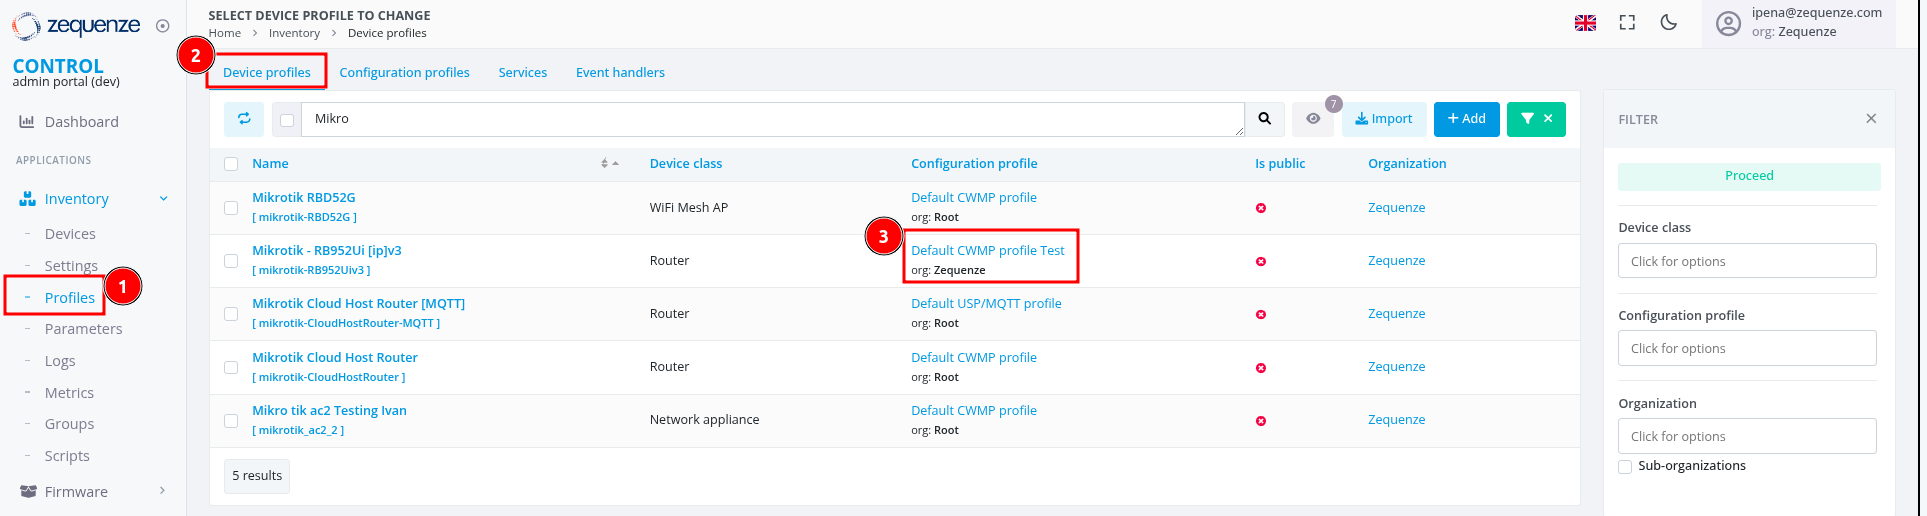
### Paso 1: Acceder a Device Profiles
1. En el menú lateral izquierdo, haga clic en **"Profiles"**
2. Verifique que se encuentra en la pestaña **"Device profiles"** (parte superior de la pantalla)
3. Localice el perfil que desea modificar en la columna **"Configuration profile"**
4. Pase el cursor sobre el nombre del perfil
5. Haga clic en el ícono de menú que aparece para abrir las opciones disponibles
[](https://docs.zequenze.com/uploads/images/gallery/2025-10/53omjPpASbbQB0Ke-1-profile-1-zqz.png)
---
### Paso 2: Abrir el Configuration Profile
1. En el menú contextual, seleccione **"Open Configuration profile"**
[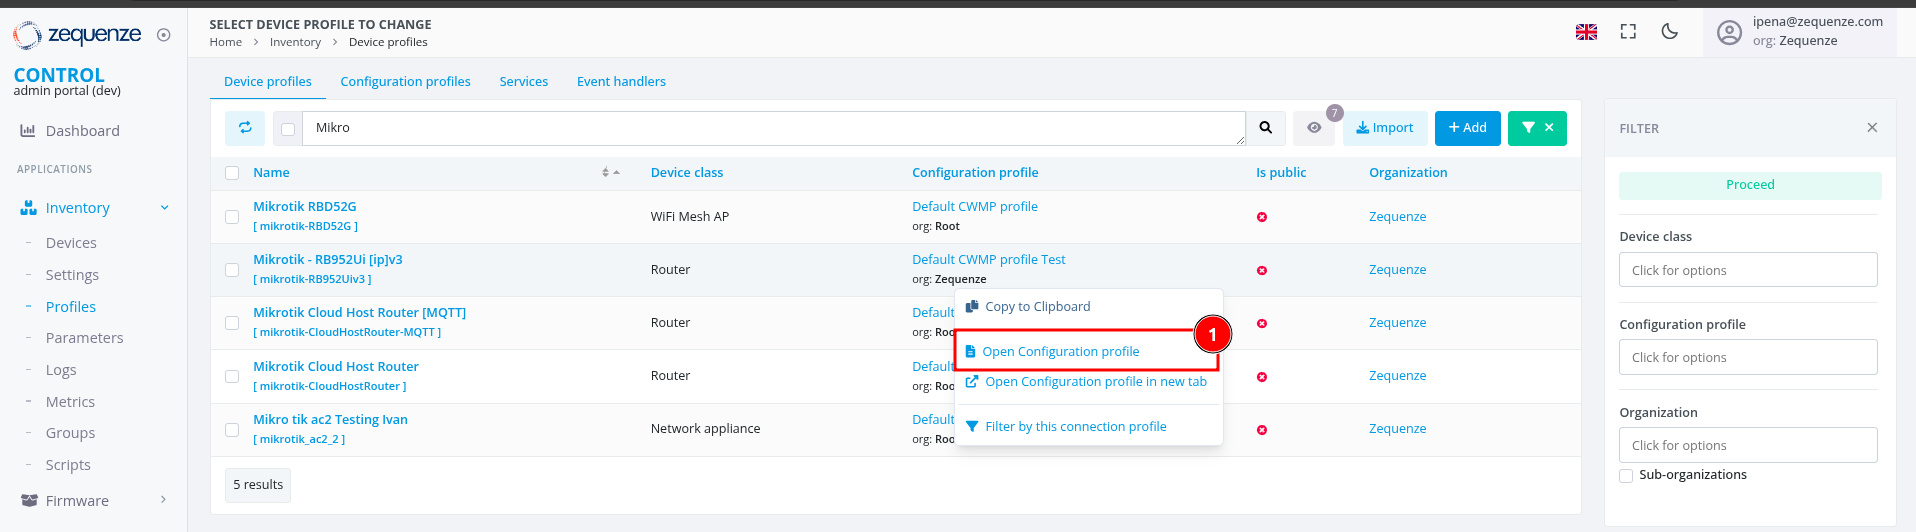](https://docs.zequenze.com/uploads/images/gallery/2025-10/FbhEkumm4X8HKrkG-1-profile-2-zqz.png)
Se abrirá la pantalla de configuración del perfil seleccionado.
---
### Paso 3: Editar el Connection Service
1. Localice la línea **"Connection service"**
2. Haga clic en el ícono de **lápiz** (editar) ubicado al final de la línea
3. Se abrirá una ventana con las opciones de configuración del servicio de conexión
[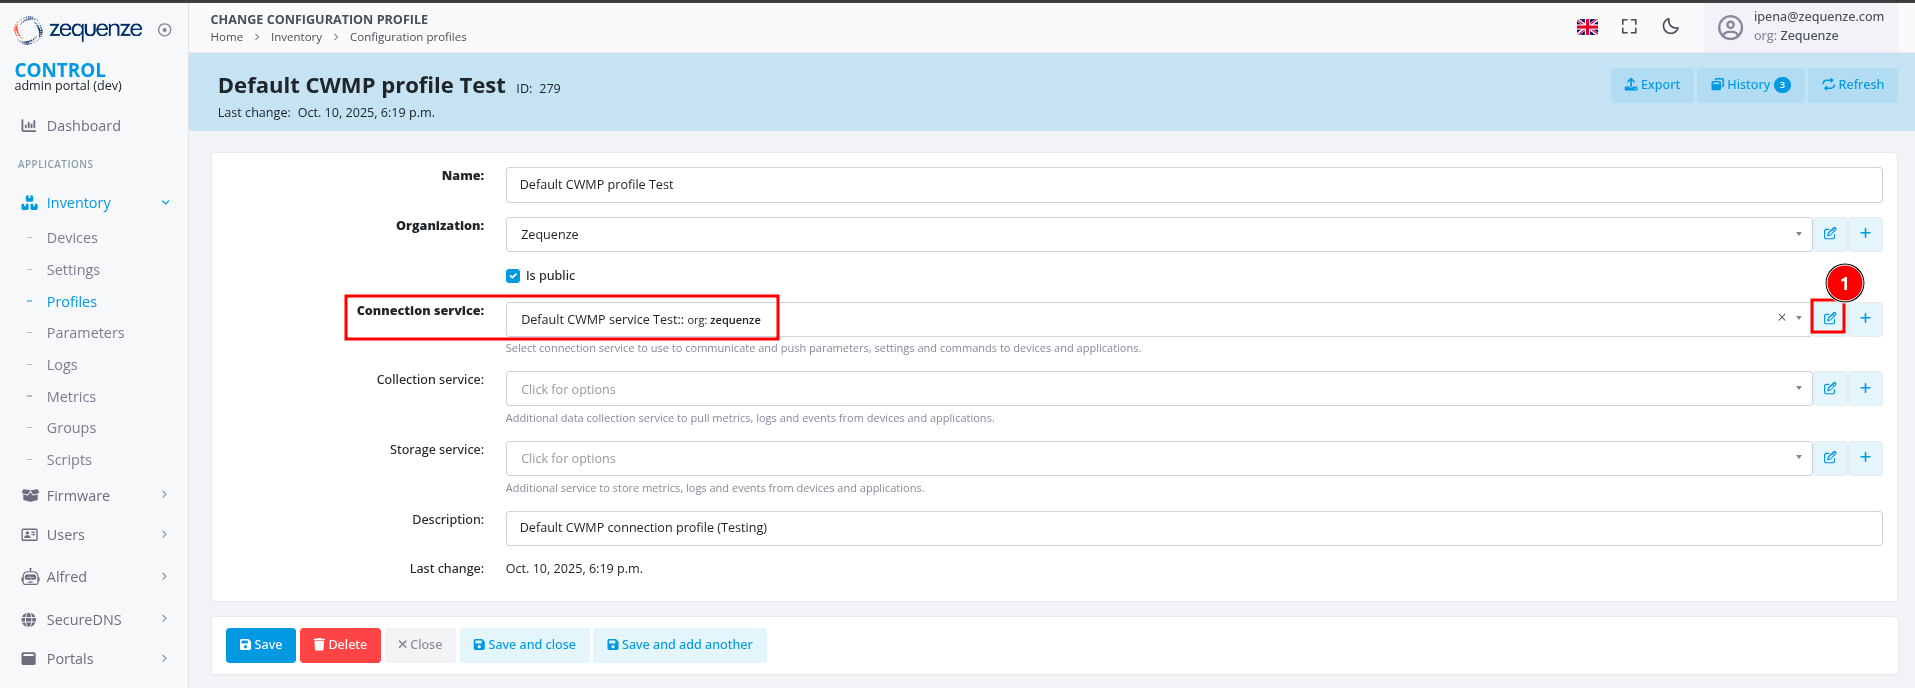](https://docs.zequenze.com/uploads/images/gallery/2025-10/1K4wc2fcD0GAUPar-3-connec-service-1-zqz.png)
---
### Paso 4: Configurar los Parámetros de Connection Request
1. Busque el grupo **"Connection parameters > CWMP protocol connection parameters and settings"**
2. Expanda este grupo para visualizar las opciones disponibles
3. Configure los parámetros según sus necesidades (ver descripciones a continuación)
4. Haga clic en **"Save"** para guardar los cambios
5. Continúe haciendo clic en **"Save"** en cada ventana anterior para asegurar que todos los cambios queden aplicados
[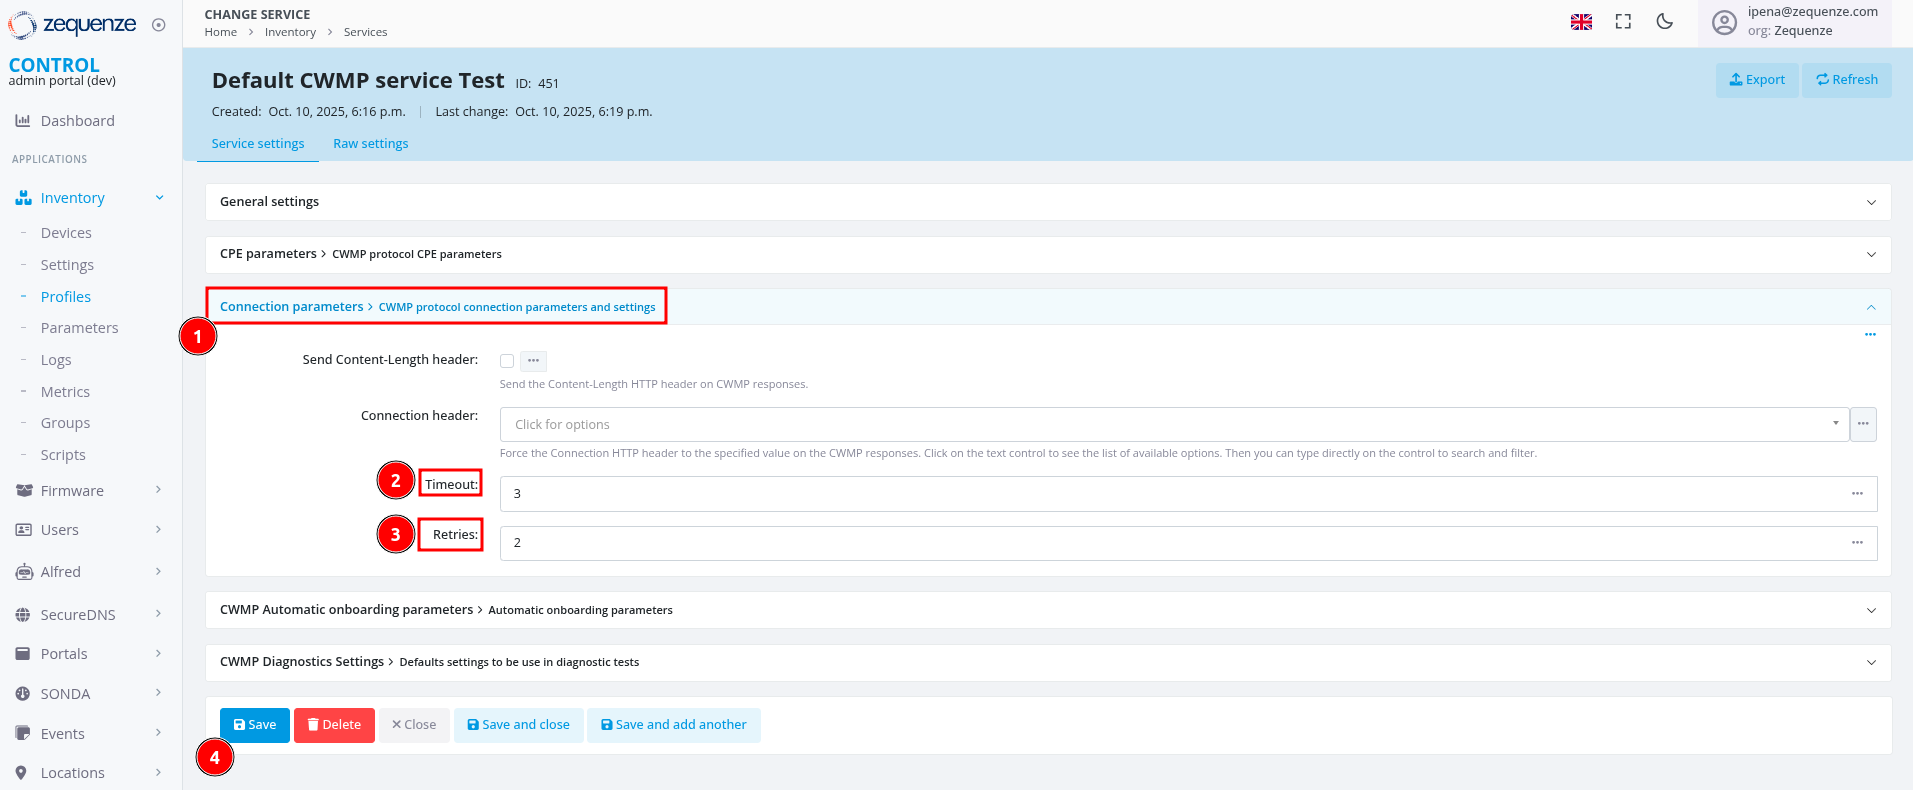](https://docs.zequenze.com/uploads/images/gallery/2025-10/Lgxuk4zHV6lJQ3q8-4-timeout-and-retries-zqz.png)
---
## Descripción de Parámetros
### Timeout
Define el tiempo máximo de espera (en segundos) que el sistema aguardará por una respuesta del dispositivo CPE antes de considerar que la solicitud de conexión ha fallado.
Este valor permite ajustar la tolerancia del sistema según las condiciones de red y características de los dispositivos gestionados.
**Valor recomendado:** Entre 5 y 30 segundos, dependiendo de la latencia de la red.
### Retries
Especifica el número de intentos que el sistema realizará para establecer la conexión con el dispositivo CPE cuando el intento inicial falle.
Este parámetro mejora la confiabilidad de la comunicación en escenarios con conectividad intermitente o inestable.
**Valor recomendado:** Entre 2 y 5 reintentos.
---
## Consideraciones Importantes
**Configuración de valores:**
- Configure los valores de **Timeout** y **Retries** considerando las características específicas de su red y dispositivos
- Valores muy altos de timeout pueden generar demoras innecesarias en la detección de fallas
- Valores muy altos de retries pueden sobrecargar el sistema cuando hay dispositivos con problemas persistentes de conectividad
**Validación:**
- Se recomienda realizar pruebas después de modificar estos parámetros para validar el comportamiento esperado