# Basic Configuration
# Knowledge Basic
## Logging into the Platform
The first step to access CONTROL is to receive an invitation email. This email contains a link that allows you to set your password for future access to the platform.
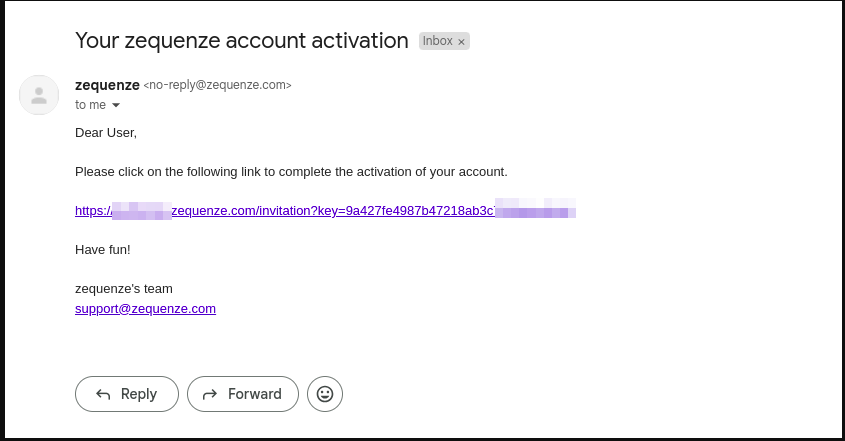 After receiving the invitation, click the link to set up your password. You will see a page similar to this example:
 Once the process is complete, you will be redirected to the CONTROL platform:
 ## Understanding the CONTROL Interface
Now that you're logged into the CONTROL platform, let's explore the available options:
## Understanding the CONTROL Interface
Now that you're logged into the CONTROL platform, let's explore the available options:
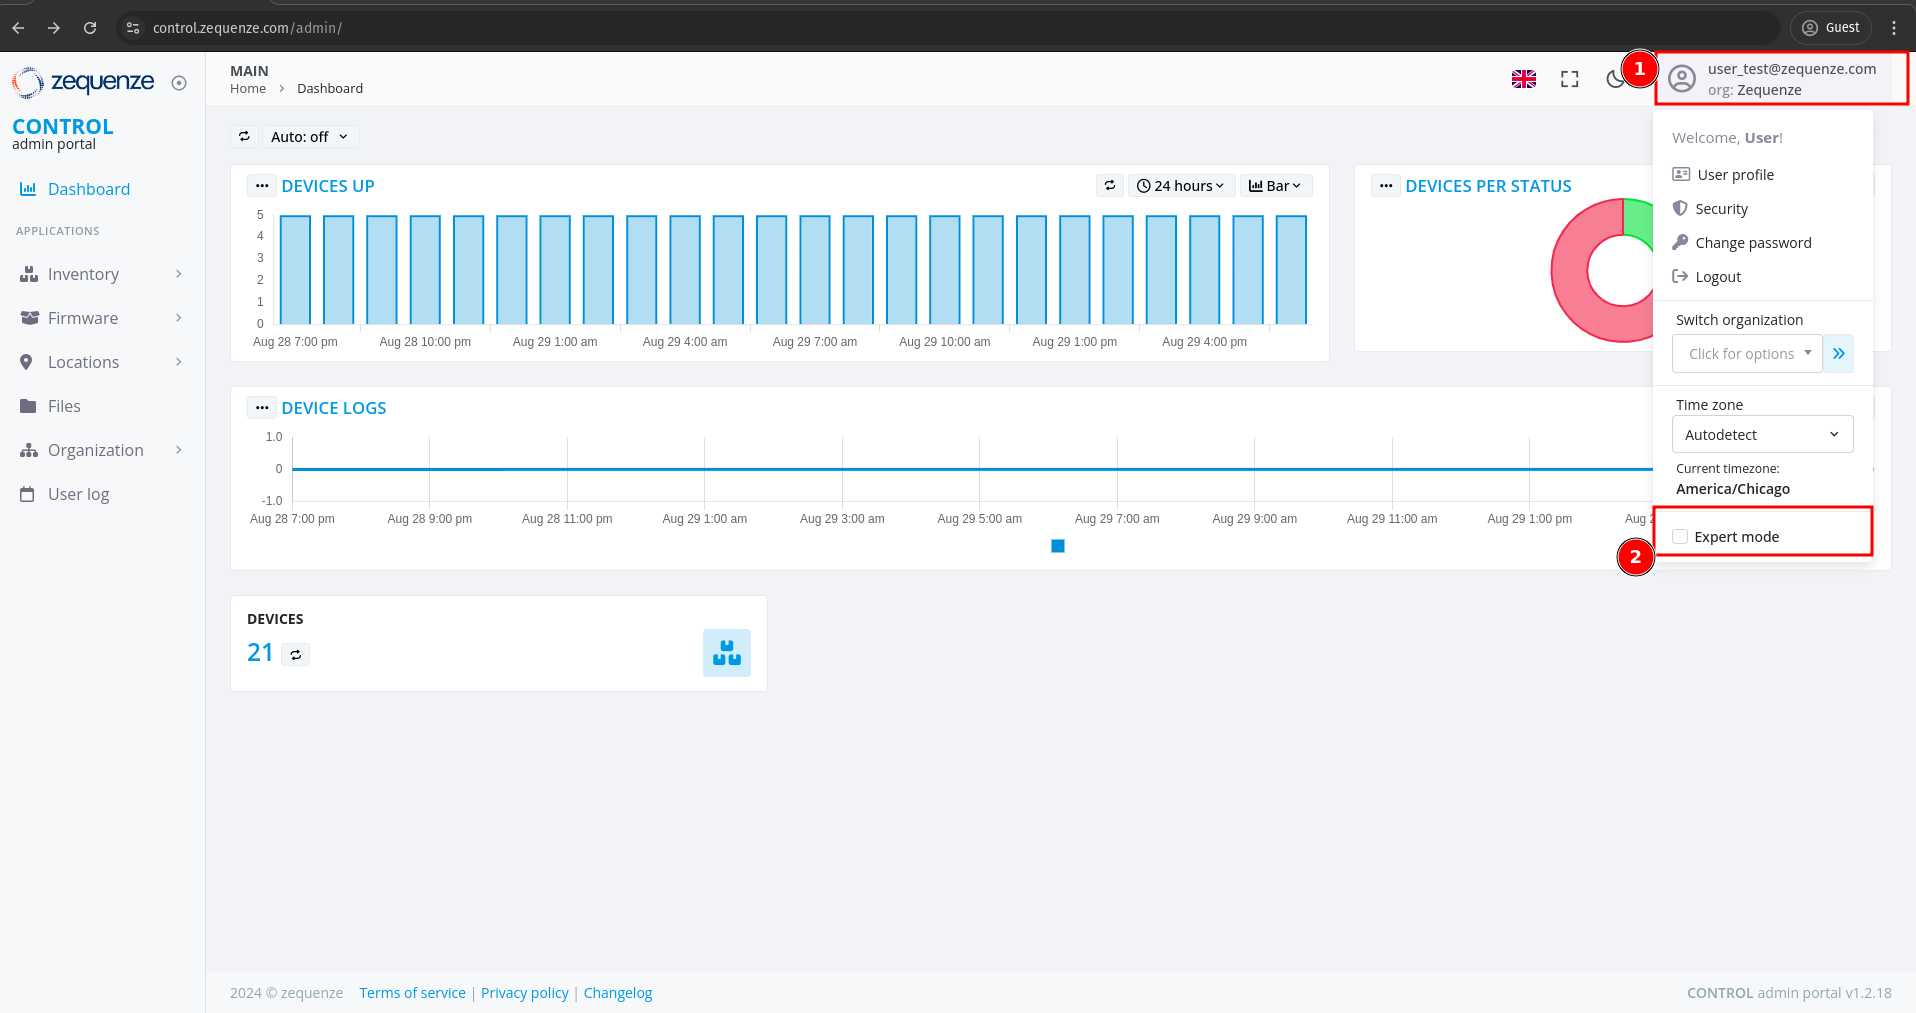
 ### Main Dashboard
In the center of the screen, you'll find a series of customizable reports in the **Main Dashboard**. These reports include:
- **Devices UP** - Shows currently active devices
- **Devices Per Status** - Displays device status distribution
- **Devices Logs** - Provides access to device log information
All of these reports are customizable if needed to suit your monitoring requirements.
### Navigation Menu
The left-side menu provides access to key platform sections:
1. **Inventory** - View devices, create configurations, and add parameters for each profile. In this section you can view the devices, create configurations, and add the parameters you need for each profile.
2. **Firmware** - Upload different firmware versions for upgrades or downgrades, and customize firmware update workflows. You can upload different versions of firmware for upgrade or downgrade, and customize the workflow for firmware upgrades as needed.
3. **Locations** - Create and manage physical locations using:
- Geo-localization with coordinates
- Custom labels to identify device groups
- Organization by OLT or DOCSIS CMTS connections
This section is very useful when you need to create different physical locations, geo-localization with coordinates, or custom labels to identify groups of devices connected to the same OLT or DOCSIS CMTS.
4. **User Log** - View all transactions and changes made within the platform. This section allows you to view all transactions or changes that have been made in the platform.
## Enabling Expert Mode
To access advanced features, you need to activate **Expert Mode**:
1. Check the **Expert mode** checkbox
2. Refresh the webpage by pressing **F5** or using your browser's refresh button
### Main Dashboard
In the center of the screen, you'll find a series of customizable reports in the **Main Dashboard**. These reports include:
- **Devices UP** - Shows currently active devices
- **Devices Per Status** - Displays device status distribution
- **Devices Logs** - Provides access to device log information
All of these reports are customizable if needed to suit your monitoring requirements.
### Navigation Menu
The left-side menu provides access to key platform sections:
1. **Inventory** - View devices, create configurations, and add parameters for each profile. In this section you can view the devices, create configurations, and add the parameters you need for each profile.
2. **Firmware** - Upload different firmware versions for upgrades or downgrades, and customize firmware update workflows. You can upload different versions of firmware for upgrade or downgrade, and customize the workflow for firmware upgrades as needed.
3. **Locations** - Create and manage physical locations using:
- Geo-localization with coordinates
- Custom labels to identify device groups
- Organization by OLT or DOCSIS CMTS connections
This section is very useful when you need to create different physical locations, geo-localization with coordinates, or custom labels to identify groups of devices connected to the same OLT or DOCSIS CMTS.
4. **User Log** - View all transactions and changes made within the platform. This section allows you to view all transactions or changes that have been made in the platform.
## Enabling Expert Mode
To access advanced features, you need to activate **Expert Mode**:
1. Check the **Expert mode** checkbox
2. Refresh the webpage by pressing **F5** or using your browser's refresh button
 This activates additional options and advanced functionality within the CONTROL platform.
---
This completes the basic overview of the CONTROL platform. The next step is to create a Profile.
# Profile
## Creating a New Profile
Before creating a profile, it's important to understand its purpose. Profiles are where you configure key device settings such as:
- WAN interface configurations
- Custom WiFi network names (e.g., "ISP-Provider-2.4GHz" for 2.4GHz networks)
- 5.0GHz network configurations
- Other device-specific parameters
This is where the magic happens when you want to create new interfaces or set up custom configurations for your devices.
### Steps to Create a Profile
1. Navigate to **Inventory** in the CONTROL portal
2. Click on **Profile**
3. Click the **Add** button
This activates additional options and advanced functionality within the CONTROL platform.
---
This completes the basic overview of the CONTROL platform. The next step is to create a Profile.
# Profile
## Creating a New Profile
Before creating a profile, it's important to understand its purpose. Profiles are where you configure key device settings such as:
- WAN interface configurations
- Custom WiFi network names (e.g., "ISP-Provider-2.4GHz" for 2.4GHz networks)
- 5.0GHz network configurations
- Other device-specific parameters
This is where the magic happens when you want to create new interfaces or set up custom configurations for your devices.
### Steps to Create a Profile
1. Navigate to **Inventory** in the CONTROL portal
2. Click on **Profile**
3. Click the **Add** button
 ---
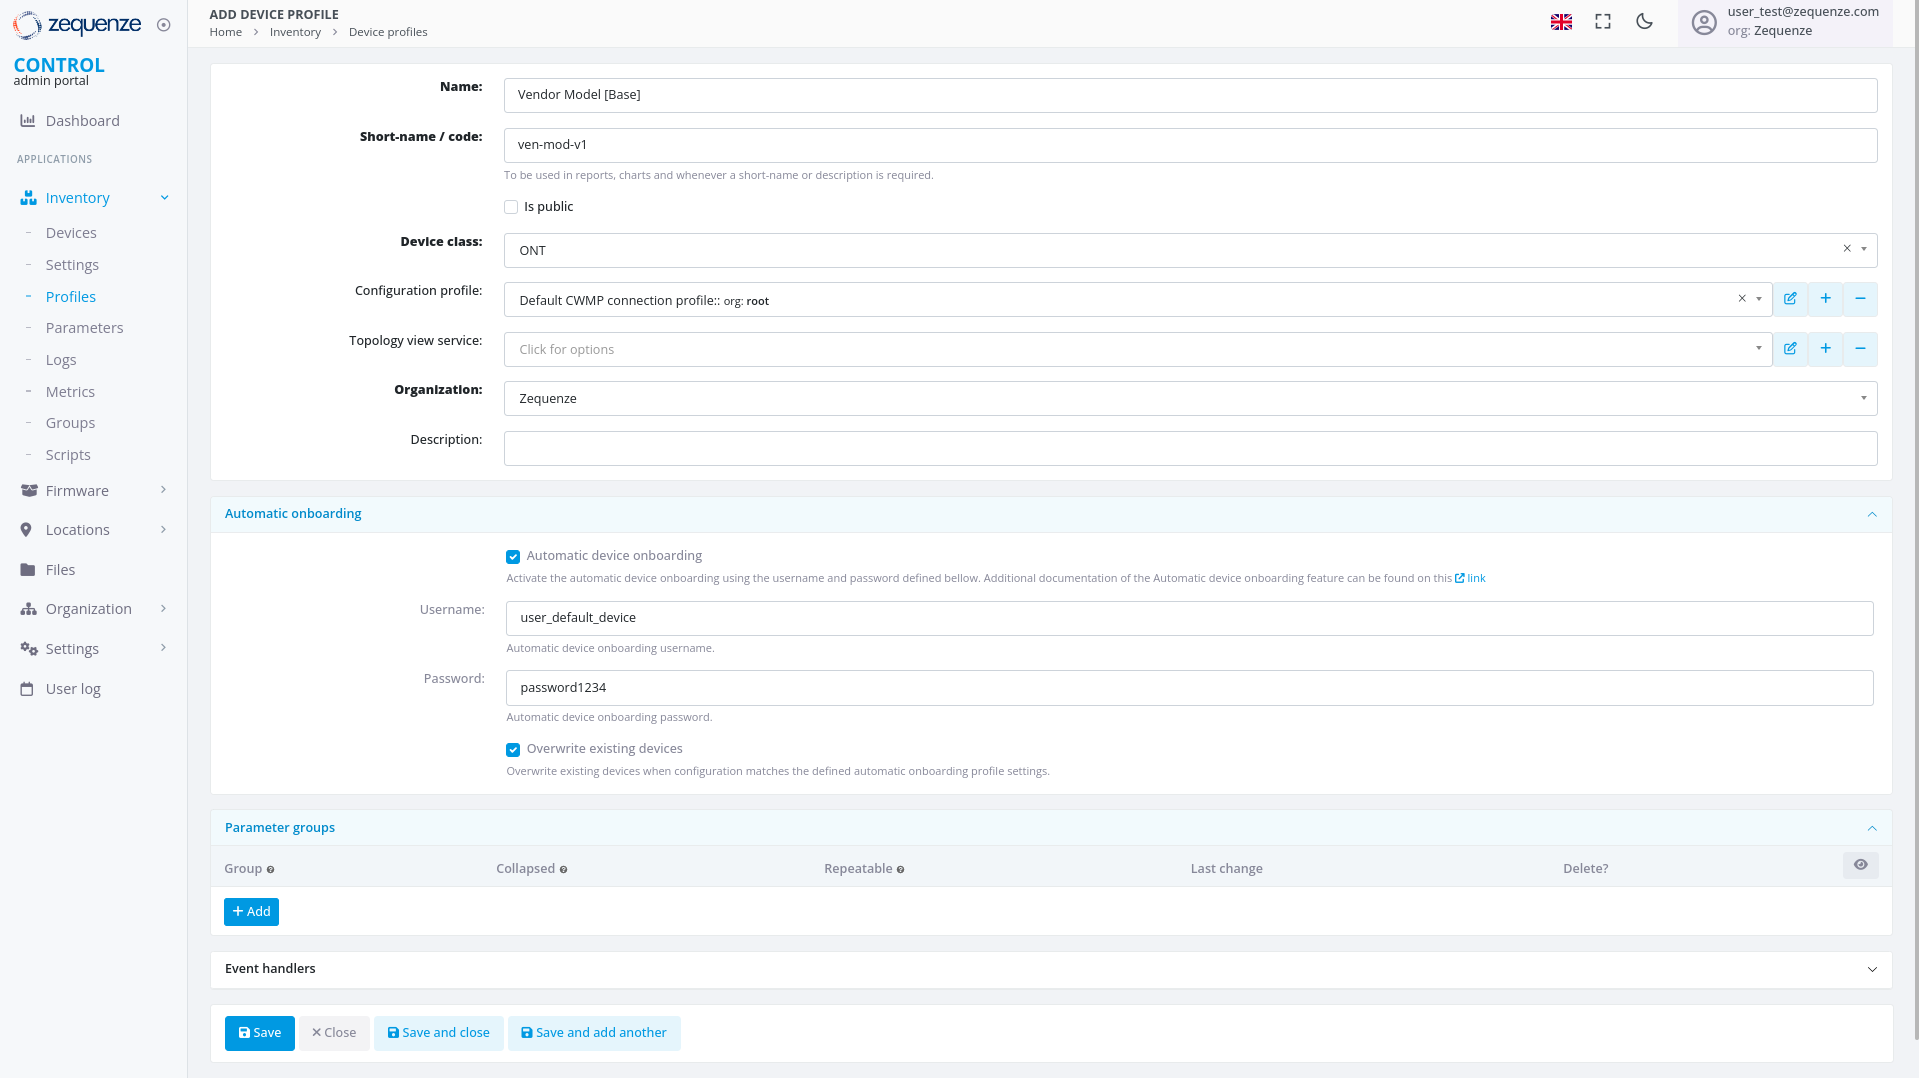
### Configuring Profile Settings
You will see the profile creation page with the following fields:
---
### Configuring Profile Settings
You will see the profile creation page with the following fields:
 #### Required Fields
1. **Name**
Enter a descriptive identifier for this profile. Best practice is to use the format: **"Vendor Model [Base]"**
Example: *"Nokia G-1425G-B [Base]"*
2. **Short-name / code**
Provide an abbreviated version of the profile name.
Example: *"Nokia-G-1425G"*
3. **Device class**
Select the appropriate device type from the following options:
- eMTA
- ONT
- DSL CPE
- Fixed Wireless Access CPE
- LTE CPE
- LTE MiFI
- STB
- WiFi eXtender
- WiFi Mesh AP
- WiFi Mesh (master)
- WiFi Mesh (slave)
- WiFi AP
- VoIP phone
- VoIP ATA
- LAN Switch
- Router
- Network appliance
- SONDA probe
- Transport gateway
- Other
4. **Organization**
If applicable, select which organization this profile belongs to.
#### Automatic Device Onboarding Settings
5. **Automatic device onboarding**
Enable this option to allow the CONTROL platform to automatically assign new credentials to devices. This ensures each device receives unique username and password combinations for enhanced security.
6. **User**
Enter the default username that matches the factory credentials on the device. This username must match what is configured on devices connecting to the CONTROL platform.
7. **Password**
Enter the default password that matches the factory credentials on the device. Both username and password must match for automatic profile assignment to work correctly.
8. **Overwrite existing devices**
Enable this option to allow devices that have been reset to factory credentials to reconnect to the CONTROL platform. This prevents connection rejection when a device already exists in the system and ensures that devices returning to factory settings can still connect without issues.
---
### Example Configuration
Below is an example of a completed profile configuration:
#### Required Fields
1. **Name**
Enter a descriptive identifier for this profile. Best practice is to use the format: **"Vendor Model [Base]"**
Example: *"Nokia G-1425G-B [Base]"*
2. **Short-name / code**
Provide an abbreviated version of the profile name.
Example: *"Nokia-G-1425G"*
3. **Device class**
Select the appropriate device type from the following options:
- eMTA
- ONT
- DSL CPE
- Fixed Wireless Access CPE
- LTE CPE
- LTE MiFI
- STB
- WiFi eXtender
- WiFi Mesh AP
- WiFi Mesh (master)
- WiFi Mesh (slave)
- WiFi AP
- VoIP phone
- VoIP ATA
- LAN Switch
- Router
- Network appliance
- SONDA probe
- Transport gateway
- Other
4. **Organization**
If applicable, select which organization this profile belongs to.
#### Automatic Device Onboarding Settings
5. **Automatic device onboarding**
Enable this option to allow the CONTROL platform to automatically assign new credentials to devices. This ensures each device receives unique username and password combinations for enhanced security.
6. **User**
Enter the default username that matches the factory credentials on the device. This username must match what is configured on devices connecting to the CONTROL platform.
7. **Password**
Enter the default password that matches the factory credentials on the device. Both username and password must match for automatic profile assignment to work correctly.
8. **Overwrite existing devices**
Enable this option to allow devices that have been reset to factory credentials to reconnect to the CONTROL platform. This prevents connection rejection when a device already exists in the system and ensures that devices returning to factory settings can still connect without issues.
---
### Example Configuration
Below is an example of a completed profile configuration:
 Once all fields are configured, click **"Save and close"** to create the profile.
---
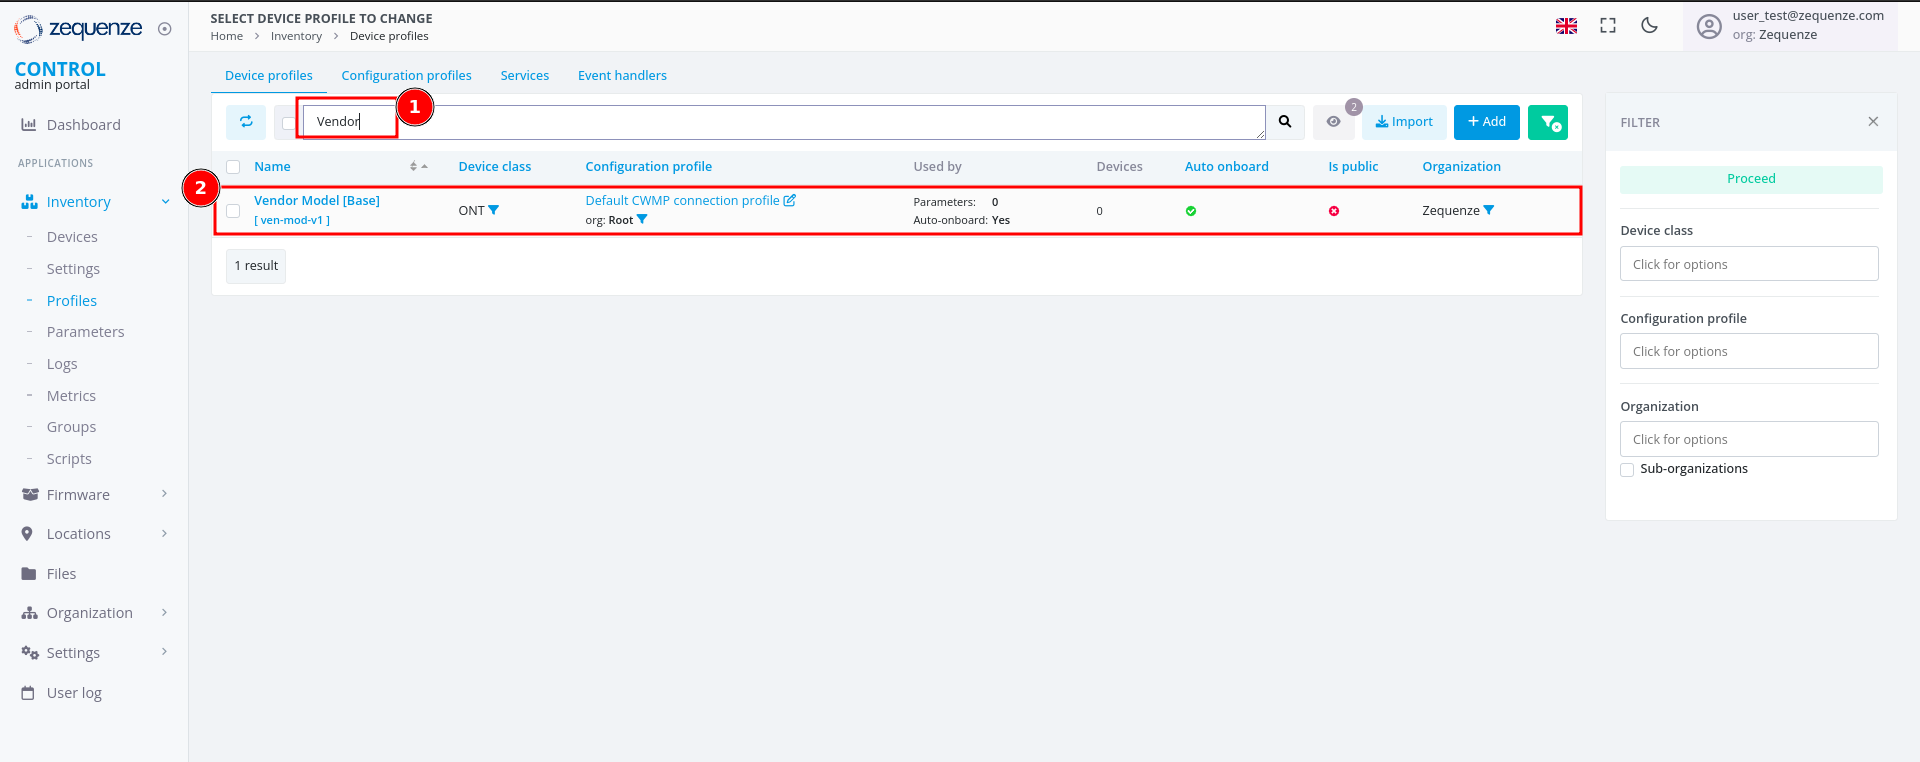
## Profile Created
After successfully creating the profile, you can:
1. **Filter by Name** - Use the search filter to locate your profile by its name
2. **View the Profile** - The newly created profile will appear in the profile list
Once all fields are configured, click **"Save and close"** to create the profile.
---
## Profile Created
After successfully creating the profile, you can:
1. **Filter by Name** - Use the search filter to locate your profile by its name
2. **View the Profile** - The newly created profile will appear in the profile list
 ---
## Next Steps
The next step is to configure a device with the credentials and URL settings.
# Add Device to CONTROL
## Overview
This guide walks you through configuring a device to connect to the CONTROL platform. In this example, we'll configure an ONT from an oriental vendor with TR069 credentials created in a previous step.
## Prerequisites
Before beginning, ensure you have:
- Valid TR069 credentials created in CONTROL (see the [Profile chapter](https://docs.zequenze.com/books/control/page/profile))
- Network access from the device to the CONTROL platform URL
- Administrative access to your device
## Step 1: Access Device Configuration
Log in to your device's web interface.
---
## Next Steps
The next step is to configure a device with the credentials and URL settings.
# Add Device to CONTROL
## Overview
This guide walks you through configuring a device to connect to the CONTROL platform. In this example, we'll configure an ONT from an oriental vendor with TR069 credentials created in a previous step.
## Prerequisites
Before beginning, ensure you have:
- Valid TR069 credentials created in CONTROL (see the [Profile chapter](https://docs.zequenze.com/books/control/page/profile))
- Network access from the device to the CONTROL platform URL
- Administrative access to your device
## Step 1: Access Device Configuration
Log in to your device's web interface.
 ## Step 2: Review Existing WAN Interfaces
After logging in, verify the existing WAN interfaces. This device has a pre-configured interface, but we'll examine the configuration and create a new one for demonstration purposes.
## Step 2: Review Existing WAN Interfaces
After logging in, verify the existing WAN interfaces. This device has a pre-configured interface, but we'll examine the configuration and create a new one for demonstration purposes.
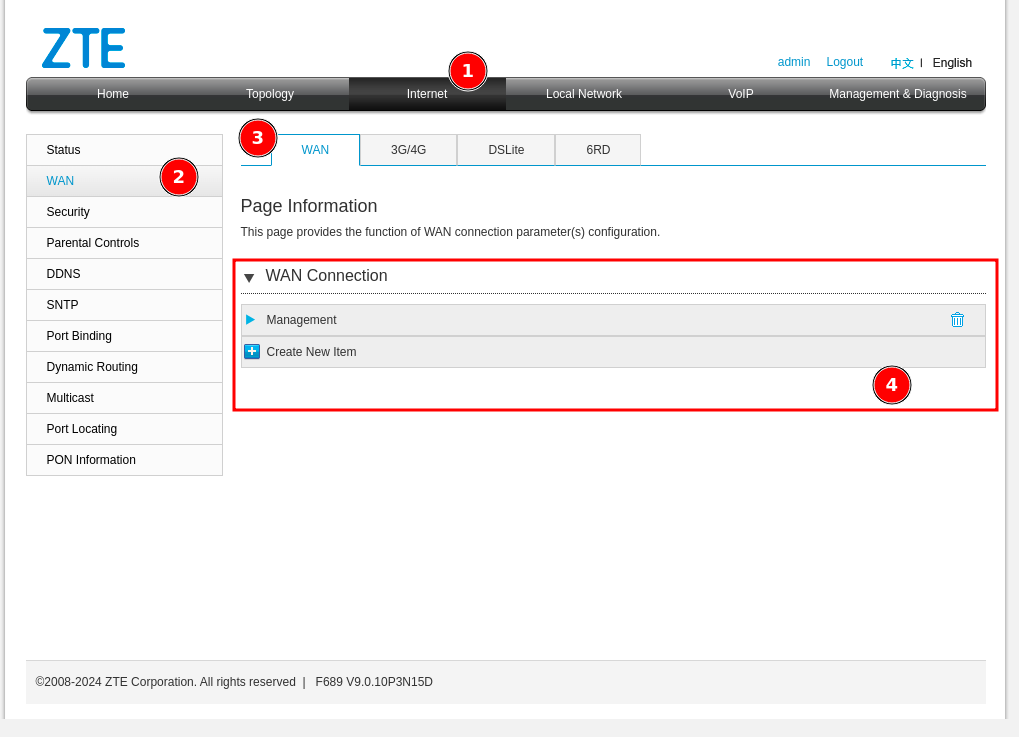 To navigate to the WAN interface configuration:
1. Click **"Internet"**
2. Click **"WAN"**
3. Click **"WAN"** again
4. In the displayed list, you'll see existing WAN interfaces (in this example, an interface named **"Management"**)
## Step 3: Create a New WAN Interface
Create a new WAN interface for TR069 connectivity:
To navigate to the WAN interface configuration:
1. Click **"Internet"**
2. Click **"WAN"**
3. Click **"WAN"** again
4. In the displayed list, you'll see existing WAN interfaces (in this example, an interface named **"Management"**)
## Step 3: Create a New WAN Interface
Create a new WAN interface for TR069 connectivity:
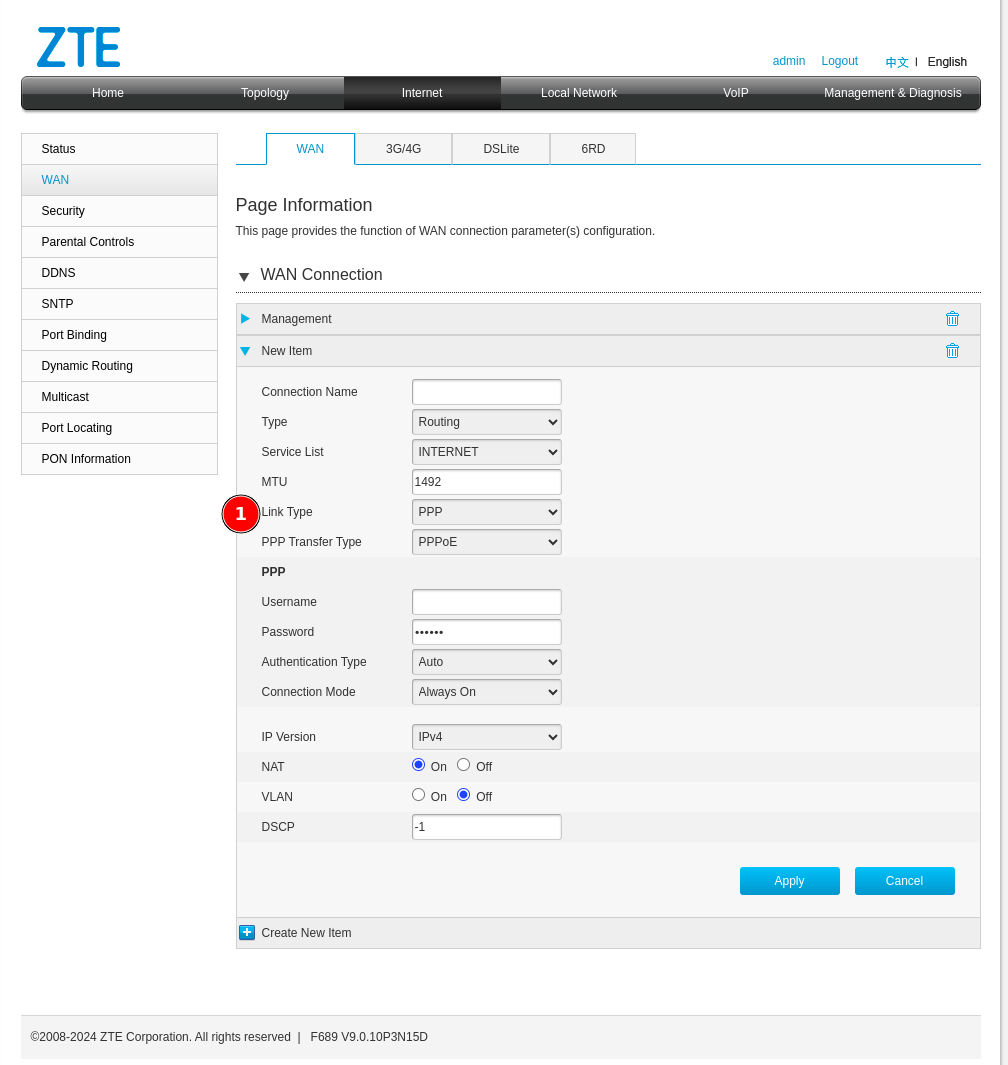 1. Change the connection type from **"PPP"** to **"IP"**:
 ## Step 4: Configure Service List Options
Next, configure the **"Service List"** type. Change it from *Internet* to one that includes *TR069*.
## Step 4: Configure Service List Options
Next, configure the **"Service List"** type. Change it from *Internet* to one that includes *TR069*.
 ### Understanding Service List Combinations
You may encounter several service list options in this device and possibly others. Here's what each means:
1. **TR069** — This option is alone, it is because there would be a separate WAN interface solely to manage the device through the CONTROL platform, which would be ideal but is often not possible due to network design issues that already exist.
2. **INTERNET_TR069** — With this option we will be sharing the Internet service for the user or client along with the administration of the device. **Not recommended** since when the service is suspended, access to the CONTROL platform is sometimes lost and communication would be limited until the service is reactivated.
3. **VOIP_TR069** — Sharing the TR069 service with VoIP may possibly be a good option since it would not affect the existing Internet services you already have.
4. **INTERNET_VoIP_TR069** — This last option would be to manage all the services in a single VLAN or WAN interface, which is rare for clients with this configuration, but it works.
## Step 5: Configure WAN Interface Parameters
Configure your WAN interface with the following settings:
### Understanding Service List Combinations
You may encounter several service list options in this device and possibly others. Here's what each means:
1. **TR069** — This option is alone, it is because there would be a separate WAN interface solely to manage the device through the CONTROL platform, which would be ideal but is often not possible due to network design issues that already exist.
2. **INTERNET_TR069** — With this option we will be sharing the Internet service for the user or client along with the administration of the device. **Not recommended** since when the service is suspended, access to the CONTROL platform is sometimes lost and communication would be limited until the service is reactivated.
3. **VOIP_TR069** — Sharing the TR069 service with VoIP may possibly be a good option since it would not affect the existing Internet services you already have.
4. **INTERNET_VoIP_TR069** — This last option would be to manage all the services in a single VLAN or WAN interface, which is rare for clients with this configuration, but it works.
## Step 5: Configure WAN Interface Parameters
Configure your WAN interface with the following settings:
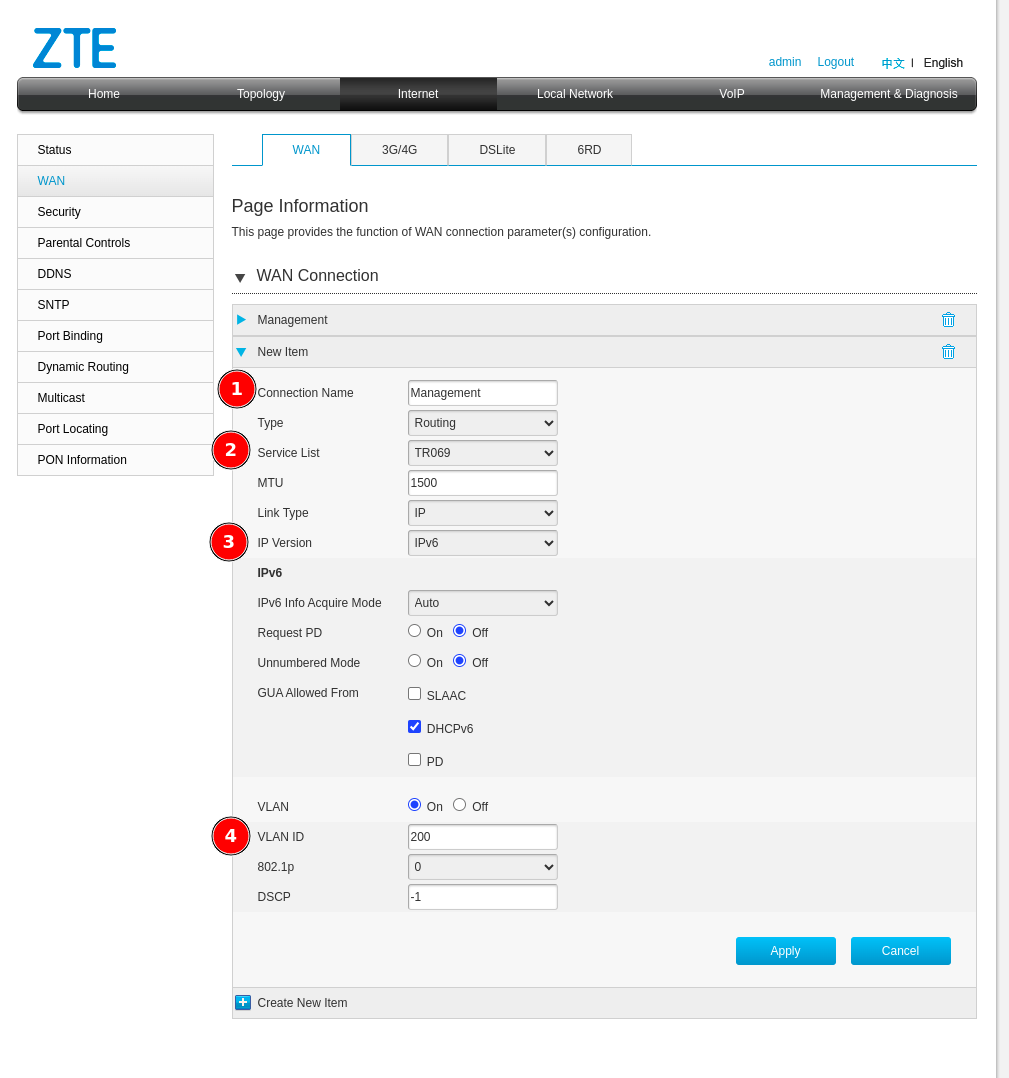 1. **Connection name** — Enter a descriptive name to identify this connection
2. **Service List** — Select **TR069**
3. **IP Version** — Select the appropriate IP version (IPv4 or IPv6)
4. **VLAN ID** — Enter the VLAN ID for this service
**Important:** Please make the necessary changes in your network configuration to ensure the device can reach the CONTROL platform URL through this WAN interface with the TR069 service enabled.
After clicking **Apply**, verify your configuration:
1. **Connection name** — Enter a descriptive name to identify this connection
2. **Service List** — Select **TR069**
3. **IP Version** — Select the appropriate IP version (IPv4 or IPv6)
4. **VLAN ID** — Enter the VLAN ID for this service
**Important:** Please make the necessary changes in your network configuration to ensure the device can reach the CONTROL platform URL through this WAN interface with the TR069 service enabled.
After clicking **Apply**, verify your configuration:
 ## Step 6: Verify Network Connectivity
Confirm that the WAN interface has a valid IP address and can reach the CONTROL platform:
## Step 6: Verify Network Connectivity
Confirm that the WAN interface has a valid IP address and can reach the CONTROL platform:
 ### Optional: Test CONTROL Platform Connectivity
This step is optional, but you can confirm with a ping that the CONTROL URL can be reached using the device's built-in ping utility:
### Optional: Test CONTROL Platform Connectivity
This step is optional, but you can confirm with a ping that the CONTROL URL can be reached using the device's built-in ping utility:
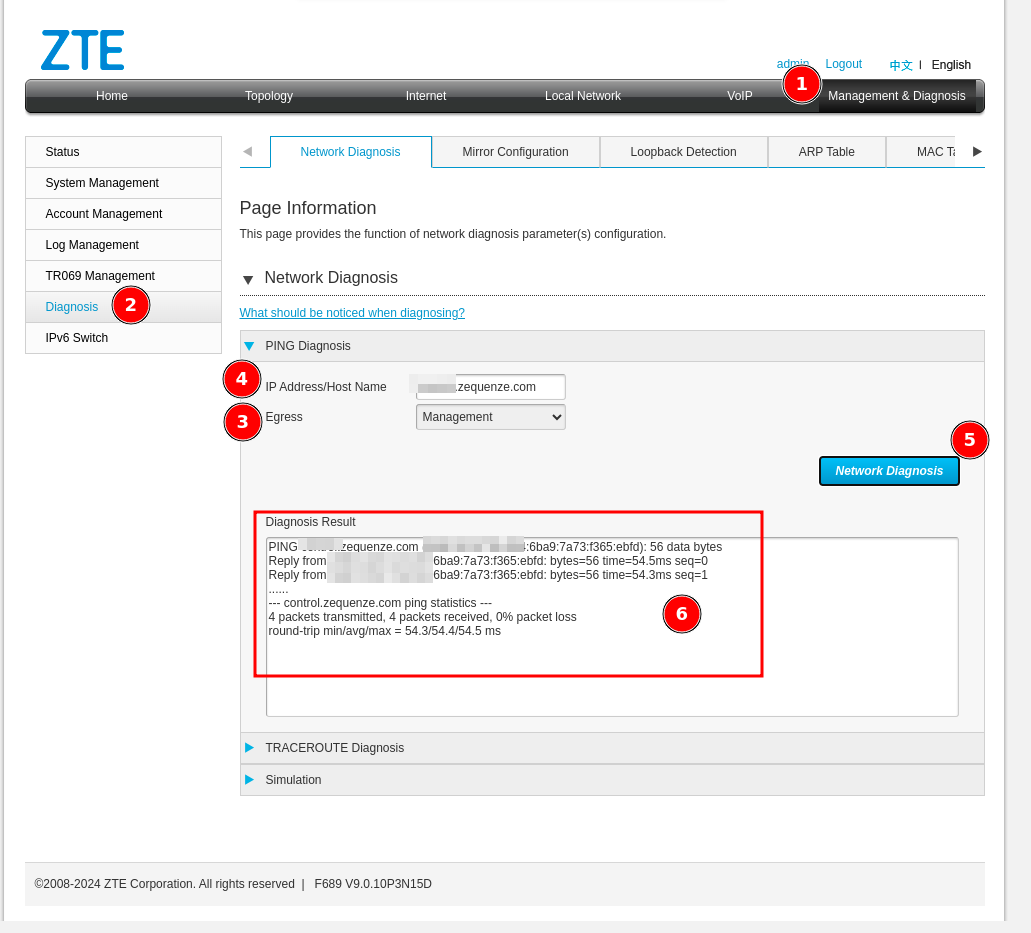 1. Navigate to **"Management & Diagnosis"**
2. Click **"Diagnosis"**
3. Under **"Egress"**, select your TR069 interface (e.g., **"Management"**)
4. Enter the CONTROL platform domain
5. Start the ping test
6. Confirm that all packets successfully reach CONTROL
## Step 7: Configure TR069 Settings
Navigate to the TR069 Management section:
1. Navigate to **"Management & Diagnosis"**
2. Click **"Diagnosis"**
3. Under **"Egress"**, select your TR069 interface (e.g., **"Management"**)
4. Enter the CONTROL platform domain
5. Start the ping test
6. Confirm that all packets successfully reach CONTROL
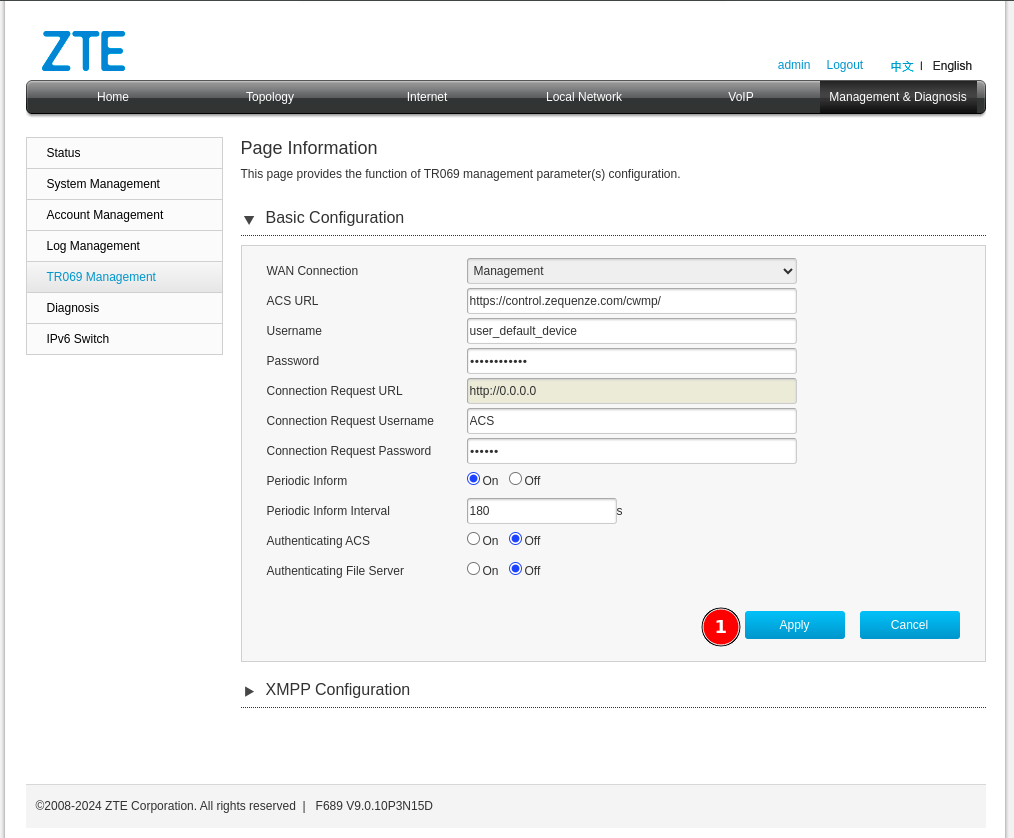
## Step 7: Configure TR069 Settings
Navigate to the TR069 Management section:
 1. Click **"Management & Diagnosis"**
2. Click **"TR069 Management"**
## Step 8: Connect Device to CONTROL
Configure the TR069 parameters to establish connection with CONTROL:
1. Click **"Management & Diagnosis"**
2. Click **"TR069 Management"**
## Step 8: Connect Device to CONTROL
Configure the TR069 parameters to establish connection with CONTROL:
 Configure the following parameters:
1. **WAN Connection** — Select the interface created for TR069 (e.g., *Management*)
2. **ACS URL** — Enter: `https://control.zequenze.com/cwmp/`
**Note:** Please confirm the correct URL with Zequenze staff before proceeding.
3. **Username** — Enter the username created in the [Profile chapter](https://docs.zequenze.com/books/control/page/profile)
4. **Password** — Enter the password created in the [Profile chapter](https://docs.zequenze.com/books/control/page/profile)
5. **Periodic Inform** — Enable this option to allow the device to report periodically to CONTROL
6. **Periodic Inform Interval** — For initial setup, set this to **180 seconds**
## Step 9: Apply Configuration
Review your final configuration:
Configure the following parameters:
1. **WAN Connection** — Select the interface created for TR069 (e.g., *Management*)
2. **ACS URL** — Enter: `https://control.zequenze.com/cwmp/`
**Note:** Please confirm the correct URL with Zequenze staff before proceeding.
3. **Username** — Enter the username created in the [Profile chapter](https://docs.zequenze.com/books/control/page/profile)
4. **Password** — Enter the password created in the [Profile chapter](https://docs.zequenze.com/books/control/page/profile)
5. **Periodic Inform** — Enable this option to allow the device to report periodically to CONTROL
6. **Periodic Inform Interval** — For initial setup, set this to **180 seconds**
## Step 9: Apply Configuration
Review your final configuration:
 Click the **Apply** button to save your changes.
## Next Steps
Device configuration is now complete. The device should appear in the CONTROL platform within the configured periodic inform interval. You can now proceed to manage and monitor your device through CONTROL.
# Discovering the parameters
## Confirm Device Connection
At this point, you should have a device successfully connected to the CONTROL platform, similar to the example shown below:
Click the **Apply** button to save your changes.
## Next Steps
Device configuration is now complete. The device should appear in the CONTROL platform within the configured periodic inform interval. You can now proceed to manage and monitor your device through CONTROL.
# Discovering the parameters
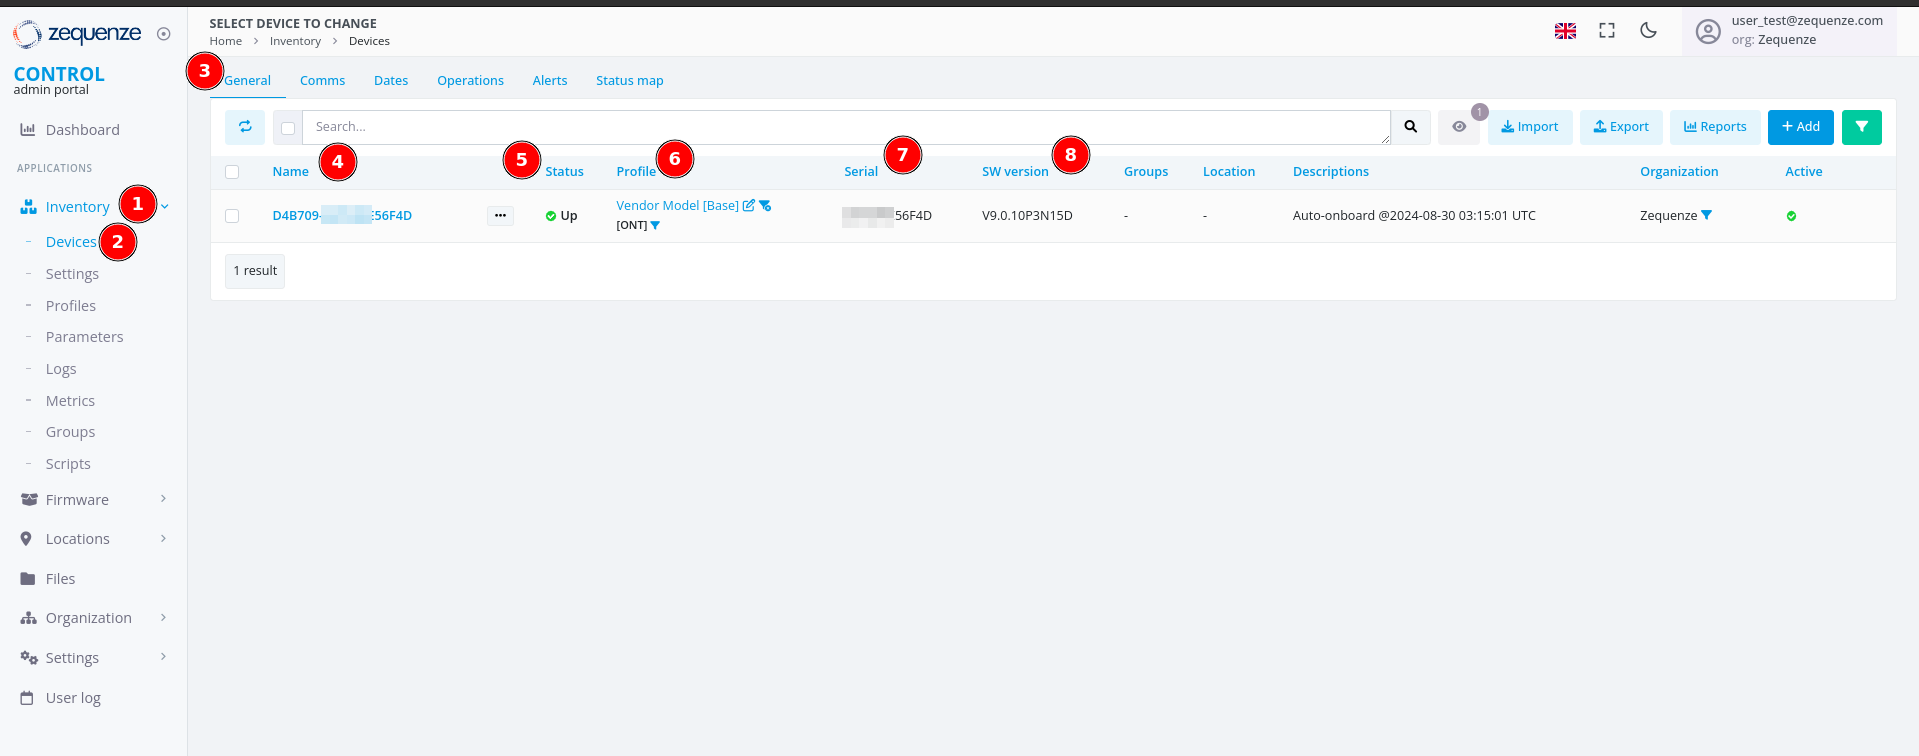
## Confirm Device Connection
At this point, you should have a device successfully connected to the CONTROL platform, similar to the example shown below:
 > **Note:** If the device list is empty, perform the following troubleshooting steps locally on the device:
>
> - **Try HTTP instead of HTTPS:** Change the CONTROL URL from `https://control.zequenze.com/cwmp/` to `http://control.zequenze.com/cwmp/`. If this works, the device does not support HTTPS or encrypted communication.
>
> - **Use IP address instead of domain:** Replace the domain `control.zequenze.com` with the CONTROL platform's IP address (e.g., `https://35.171.123.57/cwmp/` or `http://35.171.123.57/cwmp/`). If this works, verify the device's DNS configuration.
>
> - **Verify TR069 service:** Validate that the WAN interface has the TR069 service enabled to achieve connectivity to the CONTROL platform.
### Understanding the Interface
The screenshot above displays the following elements:
1. **Inventory** — Located on the left sidebar, this section contains devices, profiles, and other resources.
2. **Devices** — Displays the list of connected devices, showing their status as online or offline (with reasons for offline status).
3. **General** — The default section view when accessing a device.
4. **Name** — Automatically assigned by CONTROL as a unique identifier using the ONT's OUI-FSAN or serial number.
5. **Status** — Shows whether the device is UP or DOWN. Devices have a configured "Periodic Inform Interval" (e.g., 180 seconds). If the device fails to report within this interval, its status changes to DOWN.
6. **Profile** — Indicates which profile the device is assigned to.
7. **Serial** — Displays the serial number or FSAN reported by the device.
8. **SW Version** — Shows the current software version running on the device.
## Enable Parameter Discovery
To discover all available parameters from a device on the CONTROL platform, follow these steps:
> **Note:** If the device list is empty, perform the following troubleshooting steps locally on the device:
>
> - **Try HTTP instead of HTTPS:** Change the CONTROL URL from `https://control.zequenze.com/cwmp/` to `http://control.zequenze.com/cwmp/`. If this works, the device does not support HTTPS or encrypted communication.
>
> - **Use IP address instead of domain:** Replace the domain `control.zequenze.com` with the CONTROL platform's IP address (e.g., `https://35.171.123.57/cwmp/` or `http://35.171.123.57/cwmp/`). If this works, verify the device's DNS configuration.
>
> - **Verify TR069 service:** Validate that the WAN interface has the TR069 service enabled to achieve connectivity to the CONTROL platform.
### Understanding the Interface
The screenshot above displays the following elements:
1. **Inventory** — Located on the left sidebar, this section contains devices, profiles, and other resources.
2. **Devices** — Displays the list of connected devices, showing their status as online or offline (with reasons for offline status).
3. **General** — The default section view when accessing a device.
4. **Name** — Automatically assigned by CONTROL as a unique identifier using the ONT's OUI-FSAN or serial number.
5. **Status** — Shows whether the device is UP or DOWN. Devices have a configured "Periodic Inform Interval" (e.g., 180 seconds). If the device fails to report within this interval, its status changes to DOWN.
6. **Profile** — Indicates which profile the device is assigned to.
7. **Serial** — Displays the serial number or FSAN reported by the device.
8. **SW Version** — Shows the current software version running on the device.
## Enable Parameter Discovery
To discover all available parameters from a device on the CONTROL platform, follow these steps:
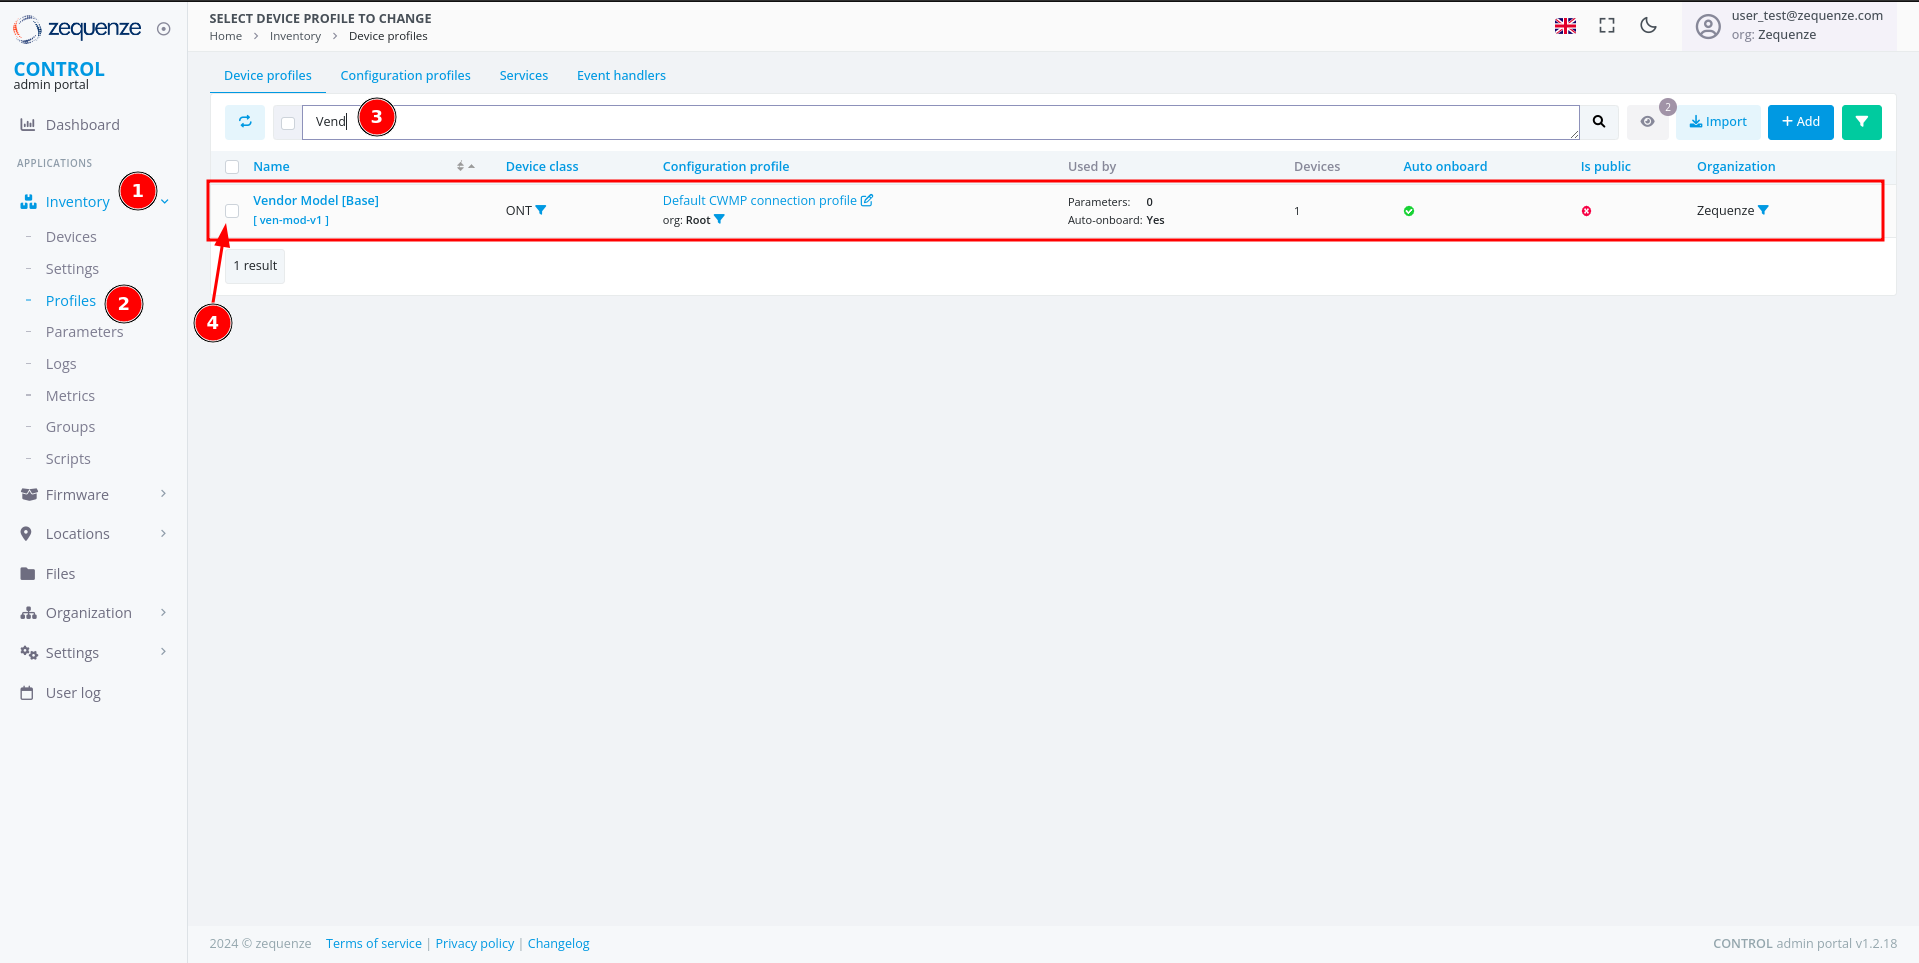 ### Step 1: Navigate to Profiles
1. Click **Inventory** in the left sidebar.
2. Select **Profiles** from the menu.
3. (Optional) Use the filter to search for a specific profile name and press Enter.
4. Check the checkbox next to the desired profile to reveal additional options.
### Step 1: Navigate to Profiles
1. Click **Inventory** in the left sidebar.
2. Select **Profiles** from the menu.
3. (Optional) Use the filter to search for a specific profile name and press Enter.
4. Check the checkbox next to the desired profile to reveal additional options.
 Once you check the checkbox:
1. The checkbox is marked and selected.
2. A new **"Action"** button appears.
### Step 2: Toggle Discovery
Once you check the checkbox:
1. The checkbox is marked and selected.
2. A new **"Action"** button appears.
### Step 2: Toggle Discovery
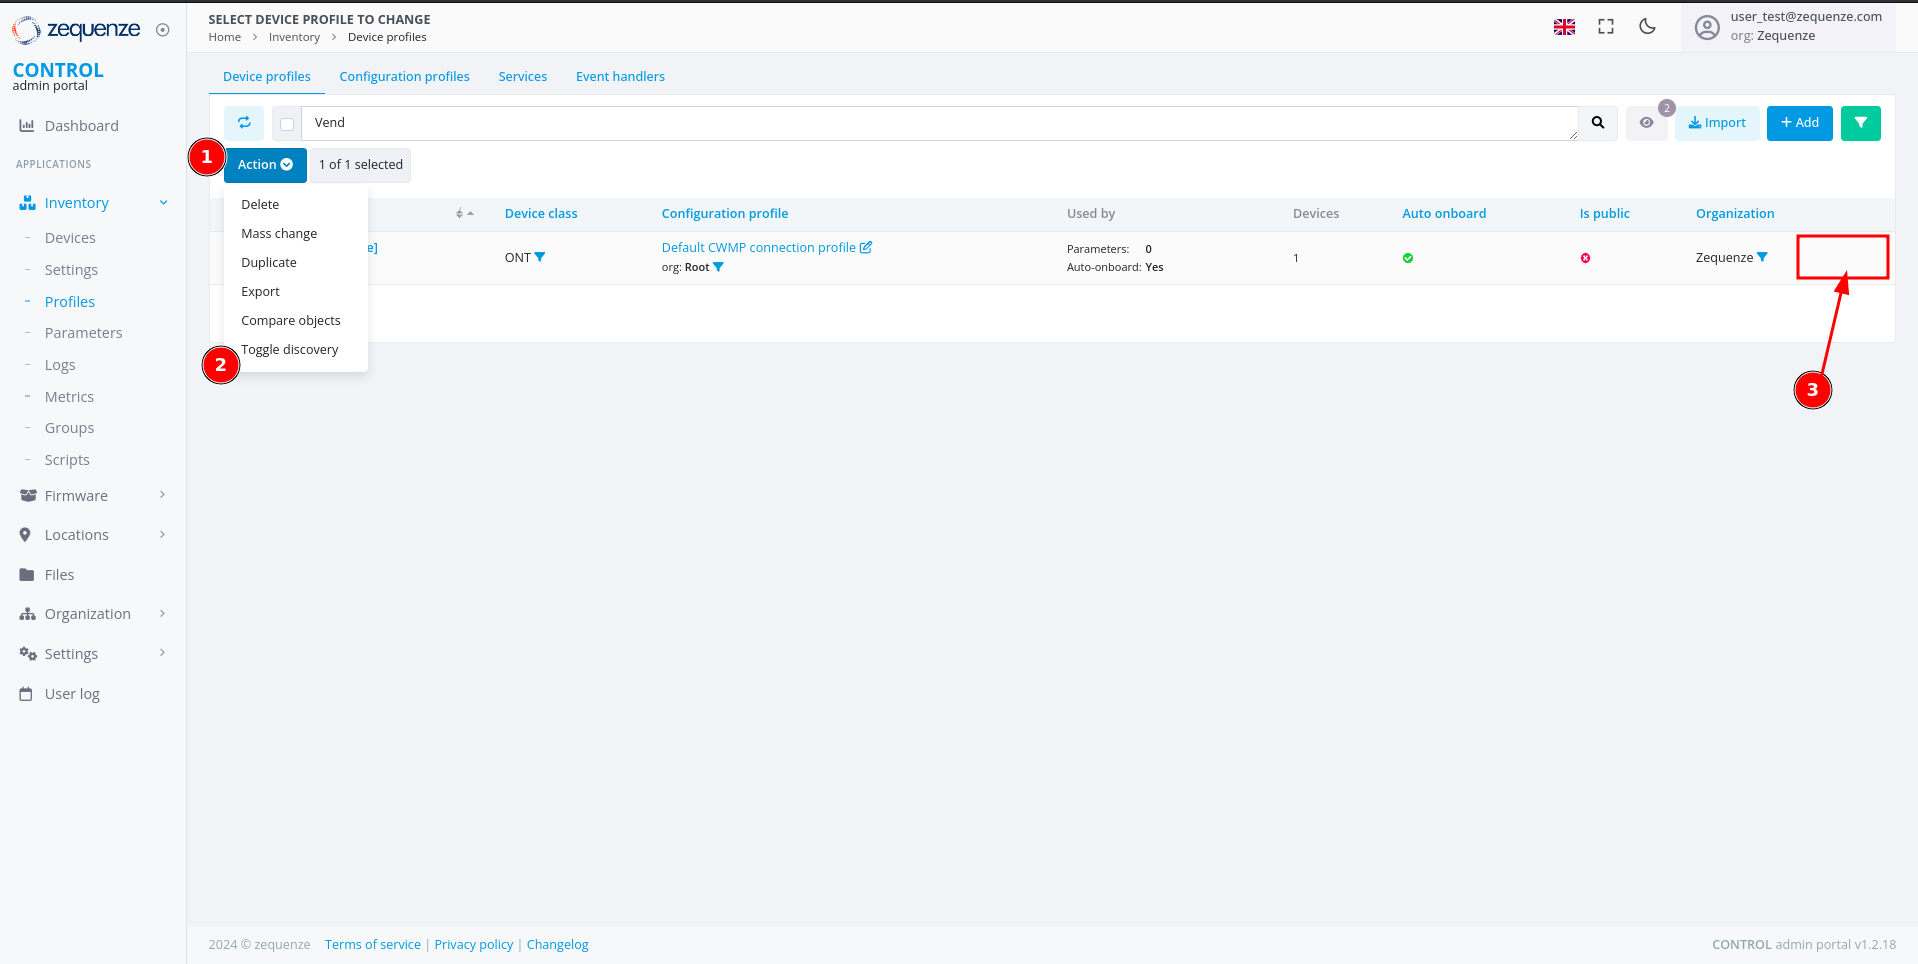 1. Click the **"Action"** button.
2. Select **"Toggle Discovery"** from the dropdown menu.
3. A green gear icon will appear, confirming that the discovery process has started.
The CONTROL platform will now wait for the device to connect and retrieve all available parameters.
### Step 3: Monitor Discovery Progress
1. Click the **"Action"** button.
2. Select **"Toggle Discovery"** from the dropdown menu.
3. A green gear icon will appear, confirming that the discovery process has started.
The CONTROL platform will now wait for the device to connect and retrieve all available parameters.
### Step 3: Monitor Discovery Progress
 The green gear icon indicates that the platform is waiting to obtain all parameters from the device. Refresh the webpage to check when the gear icon disappears, signaling that discovery is complete.
 ## View Discovered Parameters
Once discovery is complete, you can view all discovered parameters.
### Access the Profile
Click on the profile name to open its details:
## View Discovered Parameters
Once discovery is complete, you can view all discovered parameters.
### Access the Profile
Click on the profile name to open its details:
 ### Locate System Groups
Inside the profile, scroll down to the bottom of the page to find the **System groups** section:
### Locate System Groups
Inside the profile, scroll down to the bottom of the page to find the **System groups** section:
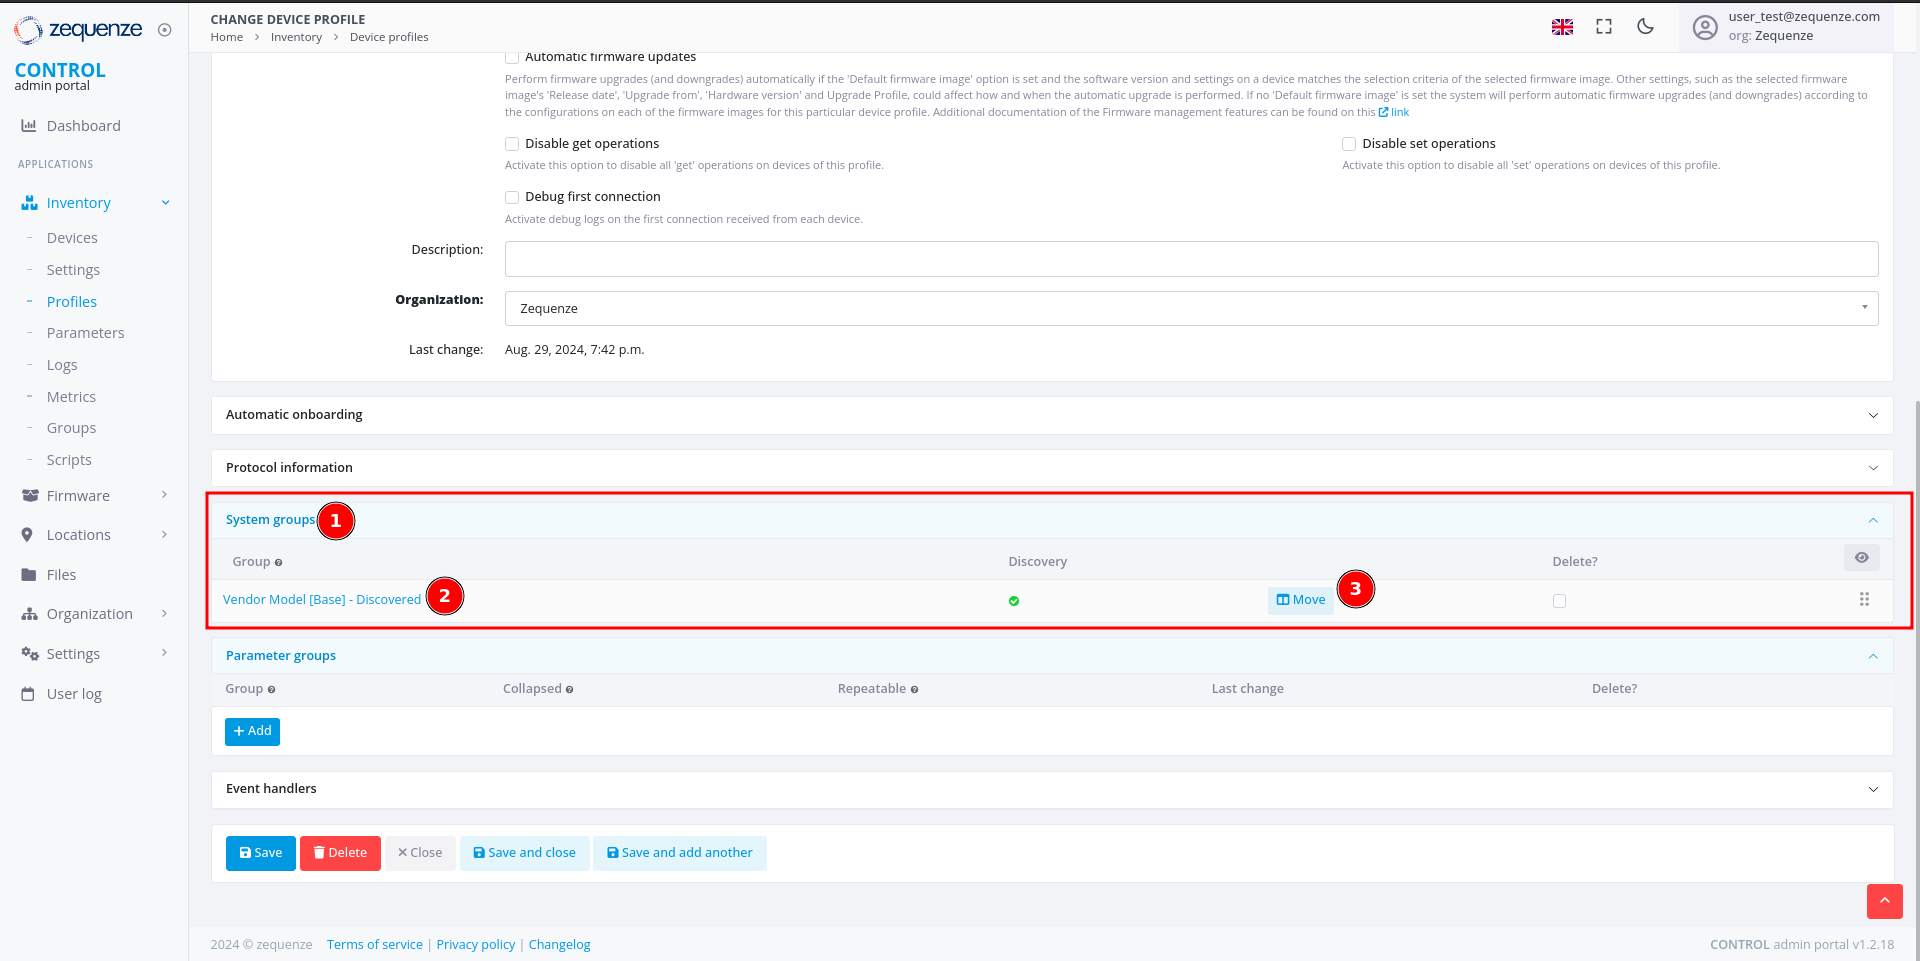 This section contains:
1. **System groups** — Where discovered parameters are stored.
2. **Group** — The name of the parameter group. For discovered parameters, this is typically the profile name followed by "Discovered".
3. **Move** — A button that displays the parameters and their count.
### View Parameter Details
Click the **"Move"** button to open the parameter viewer:
This section contains:
1. **System groups** — Where discovered parameters are stored.
2. **Group** — The name of the parameter group. For discovered parameters, this is typically the profile name followed by "Discovered".
3. **Move** — A button that displays the parameters and their count.
### View Parameter Details
Click the **"Move"** button to open the parameter viewer:
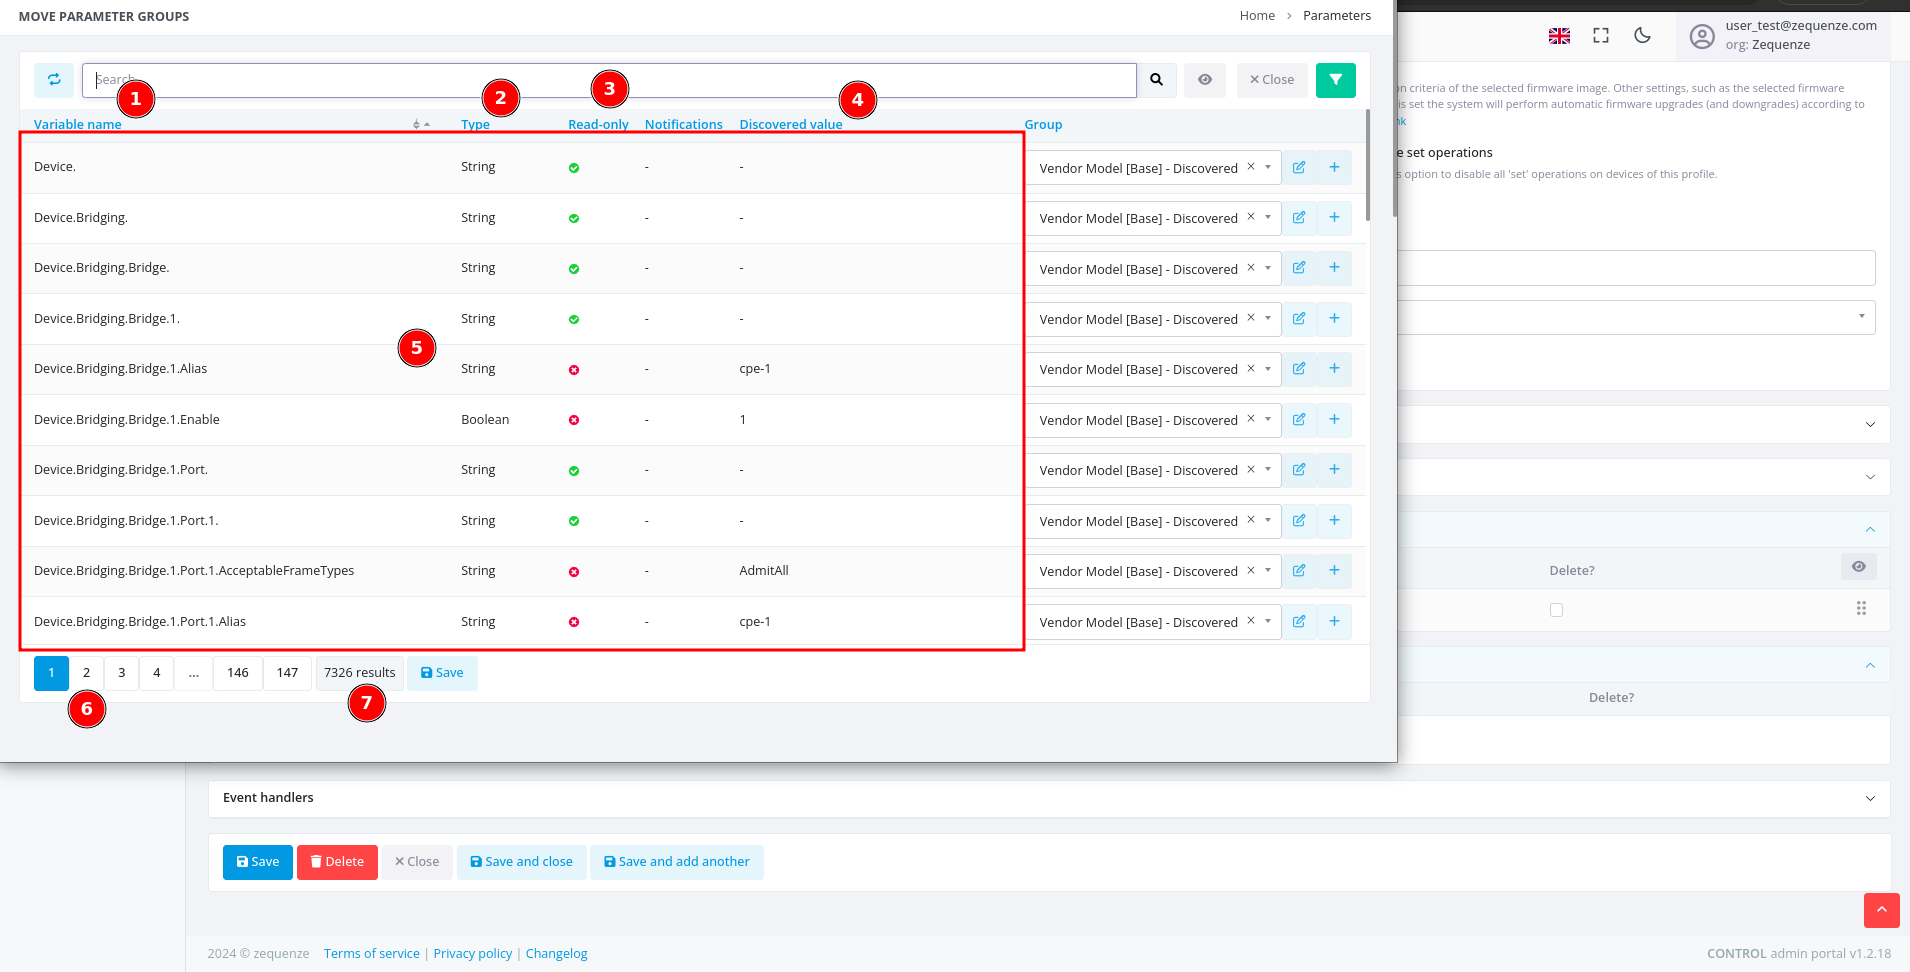 This window displays:
1. **Variable name** — The name of each discovered parameter.
2. **Type** — The parameter data type (e.g., string, integer, date, etc.).
3. **Read-only** — Indicates whether the parameter is read-only or writable.
4. **Discovered value** — The value discovered from the example device.
5. **Values** — A table containing all parameter information.
6. **Pages** — Navigation controls for browsing multiple pages of parameters.
7. **Quantity** — The total number of parameters available for this device with its current firmware or software version.
> **Reference:** For detailed information about parameters, consult the standard documentation for [TR-098](https://cwmp-data-models.broadband-forum.org/tr-098-1-8-0.html) or [TR-181](https://cwmp-data-models.broadband-forum.org/tr-181-2-18-0-cwmp.html).
## Next Steps
You can now export all discovered parameters to Excel or other formats for local analysis. This process will be covered in the next section.
# Export the parameters
## Overview
This guide explains how to locate, filter, and export parameter groups from the CONTROL portal. You'll learn to navigate to the Parameters section, apply filters to find specific groups, and export the data in your preferred format.
---
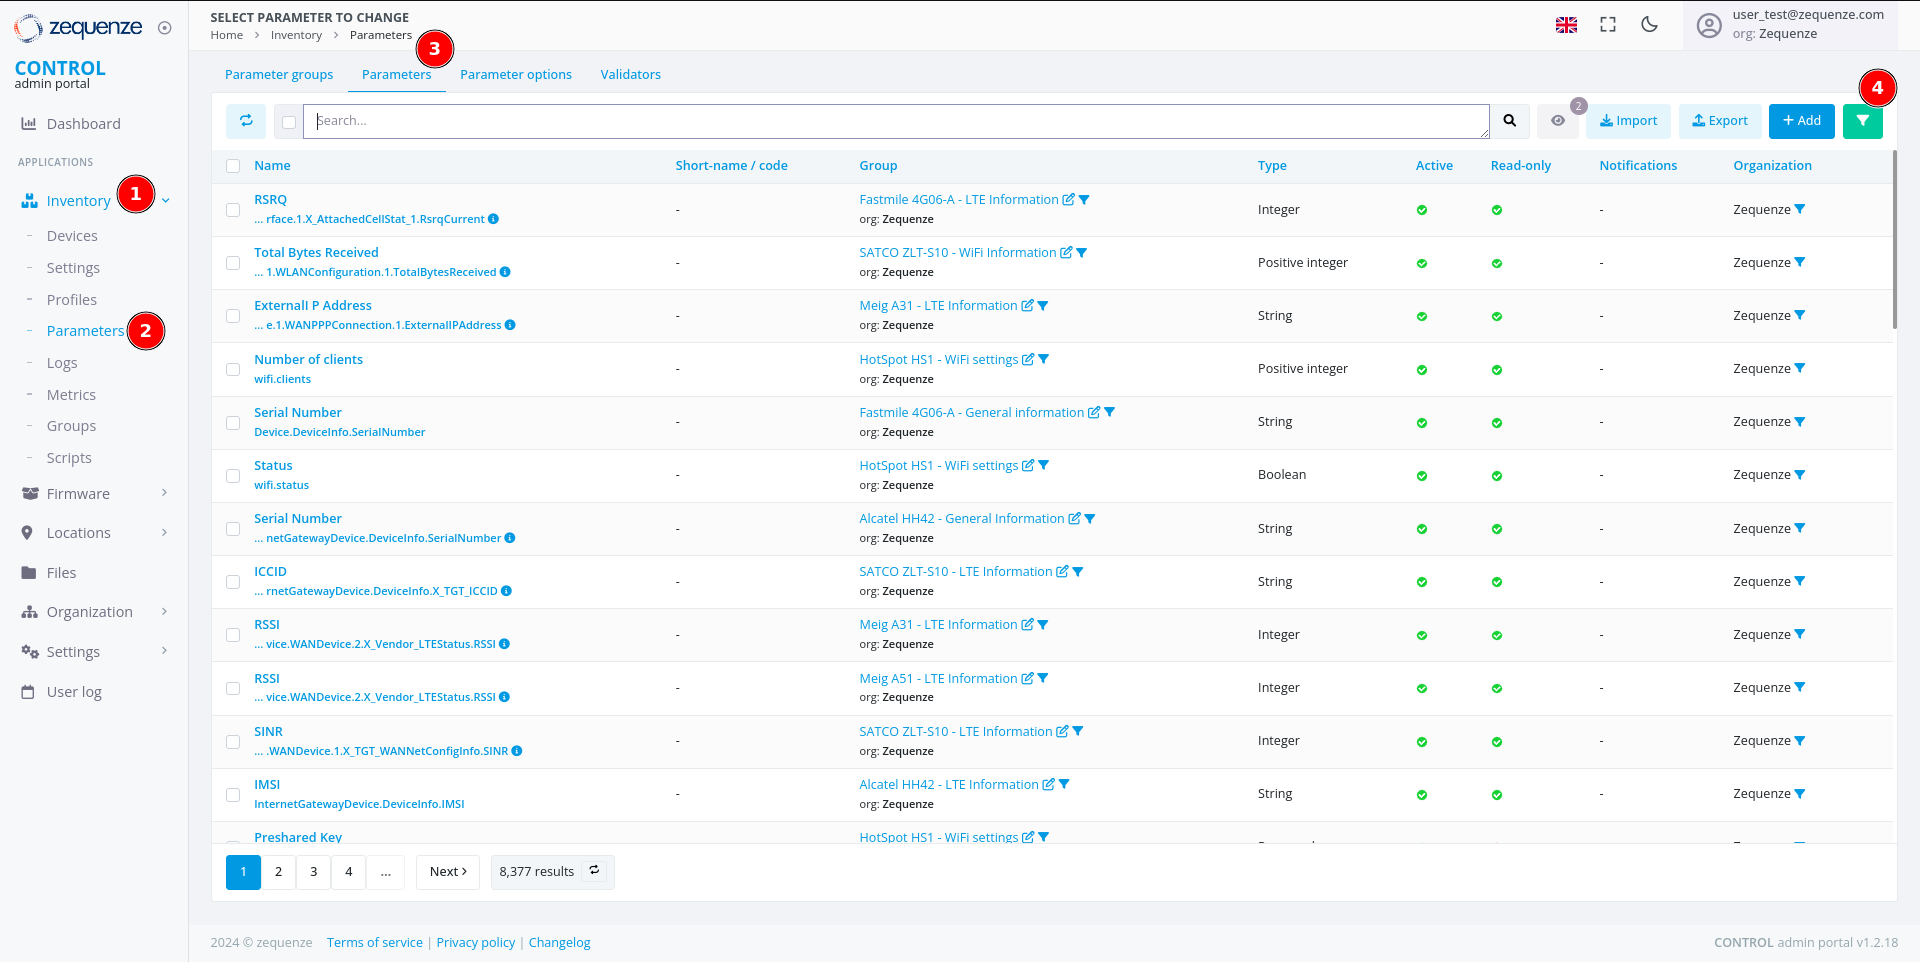
## Navigate to the Parameters Section
Begin by accessing the Parameters area within the Inventory module.
[](https://docs.zequenze.com/uploads/images/gallery/2024-08/vCmPlY55Bib7hJ7E-image.png)
1. Click on **Inventory**
2. Click on **Parameters**
3. Click on **Parameters** again
4. Activate the filter by clicking the **green funnel icon**
---
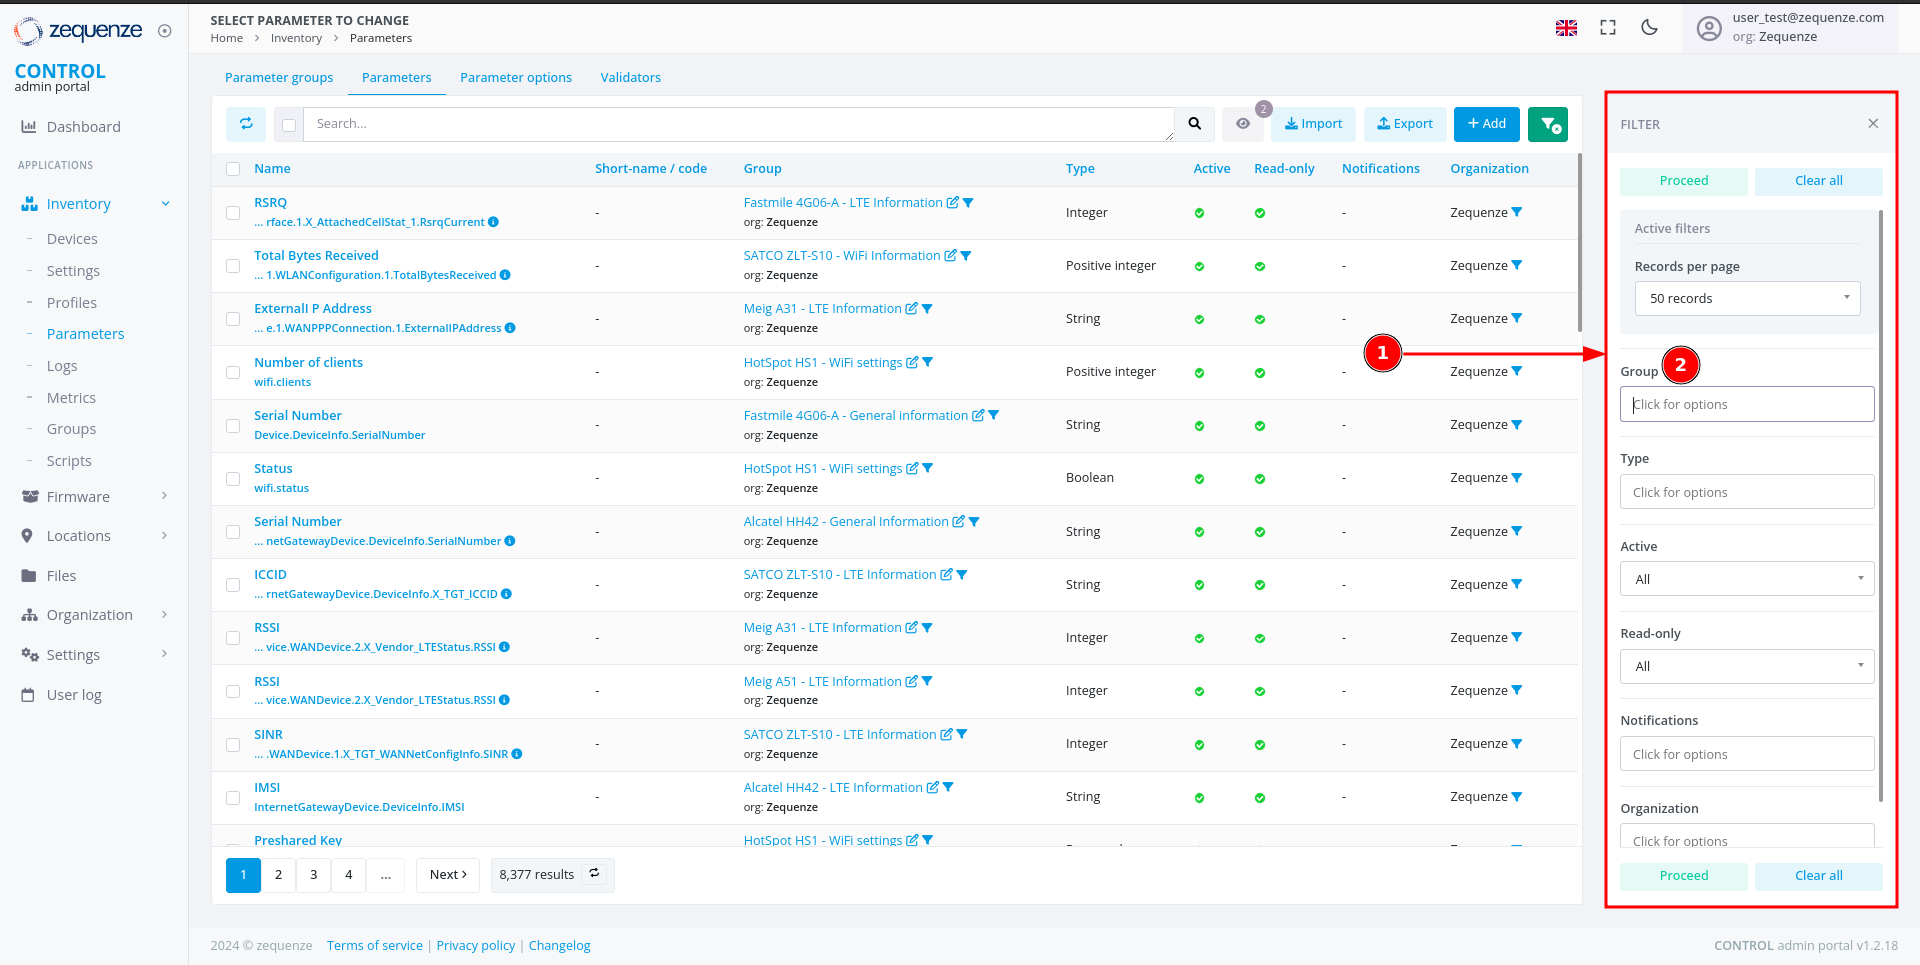
## Filter Parameters by Group
Once the filter panel is open, you can search for specific parameter groups.
[](https://docs.zequenze.com/uploads/images/gallery/2024-08/toGhtf11sQI9qsl9-image.png)
1. The filter panel displays available filter options
2. Locate the **Group** field
### Search for Your Group
[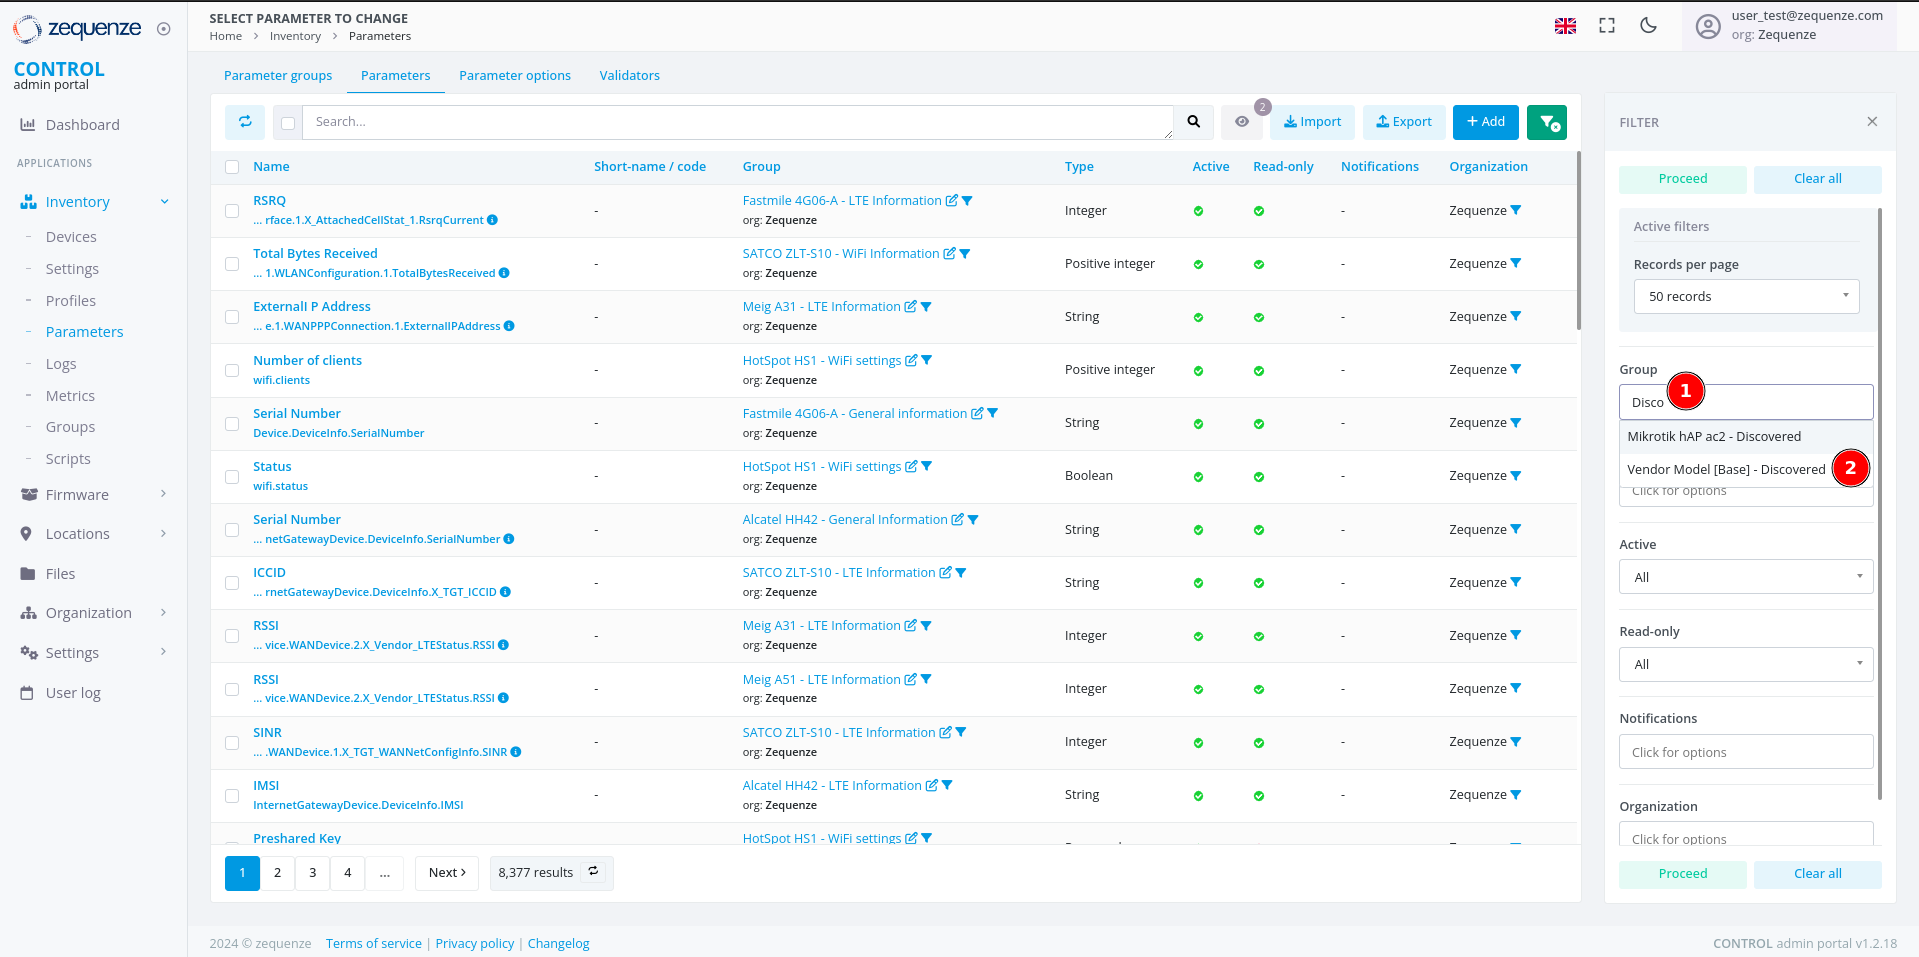](https://docs.zequenze.com/uploads/images/gallery/2024-08/OHrr7XF6n5tbCl8F-image.png)
1. In the **Group** field, enter a search term (e.g., type *"Disco"* to find all groups containing the word *"Discovered"*)
2. Select your desired group from the results (e.g., **"Vendor Model [Base] - Discovered"**)
3. Click the **Proceed** button to apply the filter
---
## Verify Filtered Results
After applying the filter, confirm that the correct parameters are displayed.
[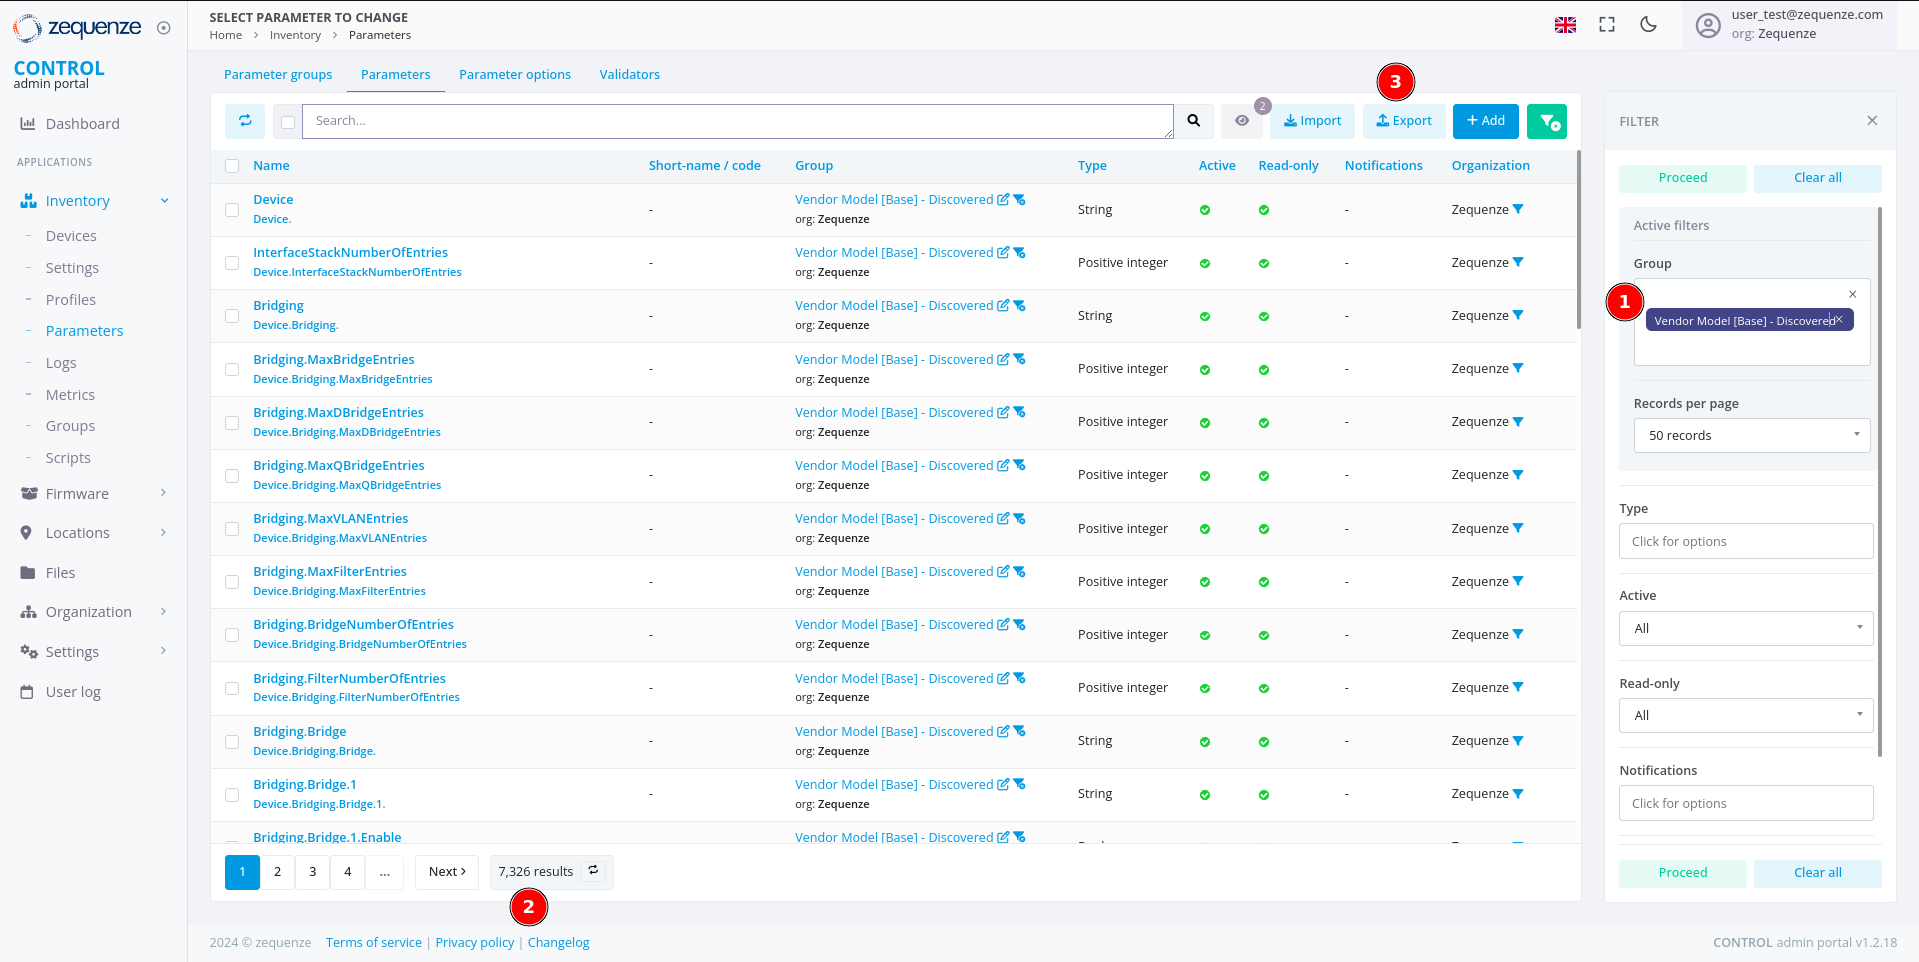](https://docs.zequenze.com/uploads/images/gallery/2024-08/uMZdfdQEezBuJMS4-image.png)
1. Review the applied Group filter
2. Verify that the parameter count matches the expected number from your Profile (you can confirm the quantity by comparing it with the number of parameters Discovered in the Profile)
3. Proceed to export the parameters
---
## Export the Parameters
### Initiate the Export
Click the **Export** button to open the export dialog.
[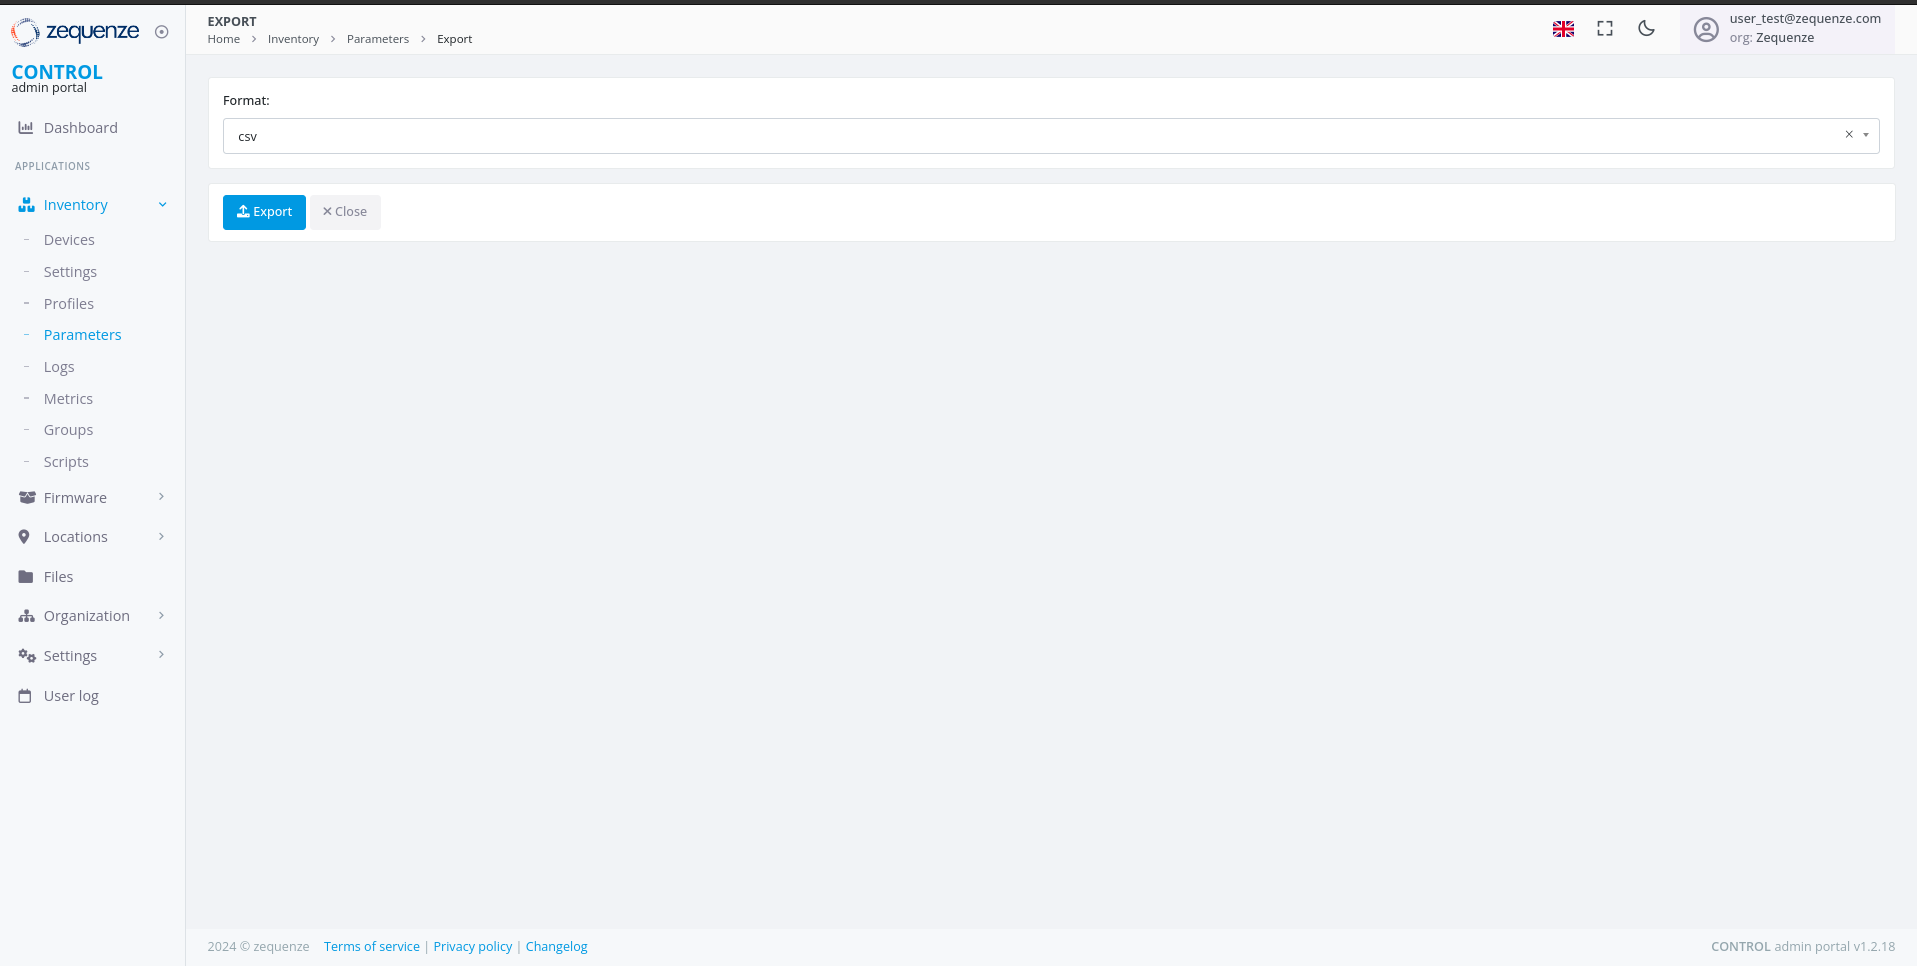](https://docs.zequenze.com/uploads/images/gallery/2024-08/dbVMA4cDCxPZk9If-image.png)
### Select Export Format
Choose your preferred file format from the available options.
[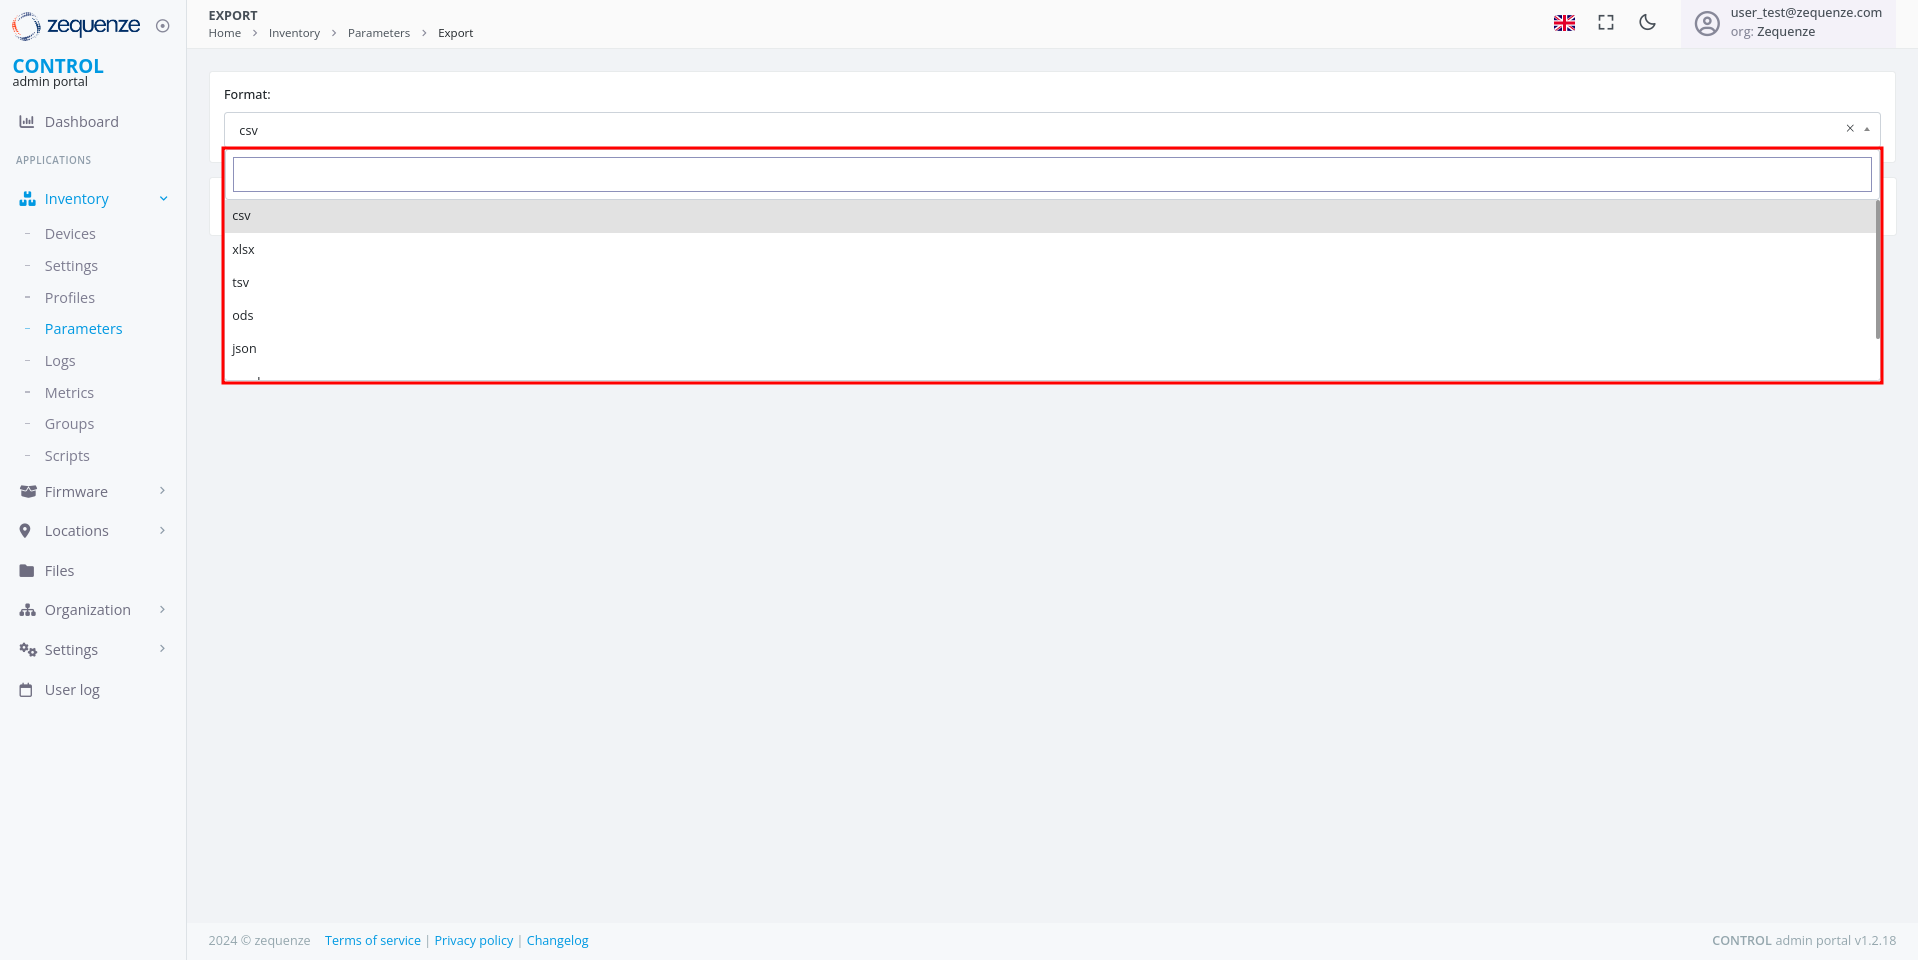](https://docs.zequenze.com/uploads/images/gallery/2024-08/rEfW5Ruensoz7Atn-image.png)
[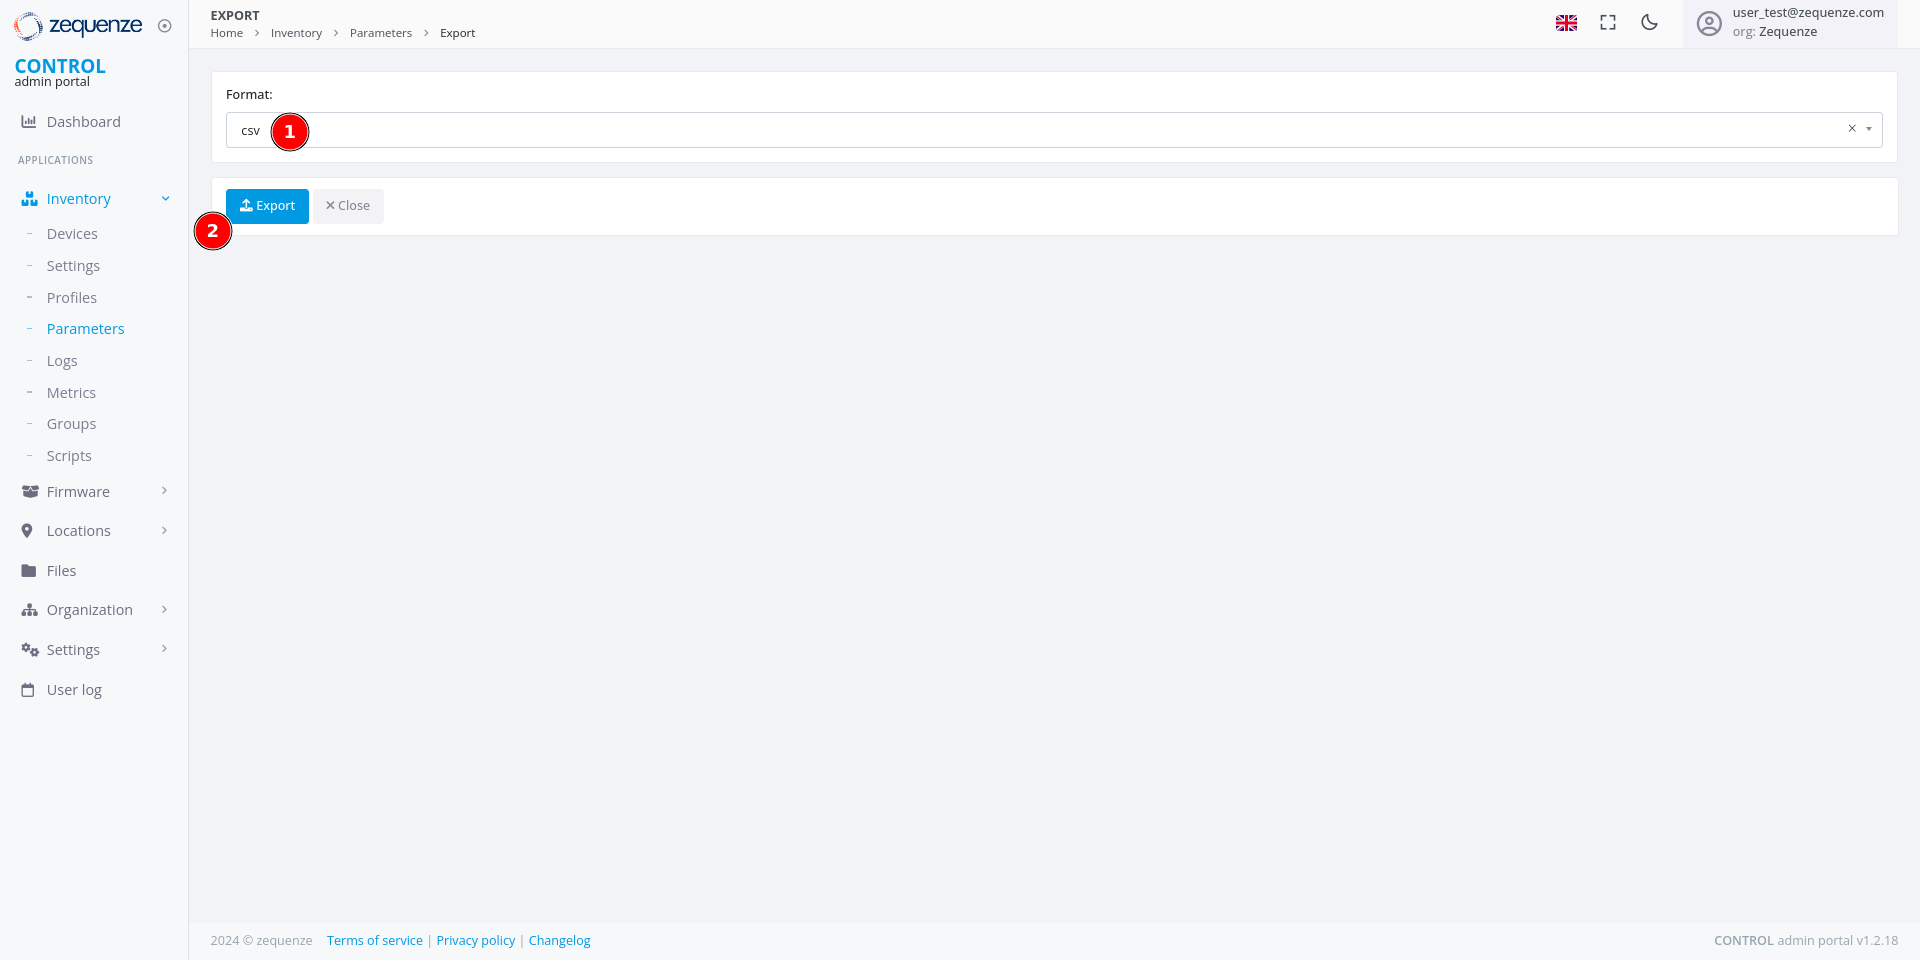](https://docs.zequenze.com/uploads/images/gallery/2024-08/O2xaE6N5ormqDOSv-image.png)
1. Select your desired format (e.g., **CSV**)
2. Click the **Export** button to start the export process
---
## Download the Exported File
### Monitor Export Progress
After initiating the export, a progress indicator appears at the top of your browser showing that the report is being generated.
[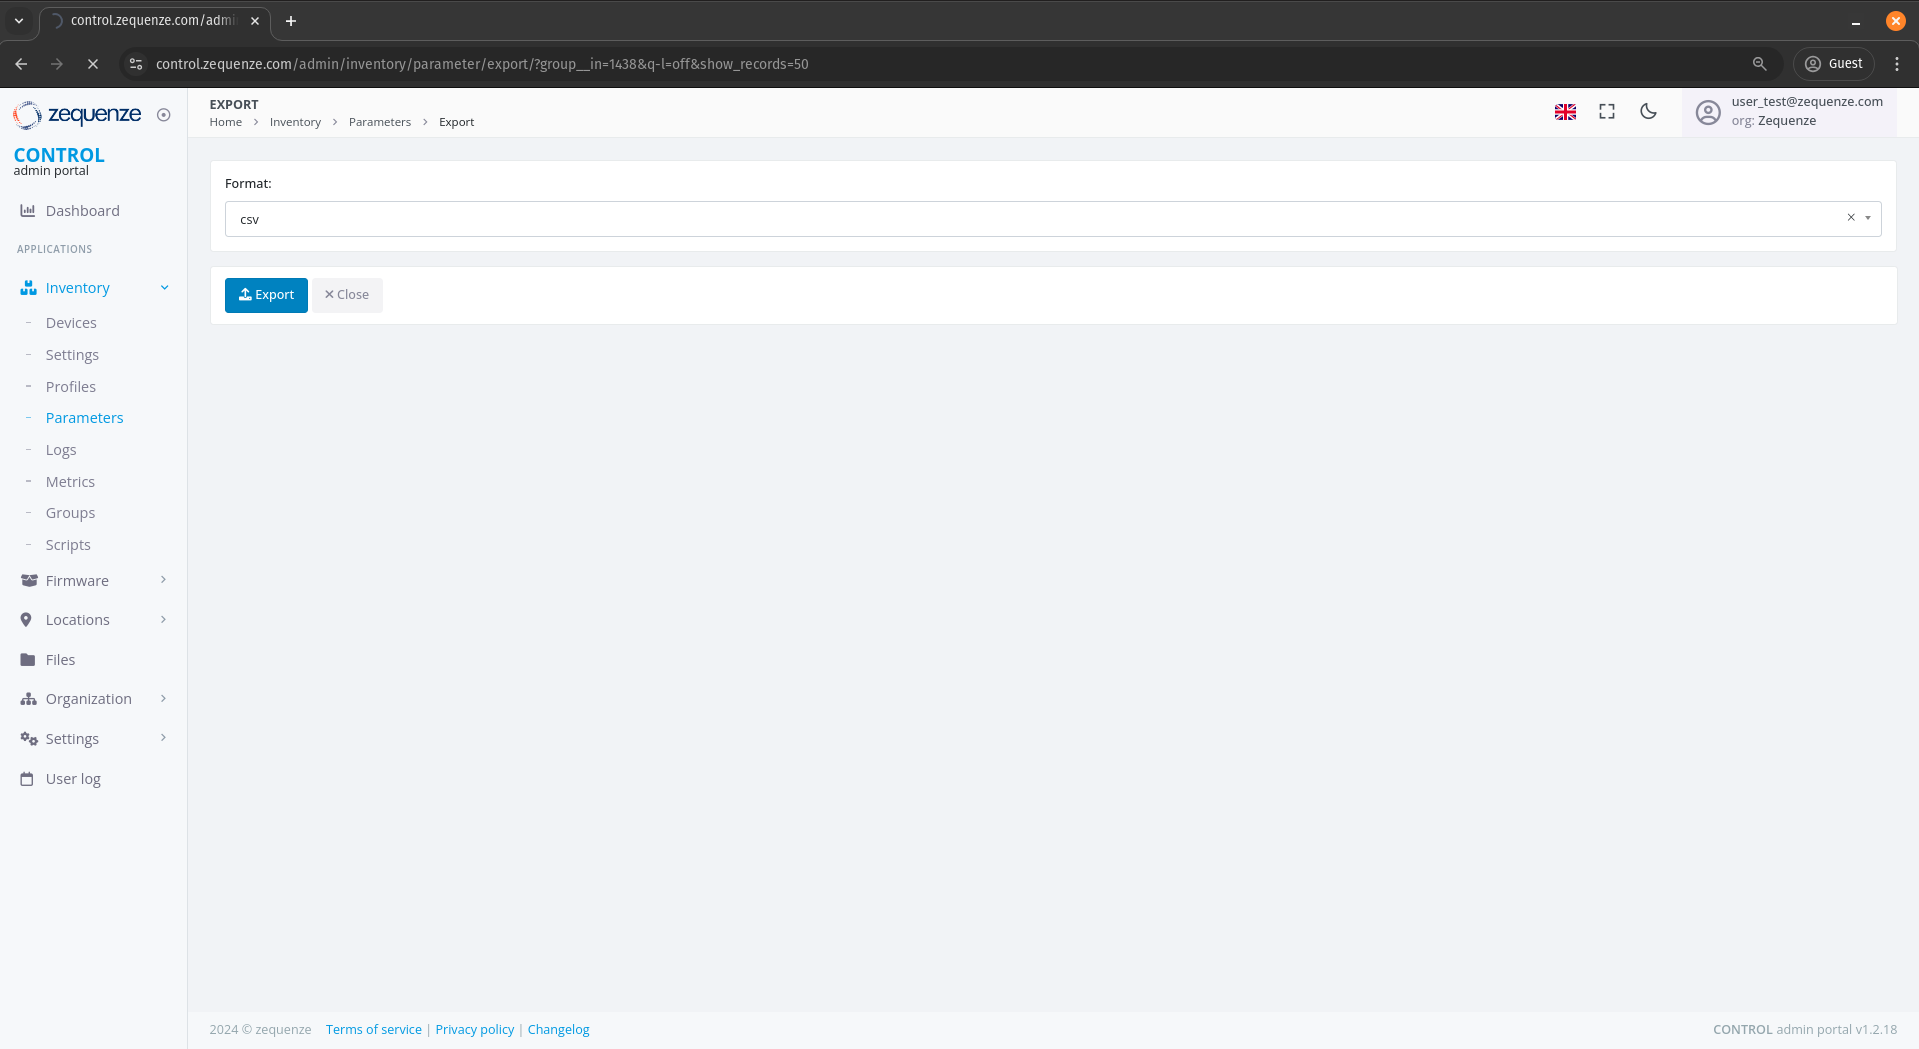](https://docs.zequenze.com/uploads/images/gallery/2024-08/iOwGL8BWiW8FTxSP-image.png)
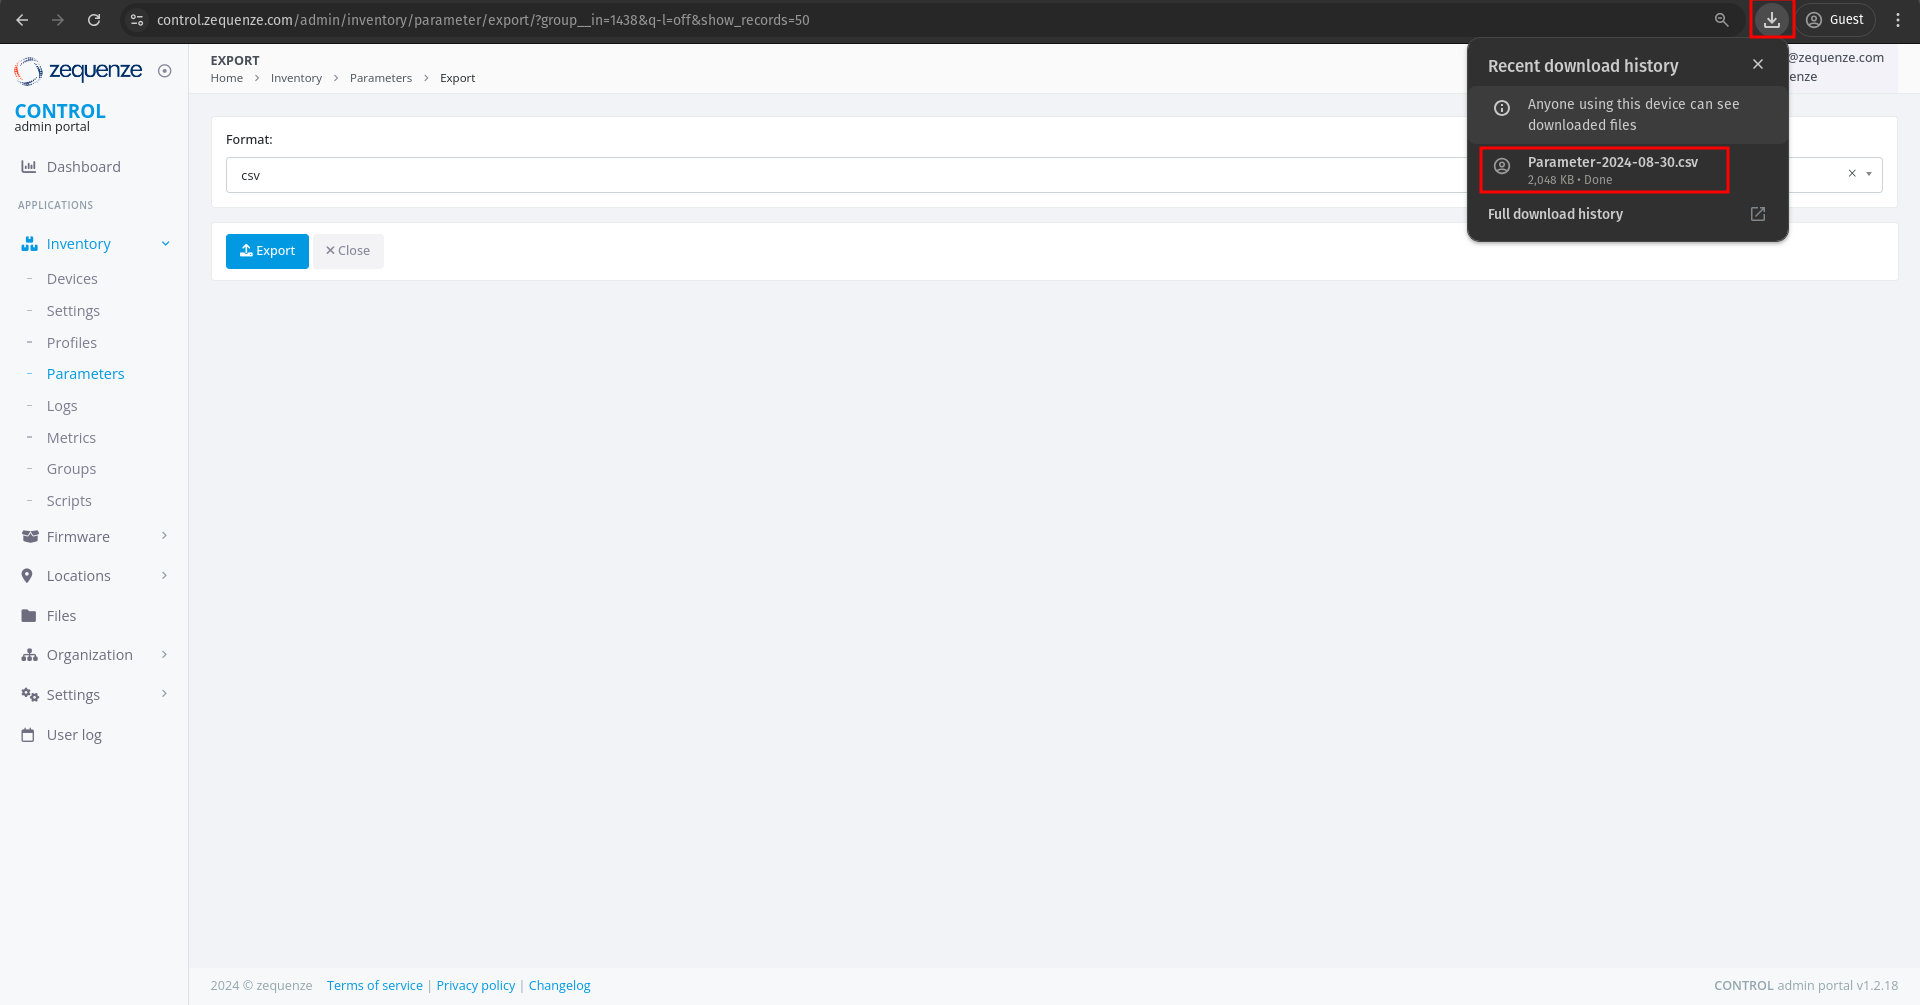
### Download Complete
When the export is ready, a download notification will appear.
[](https://docs.zequenze.com/uploads/images/gallery/2024-08/MlhHglIVaVDFrZgQ-image.png)
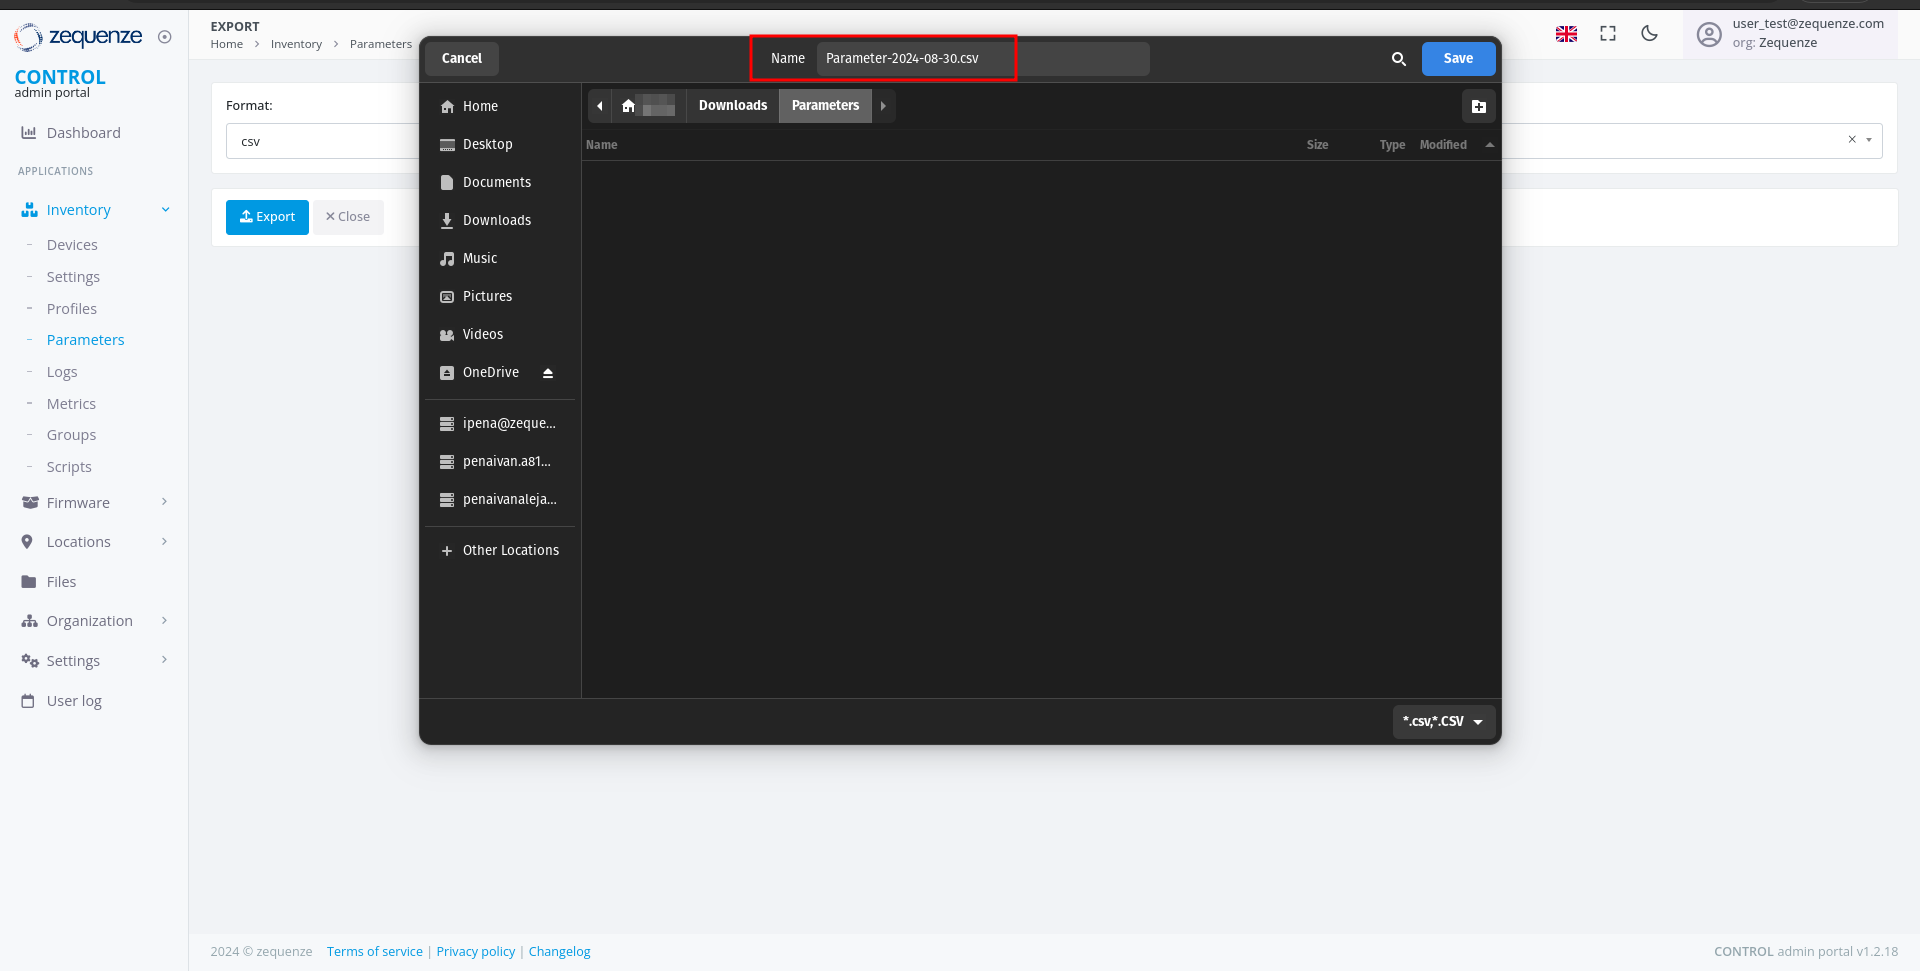
### Open the File
You can now open the exported CSV file to view your parameters.
[](https://docs.zequenze.com/uploads/images/gallery/2024-08/s0yf73kHf4Rnfrcu-image.png)
# Formatting the Parameters
This guide demonstrates how to format and organize parameters exported from CONTROL using a spreadsheet application. This example uses LibreOffice Calc, but you can apply the same process in Microsoft Excel or similar tools.
## Opening the Exported File
When you open the exported parameters file in LibreOffice, a **Text Import** dialog will appear:
This window displays:
1. **Variable name** — The name of each discovered parameter.
2. **Type** — The parameter data type (e.g., string, integer, date, etc.).
3. **Read-only** — Indicates whether the parameter is read-only or writable.
4. **Discovered value** — The value discovered from the example device.
5. **Values** — A table containing all parameter information.
6. **Pages** — Navigation controls for browsing multiple pages of parameters.
7. **Quantity** — The total number of parameters available for this device with its current firmware or software version.
> **Reference:** For detailed information about parameters, consult the standard documentation for [TR-098](https://cwmp-data-models.broadband-forum.org/tr-098-1-8-0.html) or [TR-181](https://cwmp-data-models.broadband-forum.org/tr-181-2-18-0-cwmp.html).
## Next Steps
You can now export all discovered parameters to Excel or other formats for local analysis. This process will be covered in the next section.
# Export the parameters
## Overview
This guide explains how to locate, filter, and export parameter groups from the CONTROL portal. You'll learn to navigate to the Parameters section, apply filters to find specific groups, and export the data in your preferred format.
---
## Navigate to the Parameters Section
Begin by accessing the Parameters area within the Inventory module.
[](https://docs.zequenze.com/uploads/images/gallery/2024-08/vCmPlY55Bib7hJ7E-image.png)
1. Click on **Inventory**
2. Click on **Parameters**
3. Click on **Parameters** again
4. Activate the filter by clicking the **green funnel icon**
---
## Filter Parameters by Group
Once the filter panel is open, you can search for specific parameter groups.
[](https://docs.zequenze.com/uploads/images/gallery/2024-08/toGhtf11sQI9qsl9-image.png)
1. The filter panel displays available filter options
2. Locate the **Group** field
### Search for Your Group
[](https://docs.zequenze.com/uploads/images/gallery/2024-08/OHrr7XF6n5tbCl8F-image.png)
1. In the **Group** field, enter a search term (e.g., type *"Disco"* to find all groups containing the word *"Discovered"*)
2. Select your desired group from the results (e.g., **"Vendor Model [Base] - Discovered"**)
3. Click the **Proceed** button to apply the filter
---
## Verify Filtered Results
After applying the filter, confirm that the correct parameters are displayed.
[](https://docs.zequenze.com/uploads/images/gallery/2024-08/uMZdfdQEezBuJMS4-image.png)
1. Review the applied Group filter
2. Verify that the parameter count matches the expected number from your Profile (you can confirm the quantity by comparing it with the number of parameters Discovered in the Profile)
3. Proceed to export the parameters
---
## Export the Parameters
### Initiate the Export
Click the **Export** button to open the export dialog.
[](https://docs.zequenze.com/uploads/images/gallery/2024-08/dbVMA4cDCxPZk9If-image.png)
### Select Export Format
Choose your preferred file format from the available options.
[](https://docs.zequenze.com/uploads/images/gallery/2024-08/rEfW5Ruensoz7Atn-image.png)
[](https://docs.zequenze.com/uploads/images/gallery/2024-08/O2xaE6N5ormqDOSv-image.png)
1. Select your desired format (e.g., **CSV**)
2. Click the **Export** button to start the export process
---
## Download the Exported File
### Monitor Export Progress
After initiating the export, a progress indicator appears at the top of your browser showing that the report is being generated.
[](https://docs.zequenze.com/uploads/images/gallery/2024-08/iOwGL8BWiW8FTxSP-image.png)
### Download Complete
When the export is ready, a download notification will appear.
[](https://docs.zequenze.com/uploads/images/gallery/2024-08/MlhHglIVaVDFrZgQ-image.png)
### Open the File
You can now open the exported CSV file to view your parameters.
[](https://docs.zequenze.com/uploads/images/gallery/2024-08/s0yf73kHf4Rnfrcu-image.png)
# Formatting the Parameters
This guide demonstrates how to format and organize parameters exported from CONTROL using a spreadsheet application. This example uses LibreOffice Calc, but you can apply the same process in Microsoft Excel or similar tools.
## Opening the Exported File
When you open the exported parameters file in LibreOffice, a **Text Import** dialog will appear:
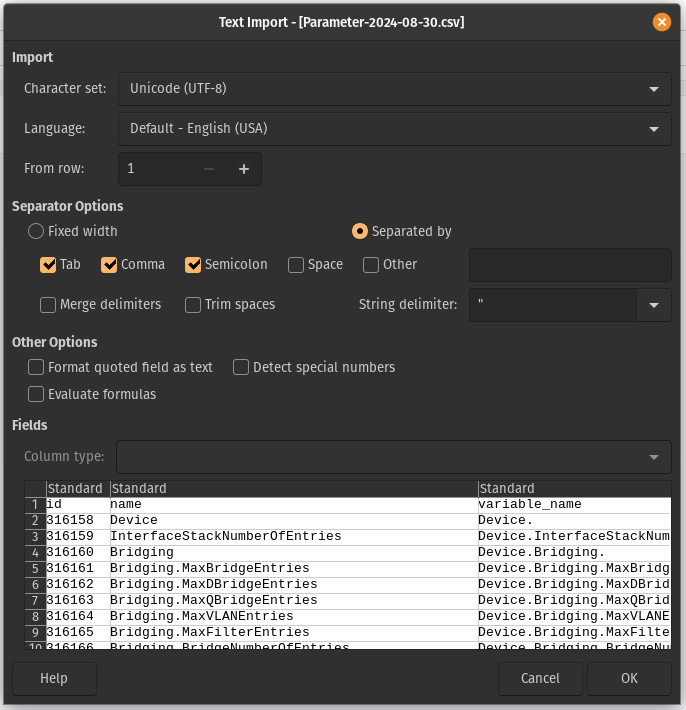 For most cases, you can simply click **OK** to accept the default import settings. If you're using Excel, you may need to use the "Import Data" function to load the file properly.
## Understanding the Parameter Sheet
After importing, you'll see a spreadsheet with many columns and parameters:
For most cases, you can simply click **OK** to accept the default import settings. If you're using Excel, you may need to use the "Import Data" function to load the file properly.
## Understanding the Parameter Sheet
After importing, you'll see a spreadsheet with many columns and parameters:
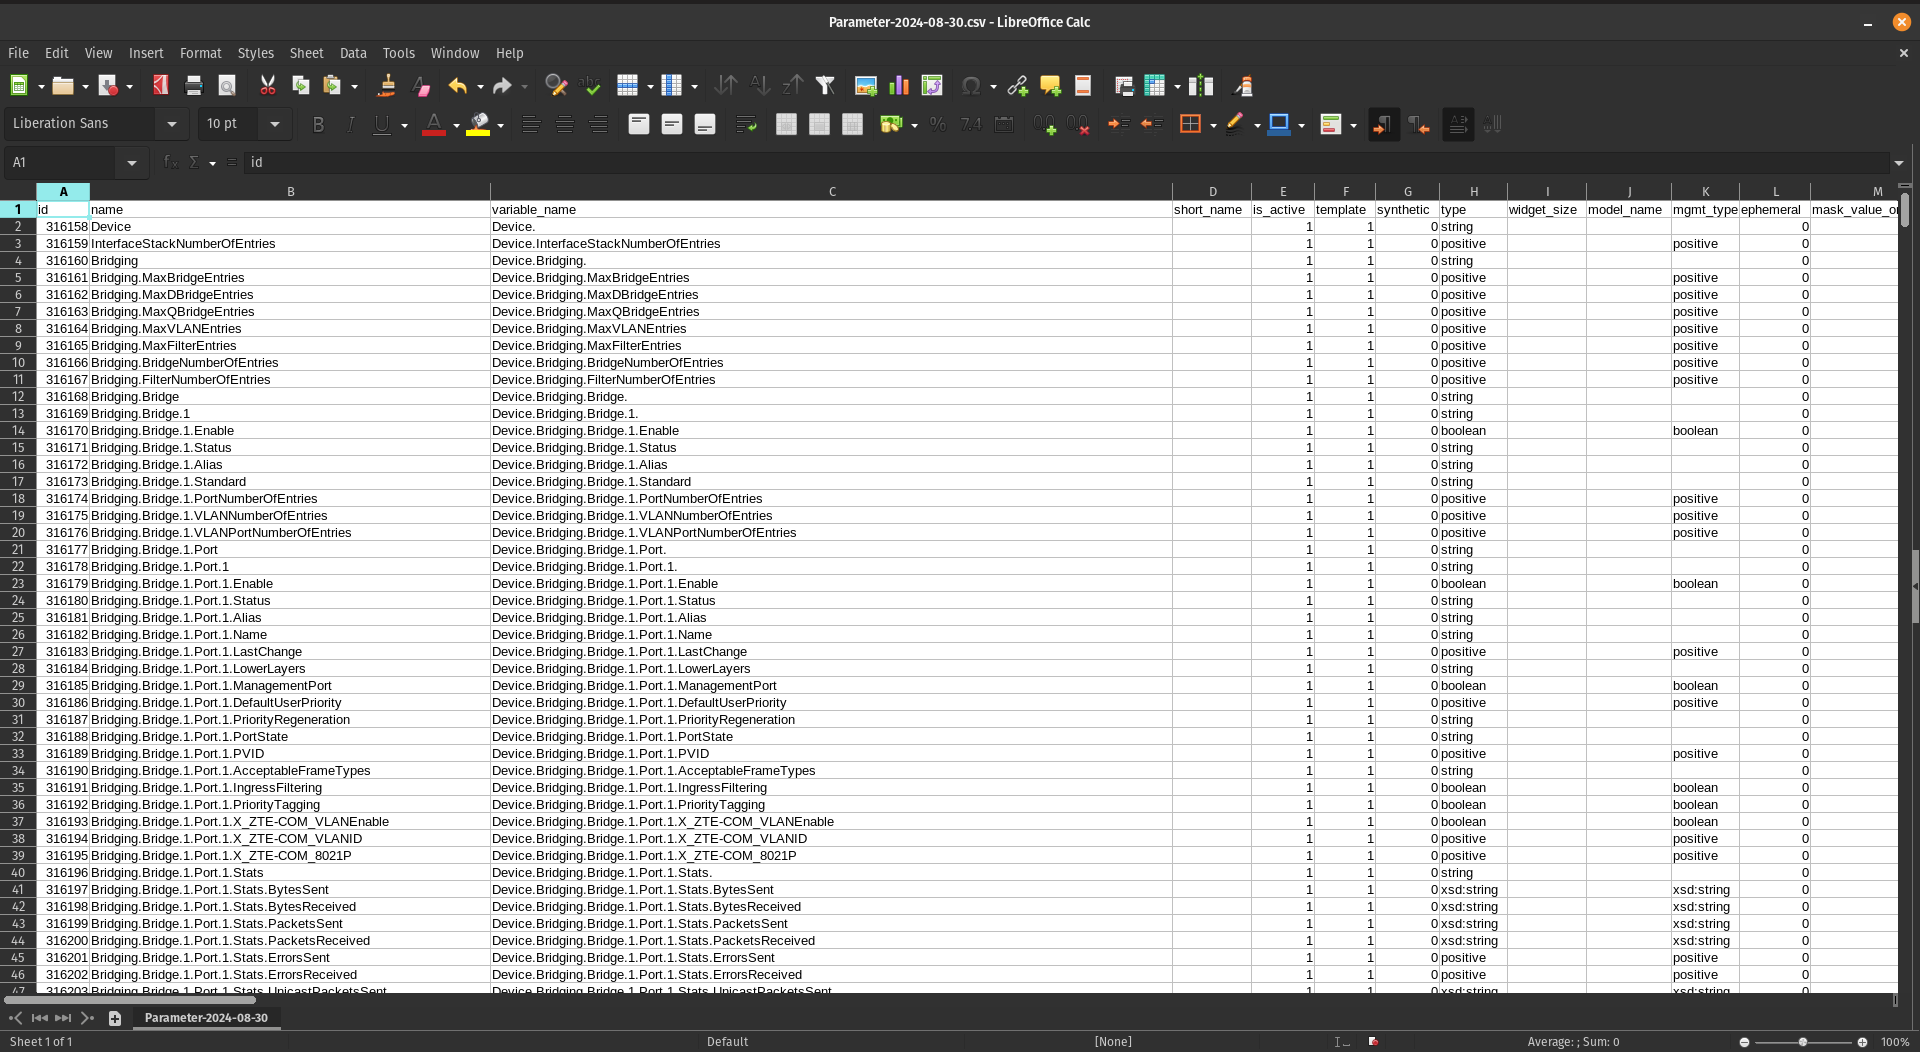 Don't be intimidated by the number of parameters—once you understand the structure, working with them becomes straightforward.
## Extracting Key Columns
For this workflow, you'll need to create a new sheet and copy only four specific columns from the original data.
### Step 1: Create a New Sheet
Create a second sheet (Sheet2) in your workbook to organize the filtered data:
Don't be intimidated by the number of parameters—once you understand the structure, working with them becomes straightforward.
## Extracting Key Columns
For this workflow, you'll need to create a new sheet and copy only four specific columns from the original data.
### Step 1: Create a New Sheet
Create a second sheet (Sheet2) in your workbook to organize the filtered data:
 1. **Sheet2** - Your new working sheet
2. **Sheet1** - The original sheet with all parameters
### Step 2: Identify the Required Columns
From the original sheet, locate and copy the following four columns:
1. **Sheet2** - Your new working sheet
2. **Sheet1** - The original sheet with all parameters
### Step 2: Identify the Required Columns
From the original sheet, locate and copy the following four columns:
 1. **Column C**
2. **Column H**
3. **Column R**
4. **Column AY**
### Step 3: Paste into Sheet2
Copy these four columns and paste them into Sheet2:
1. **Column C**
2. **Column H**
3. **Column R**
4. **Column AY**
### Step 3: Paste into Sheet2
Copy these four columns and paste them into Sheet2:
 ## Understanding the Column Structure
Your new sheet now contains four essential columns:
1. **variable_name** - Lists all parameters available for devices using this software version
2. **type** - Indicates the data type of each parameter (string, integer, boolean, etc.) and tells us what kind of parameter it is
3. **read_only** - Shows whether the parameter is read-only or can be modified. Some parameters are only read-only and you can't write to them
4. **discovered_value** - Displays the current value of each parameter (for example, the name of one SSID for a WiFi 2.4GHz network)
## Sorting the Parameters
To make the parameters easier to work with, sort them alphabetically by the first column (variable_name):
## Understanding the Column Structure
Your new sheet now contains four essential columns:
1. **variable_name** - Lists all parameters available for devices using this software version
2. **type** - Indicates the data type of each parameter (string, integer, boolean, etc.) and tells us what kind of parameter it is
3. **read_only** - Shows whether the parameter is read-only or can be modified. Some parameters are only read-only and you can't write to them
4. **discovered_value** - Displays the current value of each parameter (for example, the name of one SSID for a WiFi 2.4GHz network)
## Sorting the Parameters
To make the parameters easier to work with, sort them alphabetically by the first column (variable_name):
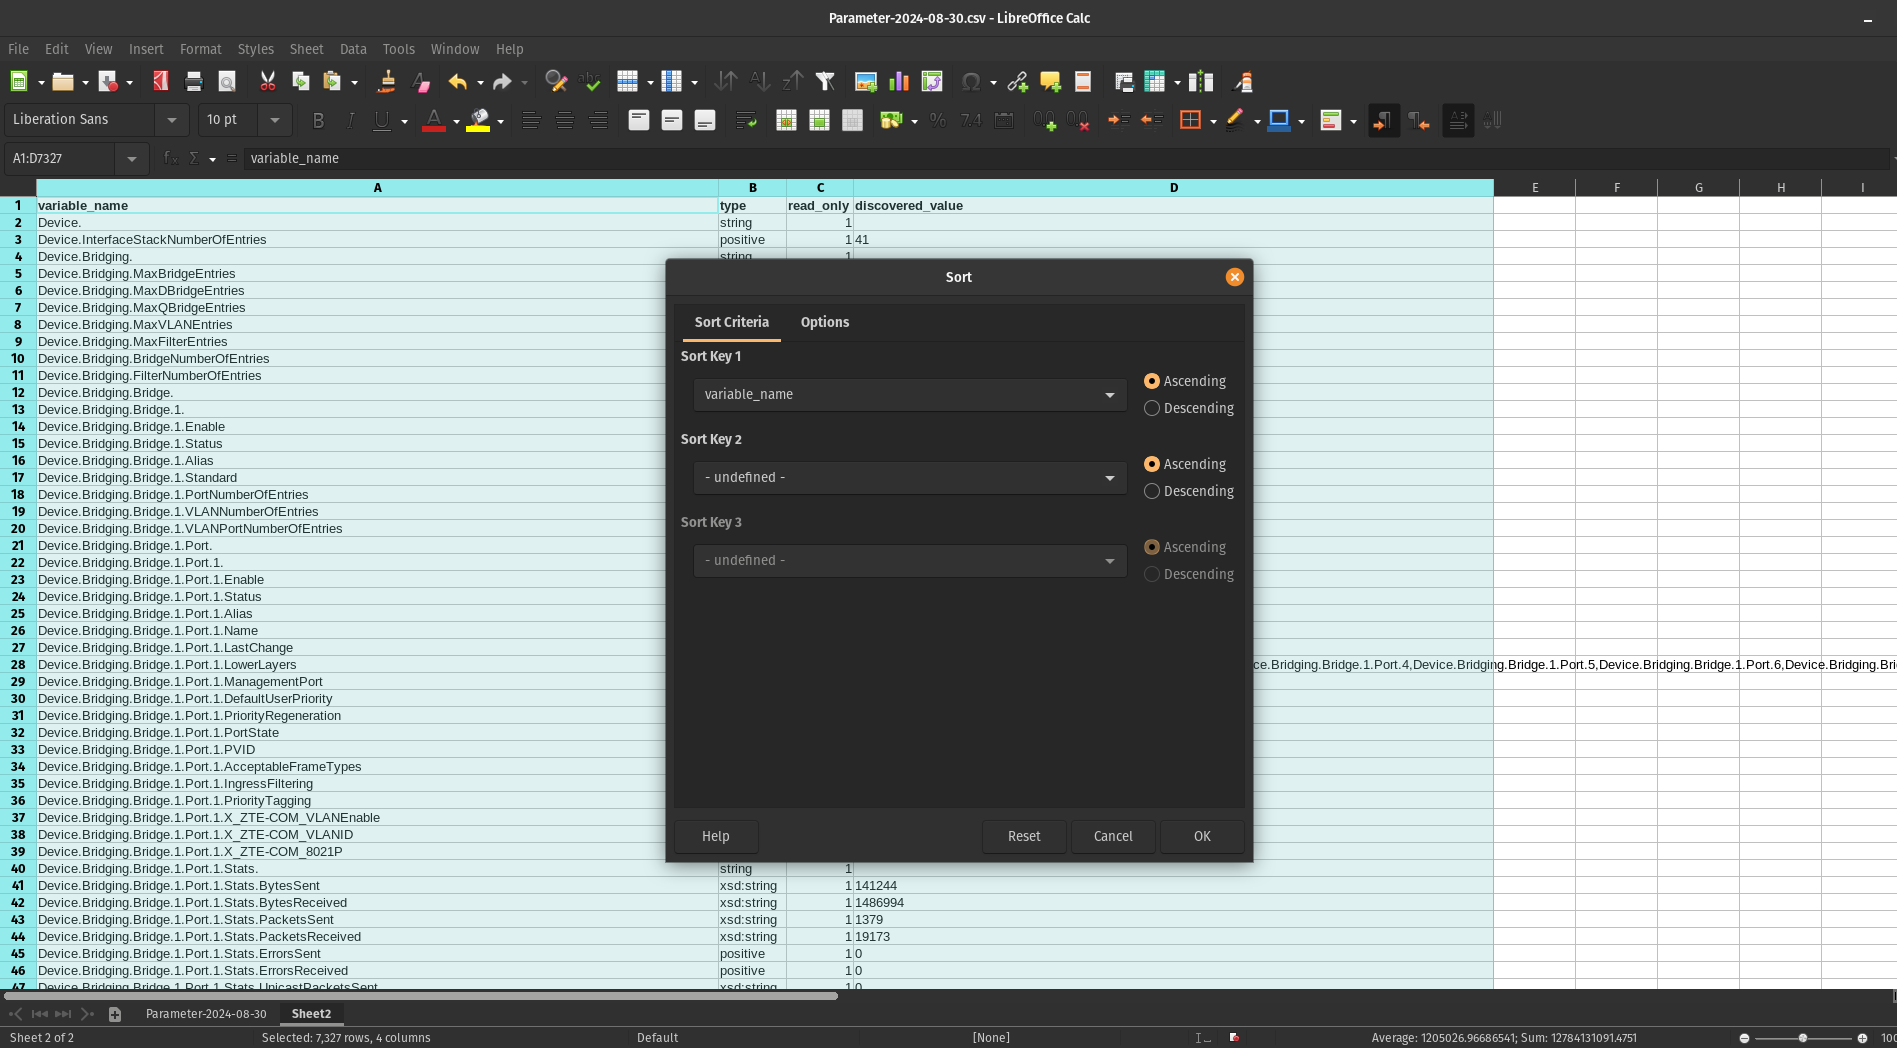 **Note:** Make sure to include the header row when sorting so the column titles remain in place.
### Result
After sorting, your parameters will be organized alphabetically:
**Note:** Make sure to include the header row when sorting so the column titles remain in place.
### Result
After sorting, your parameters will be organized alphabetically:
 ## Next Steps
With your parameters now organized and easy to navigate, you can begin creating configuration profiles by selecting the specific parameters that meet your requirements.
# First Parameters
## Group Parameters
Before adding parameters to CONTROL, we recommend organizing them into logical groups. This section demonstrates how to group device information parameters as an example.
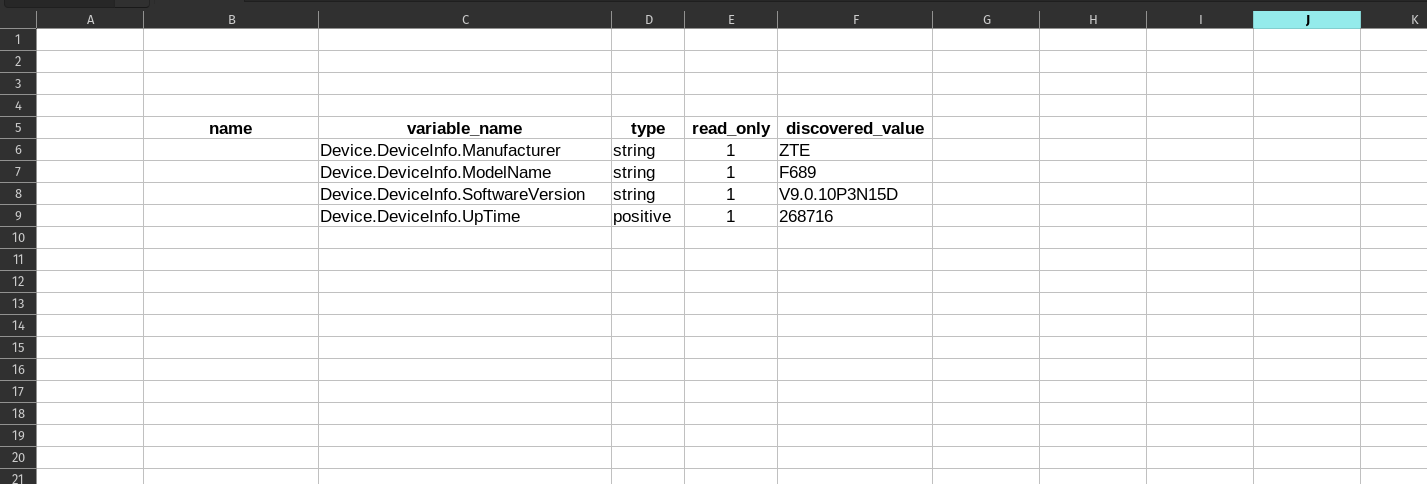
### Step 1: Identify Parameters in Your Spreadsheet
Begin by locating the parameters you want to group. For this example, we'll group four device information parameters:
## Next Steps
With your parameters now organized and easy to navigate, you can begin creating configuration profiles by selecting the specific parameters that meet your requirements.
# First Parameters
## Group Parameters
Before adding parameters to CONTROL, we recommend organizing them into logical groups. This section demonstrates how to group device information parameters as an example.
### Step 1: Identify Parameters in Your Spreadsheet
Begin by locating the parameters you want to group. For this example, we'll group four device information parameters:
 1. Locate the **Manufacturer** parameter
2. Locate the **ModelName** parameter
### Step 2: Copy Parameters to a New Sheet
When you mark or find the parameters you need, copy them to a separate sheet for easier organization:
1. Locate the **Manufacturer** parameter
2. Locate the **ModelName** parameter
### Step 2: Copy Parameters to a New Sheet
When you mark or find the parameters you need, copy them to a separate sheet for easier organization:
 ### Step 3: Add Friendly Names
Add a new **"name"** column to create user-friendly labels for each parameter:
### Step 3: Add Friendly Names
Add a new **"name"** column to create user-friendly labels for each parameter:
 You can assign a short, descriptive name for each "variable_name" to establish a clear relationship between the technical parameter name and its display name.
---
## Add Parameters to a Profile
Now that you've organized your parameters, it's time to add them to your device profile in CONTROL.
### Step 1: Navigate to Parameter Groups Section
Return to the profile you created previously and scroll down to the bottom of the page:
You can assign a short, descriptive name for each "variable_name" to establish a clear relationship between the technical parameter name and its display name.
---
## Add Parameters to a Profile
Now that you've organized your parameters, it's time to add them to your device profile in CONTROL.
### Step 1: Navigate to Parameter Groups Section
Return to the profile you created previously and scroll down to the bottom of the page:
 Locate the **"Parameter groups"** section:
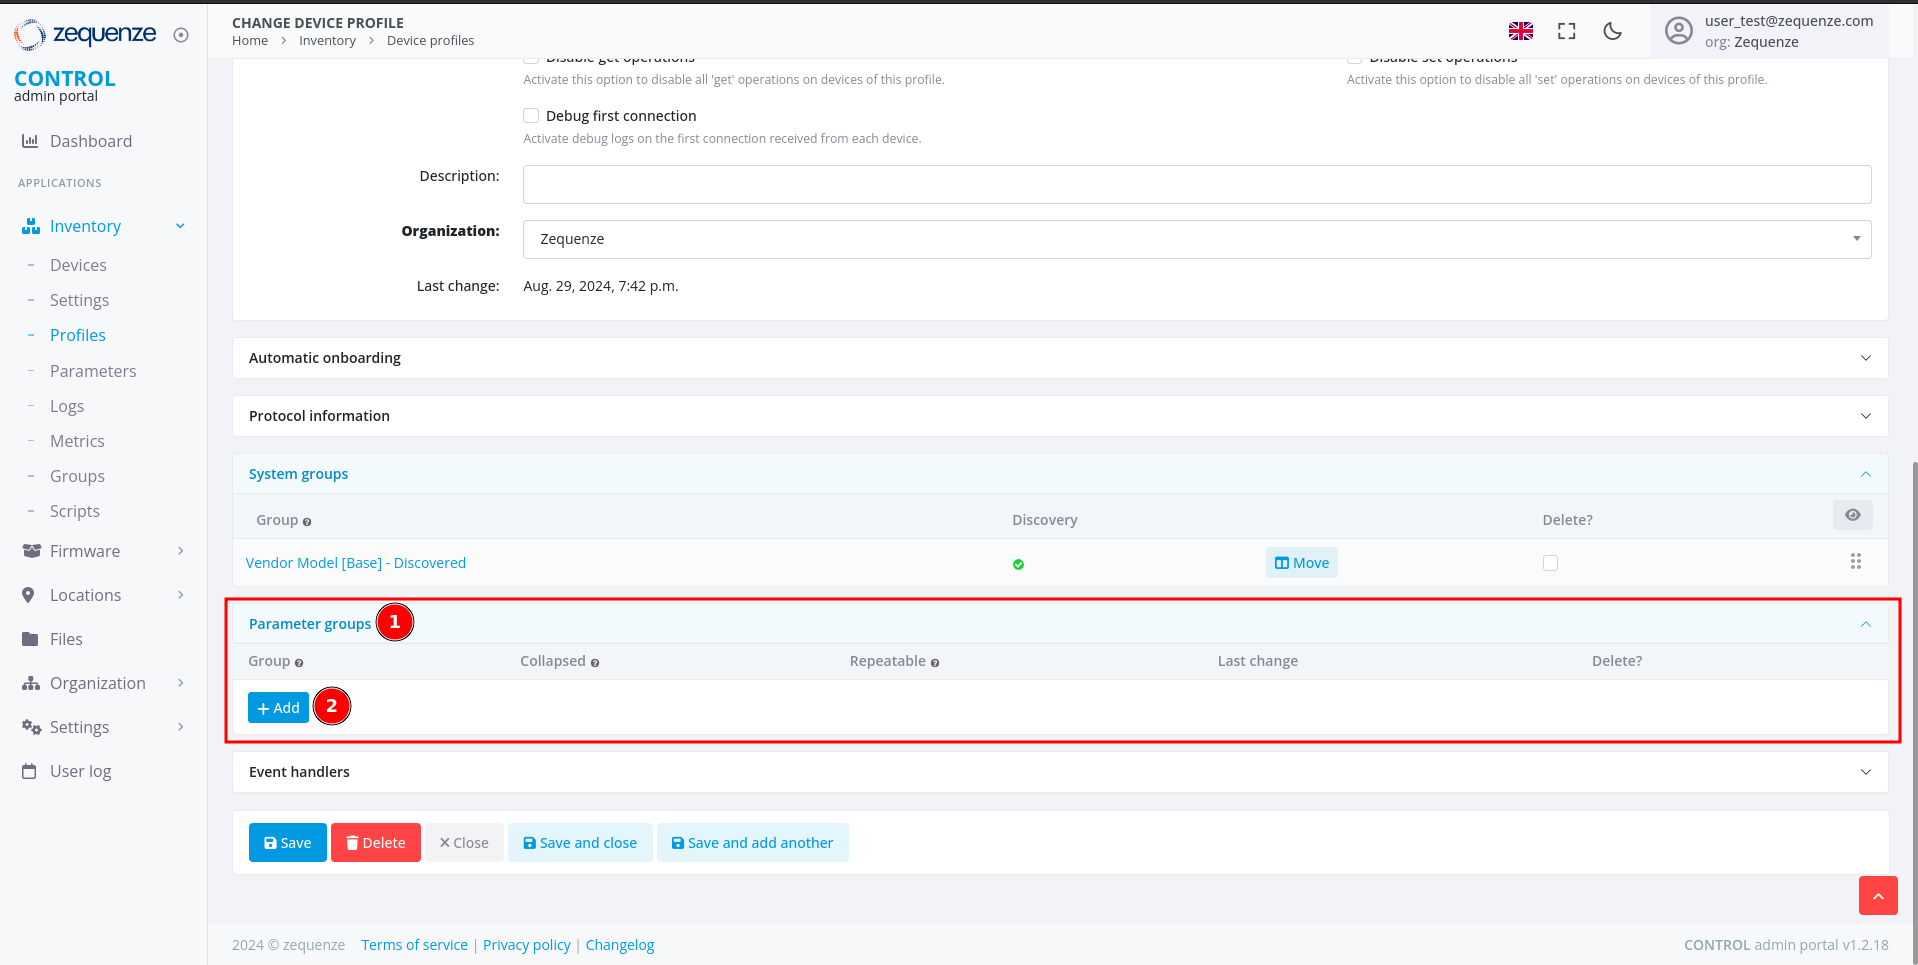 1. **Parameter groups** - This section allows you to create and organize parameter groups
2. **Add** - Click this button to create a new parameter group
### Step 2: Create a New Parameter Group
After clicking **Add**, you'll see the following interface:
1. **Parameter groups** - This section allows you to create and organize parameter groups
2. **Add** - Click this button to create a new parameter group
### Step 2: Create a New Parameter Group
After clicking **Add**, you'll see the following interface:
 1. Click the **+** icon to open the parameter group configuration window
### Step 3: Configure the Parameter Group
A new window will open where you can configure your parameter group:
1. Click the **+** icon to open the parameter group configuration window
### Step 3: Configure the Parameter Group
A new window will open where you can configure your parameter group:
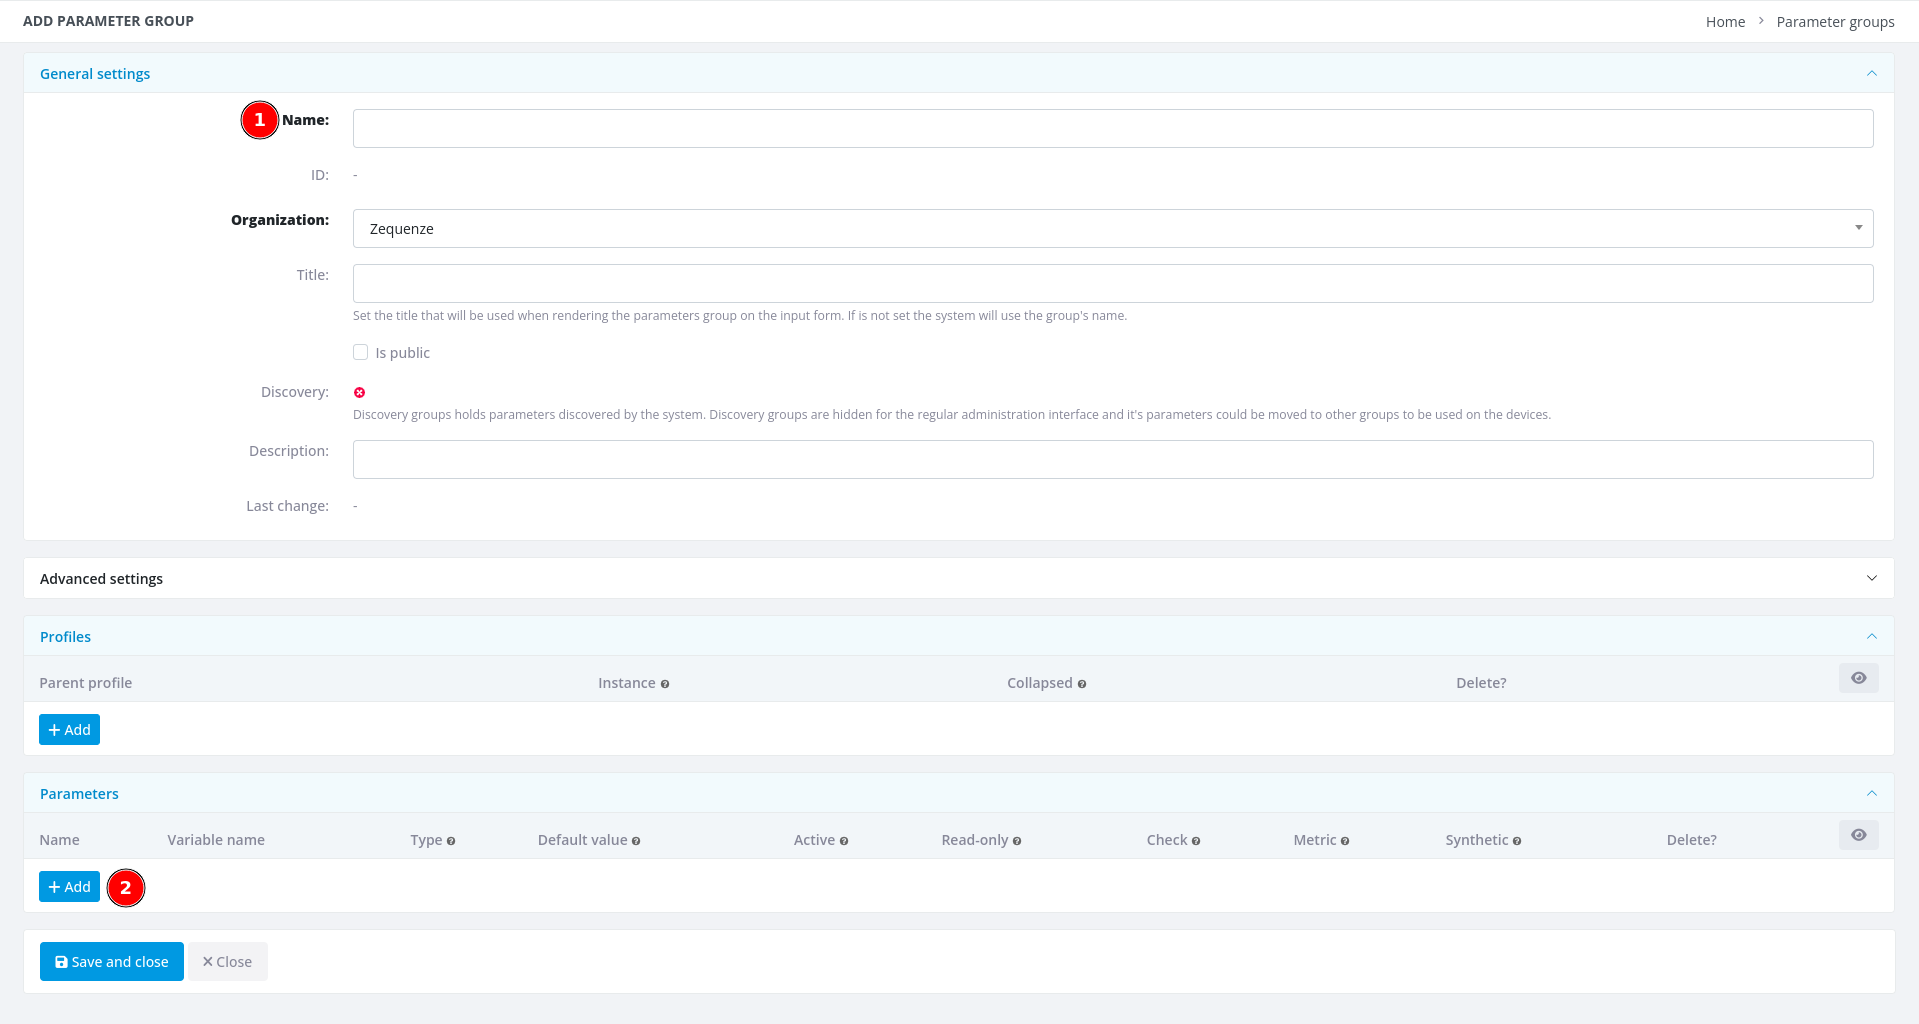 1. **Name** - Enter a descriptive name for this group (e.g., **"Model | Device Info"**)
2. **+ Add** - Click this button once for each parameter you want to add (in this example, we need 4 parameters)
### Step 4: Add Parameter Details
1. **Name** - Enter a descriptive name for this group (e.g., **"Model | Device Info"**)
2. **+ Add** - Click this button once for each parameter you want to add (in this example, we need 4 parameters)
### Step 4: Add Parameter Details
 1. After entering the group name and adding 4 parameter slots, you're ready to fill in the parameter details
Now transfer the parameter information from your Excel or LibreOffice Calc spreadsheet into CONTROL:
1. After entering the group name and adding 4 parameter slots, you're ready to fill in the parameter details
Now transfer the parameter information from your Excel or LibreOffice Calc spreadsheet into CONTROL:
 As you can see, there's now a clear correspondence between your spreadsheet and the CONTROL interface. When you've finished entering all parameters, click **"Save and close"**.
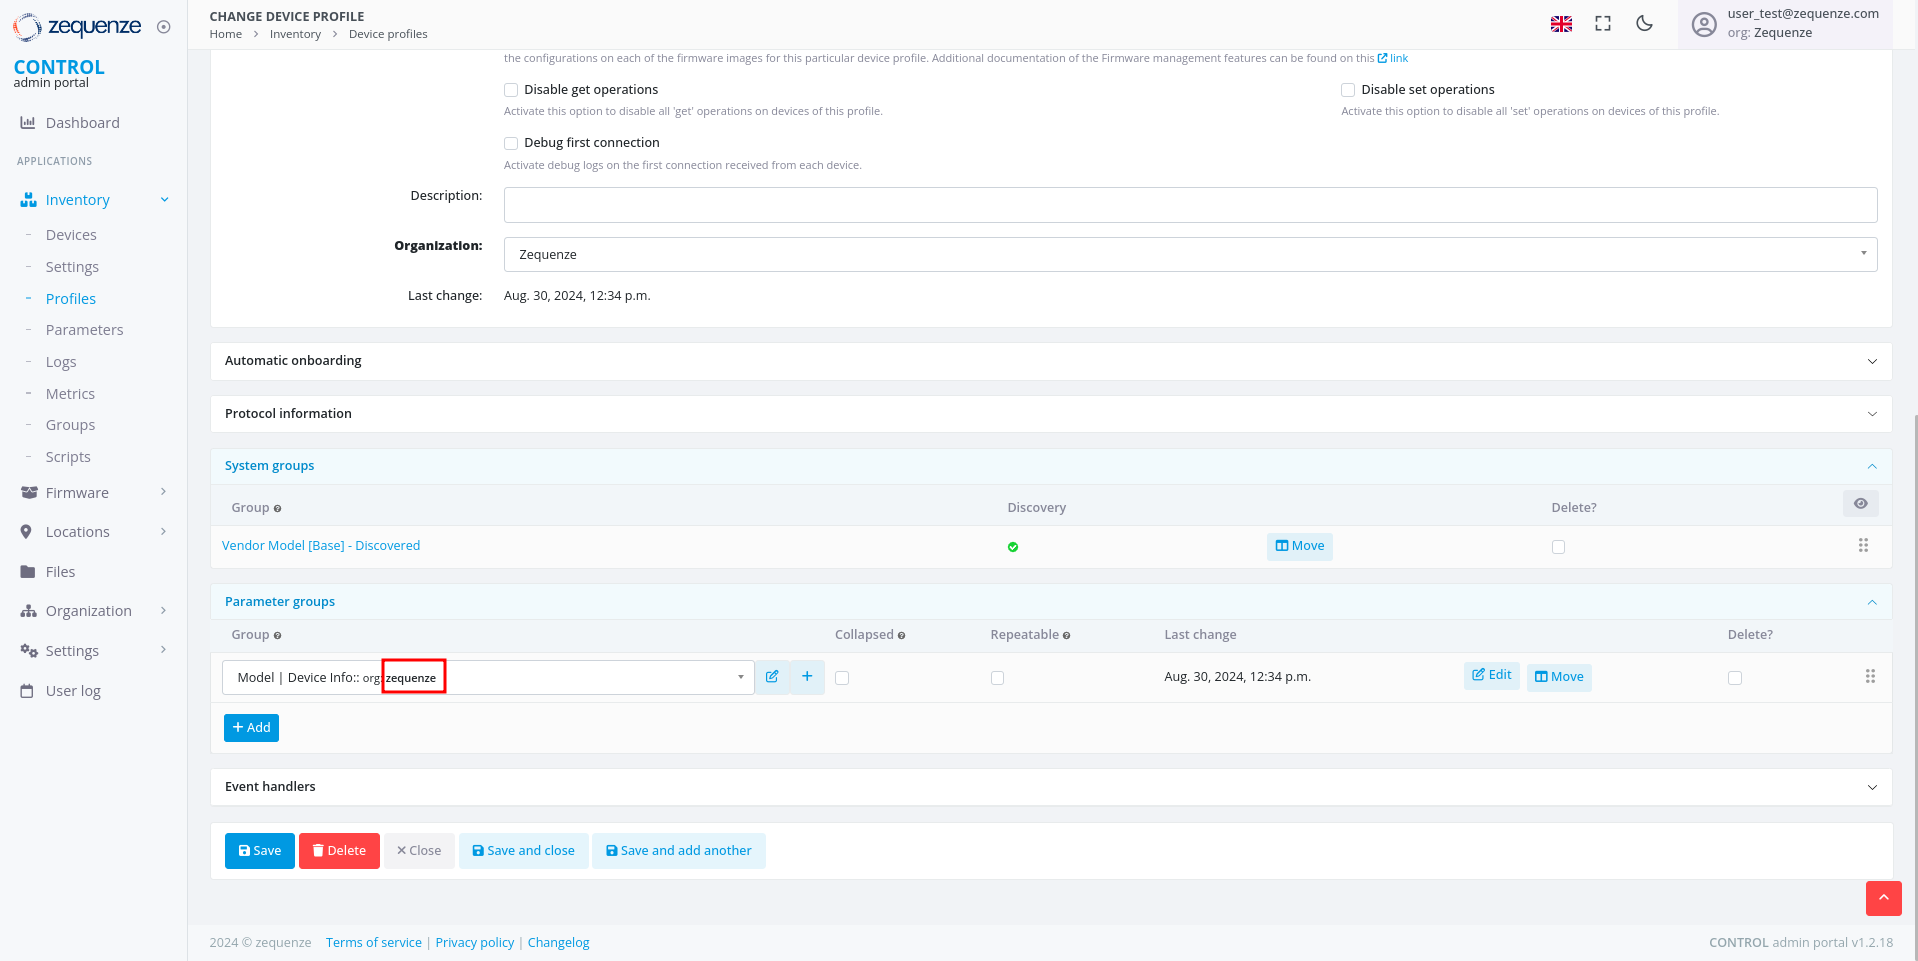
### Step 5: Save the Parameter Group
You'll now see your newly created parameter group:
As you can see, there's now a clear correspondence between your spreadsheet and the CONTROL interface. When you've finished entering all parameters, click **"Save and close"**.
### Step 5: Save the Parameter Group
You'll now see your newly created parameter group:
 1. Click the **Save** button to save your changes to the profile
After saving, you'll see the organization name displayed in the parameter groups section:
1. Click the **Save** button to save your changes to the profile
After saving, you'll see the organization name displayed in the parameter groups section:
 You can repeat this process to add additional parameter groups or parameters as needed.
---
## View Parameters on a Device
Now that you've configured your parameter groups, let's verify that they appear correctly on the device page.
### Step 1: Navigate to the Device
You can repeat this process to add additional parameter groups or parameters as needed.
---
## View Parameters on a Device
Now that you've configured your parameter groups, let's verify that they appear correctly on the device page.
### Step 1: Navigate to the Device
 1. Click on **Inventory**
2. Select **Devices**
3. You'll see your previously connected devices. In this screenshot, the device shows as **Down** because it was powered off for this demonstration
Click on the device name to view its details:
1. Click on **Inventory**
2. Select **Devices**
3. You'll see your previously connected devices. In this screenshot, the device shows as **Down** because it was powered off for this demonstration
Click on the device name to view its details:
 On the device page, you can now see:
1. The parameter group name you created
2. The first parameter: **"Model::Manufacturer"**
3. The second parameter: **"Model::Name"**
4. The third parameter: **"Model::SWVersion"**
5. The fourth parameter: **"Model::UpTime"**
6. The **Last connection** timestamp for this device in CONTROL
### Step 2: Wait for Parameter Values
It's normal for the parameter values to be empty at this stage. CONTROL will request and populate these values once the device connects to the platform.
After connecting the device:
On the device page, you can now see:
1. The parameter group name you created
2. The first parameter: **"Model::Manufacturer"**
3. The second parameter: **"Model::Name"**
4. The third parameter: **"Model::SWVersion"**
5. The fourth parameter: **"Model::UpTime"**
6. The **Last connection** timestamp for this device in CONTROL
### Step 2: Wait for Parameter Values
It's normal for the parameter values to be empty at this stage. CONTROL will request and populate these values once the device connects to the platform.
After connecting the device:
 The parameter values are automatically retrieved and displayed once the device establishes a connection to CONTROL.
You can now create additional parameter groups or add more parameters to existing groups as needed for your deployment.
# User Groups and Permissions Guide
## Overview
The CONTROL platform implements a **role-based access control (RBAC)** system to manage user permissions and data access. Access control is organized through **Groups** — collections of permissions that define which modules, actions, and data a user can access within the platform.
Users can be assigned to **multiple groups simultaneously**, and their effective permissions represent the **union** of all permissions from their assigned groups. This flexible approach allows organizations to create precise permission sets that match their operational roles and security requirements.
### Key Concepts
| Concept | Description |
|---------|-------------|
| **Group** | A named collection of permissions. Users automatically inherit all permissions from their assigned groups. |
| **Permission** | A specific action allowed on a specific resource (e.g., "Can view device", "Can change parameter"). |
| **Organization** | Users can only access data belonging to their organization and its sub-organizations. This organizational boundary is enforced independently of group permissions. |
| **Expert Mode** | An optional toggle that reveals advanced features and configuration options for experienced users. Requires assignment to the "Users: Expert mode" group. |
## Available Groups
The CONTROL platform provides standard groups organized by platform module and access level. These groups cover all core functionality areas:
| Group Name | Module | Access Level |
|-----------|--------|-------------|
| CONTROL account admins | CONTROL | Administration |
| CONTROL API Logs read-only | CONTROL | Read-only |
| CONTROL inventory admins | CONTROL | Administration |
| CONTROL inventory basic users | CONTROL | Basic |
| CONTROL inventory read-only basic users | CONTROL | Read-only (basic) |
| CONTROL inventory read-only users | CONTROL | Read-only |
| CONTROL inventory scripting | CONTROL | Specialized |
| CONTROL inventory users | CONTROL | Standard |
| CONTROL portal admins | CONTROL | Administration |
| Link admin users | Link | Administration |
| Link read-only users | Link | Read-only |
| SecureDNS admins | SecureDNS | Administration |
| SecureDNS reports | SecureDNS | Read-only |
| SONDA admins | SONDA | Administration |
| SONDA reports | SONDA | Read-only |
| Users | General | Basic |
| Users: Expert mode | General | Specialized |
## Detailed Group Descriptions
### CONTROL Account Administration
#### CONTROL account admins
**Description:** CONTROL account administration access.
**Purpose:** Grants administrative control over account-level configuration of the CONTROL platform, including device profile management, parameter configuration, and service settings.
**Key Capabilities:**
| Area | Permissions |
|------|------------|
| **Device Profiles (Types)** | View, edit, and delete device profiles — the templates that define how the platform communicates with specific CPE device models. |
| **Parameters & Groups** | View, edit, and delete parameters and parameter groups — the configuration variables used by services (WiFi Analytics, throughput tests, etc.). |
| **Lists & Options** | View, edit, and delete list groups — dropdown/selection options used in service configuration. |
| **WiFi Remediation** | View remediation policies and manage remediation logs — automatic WiFi optimization actions. |
| **Task Scheduler** | View failed tasks and manage successful tasks in the background task queue. |
| **SecureDNS** | Add and edit DNS categories; view DNS transaction logs. |
| **Service Settings** | View extended service settings. |
| **Revision History** | Edit revision entries (audit log management). |
**Recommended For:** Platform administrators responsible for configuring device profiles and service parameters.
### CONTROL API Access
#### CONTROL API Logs read-only
**Description:** CONTROL read-only API Logs.
**Purpose:** Provides read-only access to API activity logs, enabling monitoring and auditing of all API transactions made to and from the platform.
**Key Capabilities:**
| Area | Permissions |
|------|------------|
| **API Methods** | View available API methods and their configurations. |
| **API Transaction Logs** | View API transaction logs — records of all API calls made to/from the platform including request/response details. |
| **API Transaction Details** | View detailed information for individual API transactions. |
**Recommended For:** Operations staff, auditors, and support teams who need to monitor API activity for troubleshooting or compliance purposes.
### CONTROL Inventory Management
#### CONTROL inventory admins
**Description:** CONTROL — inventory administration access.
**Purpose:** Full administrative access to the device inventory system, including device management, service configuration, reporting, and system tools.
**Key Capabilities:**
| Area | Permissions |
|------|------------|
| **Devices** | Add, edit, and view devices in the inventory. Manage device settings. |
| **Service Configuration** | Full CRUD on parameters, parameter groups, lists, list groups, and service classes — the building blocks of all services. |
| **Schedules & Scripts** | Create and manage inventory schedules and view script logs. |
| **Reports & Dashboards** | View dashboards. Manage report cache data. |
| **Locations** | Add locations and manage location groups. |
| **Portal** | View and manage portal profiles and templates. |
| **Performance Profiler** | Access the SQL query profiler for performance analysis. |
| **User Management** | Manage content types, permissions, user profiles, and sessions. |
| **Data Replication** | Full control over database replication processes. |
| **WiFi Analytics** | Manage WiFi remediation logs; view remediation policies. |
| **SecureDNS** | Manage categories, view rules and transaction logs. |
| **Validators** | Manage validation rules used by parameters. |
**Recommended For:** Senior administrators and engineering staff who need full control over the inventory and service configuration.
#### CONTROL inventory users
**Description:** CONTROL — inventory regular user access.
**Purpose:** Standard operational access to the device inventory, including device management, parameter editing, and report creation. This is the primary group for day-to-day operations.
**Key Capabilities:**
| Area | Permissions |
|------|------------|
| **Custom Reports** | Create custom reports for personal use. |
| **Dashboards** | Create new dashboards and manage elements. |
| **Service Configuration** | Full CRUD on parameters, lists, and validators — configure service behavior for devices. |
| **Device Settings** | Delete device settings (data cleanup). |
| **Group Variables** | Add group variables for device group configurations. |
| **Combined Logs** | Access combined device log views. |
| **Portal Templates** | Delete portal templates. |
**Recommended For:** NOC operators, field engineers, and support staff who actively manage devices and service configurations.
#### CONTROL inventory basic users
**Description:** CONTROL — inventory basic user access.
**Purpose:** Limited access for users who need to perform basic inventory operations such as creating custom reports and managing specific settings.
**Key Capabilities:**
| Area | Permissions |
|------|------------|
| **Custom Reports** | Create and delete custom reports — personal report configurations with saved filters. |
| **Dashboard Elements** | Remove dashboard widgets from personal views. |
| **Device Settings** | Delete device settings (cleanup operations). |
| **Parameters** | Delete parameters; view and change validators. |
| **Combined Logs** | Access to combined device logs view. |
**Recommended For:** Support staff who need basic report customization and limited inventory access.
#### CONTROL inventory read-only users
**Description:** CONTROL — inventory read-only access.
**Purpose:** Read-oriented access with the ability to create custom reports and dashboards for data visualization.
**Key Capabilities:**
| Area | Permissions |
|------|------------|
| **Custom Reports** | Create and delete custom reports. |
| **Dashboards** | Create dashboards and manage dashboard elements. |
| **Combined Logs** | Access combined device log views. |
| **Device Settings** | Delete device settings (for data cleanup). |
| **Validators** | Edit validator configurations. |
**Recommended For:** Monitoring staff and analysts who need to view inventory data and create custom visualizations.
#### CONTROL inventory read-only basic users
**Description:** CONTROL — inventory read-only basic access.
**Purpose:** Minimal access for users who primarily need to view data and create personal reports.
**Key Capabilities:**
| Area | Permissions |
|------|------------|
| **Custom Reports** | Create and delete custom reports for personal use. |
| **Dashboard Elements** | Add widgets to personal dashboard views. |
| **Validators** | Edit validator configurations. |
**Recommended For:** Users who need read-only access with the ability to create custom report views.
#### CONTROL inventory scripting
**Description:** CONTROL — inventory scripting management and execution.
**Purpose:** Access to script management and execution capabilities for automating device operations.
**Key Capabilities:**
| Area | Permissions |
|------|------------|
| **Scripts** | Execute and manage inventory scripts — automated procedures that run against devices (firmware upgrades, bulk configuration, diagnostics). |
| **Script Logs** | View execution logs and results from script runs. |
**Recommended For:** Operations engineers who need to run automated scripts against the device inventory.
### CONTROL Portal Management
#### CONTROL portal admins
**Description:** CONTROL — portal administration access.
**Purpose:** Administration of the CONTROL end-user portal — the customer-facing interface where end users can view their service status and device information.
**Key Capabilities:**
| Area | Permissions |
|------|------------|
| **Portal Pages** | Create, edit, and manage portal pages — the content displayed to end users. |
| **Portal Templates** | Design and manage page templates that control the portal's appearance. |
| **Portal Profiles** | Configure portal user profiles and access levels. |
| **Portal Services** | Manage which services are exposed through the portal. |
**Recommended For:** Staff responsible for managing and customizing the customer-facing portal.
### Link Management
#### Link admin users
**Description:** Link management application administration access.
**Purpose:** Full administrative access to the Link Management module — used for managing network link associations and interconnections between devices.
**Key Capabilities:**
| Area | Permissions |
|------|------------|
| **Links** | Create, edit, and delete network links and associations. |
| **Link Services** | Manage services associated with links. |
**Recommended For:** Network engineers managing device interconnections and link topology.
#### Link read-only users
**Description:** Link management application read-only access.
**Purpose:** View-only access to the Link Management module.
**Key Capabilities:**
| Area | Permissions |
|------|------------|
| **Links** | View network links and associations without the ability to modify them. |
**Recommended For:** Support staff who need visibility into network link topology without modification rights.
### SecureDNS
#### SecureDNS admins
**Description:** SecureDNS — administration access.
**Purpose:** Administrative access to the SecureDNS module — the DNS-based security filtering system that protects devices from malicious domains.
**Key Capabilities:**
| Area | Permissions |
|------|------------|
| **DNS Rules** | Create, edit, and delete DNS filtering rules — define which domains are blocked, allowed, or redirected. |
| **Categories** | Manage DNS categories (malware, phishing, adult content, etc.). |
| **Transaction Logs** | View DNS query logs and filtering statistics. |
| **Service Settings** | Manage SecureDNS service configuration. |
**Recommended For:** Security operations staff managing DNS-based protection policies.
#### SecureDNS reports
**Description:** SecureDNS — reports and transactions access.
**Purpose:** Read-only access to SecureDNS reporting and transaction data.
**Key Capabilities:**
| Area | Permissions |
|------|------------|
| **Reports** | View DNS filtering statistics, top blocked domains, category breakdowns, and response time metrics. |
| **Transaction Logs** | View DNS query logs to analyze filtering activity. |
**Recommended For:** Analysts and managers who need visibility into DNS security metrics without the ability to modify rules.
### SONDA (User Experience Monitoring)
#### SONDA admins
**Description:** SONDA / User experience — administration access.
**Purpose:** Administrative access to the SONDA module — the user experience monitoring system that runs automated tests (latency, jitter, throughput, WiFi quality) from probes and CPE devices.
**Key Capabilities:**
| Area | Permissions |
|------|------------|
| **Events** | View and delete events — automated alerts triggered by test results exceeding thresholds. |
| **Event Patterns** | Create event patterns — define which conditions trigger automated alerts. |
| **Event Origins** | Manage event origins — configure the sources (probes, devices) that generate events. |
| **Event Logs** | Add detailed event log entries. |
| **Test Profiles** | Configure test profiles that define which tests run on which schedules. |
| **Test Services** | Manage test service definitions (ping, throughput, WiFi analytics, etc.). |
**Recommended For:** Engineers configuring automated quality of experience (QoE) monitoring and alert thresholds.
#### SONDA reports
**Description:** SONDA / User experience — reports and transactions access.
**Purpose:** Read-only access to SONDA test results, metrics, and event data.
**Key Capabilities:**
| Area | Permissions |
|------|------------|
| **Event Logs** | View and edit event log entries. |
| **Event Origins** | View and edit event origin configurations. |
| **Test Results** | View test results — latency, jitter, throughput, WiFi scores, and other QoE metrics collected from probes and devices. |
| **Reports** | Access SONDA dashboards and metric reports. |
**Recommended For:** Operators and analysts monitoring service quality metrics.
### General User Access
#### Users
**Description:** Regular users — access to user's profile, change password operations, etc.
**Purpose:** Minimal access for basic user self-service operations.
**Key Capabilities:**
| Area | Permissions |
|------|------------|
| **User Profile** | View own user profile and personal information. |
| **Password** | Change own password. |
| **Site Settings** | View basic site configuration. |
**Recommended For:** Users who only need to manage their own account, such as portal-only users or external collaborators with limited access.
#### Users: Expert mode
**Description:** Expert mode users — users that can activate the "Expert Mode" option in admin interfaces.
**Purpose:** Enables the "Expert Mode" toggle in the admin interface. When activated, Expert Mode reveals advanced fields, options, and actions that are hidden by default to prevent accidental changes.
**Key Capabilities:**
| Area | Permissions |
|------|------------|
| **Expert Mode Toggle** | Access to the Expert Mode switch in the admin interface. When activated, shows advanced fields in device profiles, parameters, services, and other admin forms. |
| **Configuration Profiles** | Create new configuration profiles — advanced device provisioning templates. |
| **Advanced Actions** | In Expert Mode, additional actions become available on models that normally restrict certain operations (e.g., audit records, firmware logs). |
**Recommended For:** Senior engineers and administrators who need access to advanced configuration options. This group should be assigned selectively to users who understand the implications of advanced configuration changes.
## Recommended Group Combinations by Role
Users are typically assigned **combinations of groups** that together define their operational role. The following combinations provide templates for common organizational roles:
### Monitoring and Read-Only Roles
| Role | Recommended Groups | Description |
|------|-------------------|-------------|
| **Basic Monitoring** | • CONTROL API Logs read-only
The parameter values are automatically retrieved and displayed once the device establishes a connection to CONTROL.
You can now create additional parameter groups or add more parameters to existing groups as needed for your deployment.
# User Groups and Permissions Guide
## Overview
The CONTROL platform implements a **role-based access control (RBAC)** system to manage user permissions and data access. Access control is organized through **Groups** — collections of permissions that define which modules, actions, and data a user can access within the platform.
Users can be assigned to **multiple groups simultaneously**, and their effective permissions represent the **union** of all permissions from their assigned groups. This flexible approach allows organizations to create precise permission sets that match their operational roles and security requirements.
### Key Concepts
| Concept | Description |
|---------|-------------|
| **Group** | A named collection of permissions. Users automatically inherit all permissions from their assigned groups. |
| **Permission** | A specific action allowed on a specific resource (e.g., "Can view device", "Can change parameter"). |
| **Organization** | Users can only access data belonging to their organization and its sub-organizations. This organizational boundary is enforced independently of group permissions. |
| **Expert Mode** | An optional toggle that reveals advanced features and configuration options for experienced users. Requires assignment to the "Users: Expert mode" group. |
## Available Groups
The CONTROL platform provides standard groups organized by platform module and access level. These groups cover all core functionality areas:
| Group Name | Module | Access Level |
|-----------|--------|-------------|
| CONTROL account admins | CONTROL | Administration |
| CONTROL API Logs read-only | CONTROL | Read-only |
| CONTROL inventory admins | CONTROL | Administration |
| CONTROL inventory basic users | CONTROL | Basic |
| CONTROL inventory read-only basic users | CONTROL | Read-only (basic) |
| CONTROL inventory read-only users | CONTROL | Read-only |
| CONTROL inventory scripting | CONTROL | Specialized |
| CONTROL inventory users | CONTROL | Standard |
| CONTROL portal admins | CONTROL | Administration |
| Link admin users | Link | Administration |
| Link read-only users | Link | Read-only |
| SecureDNS admins | SecureDNS | Administration |
| SecureDNS reports | SecureDNS | Read-only |
| SONDA admins | SONDA | Administration |
| SONDA reports | SONDA | Read-only |
| Users | General | Basic |
| Users: Expert mode | General | Specialized |
## Detailed Group Descriptions
### CONTROL Account Administration
#### CONTROL account admins
**Description:** CONTROL account administration access.
**Purpose:** Grants administrative control over account-level configuration of the CONTROL platform, including device profile management, parameter configuration, and service settings.
**Key Capabilities:**
| Area | Permissions |
|------|------------|
| **Device Profiles (Types)** | View, edit, and delete device profiles — the templates that define how the platform communicates with specific CPE device models. |
| **Parameters & Groups** | View, edit, and delete parameters and parameter groups — the configuration variables used by services (WiFi Analytics, throughput tests, etc.). |
| **Lists & Options** | View, edit, and delete list groups — dropdown/selection options used in service configuration. |
| **WiFi Remediation** | View remediation policies and manage remediation logs — automatic WiFi optimization actions. |
| **Task Scheduler** | View failed tasks and manage successful tasks in the background task queue. |
| **SecureDNS** | Add and edit DNS categories; view DNS transaction logs. |
| **Service Settings** | View extended service settings. |
| **Revision History** | Edit revision entries (audit log management). |
**Recommended For:** Platform administrators responsible for configuring device profiles and service parameters.
### CONTROL API Access
#### CONTROL API Logs read-only
**Description:** CONTROL read-only API Logs.
**Purpose:** Provides read-only access to API activity logs, enabling monitoring and auditing of all API transactions made to and from the platform.
**Key Capabilities:**
| Area | Permissions |
|------|------------|
| **API Methods** | View available API methods and their configurations. |
| **API Transaction Logs** | View API transaction logs — records of all API calls made to/from the platform including request/response details. |
| **API Transaction Details** | View detailed information for individual API transactions. |
**Recommended For:** Operations staff, auditors, and support teams who need to monitor API activity for troubleshooting or compliance purposes.
### CONTROL Inventory Management
#### CONTROL inventory admins
**Description:** CONTROL — inventory administration access.
**Purpose:** Full administrative access to the device inventory system, including device management, service configuration, reporting, and system tools.
**Key Capabilities:**
| Area | Permissions |
|------|------------|
| **Devices** | Add, edit, and view devices in the inventory. Manage device settings. |
| **Service Configuration** | Full CRUD on parameters, parameter groups, lists, list groups, and service classes — the building blocks of all services. |
| **Schedules & Scripts** | Create and manage inventory schedules and view script logs. |
| **Reports & Dashboards** | View dashboards. Manage report cache data. |
| **Locations** | Add locations and manage location groups. |
| **Portal** | View and manage portal profiles and templates. |
| **Performance Profiler** | Access the SQL query profiler for performance analysis. |
| **User Management** | Manage content types, permissions, user profiles, and sessions. |
| **Data Replication** | Full control over database replication processes. |
| **WiFi Analytics** | Manage WiFi remediation logs; view remediation policies. |
| **SecureDNS** | Manage categories, view rules and transaction logs. |
| **Validators** | Manage validation rules used by parameters. |
**Recommended For:** Senior administrators and engineering staff who need full control over the inventory and service configuration.
#### CONTROL inventory users
**Description:** CONTROL — inventory regular user access.
**Purpose:** Standard operational access to the device inventory, including device management, parameter editing, and report creation. This is the primary group for day-to-day operations.
**Key Capabilities:**
| Area | Permissions |
|------|------------|
| **Custom Reports** | Create custom reports for personal use. |
| **Dashboards** | Create new dashboards and manage elements. |
| **Service Configuration** | Full CRUD on parameters, lists, and validators — configure service behavior for devices. |
| **Device Settings** | Delete device settings (data cleanup). |
| **Group Variables** | Add group variables for device group configurations. |
| **Combined Logs** | Access combined device log views. |
| **Portal Templates** | Delete portal templates. |
**Recommended For:** NOC operators, field engineers, and support staff who actively manage devices and service configurations.
#### CONTROL inventory basic users
**Description:** CONTROL — inventory basic user access.
**Purpose:** Limited access for users who need to perform basic inventory operations such as creating custom reports and managing specific settings.
**Key Capabilities:**
| Area | Permissions |
|------|------------|
| **Custom Reports** | Create and delete custom reports — personal report configurations with saved filters. |
| **Dashboard Elements** | Remove dashboard widgets from personal views. |
| **Device Settings** | Delete device settings (cleanup operations). |
| **Parameters** | Delete parameters; view and change validators. |
| **Combined Logs** | Access to combined device logs view. |
**Recommended For:** Support staff who need basic report customization and limited inventory access.
#### CONTROL inventory read-only users
**Description:** CONTROL — inventory read-only access.
**Purpose:** Read-oriented access with the ability to create custom reports and dashboards for data visualization.
**Key Capabilities:**
| Area | Permissions |
|------|------------|
| **Custom Reports** | Create and delete custom reports. |
| **Dashboards** | Create dashboards and manage dashboard elements. |
| **Combined Logs** | Access combined device log views. |
| **Device Settings** | Delete device settings (for data cleanup). |
| **Validators** | Edit validator configurations. |
**Recommended For:** Monitoring staff and analysts who need to view inventory data and create custom visualizations.
#### CONTROL inventory read-only basic users
**Description:** CONTROL — inventory read-only basic access.
**Purpose:** Minimal access for users who primarily need to view data and create personal reports.
**Key Capabilities:**
| Area | Permissions |
|------|------------|
| **Custom Reports** | Create and delete custom reports for personal use. |
| **Dashboard Elements** | Add widgets to personal dashboard views. |
| **Validators** | Edit validator configurations. |
**Recommended For:** Users who need read-only access with the ability to create custom report views.
#### CONTROL inventory scripting
**Description:** CONTROL — inventory scripting management and execution.
**Purpose:** Access to script management and execution capabilities for automating device operations.
**Key Capabilities:**
| Area | Permissions |
|------|------------|
| **Scripts** | Execute and manage inventory scripts — automated procedures that run against devices (firmware upgrades, bulk configuration, diagnostics). |
| **Script Logs** | View execution logs and results from script runs. |
**Recommended For:** Operations engineers who need to run automated scripts against the device inventory.
### CONTROL Portal Management
#### CONTROL portal admins
**Description:** CONTROL — portal administration access.
**Purpose:** Administration of the CONTROL end-user portal — the customer-facing interface where end users can view their service status and device information.
**Key Capabilities:**
| Area | Permissions |
|------|------------|
| **Portal Pages** | Create, edit, and manage portal pages — the content displayed to end users. |
| **Portal Templates** | Design and manage page templates that control the portal's appearance. |
| **Portal Profiles** | Configure portal user profiles and access levels. |
| **Portal Services** | Manage which services are exposed through the portal. |
**Recommended For:** Staff responsible for managing and customizing the customer-facing portal.
### Link Management
#### Link admin users
**Description:** Link management application administration access.
**Purpose:** Full administrative access to the Link Management module — used for managing network link associations and interconnections between devices.
**Key Capabilities:**
| Area | Permissions |
|------|------------|
| **Links** | Create, edit, and delete network links and associations. |
| **Link Services** | Manage services associated with links. |
**Recommended For:** Network engineers managing device interconnections and link topology.
#### Link read-only users
**Description:** Link management application read-only access.
**Purpose:** View-only access to the Link Management module.
**Key Capabilities:**
| Area | Permissions |
|------|------------|
| **Links** | View network links and associations without the ability to modify them. |
**Recommended For:** Support staff who need visibility into network link topology without modification rights.
### SecureDNS
#### SecureDNS admins
**Description:** SecureDNS — administration access.
**Purpose:** Administrative access to the SecureDNS module — the DNS-based security filtering system that protects devices from malicious domains.
**Key Capabilities:**
| Area | Permissions |
|------|------------|
| **DNS Rules** | Create, edit, and delete DNS filtering rules — define which domains are blocked, allowed, or redirected. |
| **Categories** | Manage DNS categories (malware, phishing, adult content, etc.). |
| **Transaction Logs** | View DNS query logs and filtering statistics. |
| **Service Settings** | Manage SecureDNS service configuration. |
**Recommended For:** Security operations staff managing DNS-based protection policies.
#### SecureDNS reports
**Description:** SecureDNS — reports and transactions access.
**Purpose:** Read-only access to SecureDNS reporting and transaction data.
**Key Capabilities:**
| Area | Permissions |
|------|------------|
| **Reports** | View DNS filtering statistics, top blocked domains, category breakdowns, and response time metrics. |
| **Transaction Logs** | View DNS query logs to analyze filtering activity. |
**Recommended For:** Analysts and managers who need visibility into DNS security metrics without the ability to modify rules.
### SONDA (User Experience Monitoring)
#### SONDA admins
**Description:** SONDA / User experience — administration access.
**Purpose:** Administrative access to the SONDA module — the user experience monitoring system that runs automated tests (latency, jitter, throughput, WiFi quality) from probes and CPE devices.
**Key Capabilities:**
| Area | Permissions |
|------|------------|
| **Events** | View and delete events — automated alerts triggered by test results exceeding thresholds. |
| **Event Patterns** | Create event patterns — define which conditions trigger automated alerts. |
| **Event Origins** | Manage event origins — configure the sources (probes, devices) that generate events. |
| **Event Logs** | Add detailed event log entries. |
| **Test Profiles** | Configure test profiles that define which tests run on which schedules. |
| **Test Services** | Manage test service definitions (ping, throughput, WiFi analytics, etc.). |
**Recommended For:** Engineers configuring automated quality of experience (QoE) monitoring and alert thresholds.
#### SONDA reports
**Description:** SONDA / User experience — reports and transactions access.
**Purpose:** Read-only access to SONDA test results, metrics, and event data.
**Key Capabilities:**
| Area | Permissions |
|------|------------|
| **Event Logs** | View and edit event log entries. |
| **Event Origins** | View and edit event origin configurations. |
| **Test Results** | View test results — latency, jitter, throughput, WiFi scores, and other QoE metrics collected from probes and devices. |
| **Reports** | Access SONDA dashboards and metric reports. |
**Recommended For:** Operators and analysts monitoring service quality metrics.
### General User Access
#### Users
**Description:** Regular users — access to user's profile, change password operations, etc.
**Purpose:** Minimal access for basic user self-service operations.
**Key Capabilities:**
| Area | Permissions |
|------|------------|
| **User Profile** | View own user profile and personal information. |
| **Password** | Change own password. |
| **Site Settings** | View basic site configuration. |
**Recommended For:** Users who only need to manage their own account, such as portal-only users or external collaborators with limited access.
#### Users: Expert mode
**Description:** Expert mode users — users that can activate the "Expert Mode" option in admin interfaces.
**Purpose:** Enables the "Expert Mode" toggle in the admin interface. When activated, Expert Mode reveals advanced fields, options, and actions that are hidden by default to prevent accidental changes.
**Key Capabilities:**
| Area | Permissions |
|------|------------|
| **Expert Mode Toggle** | Access to the Expert Mode switch in the admin interface. When activated, shows advanced fields in device profiles, parameters, services, and other admin forms. |
| **Configuration Profiles** | Create new configuration profiles — advanced device provisioning templates. |
| **Advanced Actions** | In Expert Mode, additional actions become available on models that normally restrict certain operations (e.g., audit records, firmware logs). |
**Recommended For:** Senior engineers and administrators who need access to advanced configuration options. This group should be assigned selectively to users who understand the implications of advanced configuration changes.
## Recommended Group Combinations by Role
Users are typically assigned **combinations of groups** that together define their operational role. The following combinations provide templates for common organizational roles:
### Monitoring and Read-Only Roles
| Role | Recommended Groups | Description |
|------|-------------------|-------------|
| **Basic Monitoring** | • CONTROL API Logs read-only
• CONTROL portal admins | View the admin interface and manage the customer portal. Suitable for NOC operators focused on monitoring. |
| **Monitoring + Inventory** | • CONTROL API Logs read-only
• CONTROL inventory users
• CONTROL portal admins | Monitoring with additional inventory management capabilities. |
### Operations Roles
| Role | Recommended Groups | Description |
|------|-------------------|-------------|
| **Standard Operations** | • CONTROL account admins
• CONTROL API Logs read-only
• CONTROL inventory users | Account and inventory management for daily operational tasks. |
| **Operations + Security** | • CONTROL account admins
• CONTROL API Logs read-only
• CONTROL inventory users
• SecureDNS admins | Full operational access including DNS-based security management. |
| **Operations + Scripting** | • CONTROL account admins
• CONTROL API Logs read-only
• CONTROL inventory scripting
• CONTROL inventory users | Operational access with script execution capabilities for bulk device operations. |
### Engineering Roles
| Role | Recommended Groups | Description |
|------|-------------------|-------------|
| **Engineering** | • CONTROL account admins
• CONTROL API Logs read-only
• CONTROL inventory users
• Users: Expert mode | Full configuration access with advanced/expert features enabled. |
| **Engineering + Links** | • CONTROL account admins
• CONTROL API Logs read-only
• CONTROL inventory users
• Link read-only users
• Users: Expert mode | Engineering access with network link visibility. |
### Administrative Roles
| Role | Recommended Groups | Description |
|------|-------------------|-------------|
| **Full Administrator** | • CONTROL account admins
• CONTROL API Logs read-only
• CONTROL inventory admins
• CONTROL portal admins
• Users: Expert mode | Full access to all CONTROL modules with expert capabilities. |
| **SONDA Administrator** | • SONDA admins
• SONDA reports | Full access to user experience monitoring and reporting. |
| **SecureDNS Administrator** | • SecureDNS admins
• SecureDNS reports | Full access to DNS security management and reporting. |
### Minimal Access Roles
| Role | Recommended Groups | Description |
|------|-------------------|-------------|
| **Portal-only User** | • Users | Basic self-service access only (profile, password). |
| **API Auditor** | • CONTROL API Logs read-only | Read-only access to API transaction logs for auditing purposes. |
> **Note:** These are recommended starting points. Adjust group assignments based on your organization's specific needs and security policies.
## Organization-Based Access Control
In addition to group-based permissions, the CONTROL platform enforces **organization-based data isolation**:
- **Organization Membership:** Each user belongs to a specific **Organization**.
- **Data Visibility:** Users can only see and manage data (devices, services, reports, etc.) that belongs to their own organization and its sub-organizations.
- **Public Groups:** Groups marked as "public" are shared across sub-organizations, allowing parent organizations to define standard roles for all child organizations.
- **Isolation Enforcement:** This organizational boundary is enforced independently of group permissions.
This means two users with identical group assignments but different organizations will see different sets of devices and data, ensuring proper data isolation in multi-tenant environments.
## Best Practices
### Security and Access Management
1. **Principle of Least Privilege**
- Assign only the groups necessary for each user's role
- Start with minimum required groups and add more as needed
- Regularly review and remove unnecessary permissions
2. **Expert Mode Caution**
- Only assign "Users: Expert mode" group to users who understand the implications of advanced configuration changes
- Document which users have Expert Mode access and why
3. **Regular Audits**
- Periodically review user-to-group assignments to ensure they match current job responsibilities
- Audit organization assignments and data access patterns
- Review and clean up unused or inactive user accounts
### Role Management
4. **Use Standard Combinations**
- Follow the recommended role patterns documented above to maintain consistency across your organization
- Create standardized role definitions that can be applied consistently
5. **Document User Roles**
- Use the user "klass" (class/role) field to document each user's organizational role
- Maintain documentation of group combinations used for different job functions
- Keep records of why specific permission combinations were granted
### Multi-Organization Deployments
6. **Leverage Public Groups**
- Use public groups for standard roles shared across sub-organizations
- Define parent-level role templates that can be inherited by child organizations
- Maintain consistent role definitions across organizational boundaries
## Platform Modules Reference
| Module | Description | Administrative Groups | Reporting Groups |
|--------|-------------|----------------------|------------------|
| **CONTROL Inventory** | Device management, profiles, parameters, settings, and monitoring | • CONTROL account admins
• CONTROL inventory admins
• CONTROL inventory users | • CONTROL inventory read-only users
• CONTROL inventory read-only basic users |
| **CONTROL Portal** | Customer-facing portal for end-user access | • CONTROL portal admins | — |
| **CONTROL Scripting** | Automated script execution against devices | • CONTROL inventory scripting | — |
| **CONTROL API** | API transaction monitoring and auditing | — | • CONTROL API Logs read-only |
| **Link Management** | Network link and device interconnection management | • Link admin users | • Link read-only users |
| **SecureDNS** | DNS-based security filtering | • SecureDNS admins | • SecureDNS reports |
| **SONDA** | User experience monitoring (QoE tests, probes) | • SONDA admins | • SONDA reports |
| **General** | User profile and expert mode access | — | • Users
• Users: Expert mode |
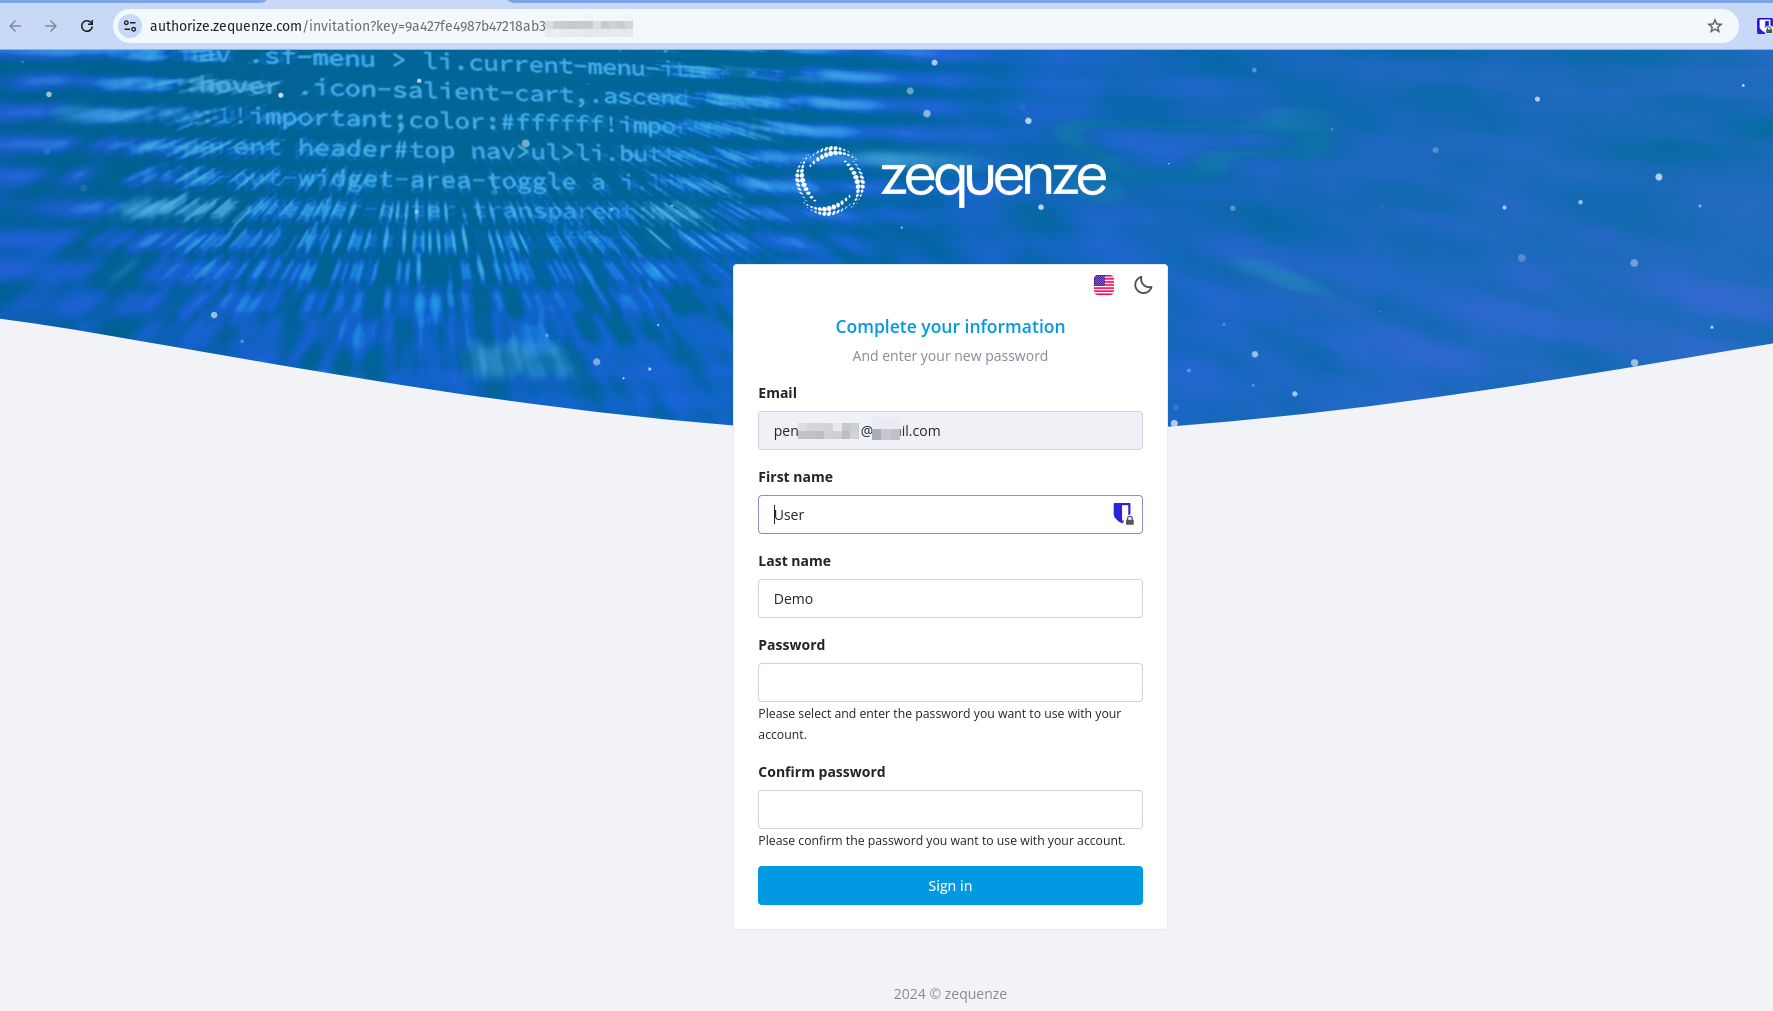 Once the process is complete, you will be redirected to the CONTROL platform:
 ## Understanding the CONTROL Interface
Now that you're logged into the CONTROL platform, let's explore the available options:
## Understanding the CONTROL Interface
Now that you're logged into the CONTROL platform, let's explore the available options:
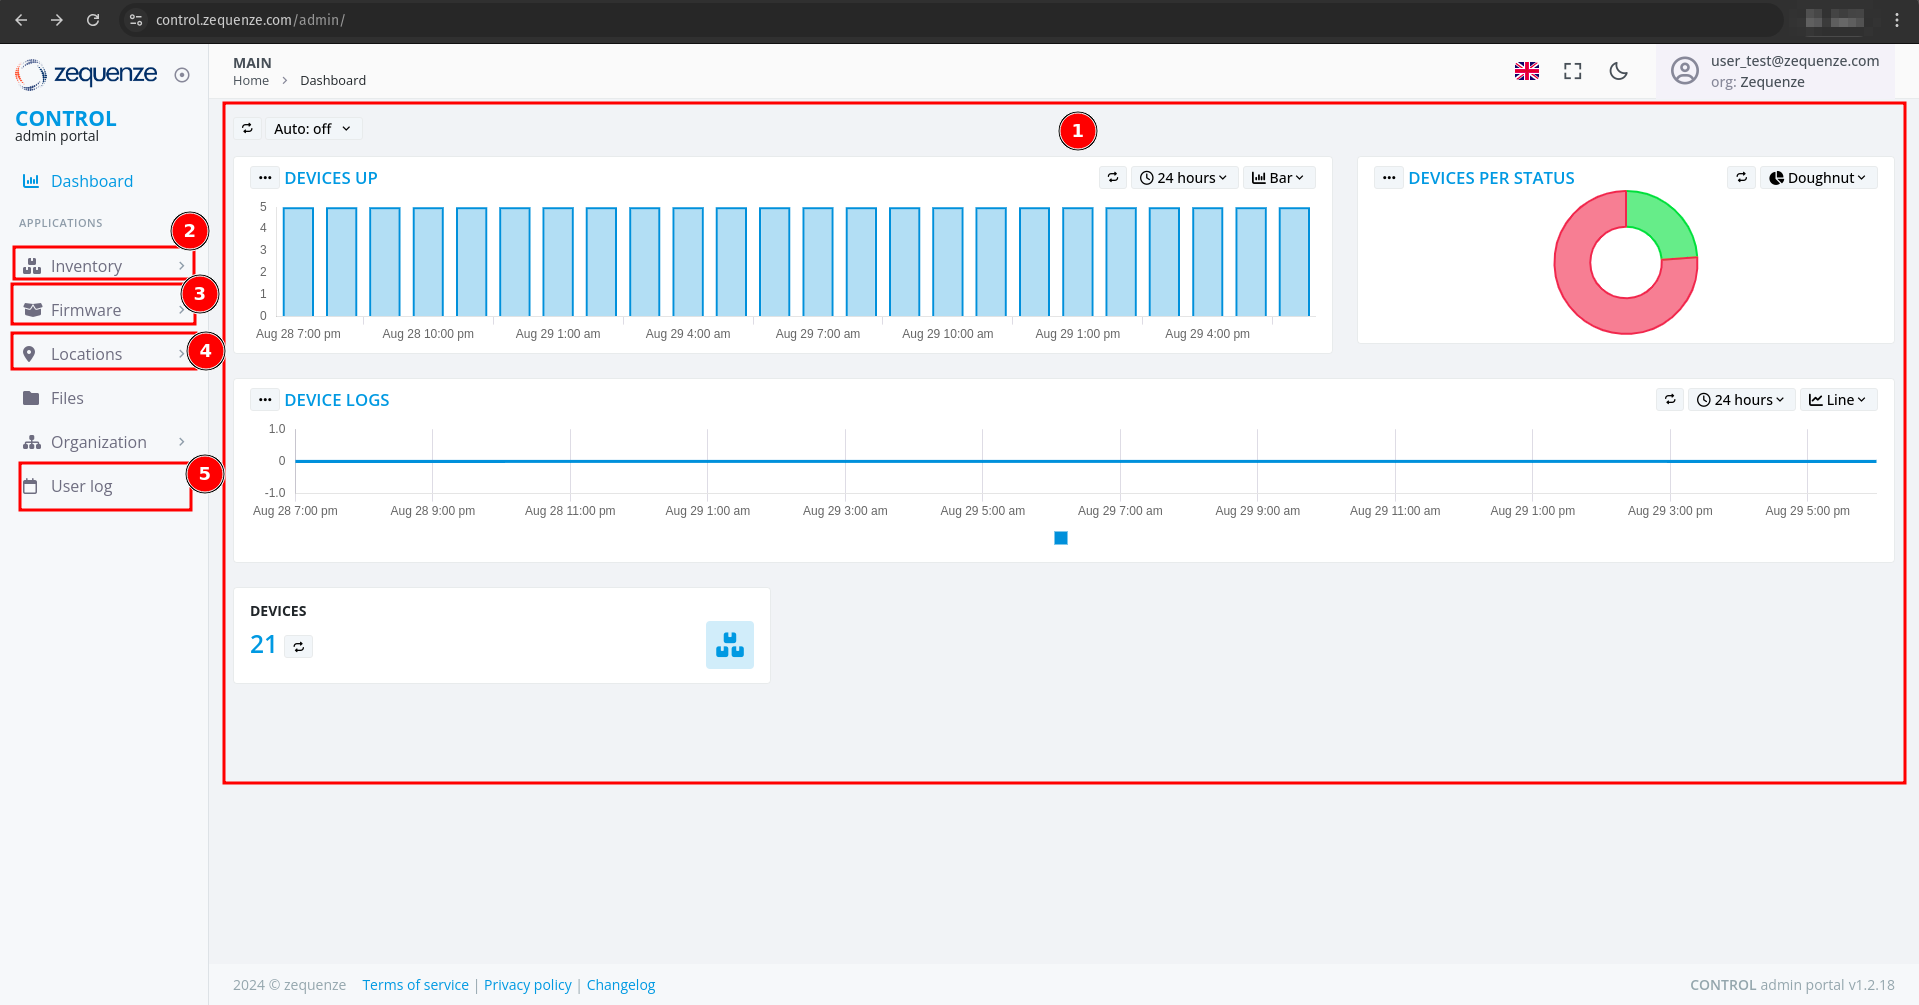 ### Main Dashboard
In the center of the screen, you'll find a series of customizable reports in the **Main Dashboard**. These reports include:
- **Devices UP** - Shows currently active devices
- **Devices Per Status** - Displays device status distribution
- **Devices Logs** - Provides access to device log information
All of these reports are customizable if needed to suit your monitoring requirements.
### Navigation Menu
The left-side menu provides access to key platform sections:
1. **Inventory** - View devices, create configurations, and add parameters for each profile. In this section you can view the devices, create configurations, and add the parameters you need for each profile.
2. **Firmware** - Upload different firmware versions for upgrades or downgrades, and customize firmware update workflows. You can upload different versions of firmware for upgrade or downgrade, and customize the workflow for firmware upgrades as needed.
3. **Locations** - Create and manage physical locations using:
- Geo-localization with coordinates
- Custom labels to identify device groups
- Organization by OLT or DOCSIS CMTS connections
This section is very useful when you need to create different physical locations, geo-localization with coordinates, or custom labels to identify groups of devices connected to the same OLT or DOCSIS CMTS.
4. **User Log** - View all transactions and changes made within the platform. This section allows you to view all transactions or changes that have been made in the platform.
## Enabling Expert Mode
To access advanced features, you need to activate **Expert Mode**:
1. Check the **Expert mode** checkbox
2. Refresh the webpage by pressing **F5** or using your browser's refresh button
### Main Dashboard
In the center of the screen, you'll find a series of customizable reports in the **Main Dashboard**. These reports include:
- **Devices UP** - Shows currently active devices
- **Devices Per Status** - Displays device status distribution
- **Devices Logs** - Provides access to device log information
All of these reports are customizable if needed to suit your monitoring requirements.
### Navigation Menu
The left-side menu provides access to key platform sections:
1. **Inventory** - View devices, create configurations, and add parameters for each profile. In this section you can view the devices, create configurations, and add the parameters you need for each profile.
2. **Firmware** - Upload different firmware versions for upgrades or downgrades, and customize firmware update workflows. You can upload different versions of firmware for upgrade or downgrade, and customize the workflow for firmware upgrades as needed.
3. **Locations** - Create and manage physical locations using:
- Geo-localization with coordinates
- Custom labels to identify device groups
- Organization by OLT or DOCSIS CMTS connections
This section is very useful when you need to create different physical locations, geo-localization with coordinates, or custom labels to identify groups of devices connected to the same OLT or DOCSIS CMTS.
4. **User Log** - View all transactions and changes made within the platform. This section allows you to view all transactions or changes that have been made in the platform.
## Enabling Expert Mode
To access advanced features, you need to activate **Expert Mode**:
1. Check the **Expert mode** checkbox
2. Refresh the webpage by pressing **F5** or using your browser's refresh button
 This activates additional options and advanced functionality within the CONTROL platform.
---
This completes the basic overview of the CONTROL platform. The next step is to create a Profile.
# Profile
## Creating a New Profile
Before creating a profile, it's important to understand its purpose. Profiles are where you configure key device settings such as:
- WAN interface configurations
- Custom WiFi network names (e.g., "ISP-Provider-2.4GHz" for 2.4GHz networks)
- 5.0GHz network configurations
- Other device-specific parameters
This is where the magic happens when you want to create new interfaces or set up custom configurations for your devices.
### Steps to Create a Profile
1. Navigate to **Inventory** in the CONTROL portal
2. Click on **Profile**
3. Click the **Add** button
This activates additional options and advanced functionality within the CONTROL platform.
---
This completes the basic overview of the CONTROL platform. The next step is to create a Profile.
# Profile
## Creating a New Profile
Before creating a profile, it's important to understand its purpose. Profiles are where you configure key device settings such as:
- WAN interface configurations
- Custom WiFi network names (e.g., "ISP-Provider-2.4GHz" for 2.4GHz networks)
- 5.0GHz network configurations
- Other device-specific parameters
This is where the magic happens when you want to create new interfaces or set up custom configurations for your devices.
### Steps to Create a Profile
1. Navigate to **Inventory** in the CONTROL portal
2. Click on **Profile**
3. Click the **Add** button
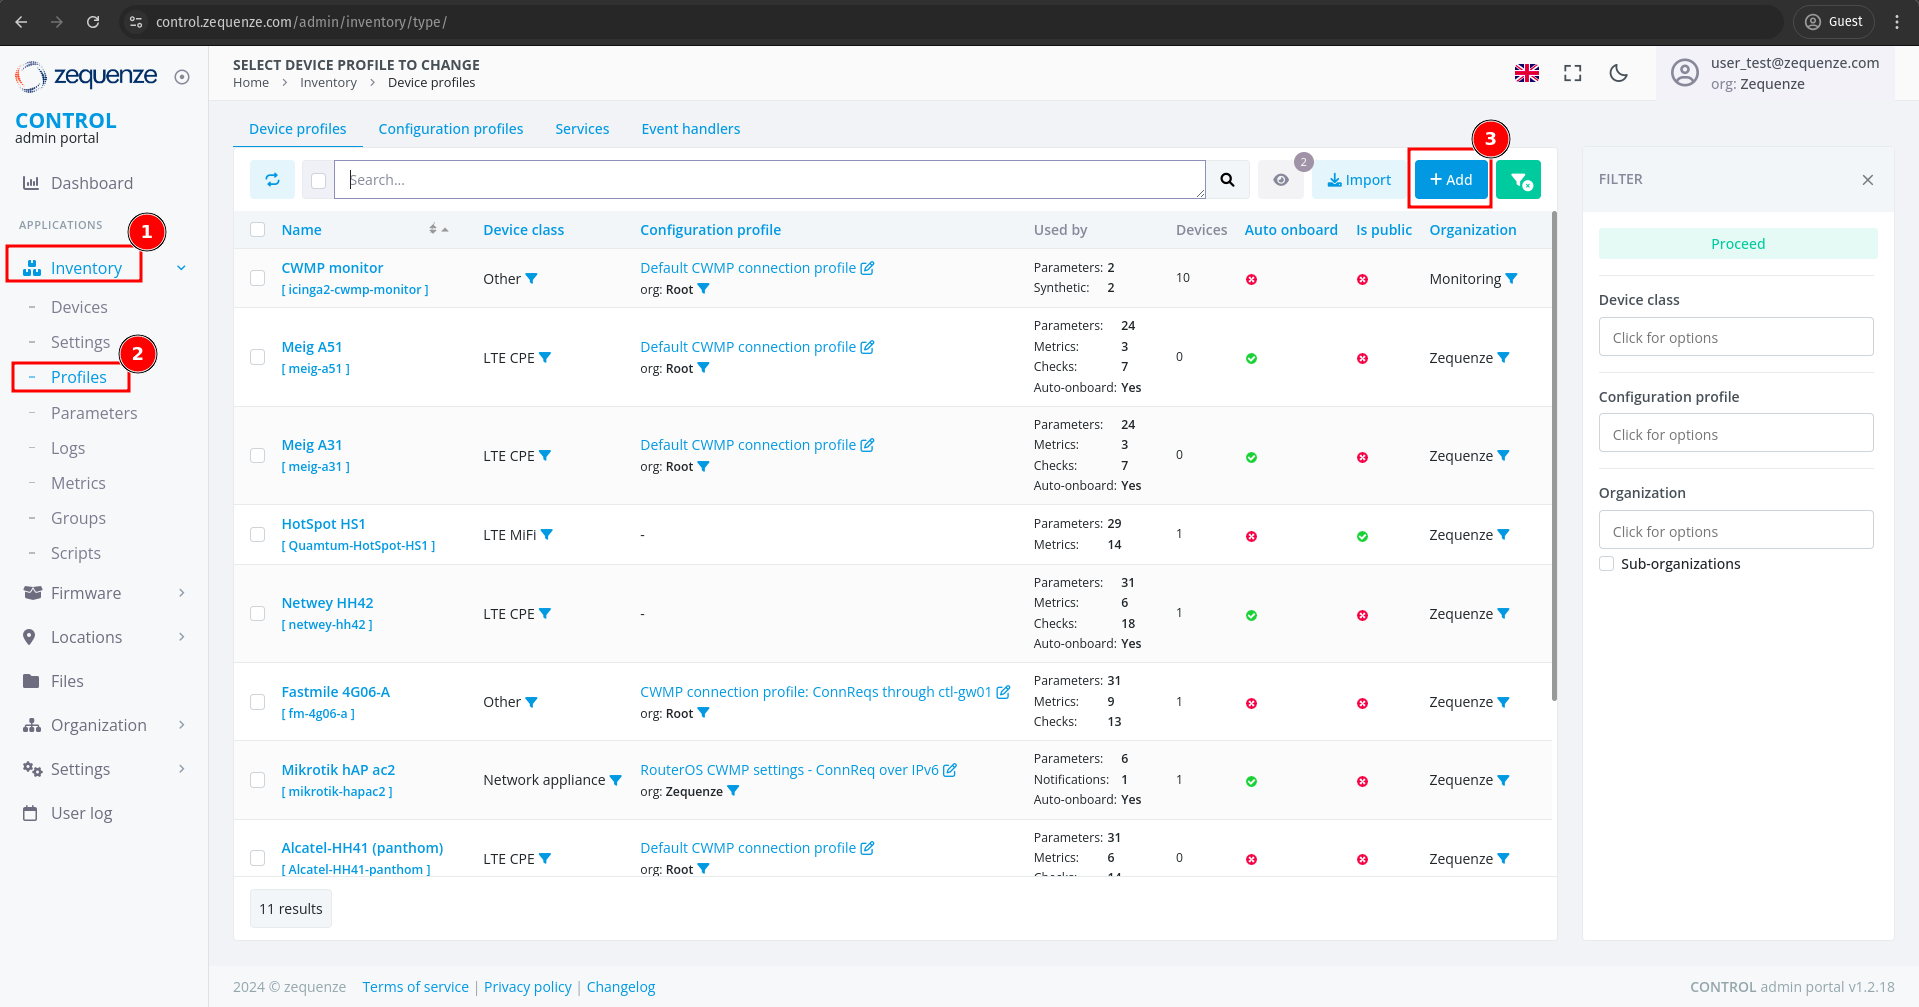 ---
### Configuring Profile Settings
You will see the profile creation page with the following fields:
---
### Configuring Profile Settings
You will see the profile creation page with the following fields:
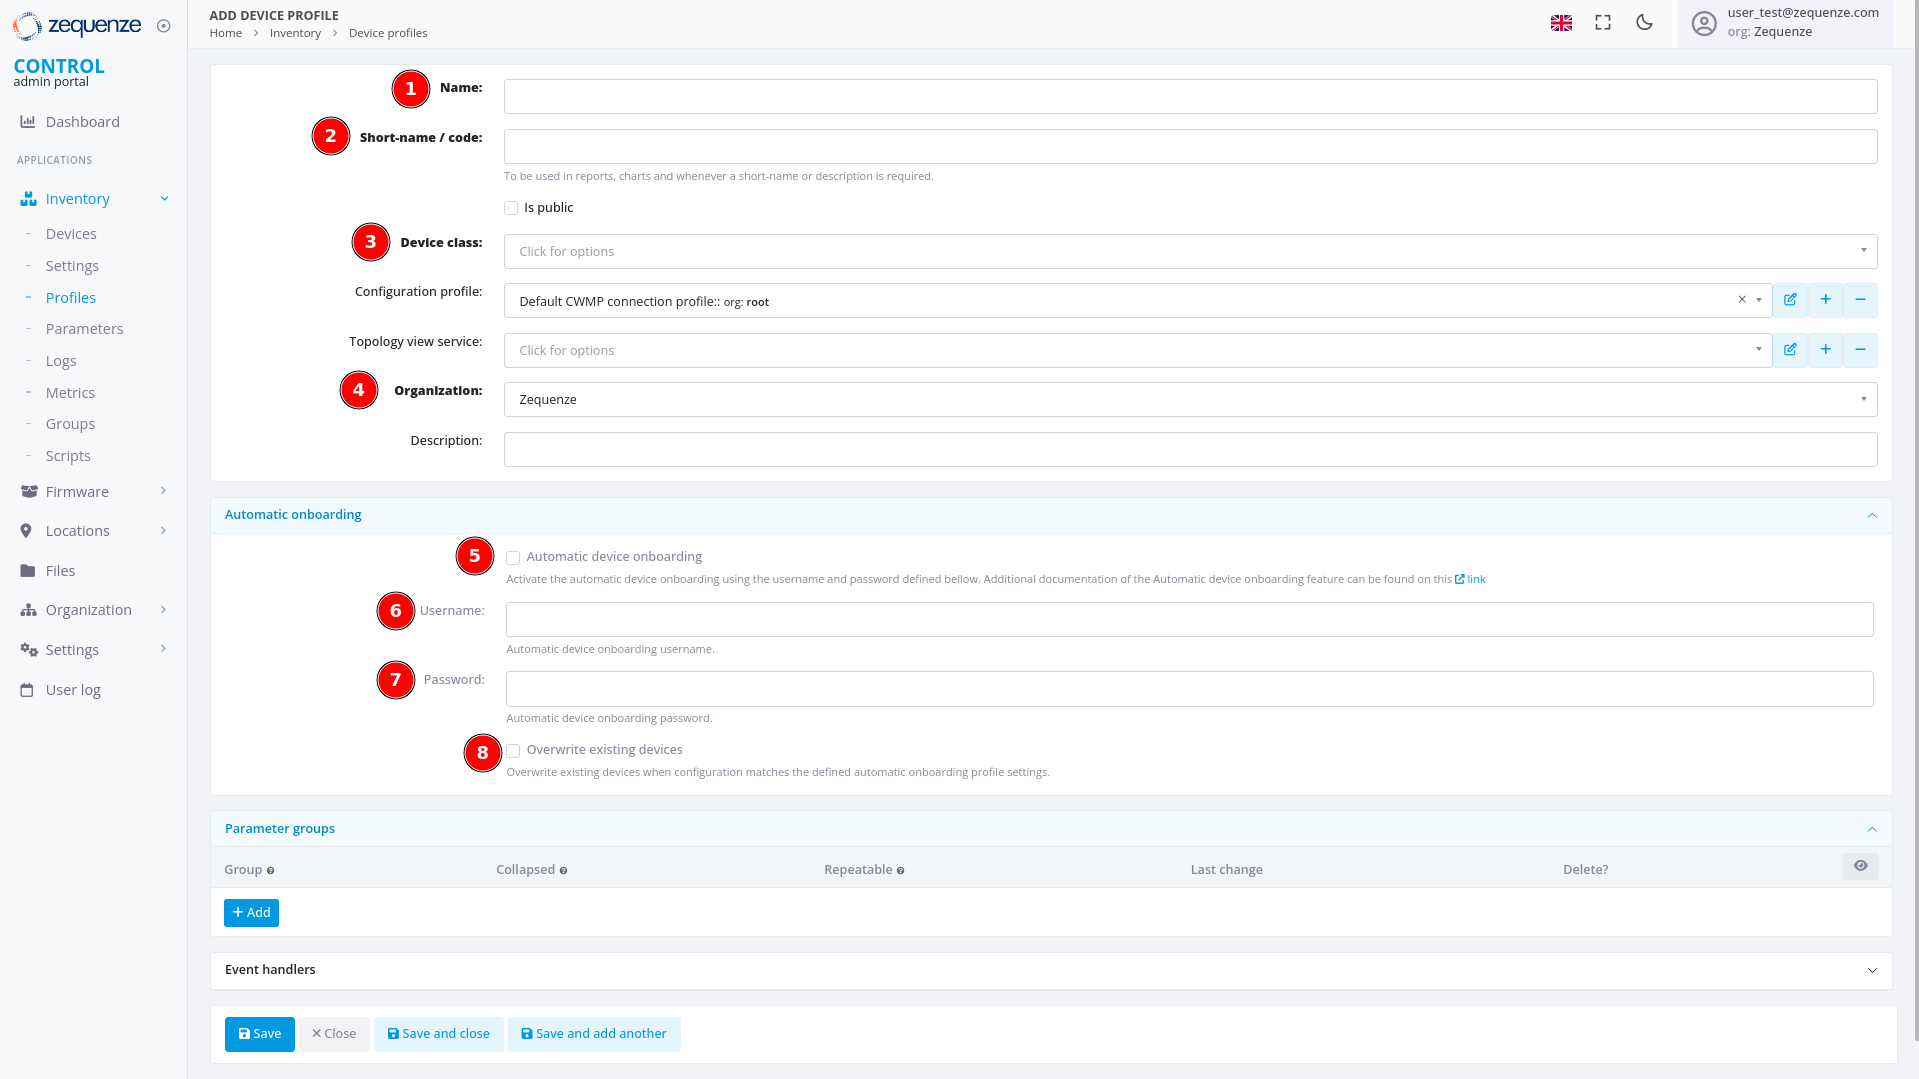 #### Required Fields
1. **Name**
Enter a descriptive identifier for this profile. Best practice is to use the format: **"Vendor Model [Base]"**
Example: *"Nokia G-1425G-B [Base]"*
2. **Short-name / code**
Provide an abbreviated version of the profile name.
Example: *"Nokia-G-1425G"*
3. **Device class**
Select the appropriate device type from the following options:
- eMTA
- ONT
- DSL CPE
- Fixed Wireless Access CPE
- LTE CPE
- LTE MiFI
- STB
- WiFi eXtender
- WiFi Mesh AP
- WiFi Mesh (master)
- WiFi Mesh (slave)
- WiFi AP
- VoIP phone
- VoIP ATA
- LAN Switch
- Router
- Network appliance
- SONDA probe
- Transport gateway
- Other
4. **Organization**
If applicable, select which organization this profile belongs to.
#### Automatic Device Onboarding Settings
5. **Automatic device onboarding**
Enable this option to allow the CONTROL platform to automatically assign new credentials to devices. This ensures each device receives unique username and password combinations for enhanced security.
6. **User**
Enter the default username that matches the factory credentials on the device. This username must match what is configured on devices connecting to the CONTROL platform.
7. **Password**
Enter the default password that matches the factory credentials on the device. Both username and password must match for automatic profile assignment to work correctly.
8. **Overwrite existing devices**
Enable this option to allow devices that have been reset to factory credentials to reconnect to the CONTROL platform. This prevents connection rejection when a device already exists in the system and ensures that devices returning to factory settings can still connect without issues.
---
### Example Configuration
Below is an example of a completed profile configuration:
#### Required Fields
1. **Name**
Enter a descriptive identifier for this profile. Best practice is to use the format: **"Vendor Model [Base]"**
Example: *"Nokia G-1425G-B [Base]"*
2. **Short-name / code**
Provide an abbreviated version of the profile name.
Example: *"Nokia-G-1425G"*
3. **Device class**
Select the appropriate device type from the following options:
- eMTA
- ONT
- DSL CPE
- Fixed Wireless Access CPE
- LTE CPE
- LTE MiFI
- STB
- WiFi eXtender
- WiFi Mesh AP
- WiFi Mesh (master)
- WiFi Mesh (slave)
- WiFi AP
- VoIP phone
- VoIP ATA
- LAN Switch
- Router
- Network appliance
- SONDA probe
- Transport gateway
- Other
4. **Organization**
If applicable, select which organization this profile belongs to.
#### Automatic Device Onboarding Settings
5. **Automatic device onboarding**
Enable this option to allow the CONTROL platform to automatically assign new credentials to devices. This ensures each device receives unique username and password combinations for enhanced security.
6. **User**
Enter the default username that matches the factory credentials on the device. This username must match what is configured on devices connecting to the CONTROL platform.
7. **Password**
Enter the default password that matches the factory credentials on the device. Both username and password must match for automatic profile assignment to work correctly.
8. **Overwrite existing devices**
Enable this option to allow devices that have been reset to factory credentials to reconnect to the CONTROL platform. This prevents connection rejection when a device already exists in the system and ensures that devices returning to factory settings can still connect without issues.
---
### Example Configuration
Below is an example of a completed profile configuration:
 Once all fields are configured, click **"Save and close"** to create the profile.
---
## Profile Created
After successfully creating the profile, you can:
1. **Filter by Name** - Use the search filter to locate your profile by its name
2. **View the Profile** - The newly created profile will appear in the profile list
Once all fields are configured, click **"Save and close"** to create the profile.
---
## Profile Created
After successfully creating the profile, you can:
1. **Filter by Name** - Use the search filter to locate your profile by its name
2. **View the Profile** - The newly created profile will appear in the profile list
 ---
## Next Steps
The next step is to configure a device with the credentials and URL settings.
# Add Device to CONTROL
## Overview
This guide walks you through configuring a device to connect to the CONTROL platform. In this example, we'll configure an ONT from an oriental vendor with TR069 credentials created in a previous step.
## Prerequisites
Before beginning, ensure you have:
- Valid TR069 credentials created in CONTROL (see the [Profile chapter](https://docs.zequenze.com/books/control/page/profile))
- Network access from the device to the CONTROL platform URL
- Administrative access to your device
## Step 1: Access Device Configuration
Log in to your device's web interface.
---
## Next Steps
The next step is to configure a device with the credentials and URL settings.
# Add Device to CONTROL
## Overview
This guide walks you through configuring a device to connect to the CONTROL platform. In this example, we'll configure an ONT from an oriental vendor with TR069 credentials created in a previous step.
## Prerequisites
Before beginning, ensure you have:
- Valid TR069 credentials created in CONTROL (see the [Profile chapter](https://docs.zequenze.com/books/control/page/profile))
- Network access from the device to the CONTROL platform URL
- Administrative access to your device
## Step 1: Access Device Configuration
Log in to your device's web interface.
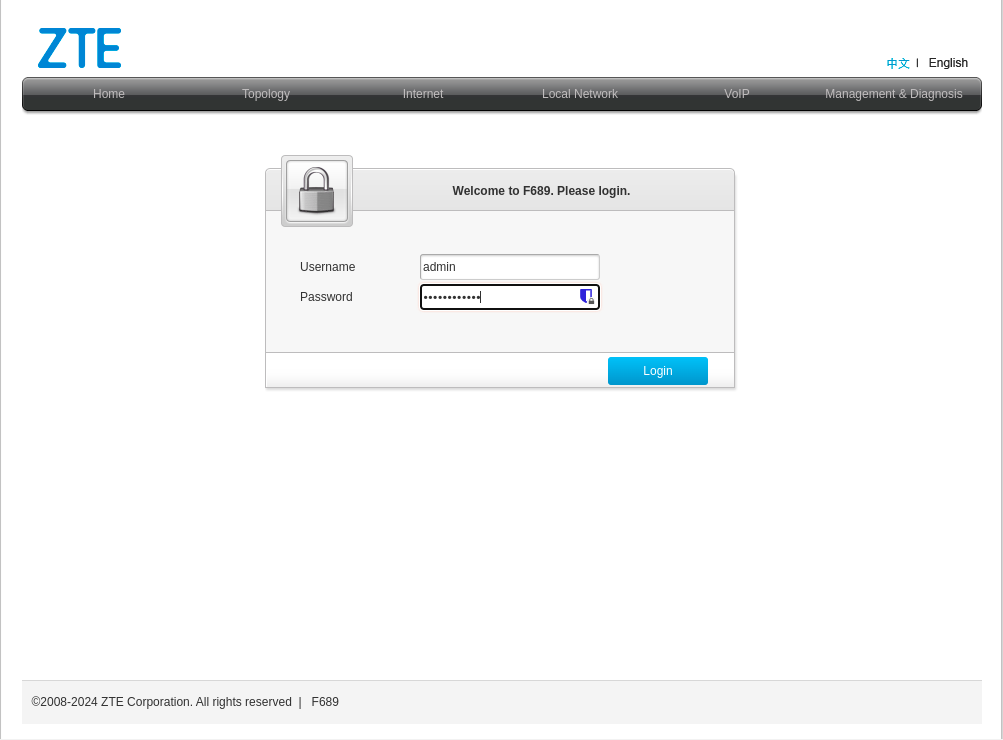 ## Step 2: Review Existing WAN Interfaces
After logging in, verify the existing WAN interfaces. This device has a pre-configured interface, but we'll examine the configuration and create a new one for demonstration purposes.
## Step 2: Review Existing WAN Interfaces
After logging in, verify the existing WAN interfaces. This device has a pre-configured interface, but we'll examine the configuration and create a new one for demonstration purposes.
 To navigate to the WAN interface configuration:
1. Click **"Internet"**
2. Click **"WAN"**
3. Click **"WAN"** again
4. In the displayed list, you'll see existing WAN interfaces (in this example, an interface named **"Management"**)
## Step 3: Create a New WAN Interface
Create a new WAN interface for TR069 connectivity:
To navigate to the WAN interface configuration:
1. Click **"Internet"**
2. Click **"WAN"**
3. Click **"WAN"** again
4. In the displayed list, you'll see existing WAN interfaces (in this example, an interface named **"Management"**)
## Step 3: Create a New WAN Interface
Create a new WAN interface for TR069 connectivity:
 1. Change the connection type from **"PPP"** to **"IP"**:
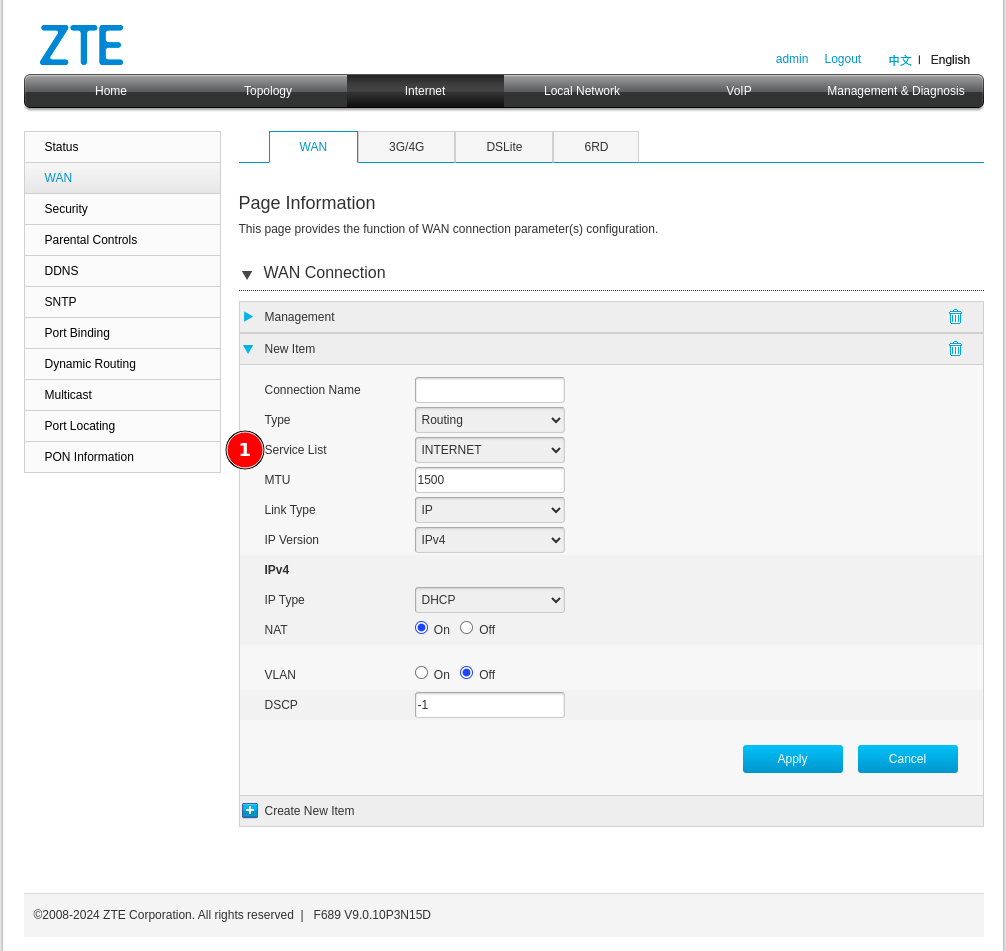 ## Step 4: Configure Service List Options
Next, configure the **"Service List"** type. Change it from *Internet* to one that includes *TR069*.
## Step 4: Configure Service List Options
Next, configure the **"Service List"** type. Change it from *Internet* to one that includes *TR069*.
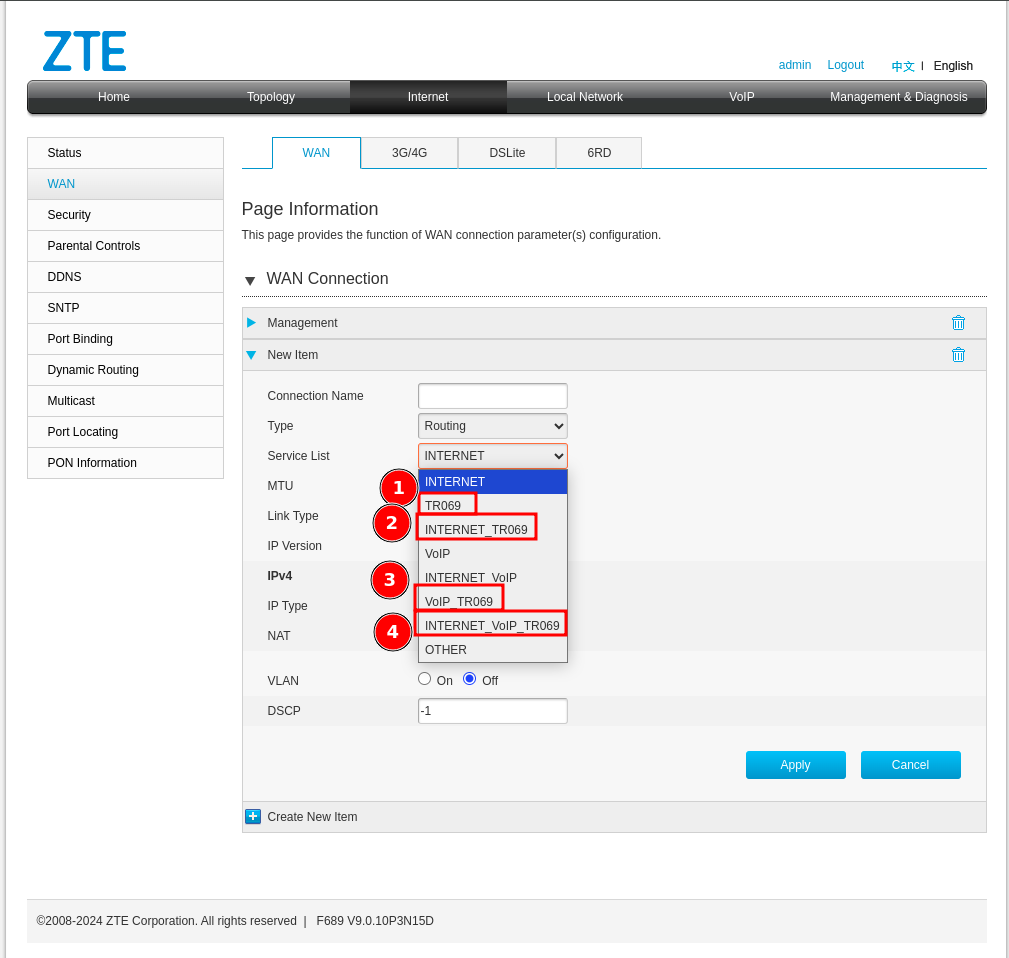 ### Understanding Service List Combinations
You may encounter several service list options in this device and possibly others. Here's what each means:
1. **TR069** — This option is alone, it is because there would be a separate WAN interface solely to manage the device through the CONTROL platform, which would be ideal but is often not possible due to network design issues that already exist.
2. **INTERNET_TR069** — With this option we will be sharing the Internet service for the user or client along with the administration of the device. **Not recommended** since when the service is suspended, access to the CONTROL platform is sometimes lost and communication would be limited until the service is reactivated.
3. **VOIP_TR069** — Sharing the TR069 service with VoIP may possibly be a good option since it would not affect the existing Internet services you already have.
4. **INTERNET_VoIP_TR069** — This last option would be to manage all the services in a single VLAN or WAN interface, which is rare for clients with this configuration, but it works.
## Step 5: Configure WAN Interface Parameters
Configure your WAN interface with the following settings:
### Understanding Service List Combinations
You may encounter several service list options in this device and possibly others. Here's what each means:
1. **TR069** — This option is alone, it is because there would be a separate WAN interface solely to manage the device through the CONTROL platform, which would be ideal but is often not possible due to network design issues that already exist.
2. **INTERNET_TR069** — With this option we will be sharing the Internet service for the user or client along with the administration of the device. **Not recommended** since when the service is suspended, access to the CONTROL platform is sometimes lost and communication would be limited until the service is reactivated.
3. **VOIP_TR069** — Sharing the TR069 service with VoIP may possibly be a good option since it would not affect the existing Internet services you already have.
4. **INTERNET_VoIP_TR069** — This last option would be to manage all the services in a single VLAN or WAN interface, which is rare for clients with this configuration, but it works.
## Step 5: Configure WAN Interface Parameters
Configure your WAN interface with the following settings:
 1. **Connection name** — Enter a descriptive name to identify this connection
2. **Service List** — Select **TR069**
3. **IP Version** — Select the appropriate IP version (IPv4 or IPv6)
4. **VLAN ID** — Enter the VLAN ID for this service
**Important:** Please make the necessary changes in your network configuration to ensure the device can reach the CONTROL platform URL through this WAN interface with the TR069 service enabled.
After clicking **Apply**, verify your configuration:
1. **Connection name** — Enter a descriptive name to identify this connection
2. **Service List** — Select **TR069**
3. **IP Version** — Select the appropriate IP version (IPv4 or IPv6)
4. **VLAN ID** — Enter the VLAN ID for this service
**Important:** Please make the necessary changes in your network configuration to ensure the device can reach the CONTROL platform URL through this WAN interface with the TR069 service enabled.
After clicking **Apply**, verify your configuration:
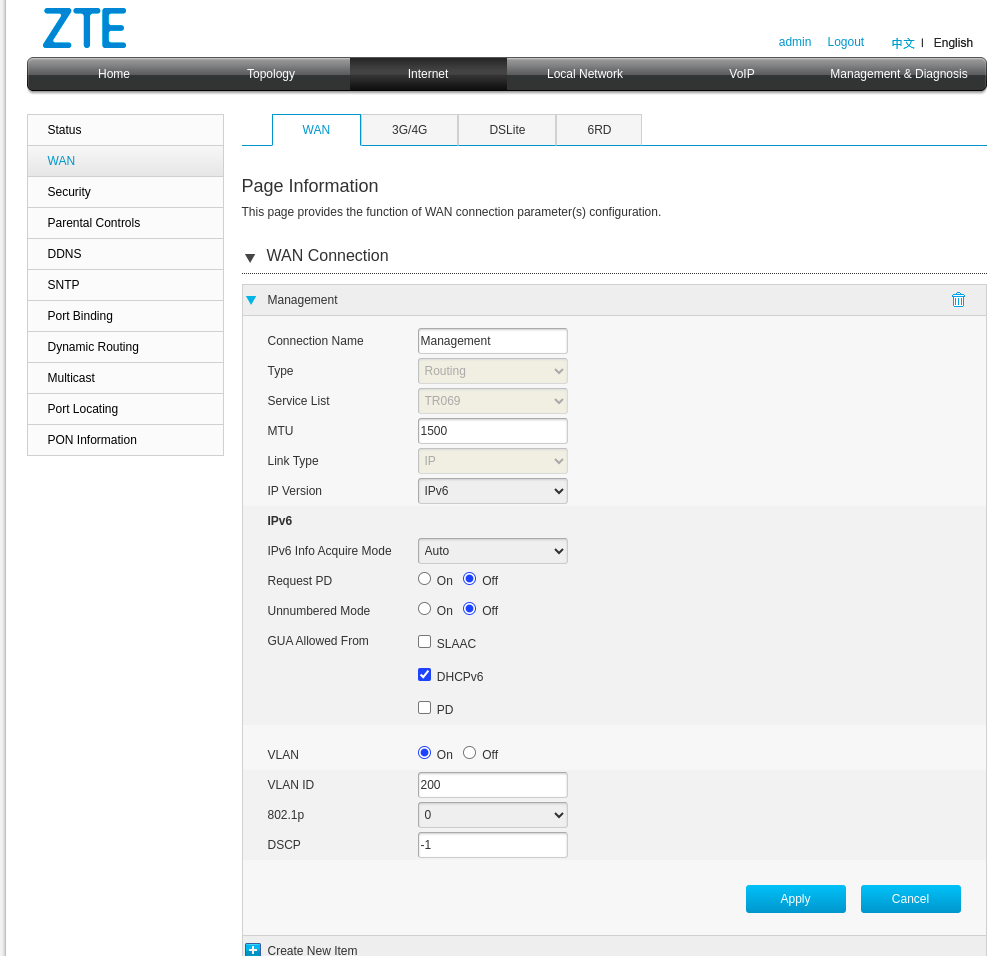 ## Step 6: Verify Network Connectivity
Confirm that the WAN interface has a valid IP address and can reach the CONTROL platform:
## Step 6: Verify Network Connectivity
Confirm that the WAN interface has a valid IP address and can reach the CONTROL platform:
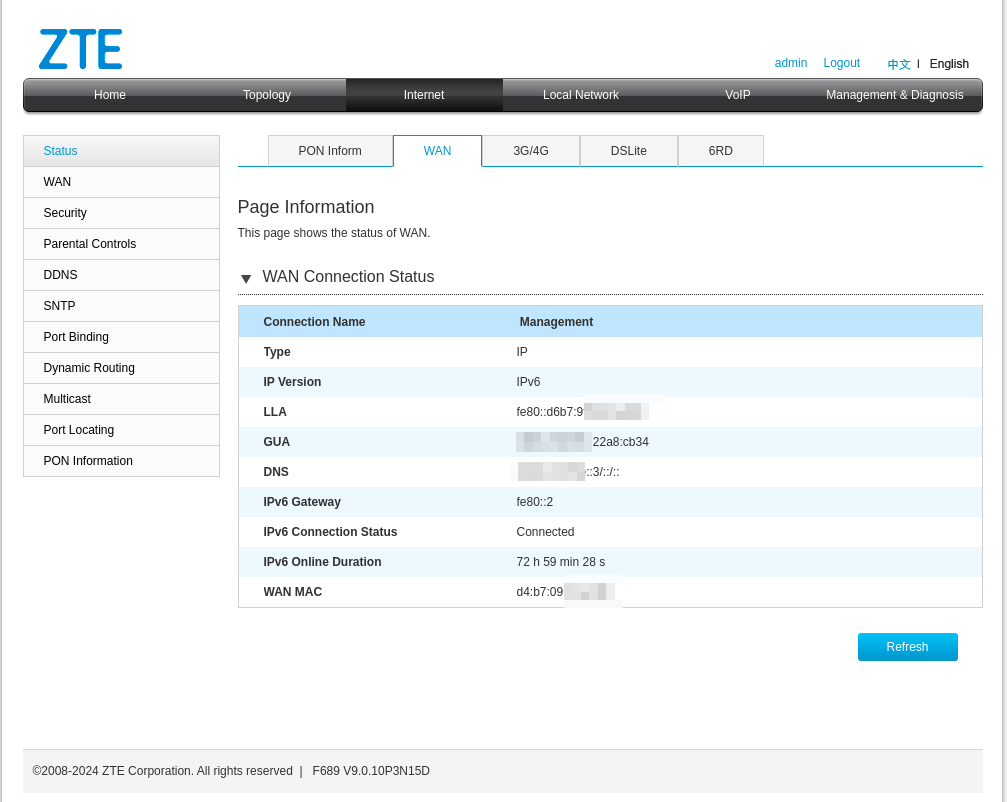 ### Optional: Test CONTROL Platform Connectivity
This step is optional, but you can confirm with a ping that the CONTROL URL can be reached using the device's built-in ping utility:
### Optional: Test CONTROL Platform Connectivity
This step is optional, but you can confirm with a ping that the CONTROL URL can be reached using the device's built-in ping utility:
 1. Navigate to **"Management & Diagnosis"**
2. Click **"Diagnosis"**
3. Under **"Egress"**, select your TR069 interface (e.g., **"Management"**)
4. Enter the CONTROL platform domain
5. Start the ping test
6. Confirm that all packets successfully reach CONTROL
## Step 7: Configure TR069 Settings
Navigate to the TR069 Management section:
1. Navigate to **"Management & Diagnosis"**
2. Click **"Diagnosis"**
3. Under **"Egress"**, select your TR069 interface (e.g., **"Management"**)
4. Enter the CONTROL platform domain
5. Start the ping test
6. Confirm that all packets successfully reach CONTROL
## Step 7: Configure TR069 Settings
Navigate to the TR069 Management section:
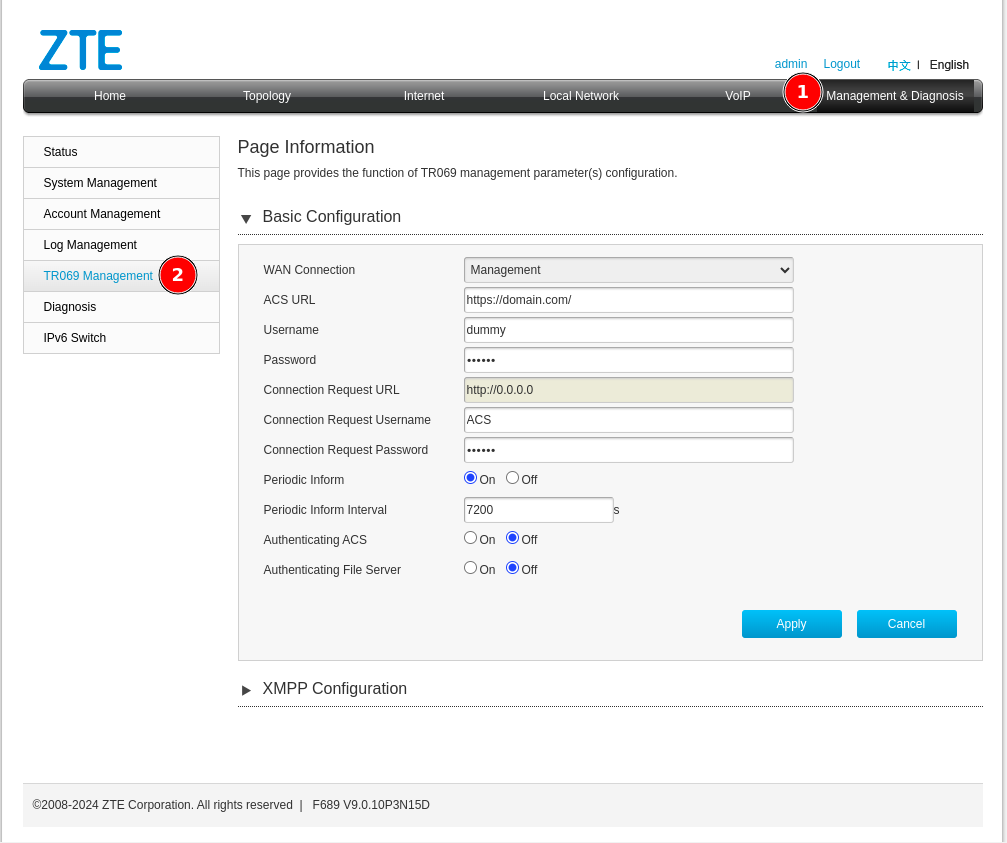 1. Click **"Management & Diagnosis"**
2. Click **"TR069 Management"**
## Step 8: Connect Device to CONTROL
Configure the TR069 parameters to establish connection with CONTROL:
1. Click **"Management & Diagnosis"**
2. Click **"TR069 Management"**
## Step 8: Connect Device to CONTROL
Configure the TR069 parameters to establish connection with CONTROL:
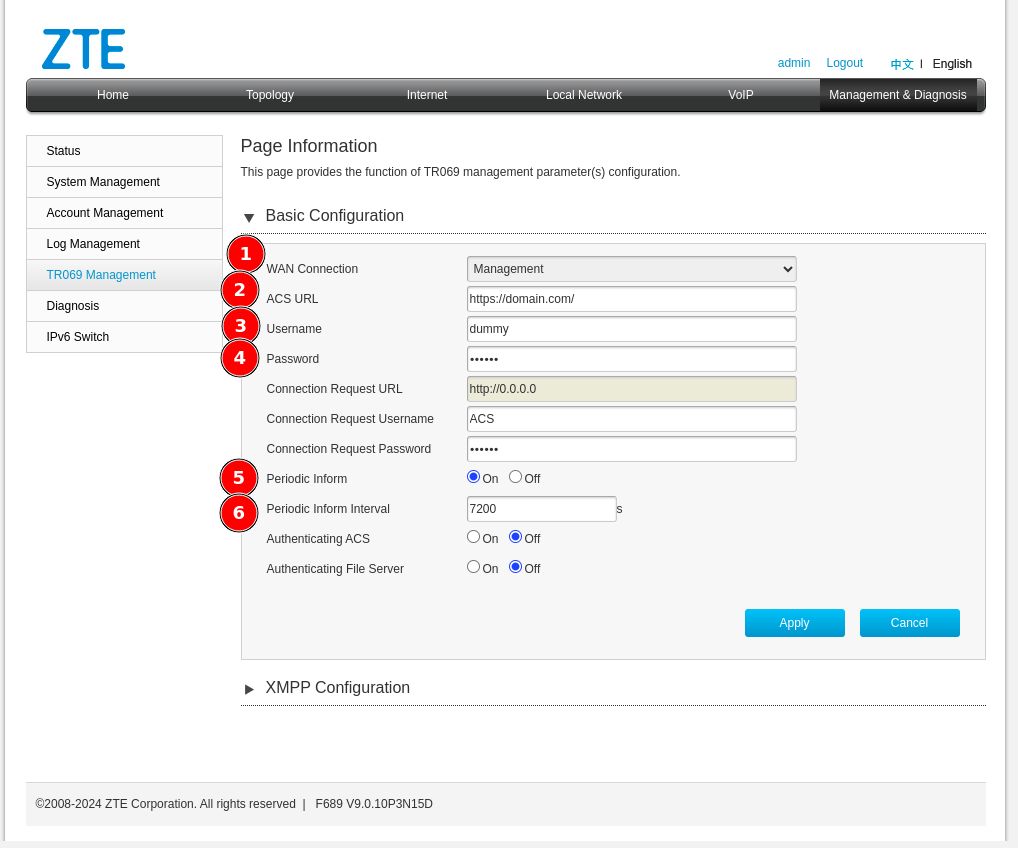 Configure the following parameters:
1. **WAN Connection** — Select the interface created for TR069 (e.g., *Management*)
2. **ACS URL** — Enter: `https://control.zequenze.com/cwmp/`
**Note:** Please confirm the correct URL with Zequenze staff before proceeding.
3. **Username** — Enter the username created in the [Profile chapter](https://docs.zequenze.com/books/control/page/profile)
4. **Password** — Enter the password created in the [Profile chapter](https://docs.zequenze.com/books/control/page/profile)
5. **Periodic Inform** — Enable this option to allow the device to report periodically to CONTROL
6. **Periodic Inform Interval** — For initial setup, set this to **180 seconds**
## Step 9: Apply Configuration
Review your final configuration:
Configure the following parameters:
1. **WAN Connection** — Select the interface created for TR069 (e.g., *Management*)
2. **ACS URL** — Enter: `https://control.zequenze.com/cwmp/`
**Note:** Please confirm the correct URL with Zequenze staff before proceeding.
3. **Username** — Enter the username created in the [Profile chapter](https://docs.zequenze.com/books/control/page/profile)
4. **Password** — Enter the password created in the [Profile chapter](https://docs.zequenze.com/books/control/page/profile)
5. **Periodic Inform** — Enable this option to allow the device to report periodically to CONTROL
6. **Periodic Inform Interval** — For initial setup, set this to **180 seconds**
## Step 9: Apply Configuration
Review your final configuration:
 Click the **Apply** button to save your changes.
## Next Steps
Device configuration is now complete. The device should appear in the CONTROL platform within the configured periodic inform interval. You can now proceed to manage and monitor your device through CONTROL.
# Discovering the parameters
## Confirm Device Connection
At this point, you should have a device successfully connected to the CONTROL platform, similar to the example shown below:
Click the **Apply** button to save your changes.
## Next Steps
Device configuration is now complete. The device should appear in the CONTROL platform within the configured periodic inform interval. You can now proceed to manage and monitor your device through CONTROL.
# Discovering the parameters
## Confirm Device Connection
At this point, you should have a device successfully connected to the CONTROL platform, similar to the example shown below:
 > **Note:** If the device list is empty, perform the following troubleshooting steps locally on the device:
>
> - **Try HTTP instead of HTTPS:** Change the CONTROL URL from `https://control.zequenze.com/cwmp/` to `http://control.zequenze.com/cwmp/`. If this works, the device does not support HTTPS or encrypted communication.
>
> - **Use IP address instead of domain:** Replace the domain `control.zequenze.com` with the CONTROL platform's IP address (e.g., `https://35.171.123.57/cwmp/` or `http://35.171.123.57/cwmp/`). If this works, verify the device's DNS configuration.
>
> - **Verify TR069 service:** Validate that the WAN interface has the TR069 service enabled to achieve connectivity to the CONTROL platform.
### Understanding the Interface
The screenshot above displays the following elements:
1. **Inventory** — Located on the left sidebar, this section contains devices, profiles, and other resources.
2. **Devices** — Displays the list of connected devices, showing their status as online or offline (with reasons for offline status).
3. **General** — The default section view when accessing a device.
4. **Name** — Automatically assigned by CONTROL as a unique identifier using the ONT's OUI-FSAN or serial number.
5. **Status** — Shows whether the device is UP or DOWN. Devices have a configured "Periodic Inform Interval" (e.g., 180 seconds). If the device fails to report within this interval, its status changes to DOWN.
6. **Profile** — Indicates which profile the device is assigned to.
7. **Serial** — Displays the serial number or FSAN reported by the device.
8. **SW Version** — Shows the current software version running on the device.
## Enable Parameter Discovery
To discover all available parameters from a device on the CONTROL platform, follow these steps:
> **Note:** If the device list is empty, perform the following troubleshooting steps locally on the device:
>
> - **Try HTTP instead of HTTPS:** Change the CONTROL URL from `https://control.zequenze.com/cwmp/` to `http://control.zequenze.com/cwmp/`. If this works, the device does not support HTTPS or encrypted communication.
>
> - **Use IP address instead of domain:** Replace the domain `control.zequenze.com` with the CONTROL platform's IP address (e.g., `https://35.171.123.57/cwmp/` or `http://35.171.123.57/cwmp/`). If this works, verify the device's DNS configuration.
>
> - **Verify TR069 service:** Validate that the WAN interface has the TR069 service enabled to achieve connectivity to the CONTROL platform.
### Understanding the Interface
The screenshot above displays the following elements:
1. **Inventory** — Located on the left sidebar, this section contains devices, profiles, and other resources.
2. **Devices** — Displays the list of connected devices, showing their status as online or offline (with reasons for offline status).
3. **General** — The default section view when accessing a device.
4. **Name** — Automatically assigned by CONTROL as a unique identifier using the ONT's OUI-FSAN or serial number.
5. **Status** — Shows whether the device is UP or DOWN. Devices have a configured "Periodic Inform Interval" (e.g., 180 seconds). If the device fails to report within this interval, its status changes to DOWN.
6. **Profile** — Indicates which profile the device is assigned to.
7. **Serial** — Displays the serial number or FSAN reported by the device.
8. **SW Version** — Shows the current software version running on the device.
## Enable Parameter Discovery
To discover all available parameters from a device on the CONTROL platform, follow these steps:
 ### Step 1: Navigate to Profiles
1. Click **Inventory** in the left sidebar.
2. Select **Profiles** from the menu.
3. (Optional) Use the filter to search for a specific profile name and press Enter.
4. Check the checkbox next to the desired profile to reveal additional options.
### Step 1: Navigate to Profiles
1. Click **Inventory** in the left sidebar.
2. Select **Profiles** from the menu.
3. (Optional) Use the filter to search for a specific profile name and press Enter.
4. Check the checkbox next to the desired profile to reveal additional options.
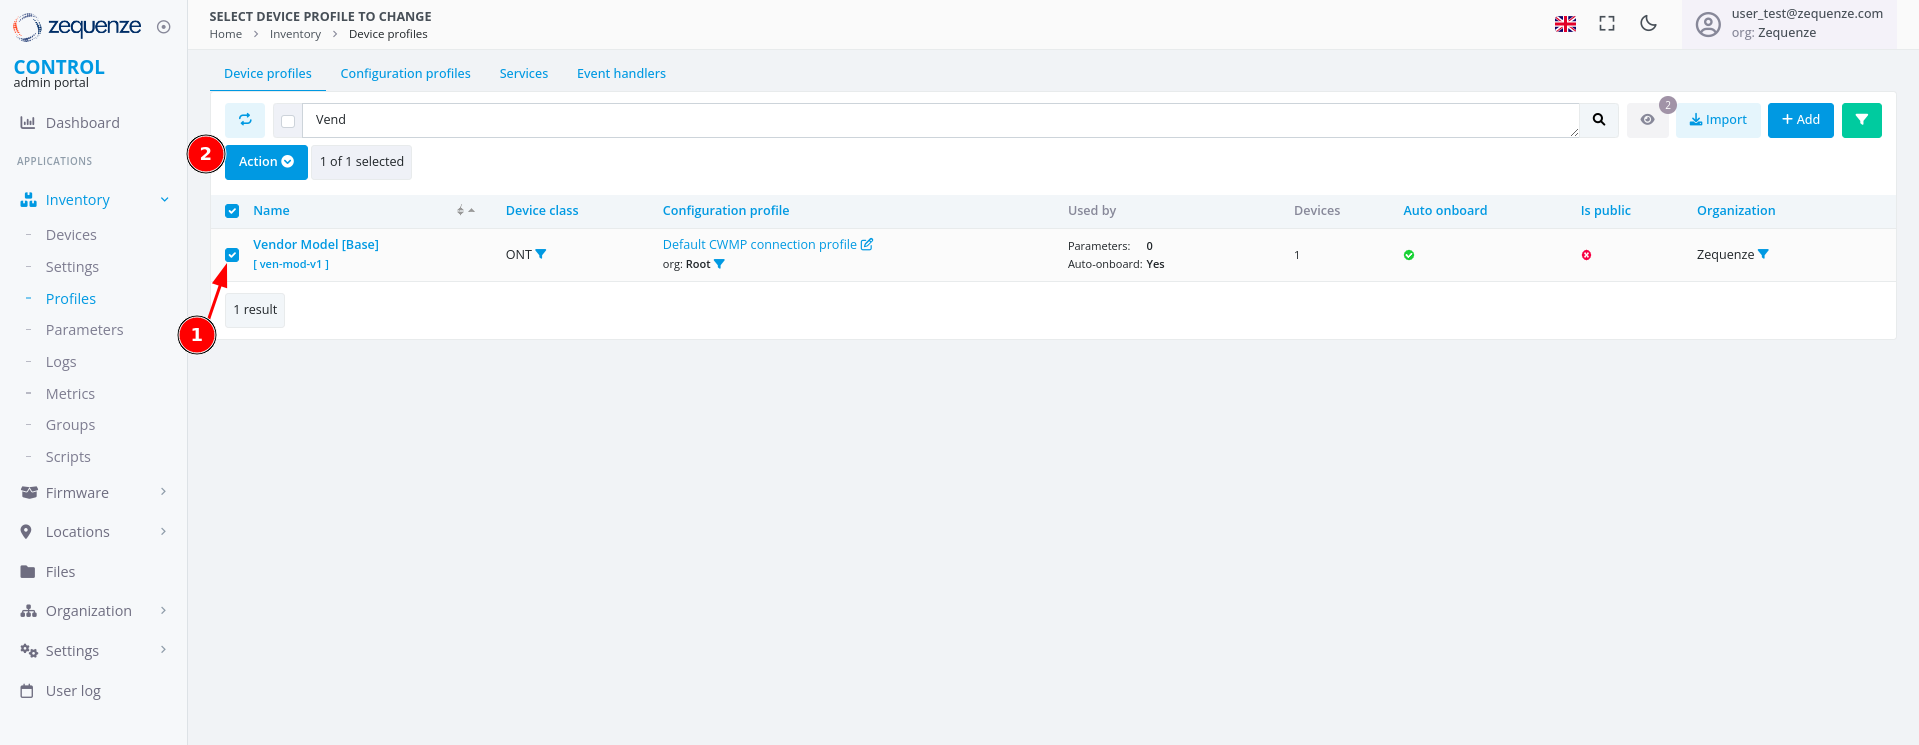 Once you check the checkbox:
1. The checkbox is marked and selected.
2. A new **"Action"** button appears.
### Step 2: Toggle Discovery
Once you check the checkbox:
1. The checkbox is marked and selected.
2. A new **"Action"** button appears.
### Step 2: Toggle Discovery
 1. Click the **"Action"** button.
2. Select **"Toggle Discovery"** from the dropdown menu.
3. A green gear icon will appear, confirming that the discovery process has started.
The CONTROL platform will now wait for the device to connect and retrieve all available parameters.
### Step 3: Monitor Discovery Progress
1. Click the **"Action"** button.
2. Select **"Toggle Discovery"** from the dropdown menu.
3. A green gear icon will appear, confirming that the discovery process has started.
The CONTROL platform will now wait for the device to connect and retrieve all available parameters.
### Step 3: Monitor Discovery Progress
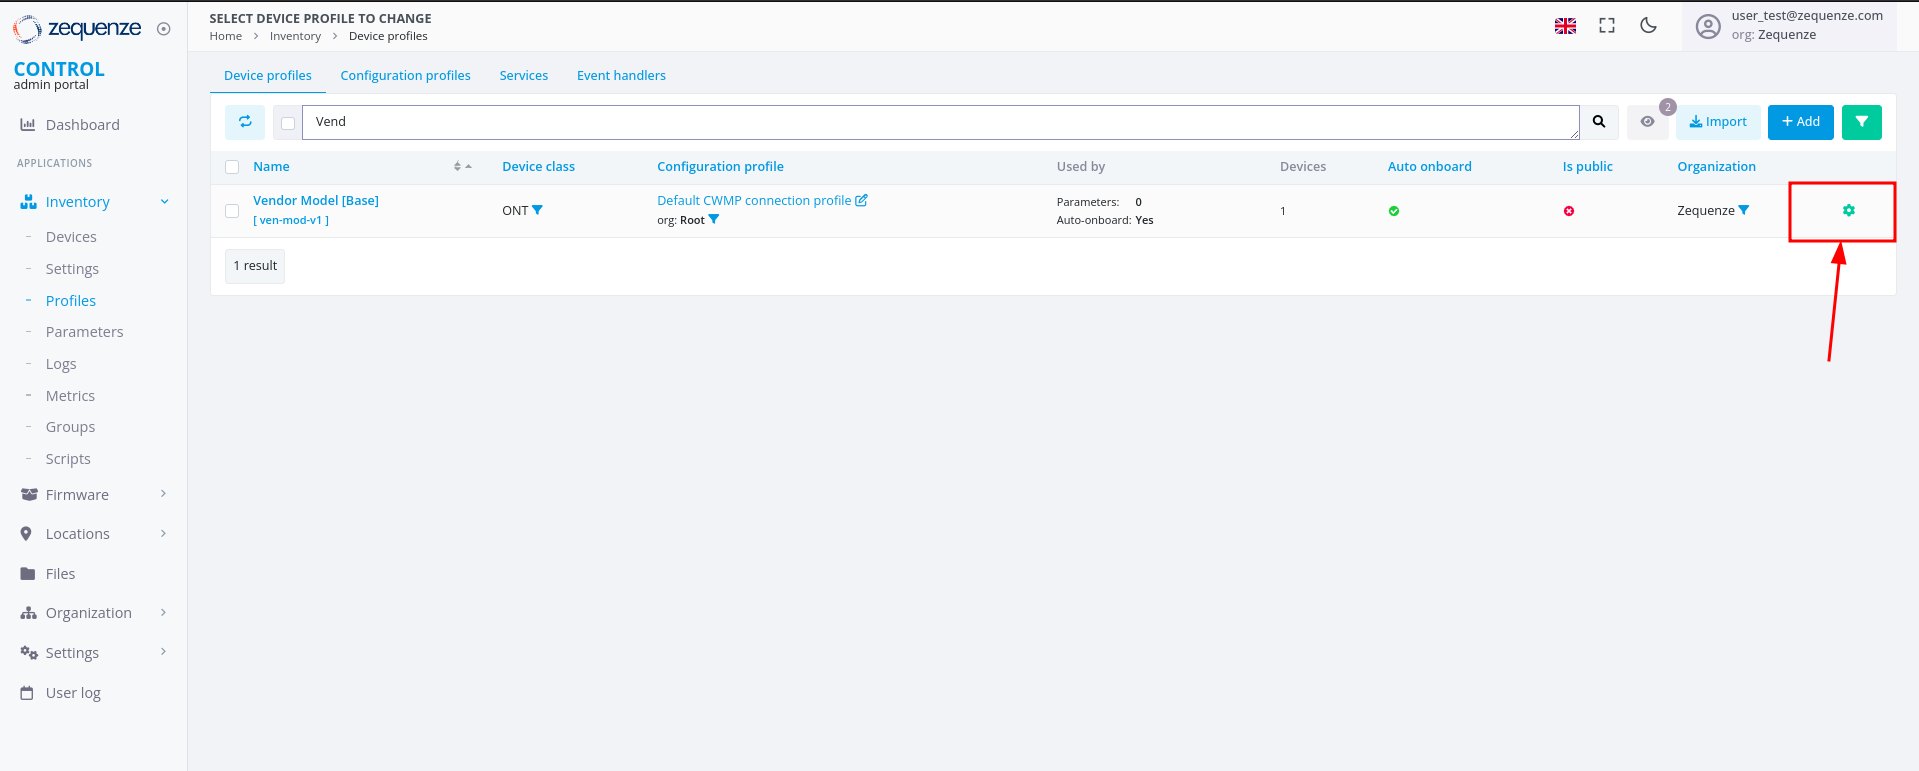 The green gear icon indicates that the platform is waiting to obtain all parameters from the device. Refresh the webpage to check when the gear icon disappears, signaling that discovery is complete.
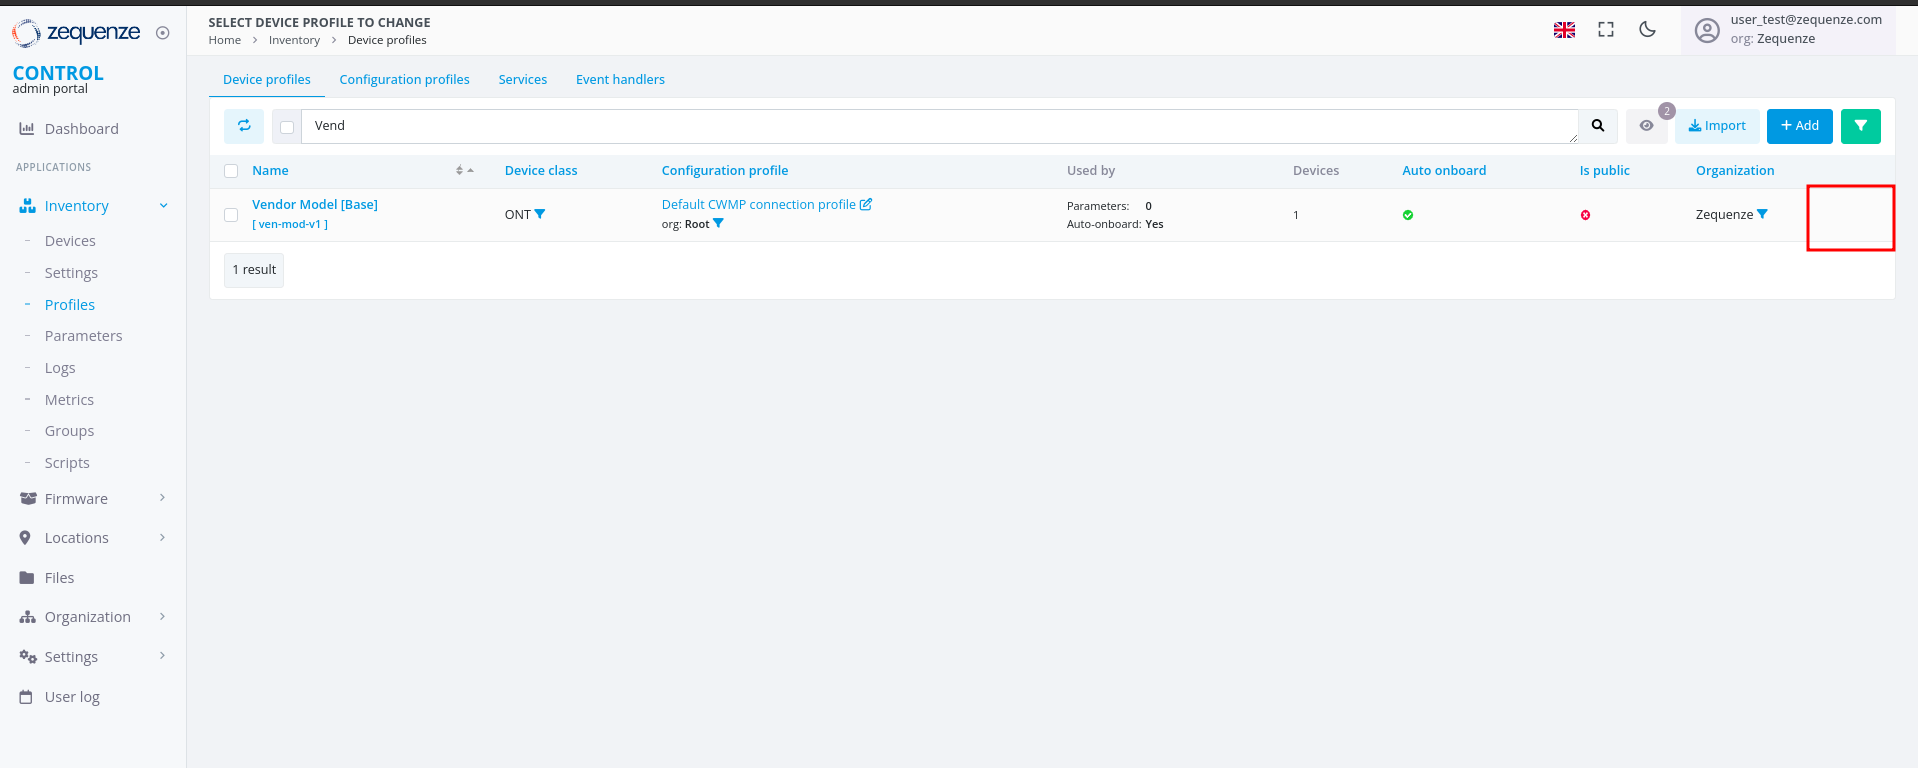 ## View Discovered Parameters
Once discovery is complete, you can view all discovered parameters.
### Access the Profile
Click on the profile name to open its details:
## View Discovered Parameters
Once discovery is complete, you can view all discovered parameters.
### Access the Profile
Click on the profile name to open its details:
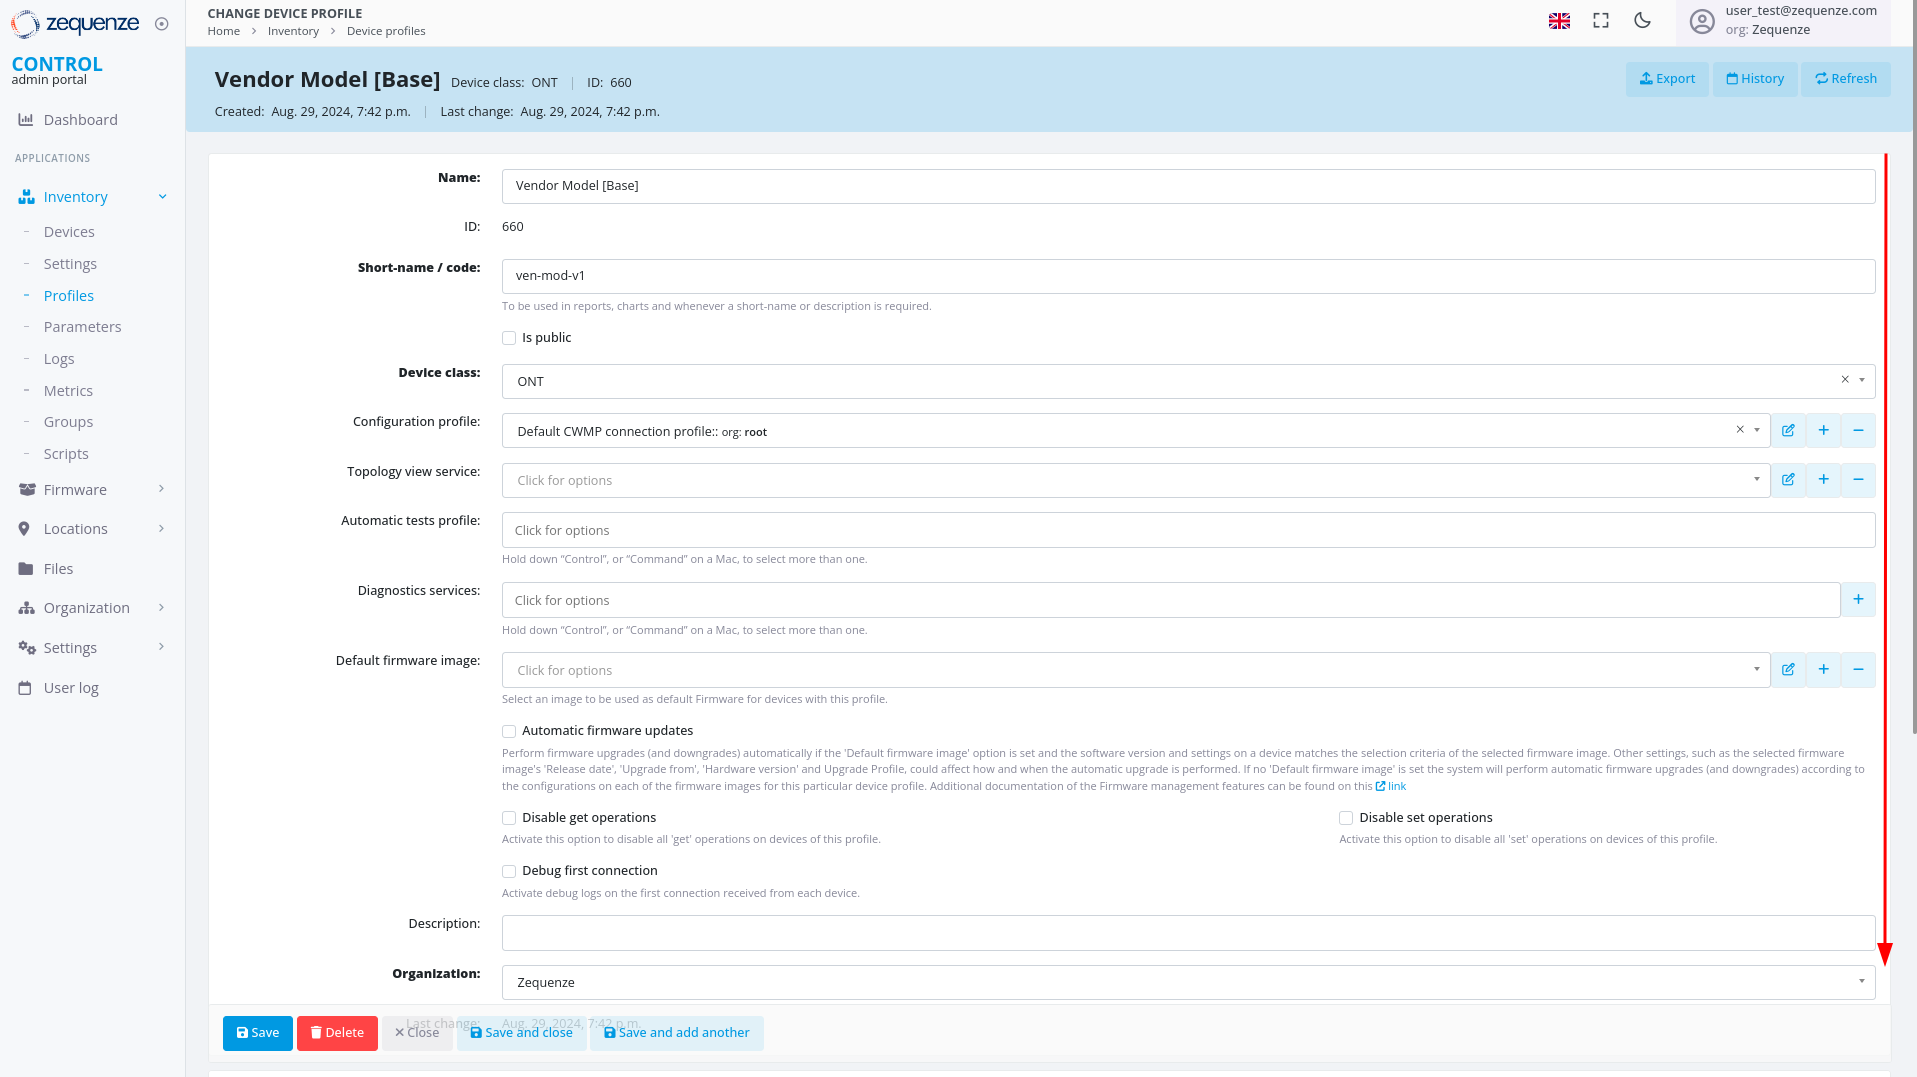 ### Locate System Groups
Inside the profile, scroll down to the bottom of the page to find the **System groups** section:
### Locate System Groups
Inside the profile, scroll down to the bottom of the page to find the **System groups** section:
 This section contains:
1. **System groups** — Where discovered parameters are stored.
2. **Group** — The name of the parameter group. For discovered parameters, this is typically the profile name followed by "Discovered".
3. **Move** — A button that displays the parameters and their count.
### View Parameter Details
Click the **"Move"** button to open the parameter viewer:
This section contains:
1. **System groups** — Where discovered parameters are stored.
2. **Group** — The name of the parameter group. For discovered parameters, this is typically the profile name followed by "Discovered".
3. **Move** — A button that displays the parameters and their count.
### View Parameter Details
Click the **"Move"** button to open the parameter viewer:
 This window displays:
1. **Variable name** — The name of each discovered parameter.
2. **Type** — The parameter data type (e.g., string, integer, date, etc.).
3. **Read-only** — Indicates whether the parameter is read-only or writable.
4. **Discovered value** — The value discovered from the example device.
5. **Values** — A table containing all parameter information.
6. **Pages** — Navigation controls for browsing multiple pages of parameters.
7. **Quantity** — The total number of parameters available for this device with its current firmware or software version.
> **Reference:** For detailed information about parameters, consult the standard documentation for [TR-098](https://cwmp-data-models.broadband-forum.org/tr-098-1-8-0.html) or [TR-181](https://cwmp-data-models.broadband-forum.org/tr-181-2-18-0-cwmp.html).
## Next Steps
You can now export all discovered parameters to Excel or other formats for local analysis. This process will be covered in the next section.
# Export the parameters
## Overview
This guide explains how to locate, filter, and export parameter groups from the CONTROL portal. You'll learn to navigate to the Parameters section, apply filters to find specific groups, and export the data in your preferred format.
---
## Navigate to the Parameters Section
Begin by accessing the Parameters area within the Inventory module.
[](https://docs.zequenze.com/uploads/images/gallery/2024-08/vCmPlY55Bib7hJ7E-image.png)
1. Click on **Inventory**
2. Click on **Parameters**
3. Click on **Parameters** again
4. Activate the filter by clicking the **green funnel icon**
---
## Filter Parameters by Group
Once the filter panel is open, you can search for specific parameter groups.
[](https://docs.zequenze.com/uploads/images/gallery/2024-08/toGhtf11sQI9qsl9-image.png)
1. The filter panel displays available filter options
2. Locate the **Group** field
### Search for Your Group
[](https://docs.zequenze.com/uploads/images/gallery/2024-08/OHrr7XF6n5tbCl8F-image.png)
1. In the **Group** field, enter a search term (e.g., type *"Disco"* to find all groups containing the word *"Discovered"*)
2. Select your desired group from the results (e.g., **"Vendor Model [Base] - Discovered"**)
3. Click the **Proceed** button to apply the filter
---
## Verify Filtered Results
After applying the filter, confirm that the correct parameters are displayed.
[](https://docs.zequenze.com/uploads/images/gallery/2024-08/uMZdfdQEezBuJMS4-image.png)
1. Review the applied Group filter
2. Verify that the parameter count matches the expected number from your Profile (you can confirm the quantity by comparing it with the number of parameters Discovered in the Profile)
3. Proceed to export the parameters
---
## Export the Parameters
### Initiate the Export
Click the **Export** button to open the export dialog.
[](https://docs.zequenze.com/uploads/images/gallery/2024-08/dbVMA4cDCxPZk9If-image.png)
### Select Export Format
Choose your preferred file format from the available options.
[](https://docs.zequenze.com/uploads/images/gallery/2024-08/rEfW5Ruensoz7Atn-image.png)
[](https://docs.zequenze.com/uploads/images/gallery/2024-08/O2xaE6N5ormqDOSv-image.png)
1. Select your desired format (e.g., **CSV**)
2. Click the **Export** button to start the export process
---
## Download the Exported File
### Monitor Export Progress
After initiating the export, a progress indicator appears at the top of your browser showing that the report is being generated.
[](https://docs.zequenze.com/uploads/images/gallery/2024-08/iOwGL8BWiW8FTxSP-image.png)
### Download Complete
When the export is ready, a download notification will appear.
[](https://docs.zequenze.com/uploads/images/gallery/2024-08/MlhHglIVaVDFrZgQ-image.png)
### Open the File
You can now open the exported CSV file to view your parameters.
[](https://docs.zequenze.com/uploads/images/gallery/2024-08/s0yf73kHf4Rnfrcu-image.png)
# Formatting the Parameters
This guide demonstrates how to format and organize parameters exported from CONTROL using a spreadsheet application. This example uses LibreOffice Calc, but you can apply the same process in Microsoft Excel or similar tools.
## Opening the Exported File
When you open the exported parameters file in LibreOffice, a **Text Import** dialog will appear:
This window displays:
1. **Variable name** — The name of each discovered parameter.
2. **Type** — The parameter data type (e.g., string, integer, date, etc.).
3. **Read-only** — Indicates whether the parameter is read-only or writable.
4. **Discovered value** — The value discovered from the example device.
5. **Values** — A table containing all parameter information.
6. **Pages** — Navigation controls for browsing multiple pages of parameters.
7. **Quantity** — The total number of parameters available for this device with its current firmware or software version.
> **Reference:** For detailed information about parameters, consult the standard documentation for [TR-098](https://cwmp-data-models.broadband-forum.org/tr-098-1-8-0.html) or [TR-181](https://cwmp-data-models.broadband-forum.org/tr-181-2-18-0-cwmp.html).
## Next Steps
You can now export all discovered parameters to Excel or other formats for local analysis. This process will be covered in the next section.
# Export the parameters
## Overview
This guide explains how to locate, filter, and export parameter groups from the CONTROL portal. You'll learn to navigate to the Parameters section, apply filters to find specific groups, and export the data in your preferred format.
---
## Navigate to the Parameters Section
Begin by accessing the Parameters area within the Inventory module.
[](https://docs.zequenze.com/uploads/images/gallery/2024-08/vCmPlY55Bib7hJ7E-image.png)
1. Click on **Inventory**
2. Click on **Parameters**
3. Click on **Parameters** again
4. Activate the filter by clicking the **green funnel icon**
---
## Filter Parameters by Group
Once the filter panel is open, you can search for specific parameter groups.
[](https://docs.zequenze.com/uploads/images/gallery/2024-08/toGhtf11sQI9qsl9-image.png)
1. The filter panel displays available filter options
2. Locate the **Group** field
### Search for Your Group
[](https://docs.zequenze.com/uploads/images/gallery/2024-08/OHrr7XF6n5tbCl8F-image.png)
1. In the **Group** field, enter a search term (e.g., type *"Disco"* to find all groups containing the word *"Discovered"*)
2. Select your desired group from the results (e.g., **"Vendor Model [Base] - Discovered"**)
3. Click the **Proceed** button to apply the filter
---
## Verify Filtered Results
After applying the filter, confirm that the correct parameters are displayed.
[](https://docs.zequenze.com/uploads/images/gallery/2024-08/uMZdfdQEezBuJMS4-image.png)
1. Review the applied Group filter
2. Verify that the parameter count matches the expected number from your Profile (you can confirm the quantity by comparing it with the number of parameters Discovered in the Profile)
3. Proceed to export the parameters
---
## Export the Parameters
### Initiate the Export
Click the **Export** button to open the export dialog.
[](https://docs.zequenze.com/uploads/images/gallery/2024-08/dbVMA4cDCxPZk9If-image.png)
### Select Export Format
Choose your preferred file format from the available options.
[](https://docs.zequenze.com/uploads/images/gallery/2024-08/rEfW5Ruensoz7Atn-image.png)
[](https://docs.zequenze.com/uploads/images/gallery/2024-08/O2xaE6N5ormqDOSv-image.png)
1. Select your desired format (e.g., **CSV**)
2. Click the **Export** button to start the export process
---
## Download the Exported File
### Monitor Export Progress
After initiating the export, a progress indicator appears at the top of your browser showing that the report is being generated.
[](https://docs.zequenze.com/uploads/images/gallery/2024-08/iOwGL8BWiW8FTxSP-image.png)
### Download Complete
When the export is ready, a download notification will appear.
[](https://docs.zequenze.com/uploads/images/gallery/2024-08/MlhHglIVaVDFrZgQ-image.png)
### Open the File
You can now open the exported CSV file to view your parameters.
[](https://docs.zequenze.com/uploads/images/gallery/2024-08/s0yf73kHf4Rnfrcu-image.png)
# Formatting the Parameters
This guide demonstrates how to format and organize parameters exported from CONTROL using a spreadsheet application. This example uses LibreOffice Calc, but you can apply the same process in Microsoft Excel or similar tools.
## Opening the Exported File
When you open the exported parameters file in LibreOffice, a **Text Import** dialog will appear:
 For most cases, you can simply click **OK** to accept the default import settings. If you're using Excel, you may need to use the "Import Data" function to load the file properly.
## Understanding the Parameter Sheet
After importing, you'll see a spreadsheet with many columns and parameters:
For most cases, you can simply click **OK** to accept the default import settings. If you're using Excel, you may need to use the "Import Data" function to load the file properly.
## Understanding the Parameter Sheet
After importing, you'll see a spreadsheet with many columns and parameters:
 Don't be intimidated by the number of parameters—once you understand the structure, working with them becomes straightforward.
## Extracting Key Columns
For this workflow, you'll need to create a new sheet and copy only four specific columns from the original data.
### Step 1: Create a New Sheet
Create a second sheet (Sheet2) in your workbook to organize the filtered data:
Don't be intimidated by the number of parameters—once you understand the structure, working with them becomes straightforward.
## Extracting Key Columns
For this workflow, you'll need to create a new sheet and copy only four specific columns from the original data.
### Step 1: Create a New Sheet
Create a second sheet (Sheet2) in your workbook to organize the filtered data:
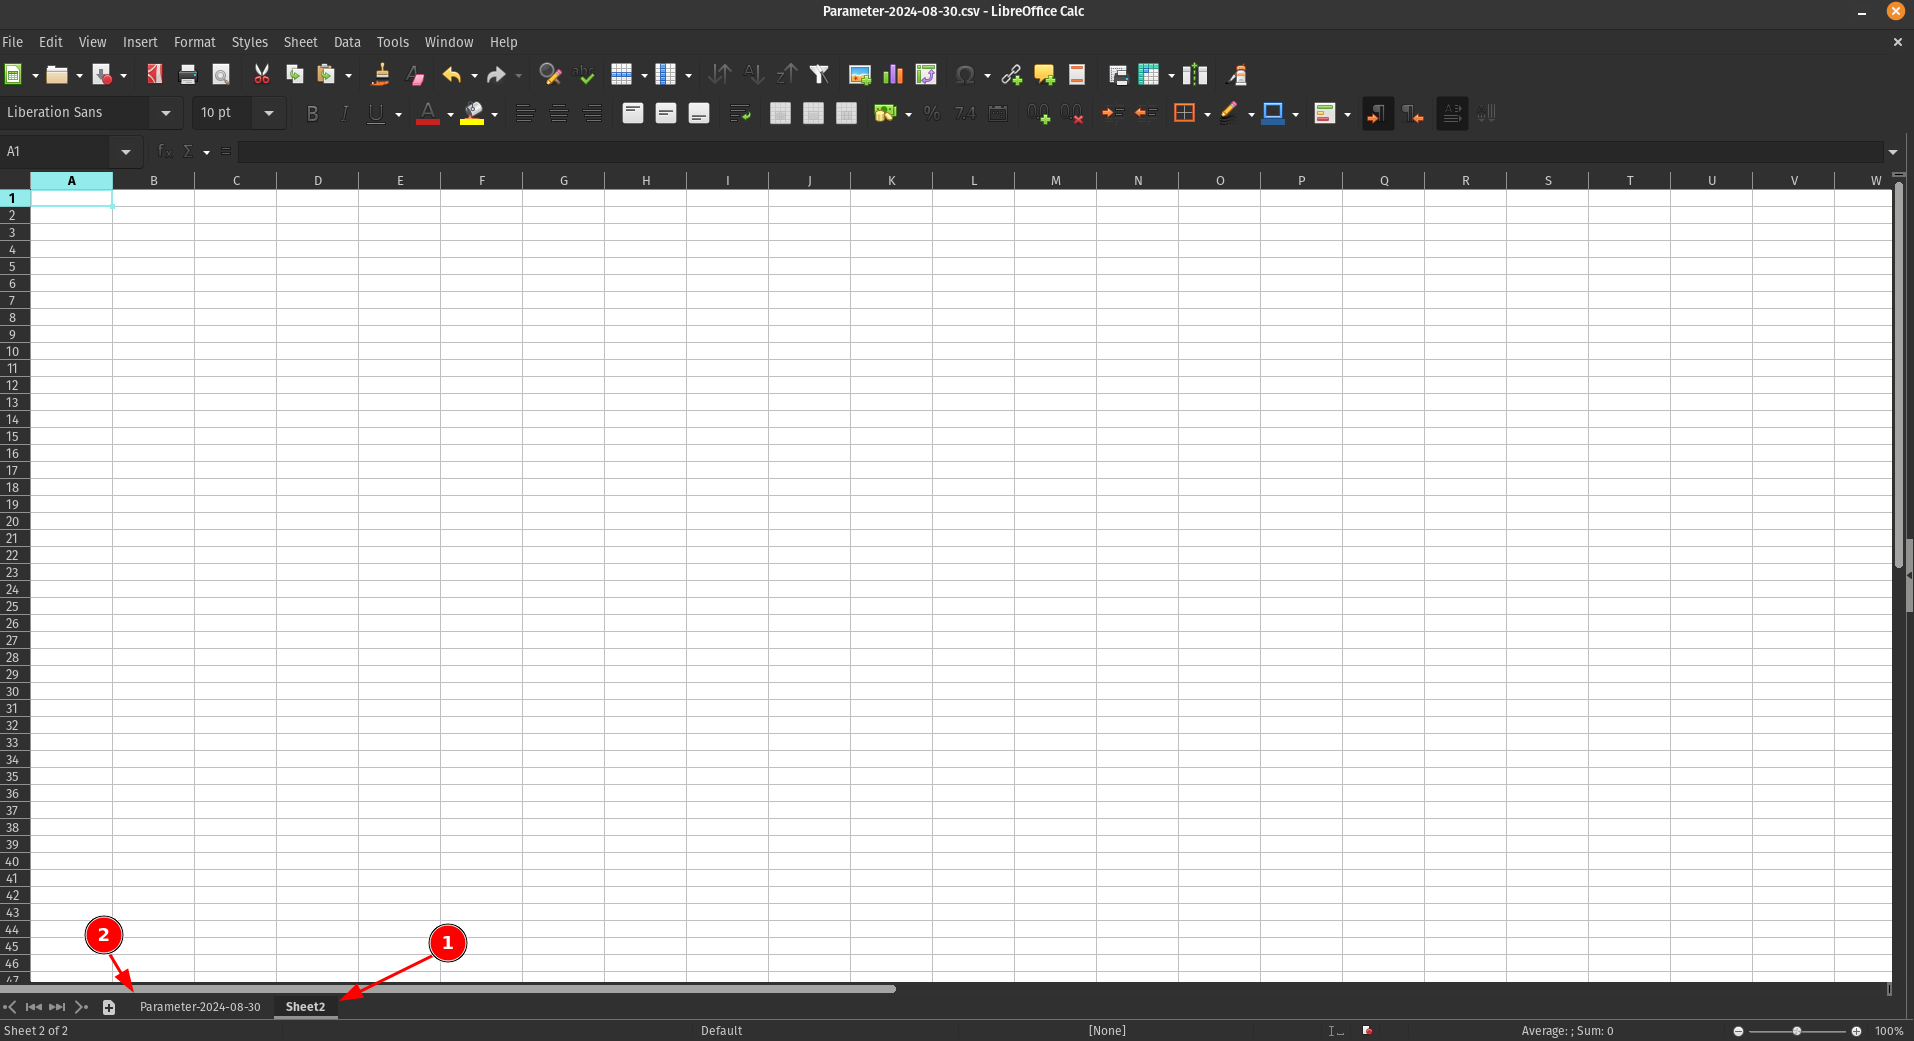 1. **Sheet2** - Your new working sheet
2. **Sheet1** - The original sheet with all parameters
### Step 2: Identify the Required Columns
From the original sheet, locate and copy the following four columns:
1. **Sheet2** - Your new working sheet
2. **Sheet1** - The original sheet with all parameters
### Step 2: Identify the Required Columns
From the original sheet, locate and copy the following four columns:
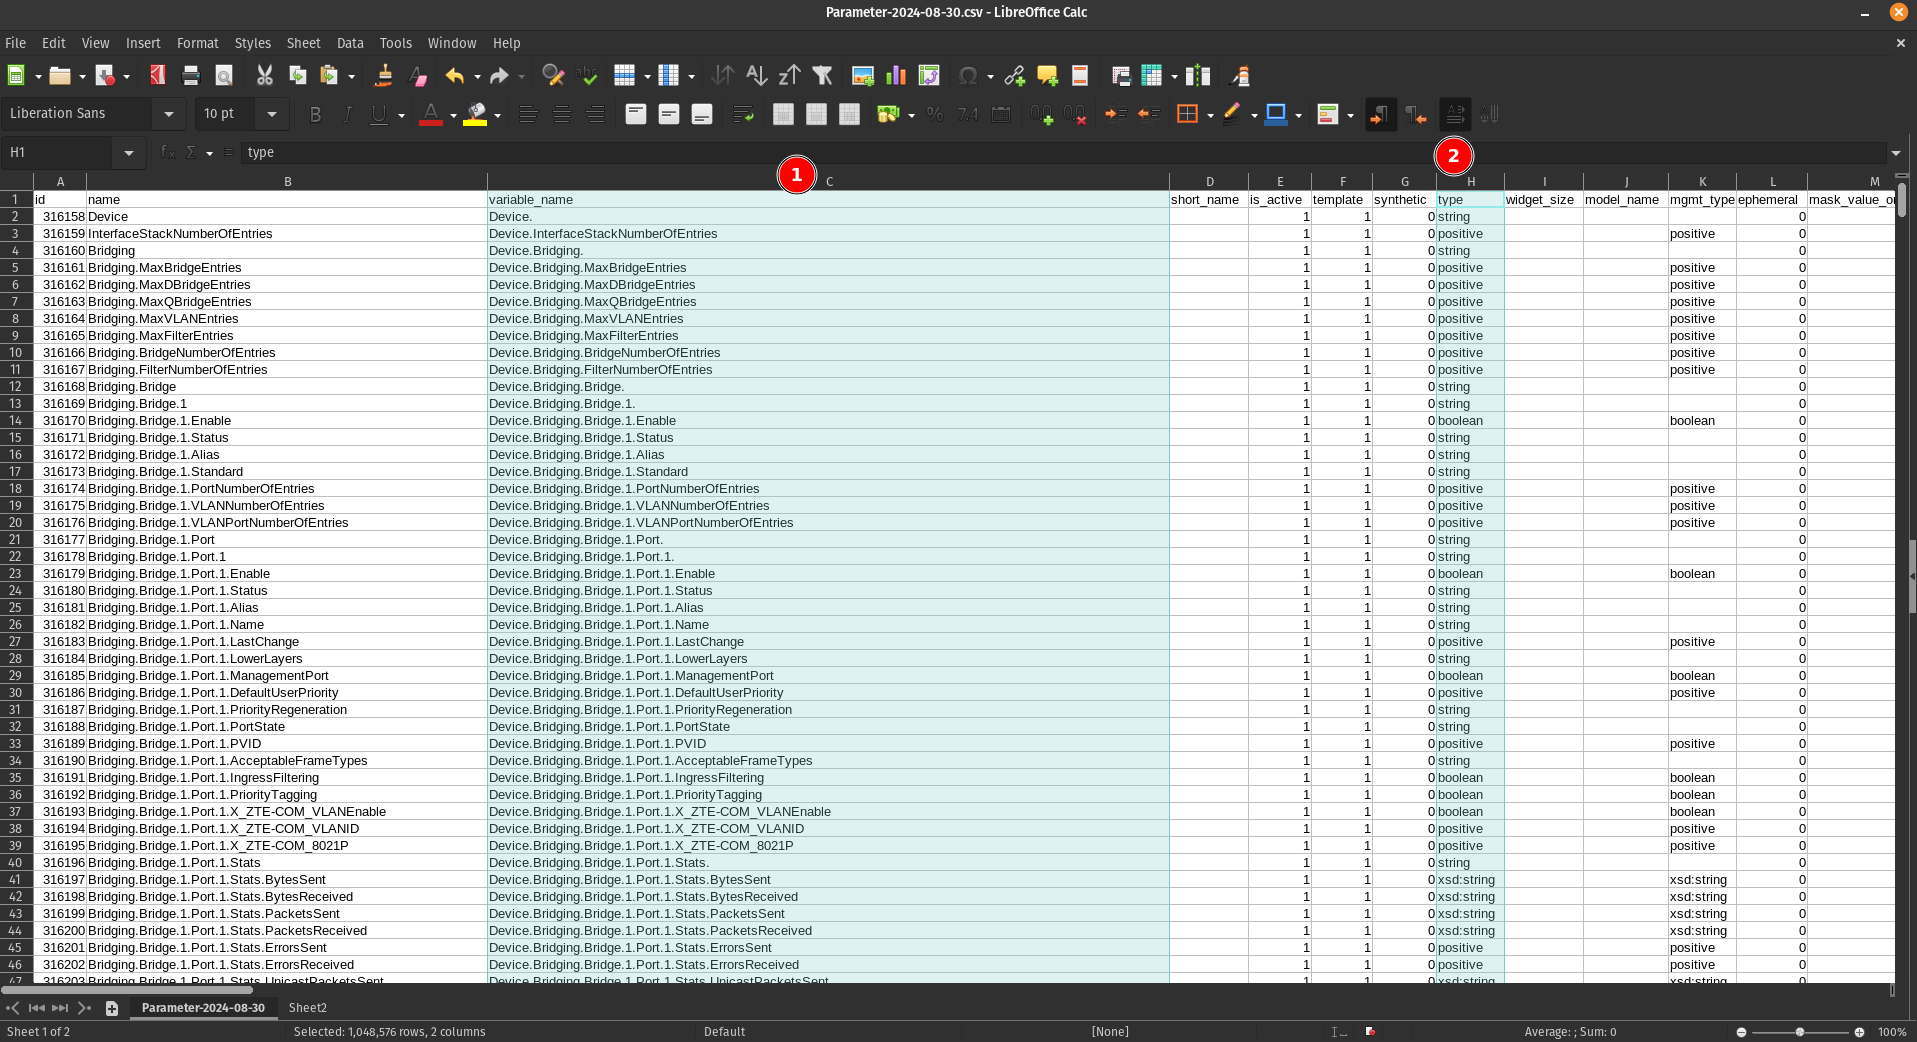 1. **Column C**
2. **Column H**
3. **Column R**
4. **Column AY**
### Step 3: Paste into Sheet2
Copy these four columns and paste them into Sheet2:
1. **Column C**
2. **Column H**
3. **Column R**
4. **Column AY**
### Step 3: Paste into Sheet2
Copy these four columns and paste them into Sheet2:
 ## Understanding the Column Structure
Your new sheet now contains four essential columns:
1. **variable_name** - Lists all parameters available for devices using this software version
2. **type** - Indicates the data type of each parameter (string, integer, boolean, etc.) and tells us what kind of parameter it is
3. **read_only** - Shows whether the parameter is read-only or can be modified. Some parameters are only read-only and you can't write to them
4. **discovered_value** - Displays the current value of each parameter (for example, the name of one SSID for a WiFi 2.4GHz network)
## Sorting the Parameters
To make the parameters easier to work with, sort them alphabetically by the first column (variable_name):
## Understanding the Column Structure
Your new sheet now contains four essential columns:
1. **variable_name** - Lists all parameters available for devices using this software version
2. **type** - Indicates the data type of each parameter (string, integer, boolean, etc.) and tells us what kind of parameter it is
3. **read_only** - Shows whether the parameter is read-only or can be modified. Some parameters are only read-only and you can't write to them
4. **discovered_value** - Displays the current value of each parameter (for example, the name of one SSID for a WiFi 2.4GHz network)
## Sorting the Parameters
To make the parameters easier to work with, sort them alphabetically by the first column (variable_name):
 **Note:** Make sure to include the header row when sorting so the column titles remain in place.
### Result
After sorting, your parameters will be organized alphabetically:
**Note:** Make sure to include the header row when sorting so the column titles remain in place.
### Result
After sorting, your parameters will be organized alphabetically:
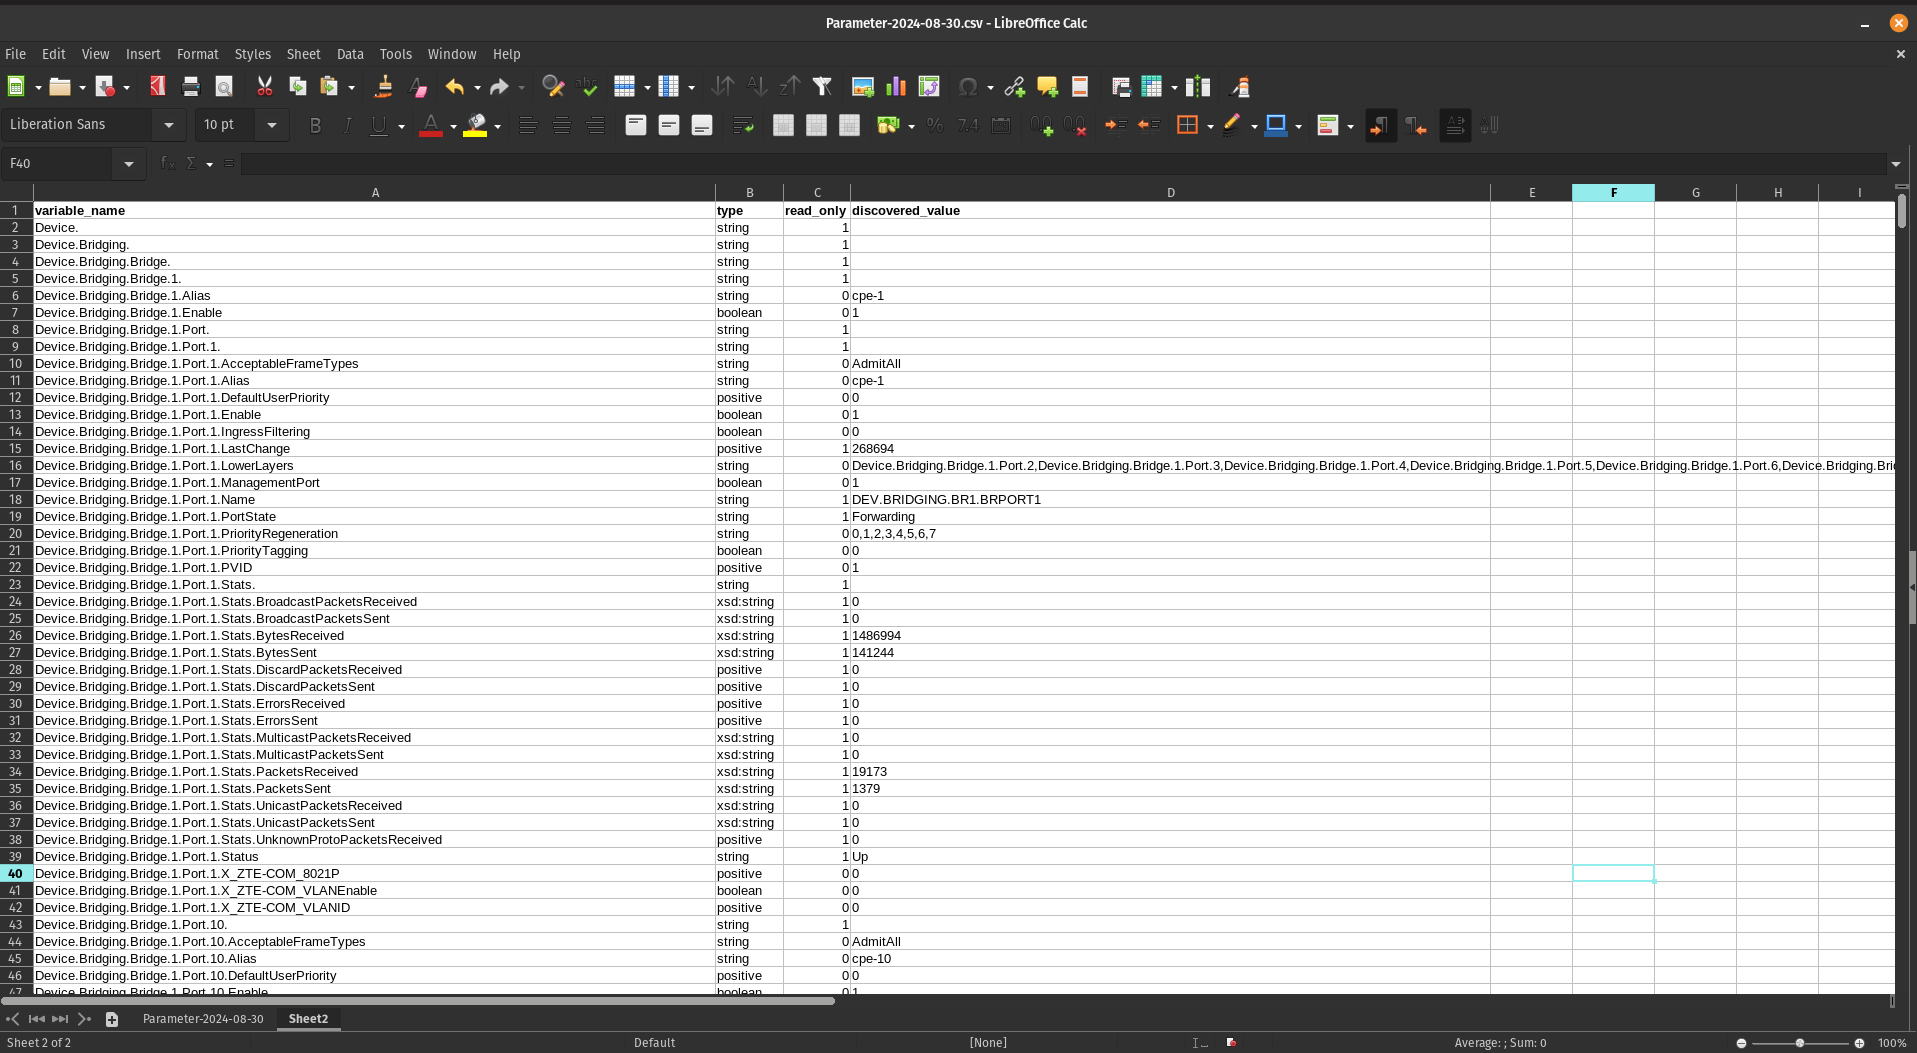 ## Next Steps
With your parameters now organized and easy to navigate, you can begin creating configuration profiles by selecting the specific parameters that meet your requirements.
# First Parameters
## Group Parameters
Before adding parameters to CONTROL, we recommend organizing them into logical groups. This section demonstrates how to group device information parameters as an example.
### Step 1: Identify Parameters in Your Spreadsheet
Begin by locating the parameters you want to group. For this example, we'll group four device information parameters:
## Next Steps
With your parameters now organized and easy to navigate, you can begin creating configuration profiles by selecting the specific parameters that meet your requirements.
# First Parameters
## Group Parameters
Before adding parameters to CONTROL, we recommend organizing them into logical groups. This section demonstrates how to group device information parameters as an example.
### Step 1: Identify Parameters in Your Spreadsheet
Begin by locating the parameters you want to group. For this example, we'll group four device information parameters:
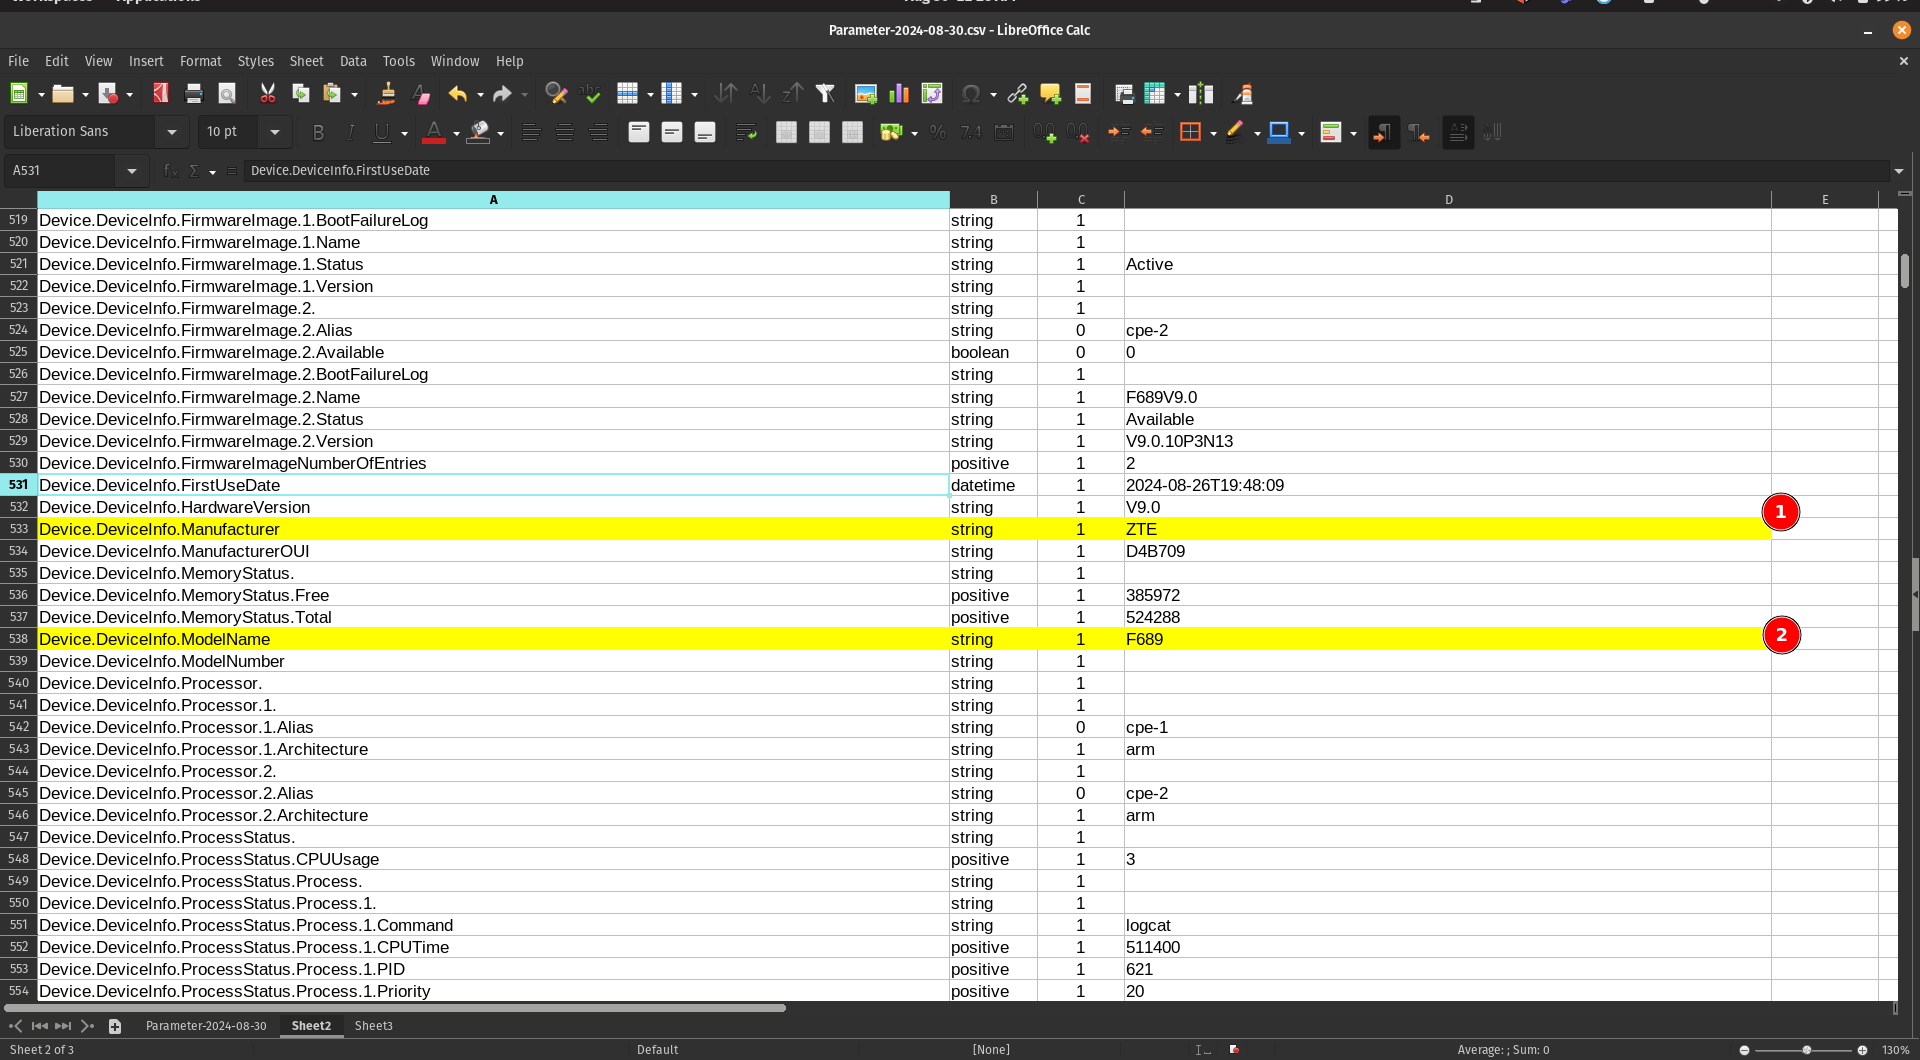 1. Locate the **Manufacturer** parameter
2. Locate the **ModelName** parameter
### Step 2: Copy Parameters to a New Sheet
When you mark or find the parameters you need, copy them to a separate sheet for easier organization:
1. Locate the **Manufacturer** parameter
2. Locate the **ModelName** parameter
### Step 2: Copy Parameters to a New Sheet
When you mark or find the parameters you need, copy them to a separate sheet for easier organization:
 ### Step 3: Add Friendly Names
Add a new **"name"** column to create user-friendly labels for each parameter:
### Step 3: Add Friendly Names
Add a new **"name"** column to create user-friendly labels for each parameter:
 You can assign a short, descriptive name for each "variable_name" to establish a clear relationship between the technical parameter name and its display name.
---
## Add Parameters to a Profile
Now that you've organized your parameters, it's time to add them to your device profile in CONTROL.
### Step 1: Navigate to Parameter Groups Section
Return to the profile you created previously and scroll down to the bottom of the page:
You can assign a short, descriptive name for each "variable_name" to establish a clear relationship between the technical parameter name and its display name.
---
## Add Parameters to a Profile
Now that you've organized your parameters, it's time to add them to your device profile in CONTROL.
### Step 1: Navigate to Parameter Groups Section
Return to the profile you created previously and scroll down to the bottom of the page:
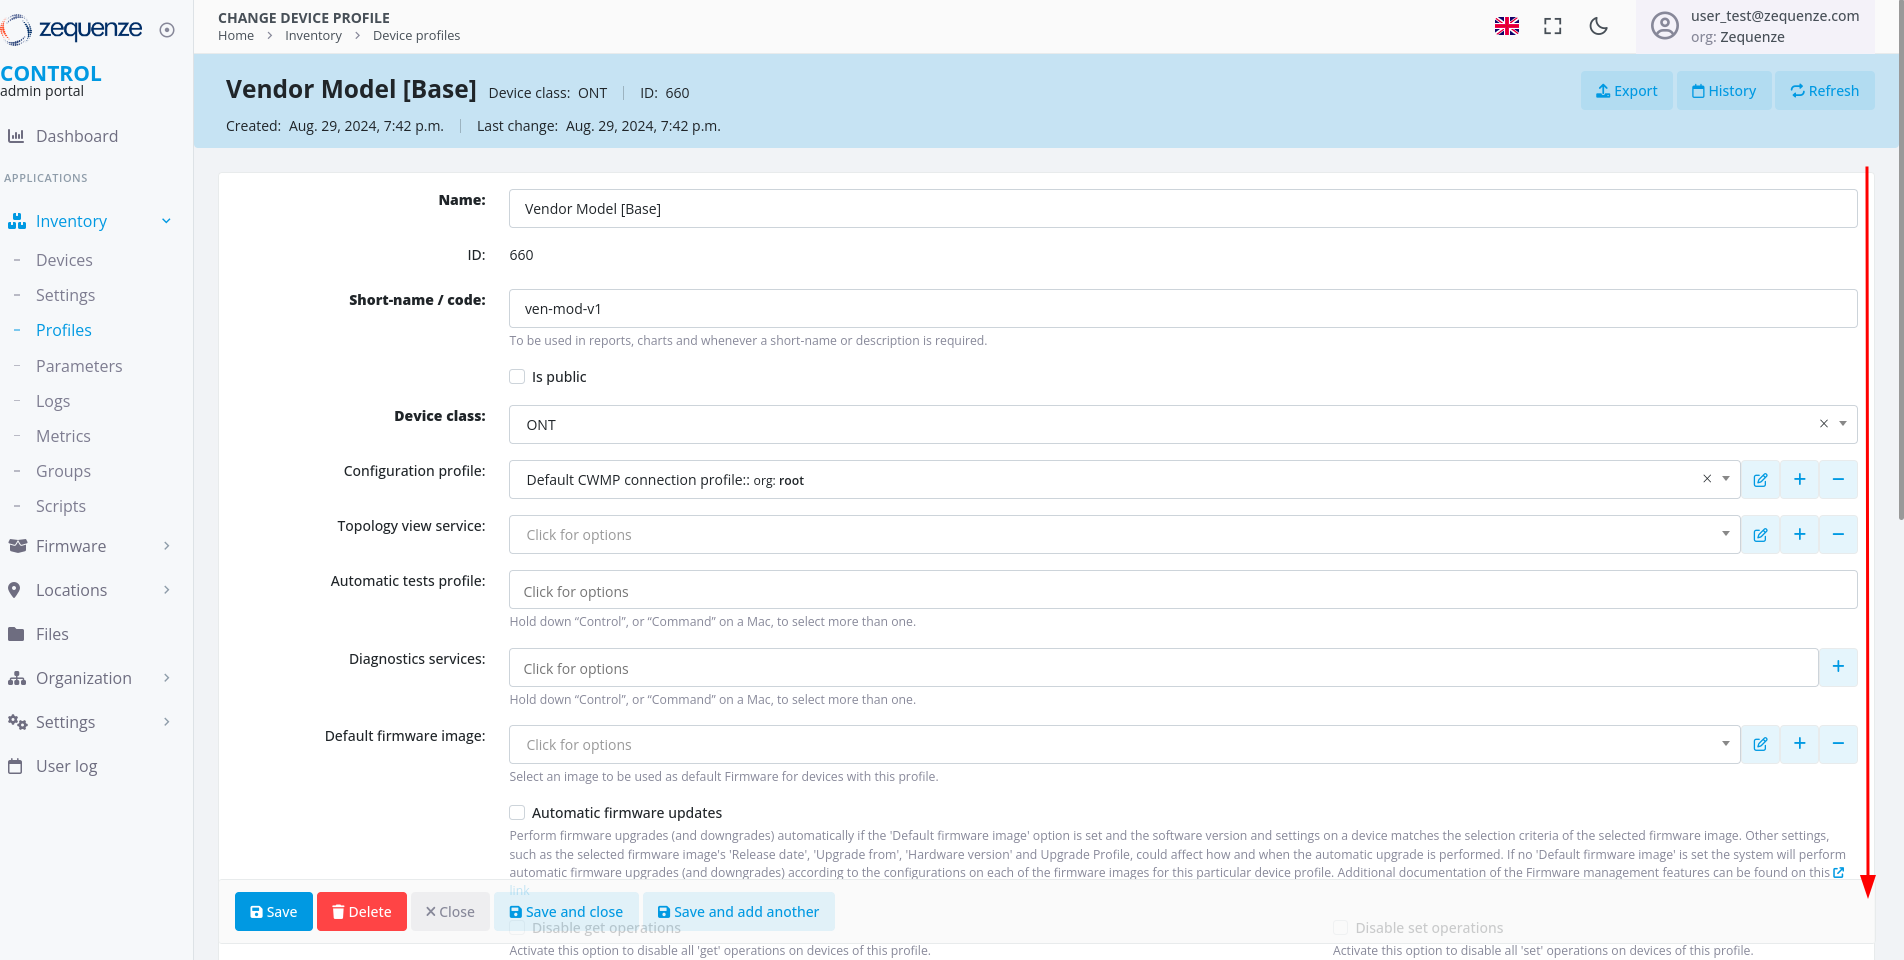 Locate the **"Parameter groups"** section:
 1. **Parameter groups** - This section allows you to create and organize parameter groups
2. **Add** - Click this button to create a new parameter group
### Step 2: Create a New Parameter Group
After clicking **Add**, you'll see the following interface:
1. **Parameter groups** - This section allows you to create and organize parameter groups
2. **Add** - Click this button to create a new parameter group
### Step 2: Create a New Parameter Group
After clicking **Add**, you'll see the following interface:
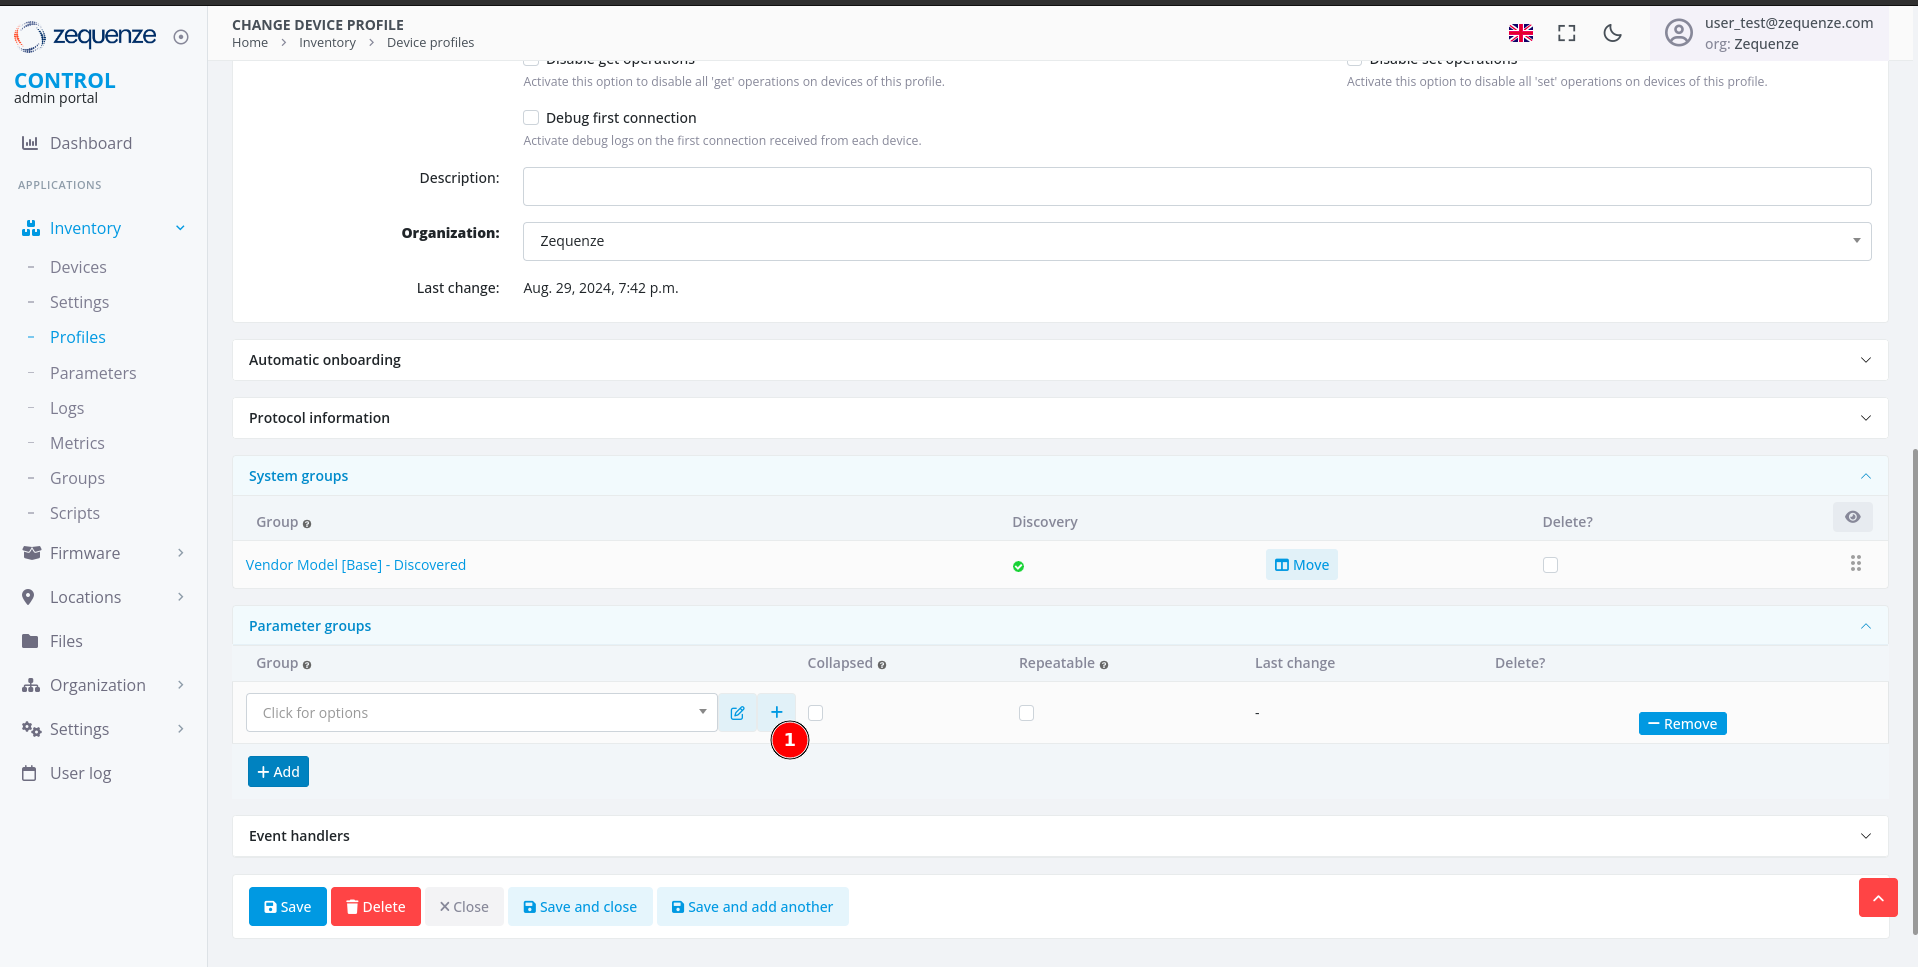 1. Click the **+** icon to open the parameter group configuration window
### Step 3: Configure the Parameter Group
A new window will open where you can configure your parameter group:
1. Click the **+** icon to open the parameter group configuration window
### Step 3: Configure the Parameter Group
A new window will open where you can configure your parameter group:
 1. **Name** - Enter a descriptive name for this group (e.g., **"Model | Device Info"**)
2. **+ Add** - Click this button once for each parameter you want to add (in this example, we need 4 parameters)
### Step 4: Add Parameter Details
1. **Name** - Enter a descriptive name for this group (e.g., **"Model | Device Info"**)
2. **+ Add** - Click this button once for each parameter you want to add (in this example, we need 4 parameters)
### Step 4: Add Parameter Details
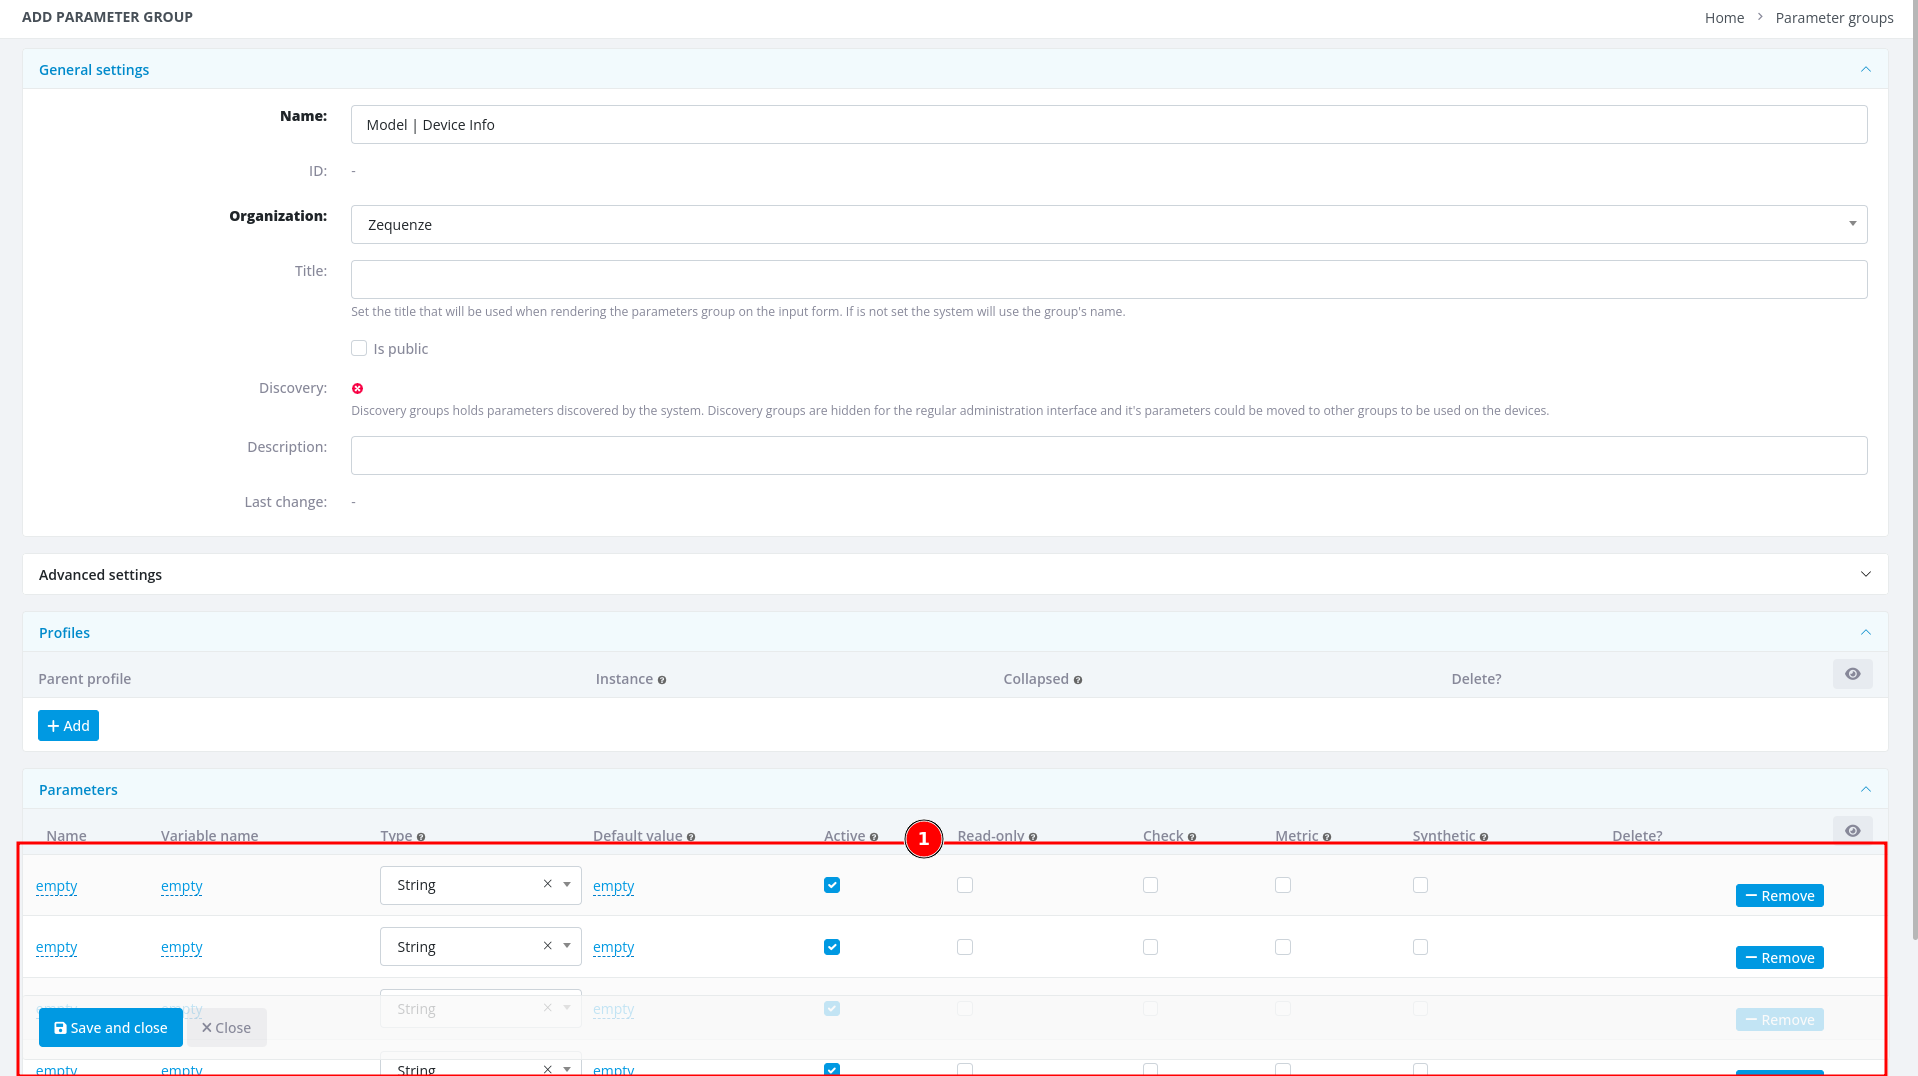 1. After entering the group name and adding 4 parameter slots, you're ready to fill in the parameter details
Now transfer the parameter information from your Excel or LibreOffice Calc spreadsheet into CONTROL:
1. After entering the group name and adding 4 parameter slots, you're ready to fill in the parameter details
Now transfer the parameter information from your Excel or LibreOffice Calc spreadsheet into CONTROL:
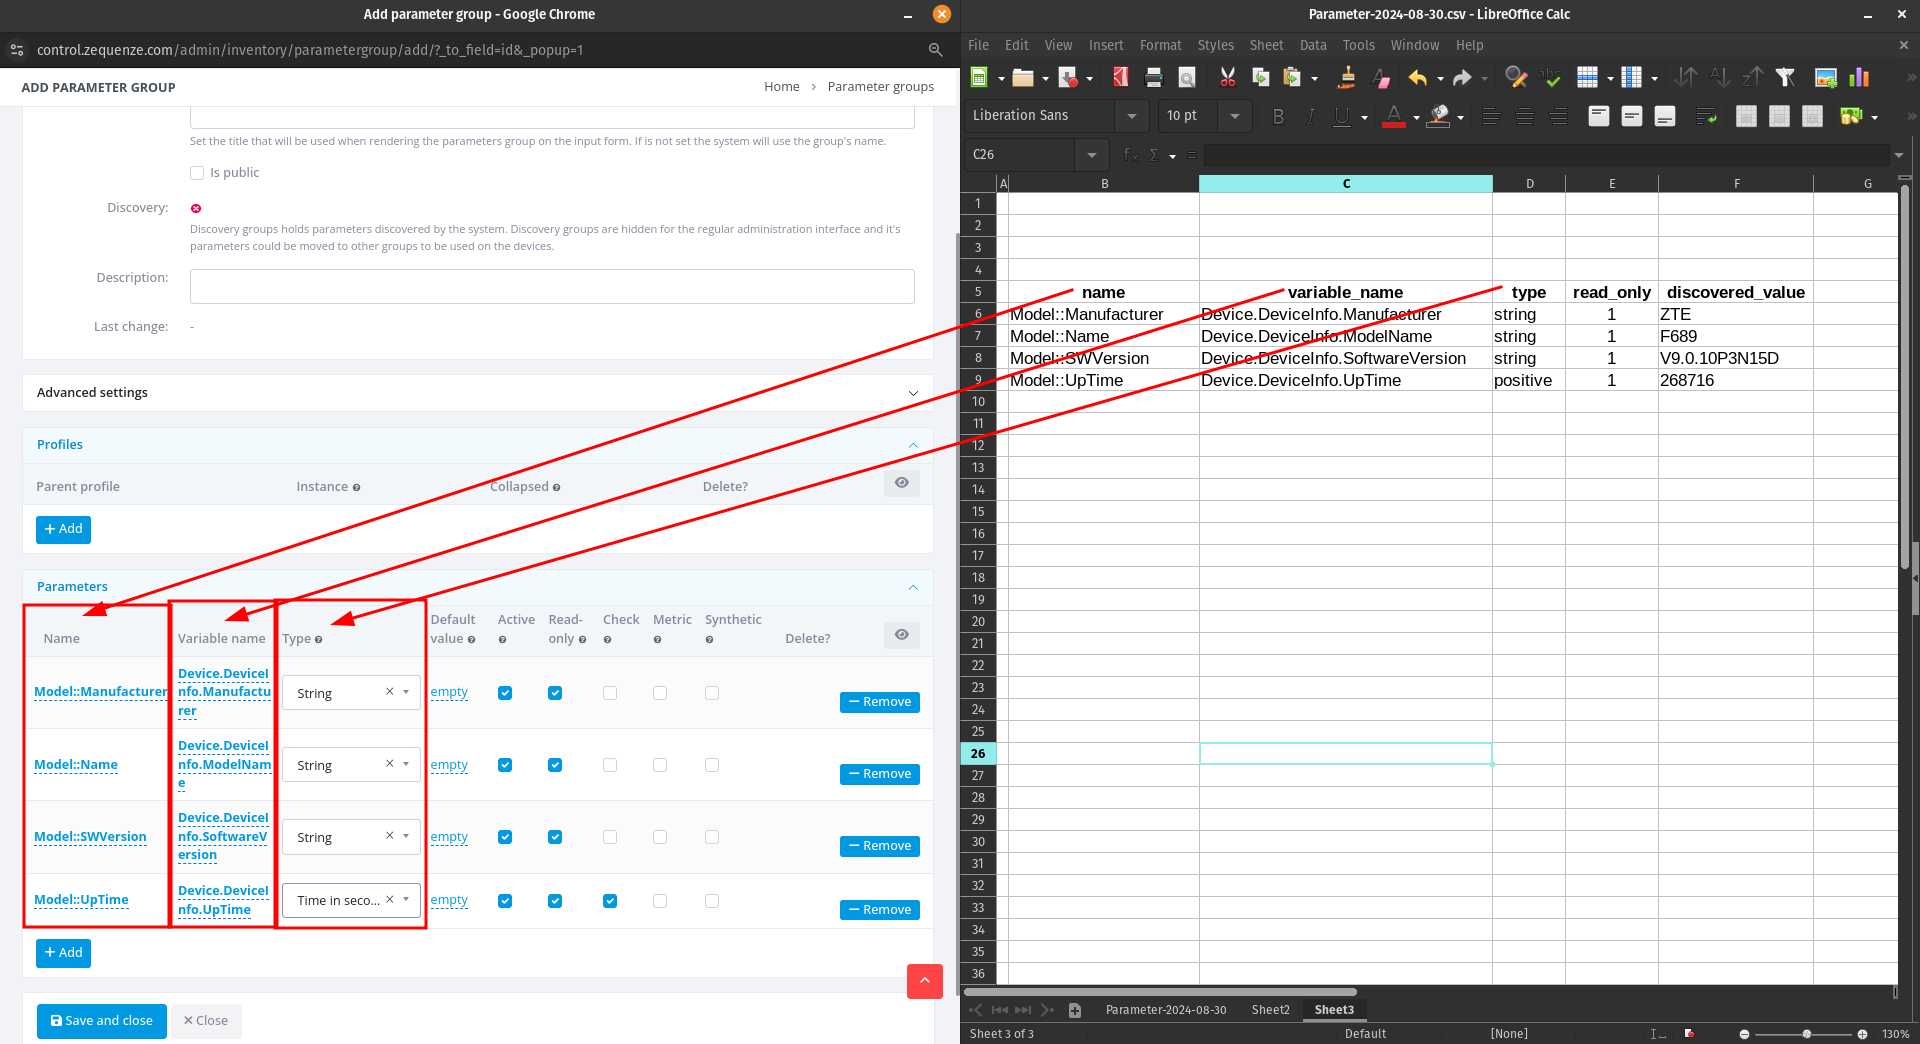 As you can see, there's now a clear correspondence between your spreadsheet and the CONTROL interface. When you've finished entering all parameters, click **"Save and close"**.
### Step 5: Save the Parameter Group
You'll now see your newly created parameter group:
As you can see, there's now a clear correspondence between your spreadsheet and the CONTROL interface. When you've finished entering all parameters, click **"Save and close"**.
### Step 5: Save the Parameter Group
You'll now see your newly created parameter group:
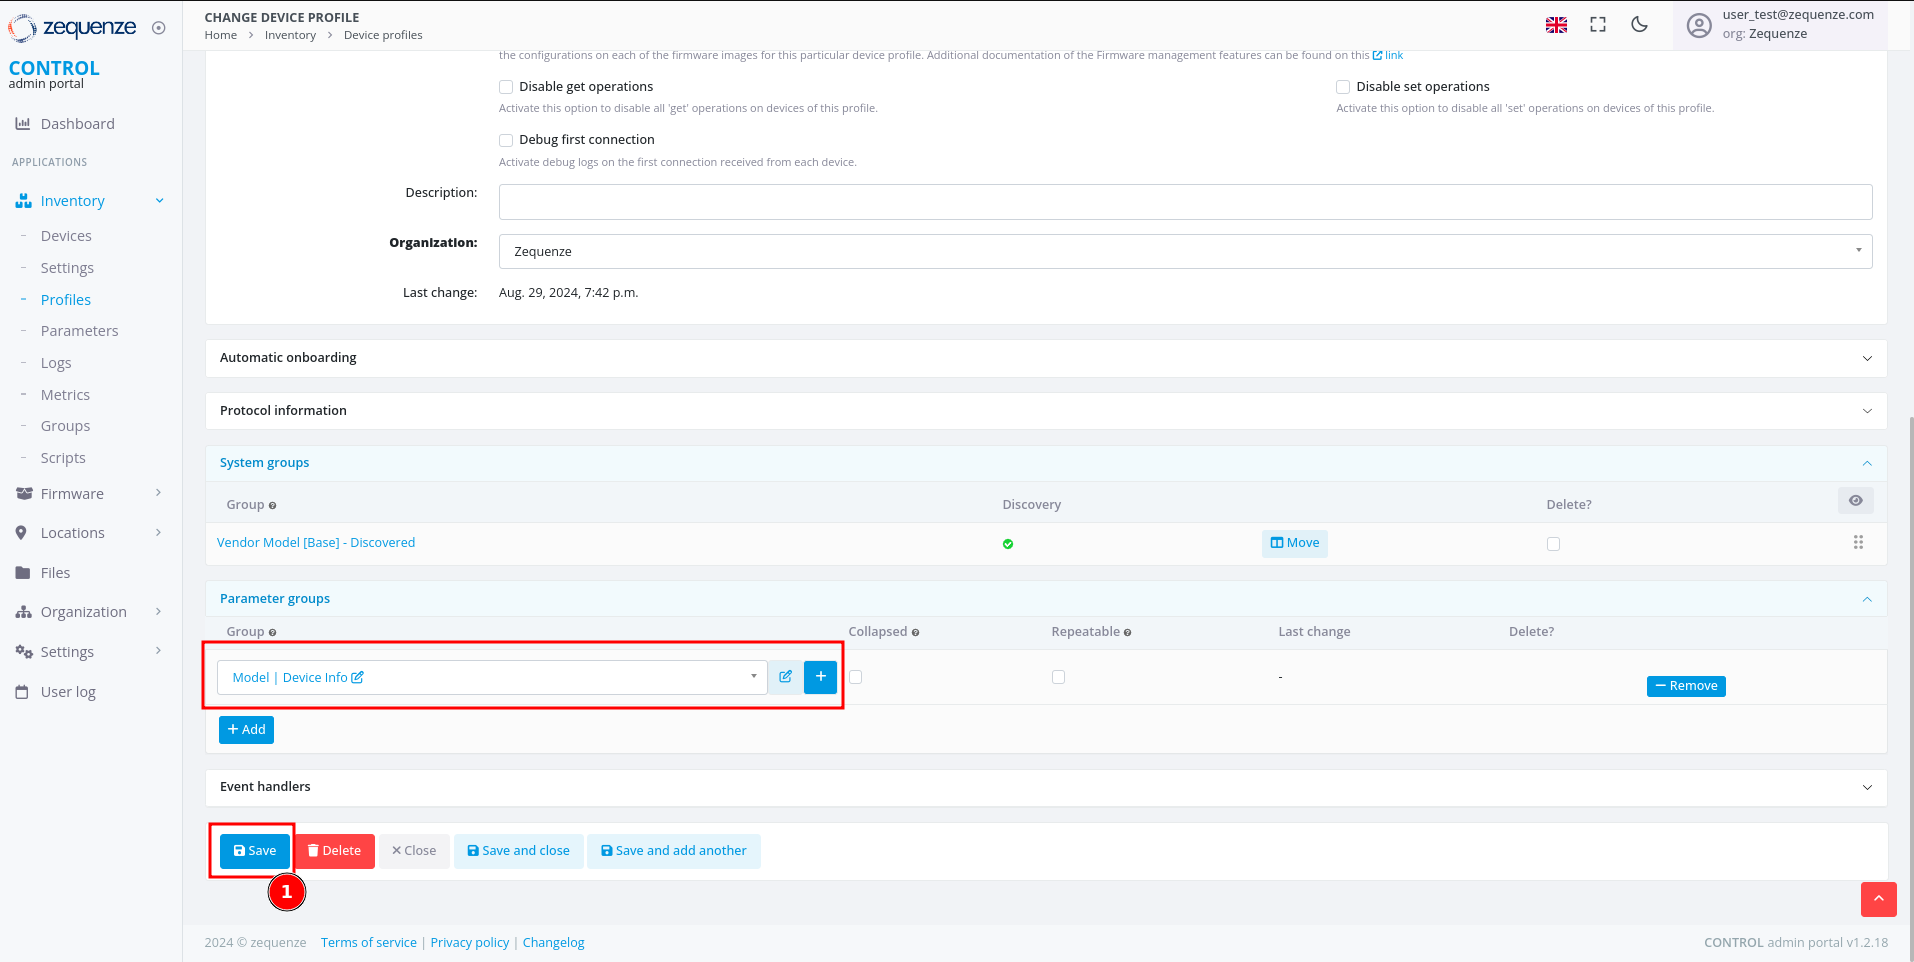 1. Click the **Save** button to save your changes to the profile
After saving, you'll see the organization name displayed in the parameter groups section:
1. Click the **Save** button to save your changes to the profile
After saving, you'll see the organization name displayed in the parameter groups section:
 You can repeat this process to add additional parameter groups or parameters as needed.
---
## View Parameters on a Device
Now that you've configured your parameter groups, let's verify that they appear correctly on the device page.
### Step 1: Navigate to the Device
You can repeat this process to add additional parameter groups or parameters as needed.
---
## View Parameters on a Device
Now that you've configured your parameter groups, let's verify that they appear correctly on the device page.
### Step 1: Navigate to the Device
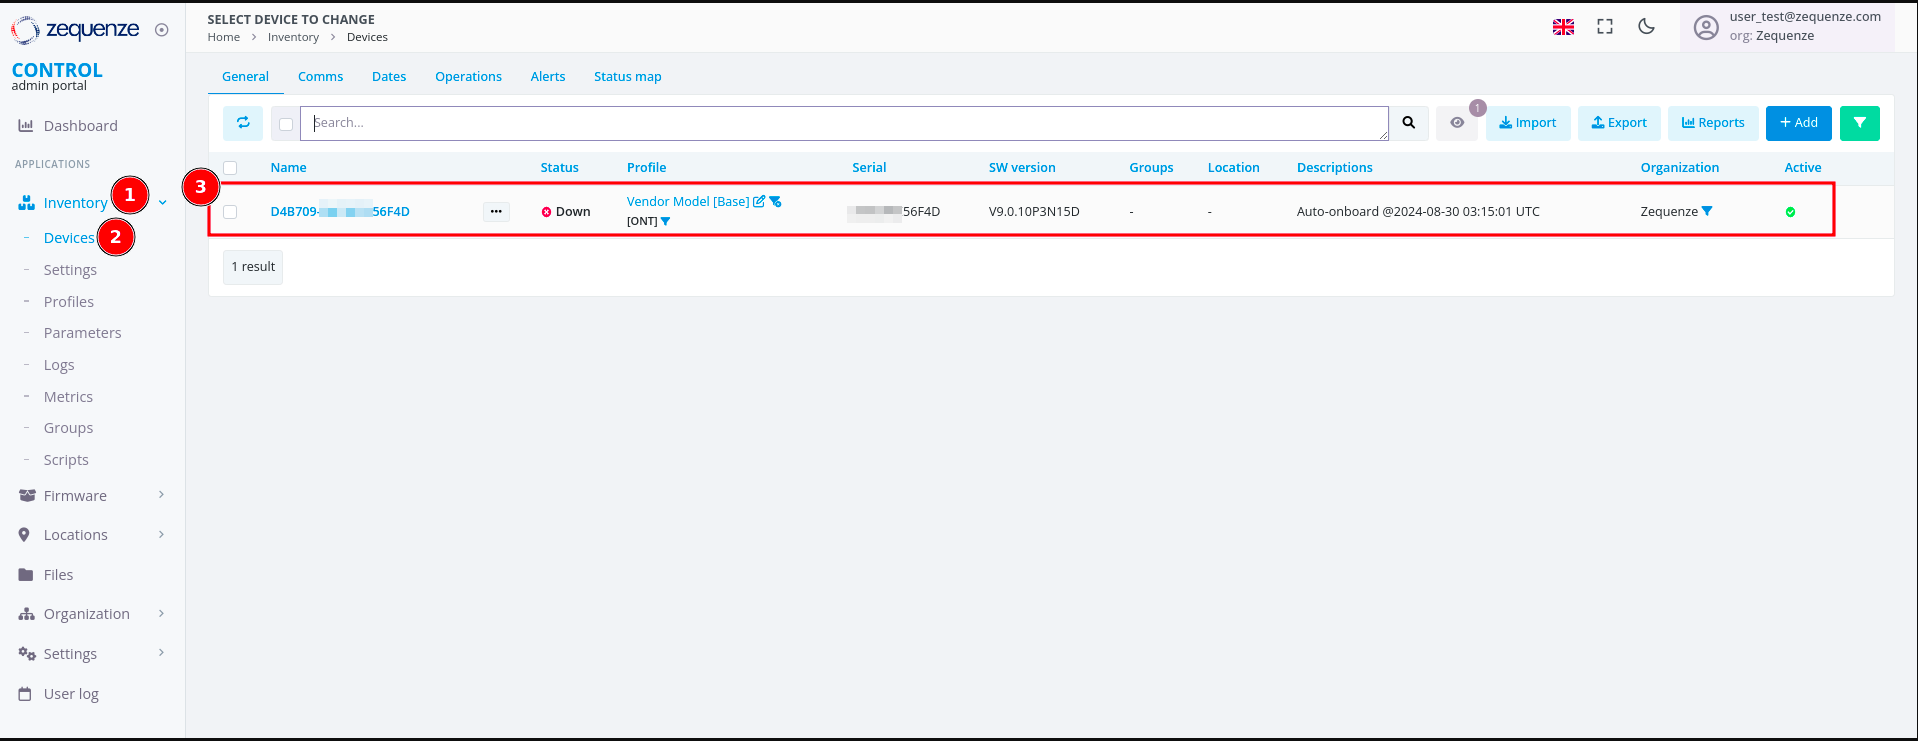 1. Click on **Inventory**
2. Select **Devices**
3. You'll see your previously connected devices. In this screenshot, the device shows as **Down** because it was powered off for this demonstration
Click on the device name to view its details:
1. Click on **Inventory**
2. Select **Devices**
3. You'll see your previously connected devices. In this screenshot, the device shows as **Down** because it was powered off for this demonstration
Click on the device name to view its details:
 On the device page, you can now see:
1. The parameter group name you created
2. The first parameter: **"Model::Manufacturer"**
3. The second parameter: **"Model::Name"**
4. The third parameter: **"Model::SWVersion"**
5. The fourth parameter: **"Model::UpTime"**
6. The **Last connection** timestamp for this device in CONTROL
### Step 2: Wait for Parameter Values
It's normal for the parameter values to be empty at this stage. CONTROL will request and populate these values once the device connects to the platform.
After connecting the device:
On the device page, you can now see:
1. The parameter group name you created
2. The first parameter: **"Model::Manufacturer"**
3. The second parameter: **"Model::Name"**
4. The third parameter: **"Model::SWVersion"**
5. The fourth parameter: **"Model::UpTime"**
6. The **Last connection** timestamp for this device in CONTROL
### Step 2: Wait for Parameter Values
It's normal for the parameter values to be empty at this stage. CONTROL will request and populate these values once the device connects to the platform.
After connecting the device:
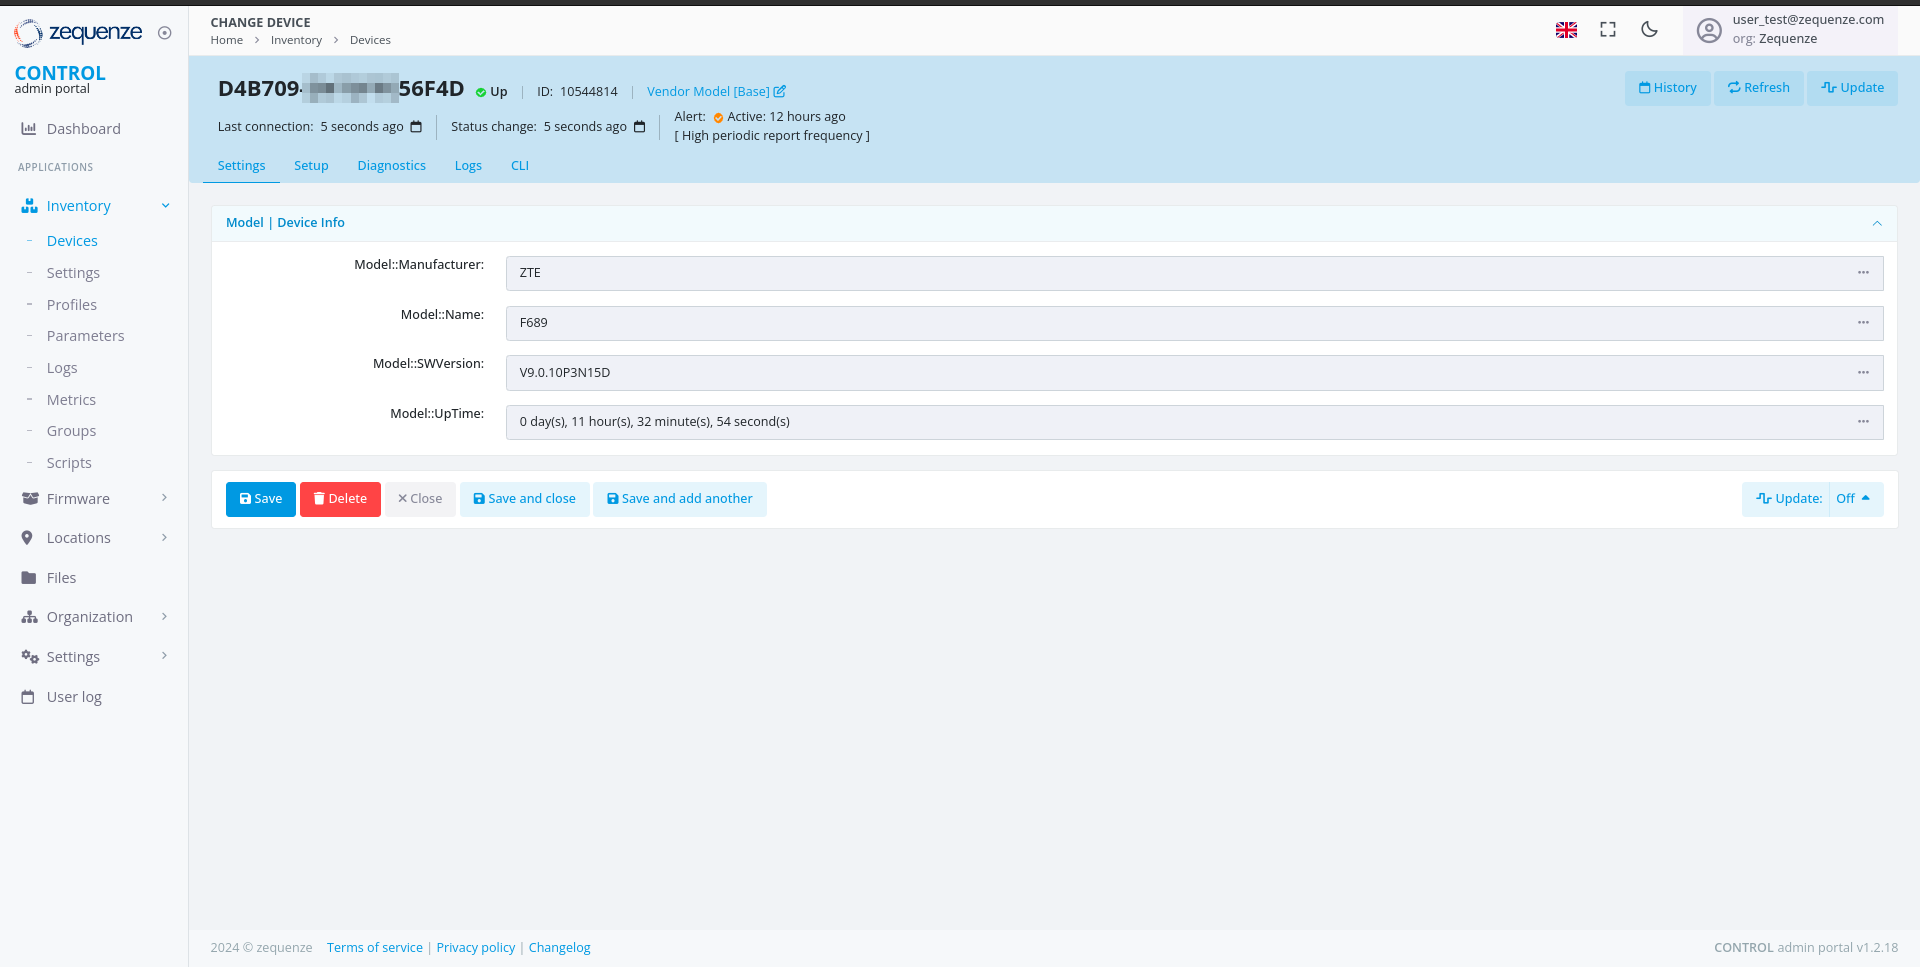 The parameter values are automatically retrieved and displayed once the device establishes a connection to CONTROL.
You can now create additional parameter groups or add more parameters to existing groups as needed for your deployment.
# User Groups and Permissions Guide
## Overview
The CONTROL platform implements a **role-based access control (RBAC)** system to manage user permissions and data access. Access control is organized through **Groups** — collections of permissions that define which modules, actions, and data a user can access within the platform.
Users can be assigned to **multiple groups simultaneously**, and their effective permissions represent the **union** of all permissions from their assigned groups. This flexible approach allows organizations to create precise permission sets that match their operational roles and security requirements.
### Key Concepts
| Concept | Description |
|---------|-------------|
| **Group** | A named collection of permissions. Users automatically inherit all permissions from their assigned groups. |
| **Permission** | A specific action allowed on a specific resource (e.g., "Can view device", "Can change parameter"). |
| **Organization** | Users can only access data belonging to their organization and its sub-organizations. This organizational boundary is enforced independently of group permissions. |
| **Expert Mode** | An optional toggle that reveals advanced features and configuration options for experienced users. Requires assignment to the "Users: Expert mode" group. |
## Available Groups
The CONTROL platform provides standard groups organized by platform module and access level. These groups cover all core functionality areas:
| Group Name | Module | Access Level |
|-----------|--------|-------------|
| CONTROL account admins | CONTROL | Administration |
| CONTROL API Logs read-only | CONTROL | Read-only |
| CONTROL inventory admins | CONTROL | Administration |
| CONTROL inventory basic users | CONTROL | Basic |
| CONTROL inventory read-only basic users | CONTROL | Read-only (basic) |
| CONTROL inventory read-only users | CONTROL | Read-only |
| CONTROL inventory scripting | CONTROL | Specialized |
| CONTROL inventory users | CONTROL | Standard |
| CONTROL portal admins | CONTROL | Administration |
| Link admin users | Link | Administration |
| Link read-only users | Link | Read-only |
| SecureDNS admins | SecureDNS | Administration |
| SecureDNS reports | SecureDNS | Read-only |
| SONDA admins | SONDA | Administration |
| SONDA reports | SONDA | Read-only |
| Users | General | Basic |
| Users: Expert mode | General | Specialized |
## Detailed Group Descriptions
### CONTROL Account Administration
#### CONTROL account admins
**Description:** CONTROL account administration access.
**Purpose:** Grants administrative control over account-level configuration of the CONTROL platform, including device profile management, parameter configuration, and service settings.
**Key Capabilities:**
| Area | Permissions |
|------|------------|
| **Device Profiles (Types)** | View, edit, and delete device profiles — the templates that define how the platform communicates with specific CPE device models. |
| **Parameters & Groups** | View, edit, and delete parameters and parameter groups — the configuration variables used by services (WiFi Analytics, throughput tests, etc.). |
| **Lists & Options** | View, edit, and delete list groups — dropdown/selection options used in service configuration. |
| **WiFi Remediation** | View remediation policies and manage remediation logs — automatic WiFi optimization actions. |
| **Task Scheduler** | View failed tasks and manage successful tasks in the background task queue. |
| **SecureDNS** | Add and edit DNS categories; view DNS transaction logs. |
| **Service Settings** | View extended service settings. |
| **Revision History** | Edit revision entries (audit log management). |
**Recommended For:** Platform administrators responsible for configuring device profiles and service parameters.
### CONTROL API Access
#### CONTROL API Logs read-only
**Description:** CONTROL read-only API Logs.
**Purpose:** Provides read-only access to API activity logs, enabling monitoring and auditing of all API transactions made to and from the platform.
**Key Capabilities:**
| Area | Permissions |
|------|------------|
| **API Methods** | View available API methods and their configurations. |
| **API Transaction Logs** | View API transaction logs — records of all API calls made to/from the platform including request/response details. |
| **API Transaction Details** | View detailed information for individual API transactions. |
**Recommended For:** Operations staff, auditors, and support teams who need to monitor API activity for troubleshooting or compliance purposes.
### CONTROL Inventory Management
#### CONTROL inventory admins
**Description:** CONTROL — inventory administration access.
**Purpose:** Full administrative access to the device inventory system, including device management, service configuration, reporting, and system tools.
**Key Capabilities:**
| Area | Permissions |
|------|------------|
| **Devices** | Add, edit, and view devices in the inventory. Manage device settings. |
| **Service Configuration** | Full CRUD on parameters, parameter groups, lists, list groups, and service classes — the building blocks of all services. |
| **Schedules & Scripts** | Create and manage inventory schedules and view script logs. |
| **Reports & Dashboards** | View dashboards. Manage report cache data. |
| **Locations** | Add locations and manage location groups. |
| **Portal** | View and manage portal profiles and templates. |
| **Performance Profiler** | Access the SQL query profiler for performance analysis. |
| **User Management** | Manage content types, permissions, user profiles, and sessions. |
| **Data Replication** | Full control over database replication processes. |
| **WiFi Analytics** | Manage WiFi remediation logs; view remediation policies. |
| **SecureDNS** | Manage categories, view rules and transaction logs. |
| **Validators** | Manage validation rules used by parameters. |
**Recommended For:** Senior administrators and engineering staff who need full control over the inventory and service configuration.
#### CONTROL inventory users
**Description:** CONTROL — inventory regular user access.
**Purpose:** Standard operational access to the device inventory, including device management, parameter editing, and report creation. This is the primary group for day-to-day operations.
**Key Capabilities:**
| Area | Permissions |
|------|------------|
| **Custom Reports** | Create custom reports for personal use. |
| **Dashboards** | Create new dashboards and manage elements. |
| **Service Configuration** | Full CRUD on parameters, lists, and validators — configure service behavior for devices. |
| **Device Settings** | Delete device settings (data cleanup). |
| **Group Variables** | Add group variables for device group configurations. |
| **Combined Logs** | Access combined device log views. |
| **Portal Templates** | Delete portal templates. |
**Recommended For:** NOC operators, field engineers, and support staff who actively manage devices and service configurations.
#### CONTROL inventory basic users
**Description:** CONTROL — inventory basic user access.
**Purpose:** Limited access for users who need to perform basic inventory operations such as creating custom reports and managing specific settings.
**Key Capabilities:**
| Area | Permissions |
|------|------------|
| **Custom Reports** | Create and delete custom reports — personal report configurations with saved filters. |
| **Dashboard Elements** | Remove dashboard widgets from personal views. |
| **Device Settings** | Delete device settings (cleanup operations). |
| **Parameters** | Delete parameters; view and change validators. |
| **Combined Logs** | Access to combined device logs view. |
**Recommended For:** Support staff who need basic report customization and limited inventory access.
#### CONTROL inventory read-only users
**Description:** CONTROL — inventory read-only access.
**Purpose:** Read-oriented access with the ability to create custom reports and dashboards for data visualization.
**Key Capabilities:**
| Area | Permissions |
|------|------------|
| **Custom Reports** | Create and delete custom reports. |
| **Dashboards** | Create dashboards and manage dashboard elements. |
| **Combined Logs** | Access combined device log views. |
| **Device Settings** | Delete device settings (for data cleanup). |
| **Validators** | Edit validator configurations. |
**Recommended For:** Monitoring staff and analysts who need to view inventory data and create custom visualizations.
#### CONTROL inventory read-only basic users
**Description:** CONTROL — inventory read-only basic access.
**Purpose:** Minimal access for users who primarily need to view data and create personal reports.
**Key Capabilities:**
| Area | Permissions |
|------|------------|
| **Custom Reports** | Create and delete custom reports for personal use. |
| **Dashboard Elements** | Add widgets to personal dashboard views. |
| **Validators** | Edit validator configurations. |
**Recommended For:** Users who need read-only access with the ability to create custom report views.
#### CONTROL inventory scripting
**Description:** CONTROL — inventory scripting management and execution.
**Purpose:** Access to script management and execution capabilities for automating device operations.
**Key Capabilities:**
| Area | Permissions |
|------|------------|
| **Scripts** | Execute and manage inventory scripts — automated procedures that run against devices (firmware upgrades, bulk configuration, diagnostics). |
| **Script Logs** | View execution logs and results from script runs. |
**Recommended For:** Operations engineers who need to run automated scripts against the device inventory.
### CONTROL Portal Management
#### CONTROL portal admins
**Description:** CONTROL — portal administration access.
**Purpose:** Administration of the CONTROL end-user portal — the customer-facing interface where end users can view their service status and device information.
**Key Capabilities:**
| Area | Permissions |
|------|------------|
| **Portal Pages** | Create, edit, and manage portal pages — the content displayed to end users. |
| **Portal Templates** | Design and manage page templates that control the portal's appearance. |
| **Portal Profiles** | Configure portal user profiles and access levels. |
| **Portal Services** | Manage which services are exposed through the portal. |
**Recommended For:** Staff responsible for managing and customizing the customer-facing portal.
### Link Management
#### Link admin users
**Description:** Link management application administration access.
**Purpose:** Full administrative access to the Link Management module — used for managing network link associations and interconnections between devices.
**Key Capabilities:**
| Area | Permissions |
|------|------------|
| **Links** | Create, edit, and delete network links and associations. |
| **Link Services** | Manage services associated with links. |
**Recommended For:** Network engineers managing device interconnections and link topology.
#### Link read-only users
**Description:** Link management application read-only access.
**Purpose:** View-only access to the Link Management module.
**Key Capabilities:**
| Area | Permissions |
|------|------------|
| **Links** | View network links and associations without the ability to modify them. |
**Recommended For:** Support staff who need visibility into network link topology without modification rights.
### SecureDNS
#### SecureDNS admins
**Description:** SecureDNS — administration access.
**Purpose:** Administrative access to the SecureDNS module — the DNS-based security filtering system that protects devices from malicious domains.
**Key Capabilities:**
| Area | Permissions |
|------|------------|
| **DNS Rules** | Create, edit, and delete DNS filtering rules — define which domains are blocked, allowed, or redirected. |
| **Categories** | Manage DNS categories (malware, phishing, adult content, etc.). |
| **Transaction Logs** | View DNS query logs and filtering statistics. |
| **Service Settings** | Manage SecureDNS service configuration. |
**Recommended For:** Security operations staff managing DNS-based protection policies.
#### SecureDNS reports
**Description:** SecureDNS — reports and transactions access.
**Purpose:** Read-only access to SecureDNS reporting and transaction data.
**Key Capabilities:**
| Area | Permissions |
|------|------------|
| **Reports** | View DNS filtering statistics, top blocked domains, category breakdowns, and response time metrics. |
| **Transaction Logs** | View DNS query logs to analyze filtering activity. |
**Recommended For:** Analysts and managers who need visibility into DNS security metrics without the ability to modify rules.
### SONDA (User Experience Monitoring)
#### SONDA admins
**Description:** SONDA / User experience — administration access.
**Purpose:** Administrative access to the SONDA module — the user experience monitoring system that runs automated tests (latency, jitter, throughput, WiFi quality) from probes and CPE devices.
**Key Capabilities:**
| Area | Permissions |
|------|------------|
| **Events** | View and delete events — automated alerts triggered by test results exceeding thresholds. |
| **Event Patterns** | Create event patterns — define which conditions trigger automated alerts. |
| **Event Origins** | Manage event origins — configure the sources (probes, devices) that generate events. |
| **Event Logs** | Add detailed event log entries. |
| **Test Profiles** | Configure test profiles that define which tests run on which schedules. |
| **Test Services** | Manage test service definitions (ping, throughput, WiFi analytics, etc.). |
**Recommended For:** Engineers configuring automated quality of experience (QoE) monitoring and alert thresholds.
#### SONDA reports
**Description:** SONDA / User experience — reports and transactions access.
**Purpose:** Read-only access to SONDA test results, metrics, and event data.
**Key Capabilities:**
| Area | Permissions |
|------|------------|
| **Event Logs** | View and edit event log entries. |
| **Event Origins** | View and edit event origin configurations. |
| **Test Results** | View test results — latency, jitter, throughput, WiFi scores, and other QoE metrics collected from probes and devices. |
| **Reports** | Access SONDA dashboards and metric reports. |
**Recommended For:** Operators and analysts monitoring service quality metrics.
### General User Access
#### Users
**Description:** Regular users — access to user's profile, change password operations, etc.
**Purpose:** Minimal access for basic user self-service operations.
**Key Capabilities:**
| Area | Permissions |
|------|------------|
| **User Profile** | View own user profile and personal information. |
| **Password** | Change own password. |
| **Site Settings** | View basic site configuration. |
**Recommended For:** Users who only need to manage their own account, such as portal-only users or external collaborators with limited access.
#### Users: Expert mode
**Description:** Expert mode users — users that can activate the "Expert Mode" option in admin interfaces.
**Purpose:** Enables the "Expert Mode" toggle in the admin interface. When activated, Expert Mode reveals advanced fields, options, and actions that are hidden by default to prevent accidental changes.
**Key Capabilities:**
| Area | Permissions |
|------|------------|
| **Expert Mode Toggle** | Access to the Expert Mode switch in the admin interface. When activated, shows advanced fields in device profiles, parameters, services, and other admin forms. |
| **Configuration Profiles** | Create new configuration profiles — advanced device provisioning templates. |
| **Advanced Actions** | In Expert Mode, additional actions become available on models that normally restrict certain operations (e.g., audit records, firmware logs). |
**Recommended For:** Senior engineers and administrators who need access to advanced configuration options. This group should be assigned selectively to users who understand the implications of advanced configuration changes.
## Recommended Group Combinations by Role
Users are typically assigned **combinations of groups** that together define their operational role. The following combinations provide templates for common organizational roles:
### Monitoring and Read-Only Roles
| Role | Recommended Groups | Description |
|------|-------------------|-------------|
| **Basic Monitoring** | • CONTROL API Logs read-only
The parameter values are automatically retrieved and displayed once the device establishes a connection to CONTROL.
You can now create additional parameter groups or add more parameters to existing groups as needed for your deployment.
# User Groups and Permissions Guide
## Overview
The CONTROL platform implements a **role-based access control (RBAC)** system to manage user permissions and data access. Access control is organized through **Groups** — collections of permissions that define which modules, actions, and data a user can access within the platform.
Users can be assigned to **multiple groups simultaneously**, and their effective permissions represent the **union** of all permissions from their assigned groups. This flexible approach allows organizations to create precise permission sets that match their operational roles and security requirements.
### Key Concepts
| Concept | Description |
|---------|-------------|
| **Group** | A named collection of permissions. Users automatically inherit all permissions from their assigned groups. |
| **Permission** | A specific action allowed on a specific resource (e.g., "Can view device", "Can change parameter"). |
| **Organization** | Users can only access data belonging to their organization and its sub-organizations. This organizational boundary is enforced independently of group permissions. |
| **Expert Mode** | An optional toggle that reveals advanced features and configuration options for experienced users. Requires assignment to the "Users: Expert mode" group. |
## Available Groups
The CONTROL platform provides standard groups organized by platform module and access level. These groups cover all core functionality areas:
| Group Name | Module | Access Level |
|-----------|--------|-------------|
| CONTROL account admins | CONTROL | Administration |
| CONTROL API Logs read-only | CONTROL | Read-only |
| CONTROL inventory admins | CONTROL | Administration |
| CONTROL inventory basic users | CONTROL | Basic |
| CONTROL inventory read-only basic users | CONTROL | Read-only (basic) |
| CONTROL inventory read-only users | CONTROL | Read-only |
| CONTROL inventory scripting | CONTROL | Specialized |
| CONTROL inventory users | CONTROL | Standard |
| CONTROL portal admins | CONTROL | Administration |
| Link admin users | Link | Administration |
| Link read-only users | Link | Read-only |
| SecureDNS admins | SecureDNS | Administration |
| SecureDNS reports | SecureDNS | Read-only |
| SONDA admins | SONDA | Administration |
| SONDA reports | SONDA | Read-only |
| Users | General | Basic |
| Users: Expert mode | General | Specialized |
## Detailed Group Descriptions
### CONTROL Account Administration
#### CONTROL account admins
**Description:** CONTROL account administration access.
**Purpose:** Grants administrative control over account-level configuration of the CONTROL platform, including device profile management, parameter configuration, and service settings.
**Key Capabilities:**
| Area | Permissions |
|------|------------|
| **Device Profiles (Types)** | View, edit, and delete device profiles — the templates that define how the platform communicates with specific CPE device models. |
| **Parameters & Groups** | View, edit, and delete parameters and parameter groups — the configuration variables used by services (WiFi Analytics, throughput tests, etc.). |
| **Lists & Options** | View, edit, and delete list groups — dropdown/selection options used in service configuration. |
| **WiFi Remediation** | View remediation policies and manage remediation logs — automatic WiFi optimization actions. |
| **Task Scheduler** | View failed tasks and manage successful tasks in the background task queue. |
| **SecureDNS** | Add and edit DNS categories; view DNS transaction logs. |
| **Service Settings** | View extended service settings. |
| **Revision History** | Edit revision entries (audit log management). |
**Recommended For:** Platform administrators responsible for configuring device profiles and service parameters.
### CONTROL API Access
#### CONTROL API Logs read-only
**Description:** CONTROL read-only API Logs.
**Purpose:** Provides read-only access to API activity logs, enabling monitoring and auditing of all API transactions made to and from the platform.
**Key Capabilities:**
| Area | Permissions |
|------|------------|
| **API Methods** | View available API methods and their configurations. |
| **API Transaction Logs** | View API transaction logs — records of all API calls made to/from the platform including request/response details. |
| **API Transaction Details** | View detailed information for individual API transactions. |
**Recommended For:** Operations staff, auditors, and support teams who need to monitor API activity for troubleshooting or compliance purposes.
### CONTROL Inventory Management
#### CONTROL inventory admins
**Description:** CONTROL — inventory administration access.
**Purpose:** Full administrative access to the device inventory system, including device management, service configuration, reporting, and system tools.
**Key Capabilities:**
| Area | Permissions |
|------|------------|
| **Devices** | Add, edit, and view devices in the inventory. Manage device settings. |
| **Service Configuration** | Full CRUD on parameters, parameter groups, lists, list groups, and service classes — the building blocks of all services. |
| **Schedules & Scripts** | Create and manage inventory schedules and view script logs. |
| **Reports & Dashboards** | View dashboards. Manage report cache data. |
| **Locations** | Add locations and manage location groups. |
| **Portal** | View and manage portal profiles and templates. |
| **Performance Profiler** | Access the SQL query profiler for performance analysis. |
| **User Management** | Manage content types, permissions, user profiles, and sessions. |
| **Data Replication** | Full control over database replication processes. |
| **WiFi Analytics** | Manage WiFi remediation logs; view remediation policies. |
| **SecureDNS** | Manage categories, view rules and transaction logs. |
| **Validators** | Manage validation rules used by parameters. |
**Recommended For:** Senior administrators and engineering staff who need full control over the inventory and service configuration.
#### CONTROL inventory users
**Description:** CONTROL — inventory regular user access.
**Purpose:** Standard operational access to the device inventory, including device management, parameter editing, and report creation. This is the primary group for day-to-day operations.
**Key Capabilities:**
| Area | Permissions |
|------|------------|
| **Custom Reports** | Create custom reports for personal use. |
| **Dashboards** | Create new dashboards and manage elements. |
| **Service Configuration** | Full CRUD on parameters, lists, and validators — configure service behavior for devices. |
| **Device Settings** | Delete device settings (data cleanup). |
| **Group Variables** | Add group variables for device group configurations. |
| **Combined Logs** | Access combined device log views. |
| **Portal Templates** | Delete portal templates. |
**Recommended For:** NOC operators, field engineers, and support staff who actively manage devices and service configurations.
#### CONTROL inventory basic users
**Description:** CONTROL — inventory basic user access.
**Purpose:** Limited access for users who need to perform basic inventory operations such as creating custom reports and managing specific settings.
**Key Capabilities:**
| Area | Permissions |
|------|------------|
| **Custom Reports** | Create and delete custom reports — personal report configurations with saved filters. |
| **Dashboard Elements** | Remove dashboard widgets from personal views. |
| **Device Settings** | Delete device settings (cleanup operations). |
| **Parameters** | Delete parameters; view and change validators. |
| **Combined Logs** | Access to combined device logs view. |
**Recommended For:** Support staff who need basic report customization and limited inventory access.
#### CONTROL inventory read-only users
**Description:** CONTROL — inventory read-only access.
**Purpose:** Read-oriented access with the ability to create custom reports and dashboards for data visualization.
**Key Capabilities:**
| Area | Permissions |
|------|------------|
| **Custom Reports** | Create and delete custom reports. |
| **Dashboards** | Create dashboards and manage dashboard elements. |
| **Combined Logs** | Access combined device log views. |
| **Device Settings** | Delete device settings (for data cleanup). |
| **Validators** | Edit validator configurations. |
**Recommended For:** Monitoring staff and analysts who need to view inventory data and create custom visualizations.
#### CONTROL inventory read-only basic users
**Description:** CONTROL — inventory read-only basic access.
**Purpose:** Minimal access for users who primarily need to view data and create personal reports.
**Key Capabilities:**
| Area | Permissions |
|------|------------|
| **Custom Reports** | Create and delete custom reports for personal use. |
| **Dashboard Elements** | Add widgets to personal dashboard views. |
| **Validators** | Edit validator configurations. |
**Recommended For:** Users who need read-only access with the ability to create custom report views.
#### CONTROL inventory scripting
**Description:** CONTROL — inventory scripting management and execution.
**Purpose:** Access to script management and execution capabilities for automating device operations.
**Key Capabilities:**
| Area | Permissions |
|------|------------|
| **Scripts** | Execute and manage inventory scripts — automated procedures that run against devices (firmware upgrades, bulk configuration, diagnostics). |
| **Script Logs** | View execution logs and results from script runs. |
**Recommended For:** Operations engineers who need to run automated scripts against the device inventory.
### CONTROL Portal Management
#### CONTROL portal admins
**Description:** CONTROL — portal administration access.
**Purpose:** Administration of the CONTROL end-user portal — the customer-facing interface where end users can view their service status and device information.
**Key Capabilities:**
| Area | Permissions |
|------|------------|
| **Portal Pages** | Create, edit, and manage portal pages — the content displayed to end users. |
| **Portal Templates** | Design and manage page templates that control the portal's appearance. |
| **Portal Profiles** | Configure portal user profiles and access levels. |
| **Portal Services** | Manage which services are exposed through the portal. |
**Recommended For:** Staff responsible for managing and customizing the customer-facing portal.
### Link Management
#### Link admin users
**Description:** Link management application administration access.
**Purpose:** Full administrative access to the Link Management module — used for managing network link associations and interconnections between devices.
**Key Capabilities:**
| Area | Permissions |
|------|------------|
| **Links** | Create, edit, and delete network links and associations. |
| **Link Services** | Manage services associated with links. |
**Recommended For:** Network engineers managing device interconnections and link topology.
#### Link read-only users
**Description:** Link management application read-only access.
**Purpose:** View-only access to the Link Management module.
**Key Capabilities:**
| Area | Permissions |
|------|------------|
| **Links** | View network links and associations without the ability to modify them. |
**Recommended For:** Support staff who need visibility into network link topology without modification rights.
### SecureDNS
#### SecureDNS admins
**Description:** SecureDNS — administration access.
**Purpose:** Administrative access to the SecureDNS module — the DNS-based security filtering system that protects devices from malicious domains.
**Key Capabilities:**
| Area | Permissions |
|------|------------|
| **DNS Rules** | Create, edit, and delete DNS filtering rules — define which domains are blocked, allowed, or redirected. |
| **Categories** | Manage DNS categories (malware, phishing, adult content, etc.). |
| **Transaction Logs** | View DNS query logs and filtering statistics. |
| **Service Settings** | Manage SecureDNS service configuration. |
**Recommended For:** Security operations staff managing DNS-based protection policies.
#### SecureDNS reports
**Description:** SecureDNS — reports and transactions access.
**Purpose:** Read-only access to SecureDNS reporting and transaction data.
**Key Capabilities:**
| Area | Permissions |
|------|------------|
| **Reports** | View DNS filtering statistics, top blocked domains, category breakdowns, and response time metrics. |
| **Transaction Logs** | View DNS query logs to analyze filtering activity. |
**Recommended For:** Analysts and managers who need visibility into DNS security metrics without the ability to modify rules.
### SONDA (User Experience Monitoring)
#### SONDA admins
**Description:** SONDA / User experience — administration access.
**Purpose:** Administrative access to the SONDA module — the user experience monitoring system that runs automated tests (latency, jitter, throughput, WiFi quality) from probes and CPE devices.
**Key Capabilities:**
| Area | Permissions |
|------|------------|
| **Events** | View and delete events — automated alerts triggered by test results exceeding thresholds. |
| **Event Patterns** | Create event patterns — define which conditions trigger automated alerts. |
| **Event Origins** | Manage event origins — configure the sources (probes, devices) that generate events. |
| **Event Logs** | Add detailed event log entries. |
| **Test Profiles** | Configure test profiles that define which tests run on which schedules. |
| **Test Services** | Manage test service definitions (ping, throughput, WiFi analytics, etc.). |
**Recommended For:** Engineers configuring automated quality of experience (QoE) monitoring and alert thresholds.
#### SONDA reports
**Description:** SONDA / User experience — reports and transactions access.
**Purpose:** Read-only access to SONDA test results, metrics, and event data.
**Key Capabilities:**
| Area | Permissions |
|------|------------|
| **Event Logs** | View and edit event log entries. |
| **Event Origins** | View and edit event origin configurations. |
| **Test Results** | View test results — latency, jitter, throughput, WiFi scores, and other QoE metrics collected from probes and devices. |
| **Reports** | Access SONDA dashboards and metric reports. |
**Recommended For:** Operators and analysts monitoring service quality metrics.
### General User Access
#### Users
**Description:** Regular users — access to user's profile, change password operations, etc.
**Purpose:** Minimal access for basic user self-service operations.
**Key Capabilities:**
| Area | Permissions |
|------|------------|
| **User Profile** | View own user profile and personal information. |
| **Password** | Change own password. |
| **Site Settings** | View basic site configuration. |
**Recommended For:** Users who only need to manage their own account, such as portal-only users or external collaborators with limited access.
#### Users: Expert mode
**Description:** Expert mode users — users that can activate the "Expert Mode" option in admin interfaces.
**Purpose:** Enables the "Expert Mode" toggle in the admin interface. When activated, Expert Mode reveals advanced fields, options, and actions that are hidden by default to prevent accidental changes.
**Key Capabilities:**
| Area | Permissions |
|------|------------|
| **Expert Mode Toggle** | Access to the Expert Mode switch in the admin interface. When activated, shows advanced fields in device profiles, parameters, services, and other admin forms. |
| **Configuration Profiles** | Create new configuration profiles — advanced device provisioning templates. |
| **Advanced Actions** | In Expert Mode, additional actions become available on models that normally restrict certain operations (e.g., audit records, firmware logs). |
**Recommended For:** Senior engineers and administrators who need access to advanced configuration options. This group should be assigned selectively to users who understand the implications of advanced configuration changes.
## Recommended Group Combinations by Role
Users are typically assigned **combinations of groups** that together define their operational role. The following combinations provide templates for common organizational roles:
### Monitoring and Read-Only Roles
| Role | Recommended Groups | Description |
|------|-------------------|-------------|
| **Basic Monitoring** | • CONTROL API Logs read-only